

You know that moment at any party where everyone crowds around one dish? The platters of chips are suddenly disappearing, and there’s a desperate elbowing contest happening over one specific bowl? That’s usually my **seven layer dip** taking center stage. When life gets busy—and trust me, I know busy from my marketing days—the last thing I need is a complicated, fussy appetizer. We need food that brings serious flavor without demanding hours in the kitchen. This recipe for the ultimate Tex-Mex appetizer is the answer. It’s designed to look absolutely stunning in a clear dish while tasting incredible. We’re talking about a truly foolproof **seven layer dip** that guests will talk about long after the party ends. Let’s get layering!
- Why This Seven Layer Dip Is the Best 7-Layer Dip for Your Party
- Ingredients Needed for the Perfect Seven Layer Dip
- Step-by-Step Instructions: How to Make Seven Layer Dip
- Tips for Success When Making a Layered Bean Dip
- Making Your Seven Layer Dip Ahead of Time
- Serving Suggestions for Your Party Layered Dip
- Storage and Reheating Instructions
- Frequently Asked Questions About Seven Layer Dip
- Estimated Nutritional Information for This Seven Layer Dip
- Share Your Experience Making This Classic Seven Layer Dip
Why This Seven Layer Dip Is the Best 7-Layer Dip for Your Party
When I developed this recipe, my goal wasn’t just good flavor—it was stability! If you’ve had a classic **party layered dip** slumping into a muddy mess halfway through the evening, you know the horror. This version holds its structure beautifully, offering that satisfying textural contrast with every chip scoop. Trust me, this is the **best 7-layer dip** you’ll make.
- Zero confusion: Every component has a distinct role to play.
- It sets up perfectly in the fridge.
- Easy to scale up for huge crowds!
Achieving Distinct Layers in Your Seven Layer Dip
The biggest heartbreak is watery layers, right? That happens if you skip draining the salsa—don’t do that! You must let that salsa drip dry in a sieve for a good 15 minutes before it even thinks about touching the sour cream. Also, chilling is non-negotiable. I always make sure I chill mine for at least an hour, sometimes longer. This lets everything firm up so when your guests plunge their chips in, they get beans, guac, and cheese all in one perfectly stacked bite.
Ingredients Needed for the Perfect Seven Layer Dip
Gathering your ingredients for the **seven layer dip** is almost as fun as eating it, I think! The key is making sure you have everything at the right stage before you start stacking. Remember, we are building this masterpiece in layers, so we can’t have cold beans sabotaging the base or soupy salsa ruining the texture up top. I’ve laid out exactly what you need below, including those crucial details like making sure your refried beans are actually room temperature so they spread like silk across the bottom of the dish.
- 1 (16 ounce) can refried beans, room temperature
- 1 teaspoon ground cumin
- 1/2 teaspoon chili powder
- 1 cup guacamole (store-bought or homemade)
- 1 cup sour cream
- 1 packet (1 ounce) taco seasoning mix
- 1 cup salsa, drained well
- 1 cup shredded cheddar or Mexican blend cheese
- 1/2 cup chopped tomatoes
- 1/4 cup sliced black olives, drained
- Optional: Chopped green onions for garnish
Ingredient Notes and Substitutions for Easy Seven Layer Dip
When it comes to seasoning up the sour cream, please don’t eyeball it! We use the whole packet of taco seasoning for one cup of sour cream to get that perfect punch you expect in an **easy seven layer dip**. If you prefer a slightly cooler flavor, maybe hold back a teaspoon, but generally, use it all. For the cheese, I always go with a Mexican blend because it melts nicer, but sharp cheddar is fantastic if that’s what you have. And olives? If you hate olives, green chiles work as a tangy replacement on that top layer!
Step-by-Step Instructions: How to Make Seven Layer Dip
Okay, here’s where the fun starts: the actual construction! Remember how I stressed getting a clear glass dish? Now you’ll see why. It’s all visual gratification here. We’re taking our time so these layers stay distinct and look gorgeous when they are ready for dipping. Don’t rush this part; it’s satisfying work!
Preparing the Base Layers of Your Tex-Mex Appetizer
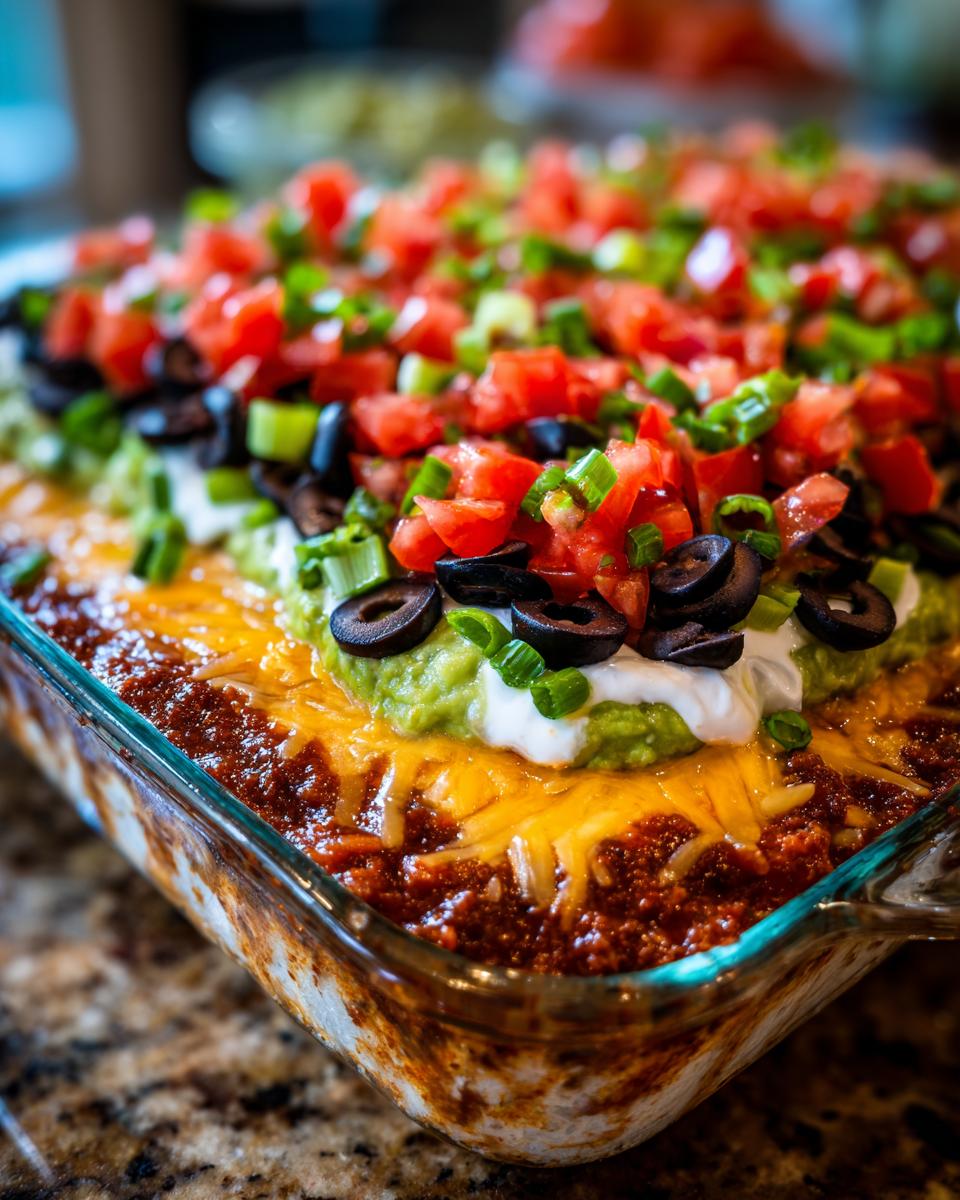
First up, the beans! Grab that small bowl and stir your cumin and chili powder right into those room-temperature refried beans. Mix it well—we want that deep, smoky flavor throughout the base layer. Spread this seasoned mixture out evenly across the bottom of your clear dish. Try to get it right up to the edges. Next, take your guacamole and gently spread it over the seasoned beans. Be deliberate here! If you mash too hard, you’ll drag the spices up into the guac, and we want segregation, not a muddy brown layer.
Assembling the Top Layers of Your Seven Layer Dip
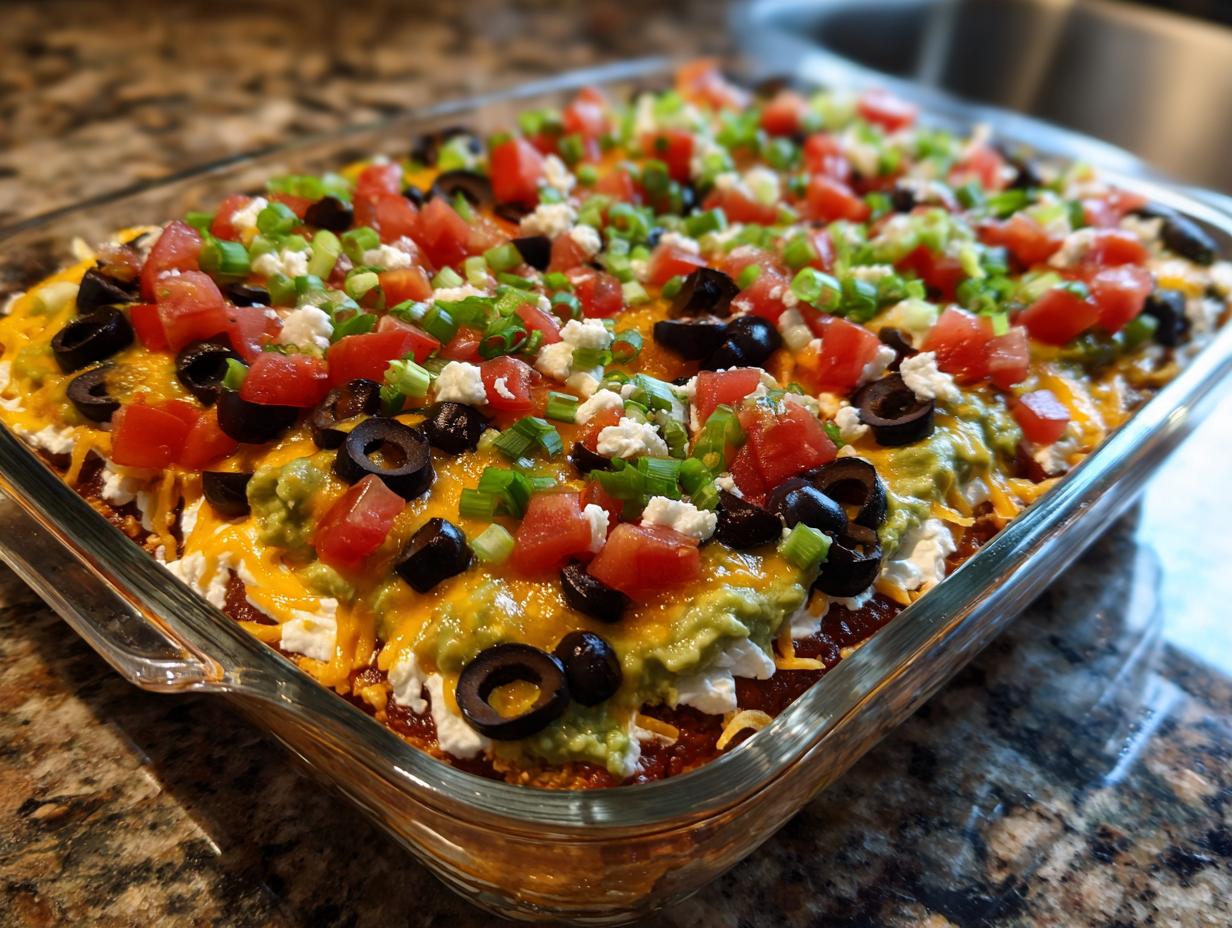
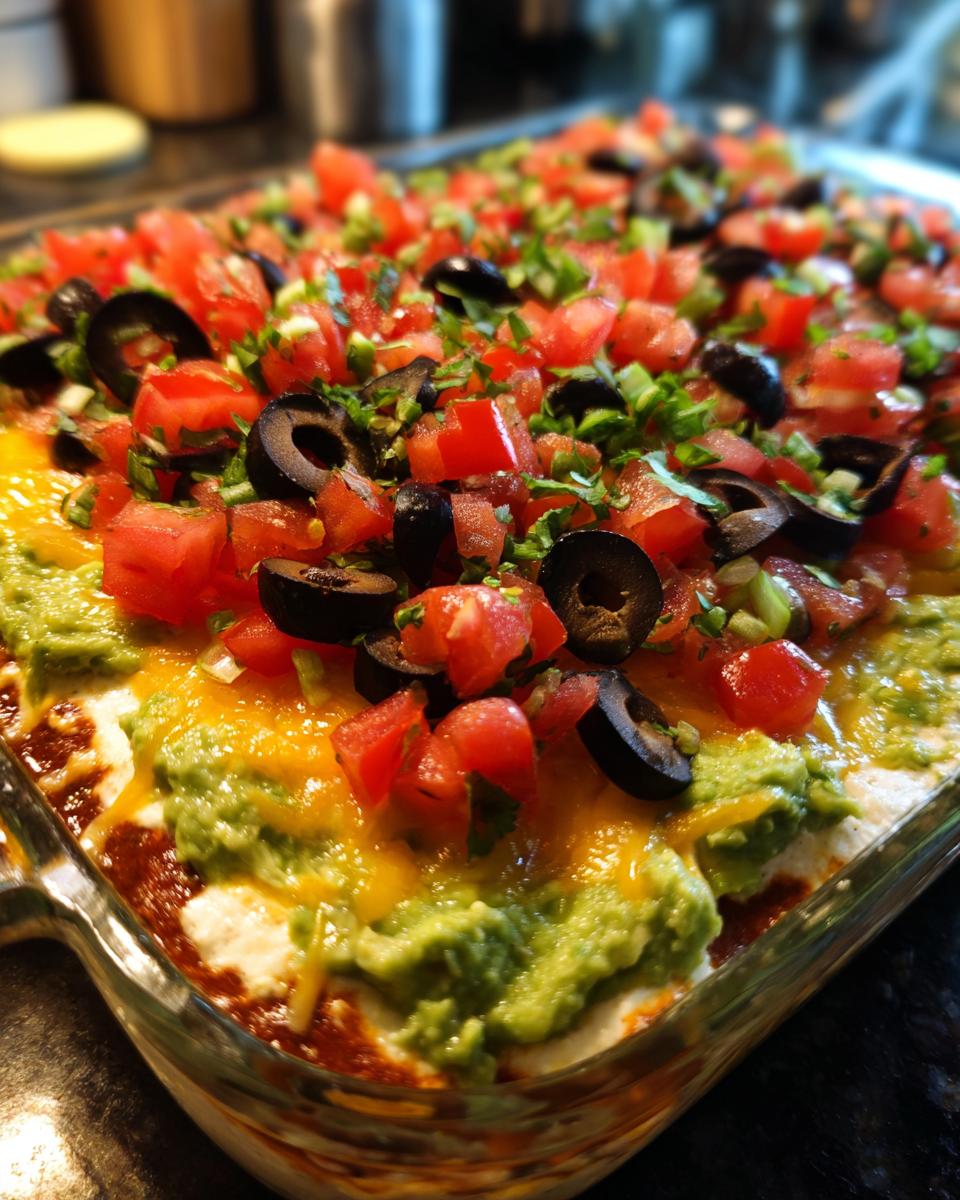
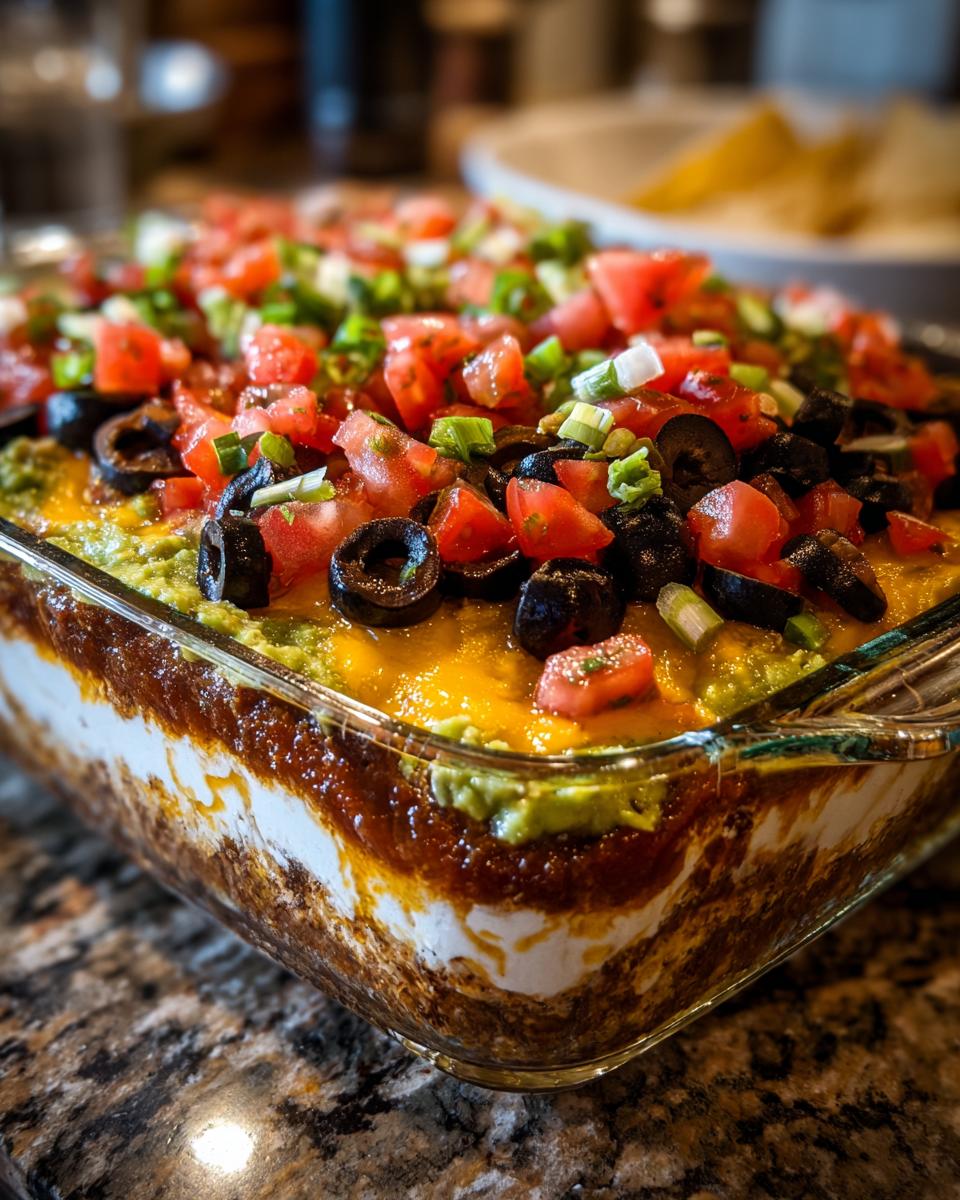
Now, we move onto the dairy section! Mix that taco seasoning right into your sour cream until it’s completely uniform—that seasoned cream is divine. Spread this carefully over the guacamole. Then, ever so gently, spoon your well-drained salsa on top of that. This is where precision matters most so you don’t disturb the sour cream underneath! Follow that with your shredded cheese, then scatter your chopped tomatoes, and finish strong by showering the top with those drained black olives. That’s our complete **seven layer dip**!
Tips for Success When Making a Layered Bean Dip
Even though this **layered bean dip** seems straightforward, a few little tricks I picked up over busy weekends make a huge difference. My absolute biggest secret for making sure the green stays green is the plastic wrap trick. Seriously, this saves you every time! Before you dollop that sour cream on top of the guacamole, take a piece of plastic wrap and gently press it directly onto the surface of the green layer.
This cuts off the air, and when you lift it off just before adding the sour cream, the guac underneath is still bright and fresh! Also, remember I said the beans should be room temperature? That’s important for smooth spreading. If they are cold from the fridge, they tear up the bottom of the glass dish and create uneven spots. A little attention at the beginning saves so much heartache later!
Making Your Seven Layer Dip Ahead of Time
One of the best things about this **seven layer dip** is that it’s actually better when made ahead of time! Seriously, this is party lifesaver material. You *can* make it right before your guests arrive, but I strongly recommend assembling everything and then letting it chill for at least one full hour. This chilling time lets those flavors marry up—especially the spices in the bean layer and the sour cream.
If you’re planning ahead for a big bash, this holds up beautifully in the fridge for up to 24 hours. Just make sure it’s covered well so the toppings don’t dry out. When you pull it out, give those olives and tomatoes a quick check just to ensure they still look their best before setting it out on the chip station!
Serving Suggestions for Your Party Layered Dip
So, the star of the show is ready, but what are people going to scoop all that goodness with? While standard tortilla chips are the classic choice for this **party layered dip**, don’t be afraid to offer some variety. I love setting out some sturdy, thick-cut corn chips because they really hold up to digging deep down to that seasoned bean base.
For those who want something lighter, celery sticks and colorful bell pepper slices are fantastic dippers! And I have to say it again: please use a clear glass dish if you can. Seeing those seven distinct, colorful stripes makes the whole appetizer look like a million bucks before anyone even takes a bite!
Storage and Reheating Instructions
Once your party wraps up, cleanup is simple. Any leftover **seven layer dip** needs to go straight back into the fridge, covered tightly with plastic wrap or a lid. Since this is a cold dip, you never, ever want to reheat it! The sour cream and the salsa just don’t behave well under heat, and the texture gets funky fast. Honestly, this dip tastes best the day it’s made, but it keeps well for about two days if you manage to have leftovers!
Frequently Asked Questions About Seven Layer Dip
I get so many questions whenever I serve this dip, which is a sign that everyone wants to make the **best 7-layer dip** at home! It’s amazing how much planning goes into a simple appetizer, but I’m happy to share the insider secrets. Here are the things people ask me most often about assembly and ingredients.
Can I skip the guacamole layer in this seven layer dip?
Technically, you can do whatever you want in your own kitchen! But if you skip that guacamole layer in this **seven layer dip**, you are really missing out on flavor and texture. More importantly, the guacamole acts like a natural, fatty barrier that helps keep the moisture from the salsa staying up top, away from the beans and sour cream below. If you leave it out, things get watery fast!
What is the best chip for this Tex-Mex appetizer?
You need a chip with serious structural integrity for this job! I always stock up on those restaurant-style, thick tortilla chips. Thin, delicate chips just break off the second they hit the bean layer, leaving you with a frustrating scoop full of chip bits and topping debris.

If you want the best experience for this **easy seven layer dip**, you need chips that can handle digging deep; think of it as a load-bearing chip! Also, sometimes I’ll put out some sturdy carrot sticks or sturdy celery, just for that slight crunch contrast.
If you ever need to check our privacy practices while you’re planning your party shopping, you can always review our policy over at our privacy policy page here.
Estimated Nutritional Information for This Seven Layer Dip
Now, let’s talk about the fuel in this Tex-Mex powerhouse. Because this **seven layer dip** relies on beans, cheese, and sour cream, it definitely packs a flavor punch, but it’s important to remember these numbers are just estimates. If you swap out sour cream for Greek yogurt or use reduced-fat cheese, those counts will change dramatically! These figures are based on serving 1/12th of the recipe, assuming standard ingredient choices. We always aim for deliciousness first, but it’s good to know what you’re serving!
- Serving Size: 1/12 of dip
- Calories: 150
- Fat: 10g
- Carbohydrates: 10g
- Protein: 6g
- Sodium: 350mg
If reading deeper into our site policies is on your mind, you can always check out our terms of use right here on the blog.
Share Your Experience Making This Classic Seven Layer Dip
I poured my heart into making sure this **seven layer dip** recipe works perfectly for your gatherings! Once you’ve tried it, please come back and leave me a star rating right below—it helps me know what’s working for you busy cooks. Tell me in the comments: which layer was your absolute favorite to scoop up? I love seeing what you all think! And snap a picture of your beautifully stacked creation!
You can tag me on social media; I always check in on my favorites. If you have any lingering questions, don’t hesitate to reach out through my contact page. Happy dipping!
PrintClassic Seven Layer Dip

Make this Tex-Mex inspired layered dip for your next gathering. It features distinct layers of flavor that are easy to assemble.
- Prep Time: 20 min
- Cook Time: 0 min
- Total Time: 20 min
- Yield: 12 servings 1x
- Category: Appetizer
- Method: Layering
- Cuisine: Tex-Mex
- Diet: Vegetarian
Ingredients
- 1 (16 ounce) can refried beans, room temperature
- 1 teaspoon ground cumin
- 1/2 teaspoon chili powder
- 1 cup guacamole (store-bought or homemade)
- 1 cup sour cream
- 1 packet (1 ounce) taco seasoning mix
- 1 cup salsa, drained well
- 1 cup shredded cheddar or Mexican blend cheese
- 1/2 cup chopped tomatoes
- 1/4 cup sliced black olives, drained
- Optional: Chopped green onions for garnish
Instructions
- In a small bowl, mix the refried beans with cumin and chili powder. Spread this mixture evenly across the bottom of a clear 9×13 inch serving dish. This is your first layer.
- Spread the guacamole evenly over the bean layer.
- In a separate bowl, mix the sour cream with the taco seasoning mix until fully combined. Spread this seasoned sour cream mixture over the guacamole layer.
- Spoon the drained salsa evenly over the sour cream layer.
- Sprinkle the shredded cheese over the salsa layer.
- Top the cheese with the chopped tomatoes.
- Finish the dip by scattering the sliced black olives over the tomatoes.
- If using, sprinkle with green onions.
- Cover the dish and chill in the refrigerator for at least 1 hour before serving to allow the layers to set. Serve with tortilla chips.
Notes
- Use a clear glass dish so guests can see all seven layers.
- Drain your salsa well; excess liquid will make the lower layers watery.
- To keep the guacamole layer fresh longer, press plastic wrap directly onto the surface of the guacamole before adding the sour cream layer.
Nutrition
- Serving Size: 1/12 of dip
- Calories: 150
- Sugar: 3
- Sodium: 350
- Fat: 10
- Saturated Fat: 5
- Unsaturated Fat: 5
- Trans Fat: 0
- Carbohydrates: 10
- Fiber: 2
- Protein: 6
- Cholesterol: 25