


Okay, listen up, because when the air gets that perfect crispness, we all deserve a little autumn magic without spending all day wrestling with the oven. Forget those complicated pies! The ultimate, easiest treat to capture all those cozy fall feelings is right here: the incredible **pumpkin crunch** dessert. Seriously. This is the recipe that proves you can achieve something show-stopping, layered, and absolutely delicious without stressing out your already busy schedule. That’s what Felix is all about, right? Taking amazing, simple ingredients and promising you a win every single time. This layered dream is so straightforward, you’ll be shocked how quickly you go from pantry to party centerpiece. If you want to know more about the mission behind these simple, successful results, you can read all about our story here.
- Why This Pumpkin Crunch Cake is Your New Favorite Fall Baking Idea
- Gathering Ingredients for Your Pumpkin Crunch
- Step-by-Step Instructions for the Pumpkin Crunch Cake Recipe
- Tips for Perfect Pumpkin Crunch Success
- Serving Suggestions for Your Easy Pumpkin Dessert
- Storage and Reheating Instructions for Leftover Pumpkin Crunch
- Frequently Asked Questions About This Pumpkin Crunch Recipe
- Estimated Nutritional Data for Pumpkin Spice and Pecan Dessert
- Share Your Pumpkin Crunch Creation
Why This Pumpkin Crunch Cake is Your New Favorite Fall Baking Idea
Honestly, this is the recipe I reach for when I need something amazing but only have twenty minutes to spare. You want that perfect taste of autumn without the fuss? This layered beauty delivers, big time. It’s become my go-to for every single holiday gathering, especially when I’m running around preparing all those **Thanksgiving Pumpkin Treats**.
- It’s practically a **dump cake style pumpkin dessert**—minimal stirring, maximum flavor.
- Cleanup is a dream! You’re using just one 9×13 dish.
- It balances sweet, creamy pumpkin with that irresistible buttery, nutty top layer.
- The result is a guaranteed success, which is what we all need in the kitchen, right?
Quick Prep for a Pumpkin Crunch Dessert
The best part? The prep time clocks in at just fifteen minutes. Yes, fifteen! I’m not even fully caffeinated by the time I have the box mix sprinkled and the pumpkin mixture poured. If you’ve been searching for genuinely **Simple Autumn Desserts** that don’t require you to pull out a stand mixer and three different bowls, this **Pumpkin Crunch** is your answer. It’s fast, it’s foolproof, and it tastes like you spent hours on it.
Gathering Ingredients for Your Pumpkin Crunch
Okay, getting ready for this **Pumpkin Crunch** dessert is ridiculously simple because we rely on shelf-stable standbys! You can’t mess this up. Because this recipe is layered rather than mixed together (huge difference!), I like to think of the ingredients in three simple groups: the stuff that makes the bottom cake texture, the creamy middle, and the glorious topping. Don’t stress about finding anything odd; the beauty of this dessert is how accessible everything is.
And hey, a quick expert tip: if you aren’t a big pecan fan, or if you just happen to have those beautiful chopped walnuts sitting around, go ahead and swap those out! Walnuts bring a slightly different kind of earthy flavor to that topping, and it’s just as delicious. Just make sure your butter is melted for the crunch layer!
For the Creamy Pumpkin Layer and Cake Base
These are the foundational items that create that unique two-texture effect. Remember, we are *not* mixing these!
- 1 box yellow cake mix – and this is important: leave it completely dry and undisturbed for the base layer!
- 1 can (15 oz) pumpkin puree – make sure it’s pure pumpkin, not pumpkin pie filling!
- 1 can (12 oz) evaporated milk
- 3 large eggs
- 1 1/2 cups granulated sugar
- 1 teaspoon ground cinnamon
- 1/2 teaspoon salt
For the Buttery Pecan Crunchy Topping Cake Finish
This is where the magic happens that gives the dessert its name!
- 1 cup chopped pecans (or walnuts, if you prefer!)
- 1 cup (2 sticks) butter, melted – gotta be melted for that coating texture!
- Cool Whip, for topping (we only add this once it’s totally cool)
Step-by-Step Instructions for the Pumpkin Crunch Cake Recipe
We are moving fast now! The beauty of this **Pumpkin Crunch Cake Recipe** is that it’s more about layering than mixing. You don’t need a stand mixer for this, just your two hands and a big rectangular dish. Follow this order exactly, and you’ll have the perfect texture contrast just like you want. I put this together last week for a gathering earlier than expected, and honestly, the speed shocked everyone!
We are basically building a sandwich here, not a traditional cake batter. If you want to check out how we handle data privacy as you use our site, you can read our Privacy Policy here before we dive into mixing our wet ingredients.
Preparing the Layers for Your Layered Pumpkin Dessert
First things first: get your oven warmed up! Preheat everything to 350°F (175°C). You’ll want a standard 9×13 inch baking dish, lightly greased so nothing tries to stick later. Now, this is the most important part for achieving that signature texture: you must keep the layers separate!
Take your dry yellow cake mix and just sprinkle it evenly across the bottom of the prepared dish. That’s it! Don’t stir it into anything. Next, in a separate medium bowl, whisk together all your wet ingredients: the pumpkin puree, the evaporated milk, the three eggs, sugar, cinnamon, and salt. Whisk it until it looks totally smooth and creamy. This pumpkin mixture gets poured gently and evenly right over that dry cake mix layer.
Baking and Cooling the Pumpkin Crunch
Time for the crunch factor! In a small bowl, toss your chopped pecans with the melted butter. Make sure every single pecan is coated in that buttery goodness. This buttery pecan mixture is sprinkled gently over the top of the wet pumpkin layer. It will look a little separated right now, but trust the process!
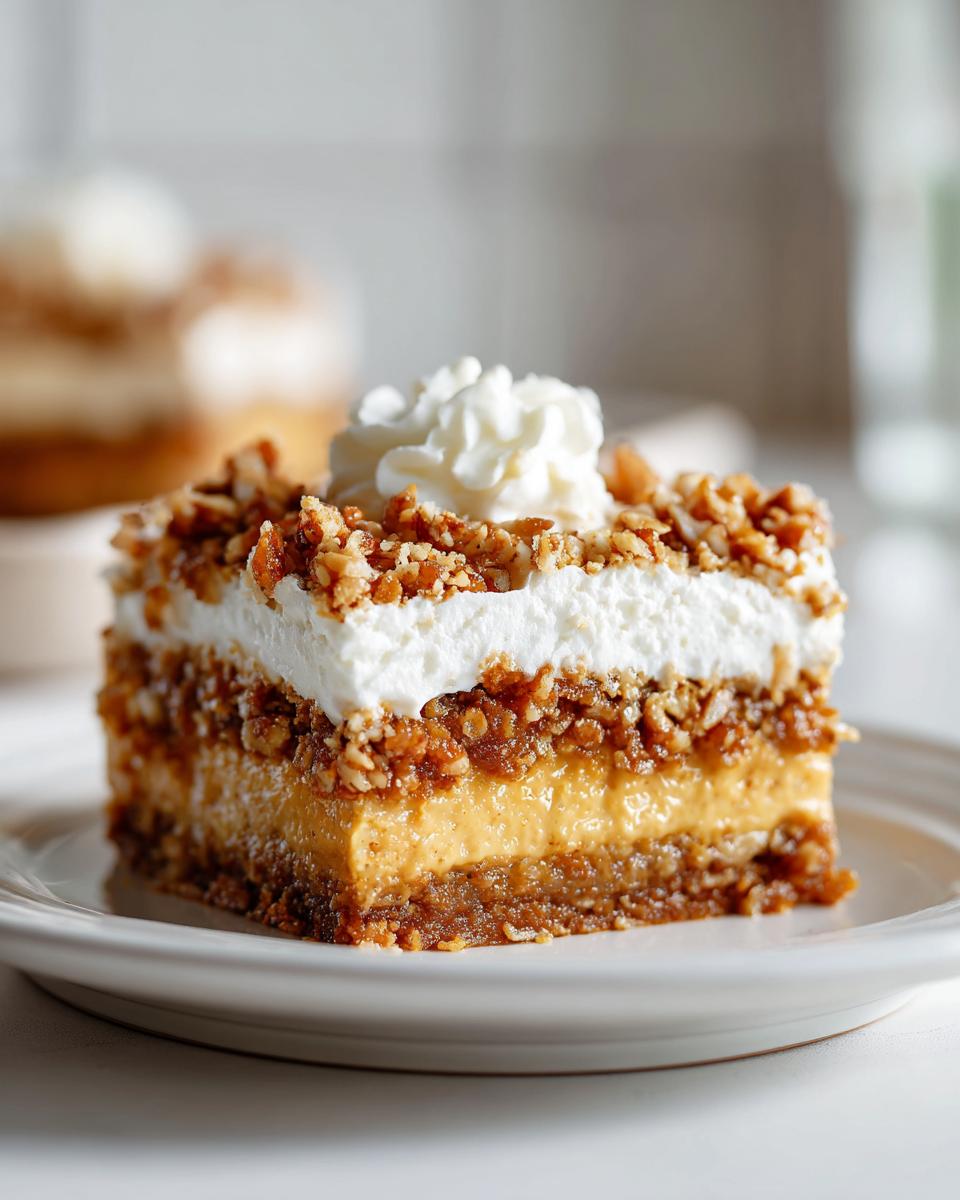
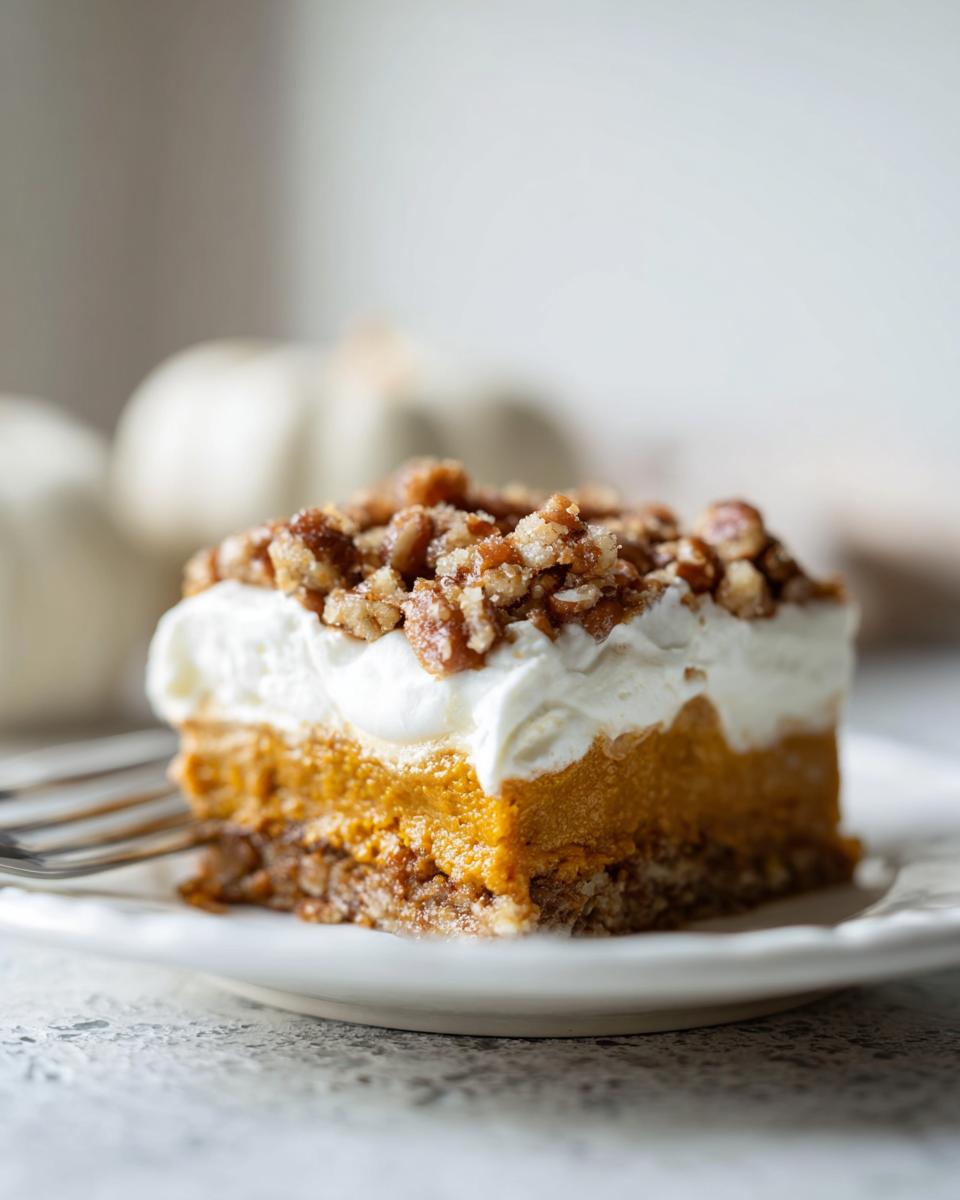
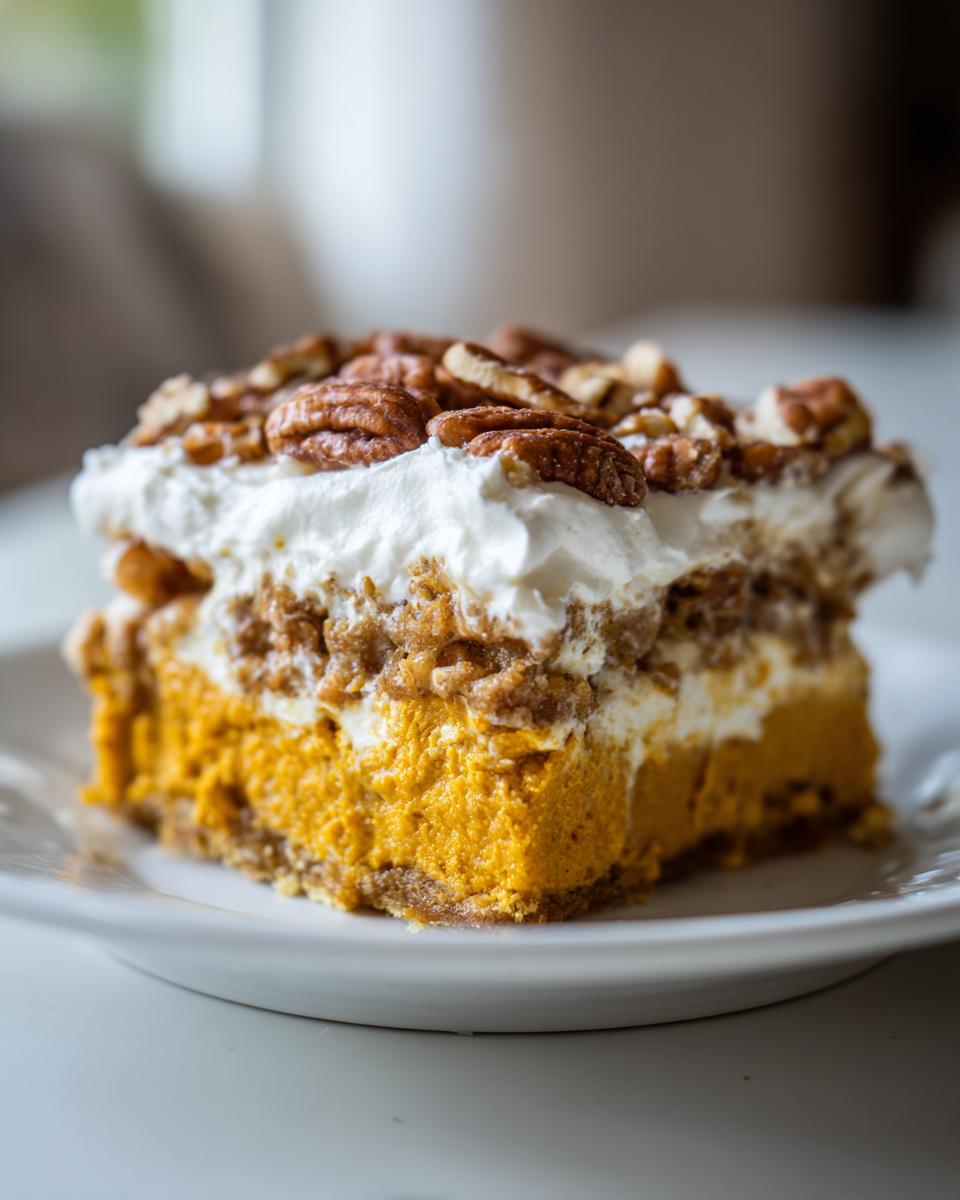
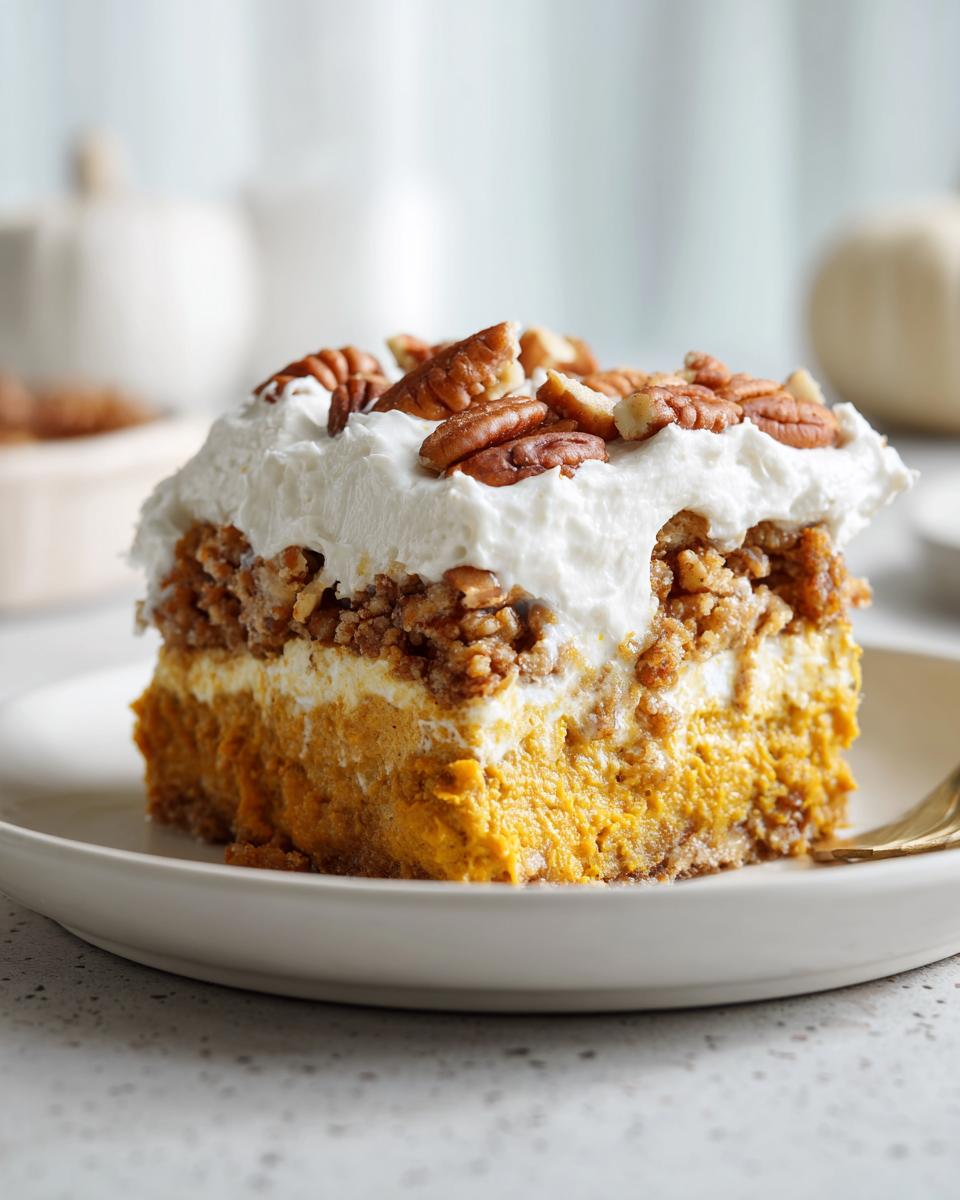
Bake this beauty for about 50 to 60 minutes. You are looking for that topping to be deep golden brown, and when you gently shake the pan, the center should look mostly set. Don’t rush the cooling! You absolutely must let this **Pumpkin Crunch** cool completely on a wire rack before you attempt the final step. If you put the Cool Whip on warm cake, you’re just getting soup. Once it’s truly cool to the touch—and I mean rock solid cool—then you spread that layer of Cool Whip smooth across the top. That finished, chilled dessert is what we are aiming for!
Tips for Perfect Pumpkin Crunch Success
Look, everyone wants that perfect dessert where the bottom is soft and creamy and the top has that amazing, buttery crispness. Since this isn’t a traditional cake—it’s more of a baked custard situation underneath that topping—we need to pay attention to a couple of things to guarantee a win. Don’t worry if yours looks a little wobbly when it comes out; that’s normal! We rely on cooling time to really set everything into that spectacular dessert slice you’re imagining.
Achieving the Best Crunchy Topping Cake Texture
The secret to preventing a soggy top is twofold: the butter and patience! First, make absolutely certain that the butter you use for the pecan topping is fully melted—not just soft, but liquid! When it gets poured over the dry cake mix and pecans, that melted butter has to soak in and coat everything so it can properly crisp up in the oven instead of burning or just steaming.
When you check for doneness (around the 50-minute mark), don’t just rely on a toothpick in the middle, because that middle layer is inherently more pudding-like! Gently shimmy the pan. If the edges look set and the very center *just* barely jiggles—like thick gelatin—it’s done. If it sloshes, give it ten or fifteen more minutes. Overbaking this will dry out that lovely pumpkin layer, so we want to catch it right as it sets. Trust me, the cooling process does the heavy lifting after it leaves the heat!
Serving Suggestions for Your Easy Pumpkin Dessert
Now that you’ve managed the tricky part—baking it perfectly and letting it chill—it’s time for the fun part: eating it! This kind of **Easy Pumpkin Dessert** is extremely versatile, but I always feel like it deserves a little something extra to shine. Since the **Pumpkin Crunch** has that firm, creamy pumpkin layer underneath the crisp topping, how you serve it can change the whole experience.
For the best texture, I really recommend serving this chilled. You have to let that top layer firm up against the custard layer in the fridge for at least four hours, but honestly, overnight is even better. When it’s cold, you get a clean slice, and that crunch really pops against the creamy filling. It makes you feel like you’re eating a rich, homemade pumpkin cheesecake bar, but way easier!
If you’re serving it right after dinner, a little scoop of good quality vanilla bean ice cream on the side is pure heaven. The cold ice cream melts slightly into the nutty topping, creating this amazing sauce. Or, if you’re having coffee for dessert (which I totally support!), just a little dusting of extra cinnamon on your plate looks beautiful.
This dessert is rich, so don’t feel pressured to do anything fancy outside of keeping on hand a big tub of **Cool Whip** or some fresh whipped cream. It truly stands up on its own as one of the best **Simple Autumn Desserts** out there!
Storage and Reheating Instructions for Leftover Pumpkin Crunch
Because we finish this beautiful **Pumpkin Crunch** dessert with a layer of Cool Whip, we have to treat leftovers just like a dairy-based pie, okay? Don’t leave anything sitting out on the counter for too long, or that whipped topping is going to get sad fast. You need to cover the whole dish tightly with plastic wrap or transfer slices into an airtight container right away. Everything goes straight into the refrigerator.
Now, the big question: reheating? I generally say no! This dessert is designed to be served chilled or at room temperature. If you try to warm up a slice, you’re going to melt that beautiful Cool Whip layer right off, and the creamy base will turn watery. It just tastes best when it’s cold and firm. So, just pull out your portion a little while before you want to eat it, let it sit on the counter for about twenty minutes to lose the deep chill, and enjoy that satisfying crunch!
Frequently Asked Questions About This Pumpkin Crunch Recipe
I know you’re going to love this, but sometimes questions pop up when you’re dealing with a recipe that layers instead of mixes! That’s totally normal, especially when you start customizing things. I’ve gathered up the most common ones I get asked when people first try this for their **Fall Baking Ideas**. If you have a super specific question after you try it, please feel free to drop us a line using the contact form—I love hearing how you tweak things for your family!
Can I make this Pumpkin Crunch Cake Recipe ahead of time?
You absolutely can prep this dessert ahead of time, which is a huge win for holiday baking! You can certainly mix the pumpkin layer ingredients and assemble the first two layers (dry cake mix, then pumpkin mixture, then pecan topping) up to a day ahead of time. Cover the whole thing tightly with foil and keep it refrigerated. The trick is the Cool Whip topping! You *must* wait until the dessert is completely cooled down after baking and chilling before spreading that final creamy layer on top. If you add the Cool Whip too early, it gets runny.
What makes this a Dump Cake Style Pumpkin Dessert?
That label just means we are keeping things incredibly simple, which is what I strive for! In a traditional cake, you cream the butter, mix the wet and dry ingredients carefully, and worry about gluten development. With this **Pumpkin Crunch** dessert? You literally *dump* (sprinkle) the dry yellow cake mix right over the bottom of the pan, then *dump* the wet pumpkin custard over that! There is almost no mixing involved with the main components, allowing the oven to do all the work to create that unique juxtaposition of textures. It’s the easiest way to get a stunning **Layered Pumpkin Dessert**!
Speaking of layers and regions, sometimes people ask if this is the same as the famous **Hawaiian Style Pumpkin Crunch**. While the basic concept is similar—a crispy top over a pumpkin base—the traditional Hawaiian version often uses different spices or sometimes even incorporates pumpkin pie filling instead of pure pumpkin. My version aims for that comforting North American fall flavor profile using simple pantry staples. If you are curious about that regional variation, I saw a really interesting breakdown on how to make it over here!
Estimated Nutritional Data for Pumpkin Spice and Pecan Dessert
Because we’re dealing with butter, pecans, cake mix, and creaminess, this dessert certainly hits high when it comes to flavor! Keep in mind that this information is strictly an estimate based on the ingredients listed in the recipe and serving size we defined. Cooking is an exact science for some things, but when you’re throwing down a recipe like this **Pumpkin Spice and Pecan Dessert**, the exact numbers will shift slightly based on the brand of cake mix or how much Cool Whip you use on your slice.
But for reference, here is the ballpark of what you can expect per slice:
- Calories: 420
- Total Fat: 22g
- Carbohydrates: 55g
- Protein: 5g
We are prioritizing joy and flavor here, not counting every carb! But it’s good practice to know what we’re working with, right? This is meant to be a fulfilling, comforting end to your amazing fall meal.
Share Your Pumpkin Crunch Creation
Now that you’ve successfully made this incredibly easy **Pumpkin Crunch** dessert, the best part is seeing what you come up with! I’m so proud of you for tackling a delicious fall bake without ending up stressed out.
Seriously, I want to see your dishes! Snap a photo once you’ve got that perfect layer of Cool Whip spread on top and tag me on social media. Even better, if you have just a second, please leave a rating right here below the recipe. Those stars really help other busy cooks find this reliable dessert when autumn rolls around. Did you use pecans or go for walnuts? Did you serve it after chilling overnight or just wait until it wasn’t piping hot? Let me know all the details in the comments so we can cheer each other on!
PrintEasy Pumpkin Crunch Cake

Make this simple, layered Pumpkin Crunch Cake for a satisfying autumn dessert. It features a creamy pumpkin base and a buttery, crunchy pecan topping.
- Prep Time: 15 min
- Cook Time: 60 min
- Total Time: 75 min
- Yield: 12 servings 1x
- Category: Dessert
- Method: Baking
- Cuisine: American
- Diet: Vegetarian
Ingredients
- 1 box yellow cake mix
- 1 can (15 oz) pumpkin puree
- 1 can (12 oz) evaporated milk
- 3 large eggs
- 1 1/2 cups granulated sugar
- 1 teaspoon ground cinnamon
- 1/2 teaspoon salt
- 1 cup chopped pecans
- 1 cup (2 sticks) butter, melted
- Cool Whip, for topping
Instructions
- Preheat your oven to 350°F (175°C). Lightly grease a 9×13 inch baking dish.
- In a medium bowl, whisk together the pumpkin puree, evaporated milk, eggs, sugar, cinnamon, and salt until smooth. Set this pumpkin mixture aside.
- Sprinkle the dry yellow cake mix evenly over the bottom of the prepared baking dish. Do not mix it with the pumpkin layer.
- In a separate small bowl, combine the chopped pecans with the melted butter.
- Pour the pumpkin mixture evenly over the dry cake mix layer in the baking dish.
- Sprinkle the buttered pecan mixture evenly over the top of the pumpkin layer.
- Bake for 50 to 60 minutes, or until the topping is golden brown and the center is set.
- Let the cake cool completely on a wire rack.
- Once cool, spread an even layer of Cool Whip over the top before slicing and serving.
Notes
- You can substitute walnuts for pecans in the topping if you prefer.
- For a quicker cool-down, place the cake in the refrigerator after it reaches room temperature.
- This dessert tastes best when served chilled or at room temperature.
Nutrition
- Serving Size: 1 slice
- Calories: 420
- Sugar: 45
- Sodium: 250
- Fat: 22
- Saturated Fat: 10
- Unsaturated Fat: 12
- Trans Fat: 0
- Carbohydrates: 55
- Fiber: 2
- Protein: 5
- Cholesterol: 60