

There’s something truly magical about a cake that shows up to the party looking like it took hours of intricate work, right? That’s the beauty of a bundt pan—it does most of the decorating for you! But let’s be honest, those beautiful cakes can sometimes taste dry if you aren’t watching the details. I developed this **red velvet bundt cake** because I refuse to choose between having a stunning dessert and having ten precious minutes to myself after work. This recipe proves you can have that deep, classic cocoa flavor and a crumb that stays so unbelievably moist, all while keeping things surprisingly simple. Trust me, this is the showstopper you’ve been needing.
- Why This Red Velvet Bundt Cake Recipe Works for You
- Ingredients for Your Moist Red Velvet Bundt Cake
- Expert Tips for Preparing the Red Velvet Bundt Cake
- Step-by-Step Instructions for Your Red Velvet Bundt Cake Recipe
- Crafting the Best Cream Cheese Glaze Cake Topping
- Storage and Serving Suggestions for Your Red Velvet Bundt Cake
- Troubleshooting Common Red Velvet Bundt Cake Issues
- Frequently Asked Questions About This Red Velvet Bundt Cake
- Nutritional Estimate for Your Red Velvet Bundt Cake
- Share Your Elegant Bundt Recipes Creation
Why This Red Velvet Bundt Cake Recipe Works for You
Look, I’ve been there—staring at a box mix, knowing I want more but feeling like I don’t have the time for a real baking project. That’s not the case here, even though you are baking this completely from scratch! We’ve built in the key components that guarantee success on the first try. You deserve a beautiful cake without the all-day commitment.
- It’s unbelievably rich. We use simple additions that pack a serious flavor punch. Check out more wonderful recipes like this one when you have time here—they really know their way around a good dessert!
- It’s designed for the modern kitchen. This recipe embraces easy red velvet baking techniques.
Achieving the Signature Tender Red Velvet Cake Texture
The secret to making sure this is a truly moist bundt cake lies in the fat and acid working together. By using oil instead of just butter, we lock in moisture that just stays put. Plus, the buttermilk reacts perfectly with the baking soda to create the most delicate crumb structure possible. It’s soft, never crumbly!
Simple Steps for a Stunning Red Velvet Bundt Cake
Even though this red velvet bundt cake is elegant, the method is straightforward. We skip complicated layering and focus on one beautiful pan and one fantastic glaze. It’s impressive dessert making made easy for your busy weeknights or last-minute gatherings!
Ingredients for Your Moist Red Velvet Bundt Cake
I know lists aren’t the most exciting part of baking, but stick with me for a second. These measurements are really precise because, in baking, every little thing counts, especially when we are going for that incredible moisture. If you treat your ingredients nicely, they’ll treat you back with an amazing cake! Make sure you have everything measured out before you even turn the oven on—that always helps me stay calm.
Cake Batter Ingredients
- 1 3/4 cups all-purpose flour—make sure it’s spooned and leveled!
- 1 1/2 cups granulated sugar—nice and fine for a tender crumb.
- 1 teaspoon baking soda
- 1 teaspoon unsweetened cocoa powder—this is what gives it that subtle chocolate note.
- 1/2 teaspoon salt
- 1 cup buttermilk, and this is crucial—it *must* be at room temperature.
- 1/2 cup vegetable oil—oil is your friend for moisture here.
- 2 large eggs, also at room temperature, please!
- 1 teaspoon white vinegar
- 1 teaspoon vanilla extract
- 1 tablespoon red food coloring (I swear by the gel kind for a deep color!)
- 1 teaspoon instant coffee granules (this is just optional, but wow, it deepens the cocoa!)
- 1/2 cup boiling water—don’t worry, we add this last!
For the Silky Cream Cheese Glaze Cake Topping
This glaze needs to be creamy where the cake is rich. Remember, both your cream cheese and butter need to be soft—not melted, but soft enough that they squish easily in the bowl. This ensures we don’t get any horrible lumps!
- 8 ounces cream cheese, completely softened
- 1 1/2 cups powdered sugar, make sure you sift this! No one likes a gritty frosting.
- 1/4 cup unsalted butter, also softened nicely
- 1 teaspoon vanilla extract
- 1 to 3 tablespoons milk or heavy cream—we use this to control the drizzle thickness later.
Expert Tips for Preparing the Red Velvet Bundt Cake
Doing this prep work right means the difference between a showstopper and a disaster when you try to flip it out! Baking a gorgeous red velvet bundt cake is 50% about the mixing and 50% about getting the pan ready. I learned this the hard way early on. Remember, the high moisture we aim for is wonderful for eating but means the cake really wants to cling to every part of that detailed pan. You can see some really elegant ideas for different bundt styles, like this layered red velvet cheesecake version, but for this recipe, we focus on simple perfection.
Pan Preparation for a Perfect Release
This is non-negotiable: you have to grease and flour the pan like you mean it. Don’t just spray it lightly! I use softened butter or shortening and literally spread it into every nook and cranny with a pastry brush. Get right up into those ridges. Then, dump in about two tablespoons of flour, holding the pan over the sink, and twist it around until every single buttered surface has a thin, even coat of flour. Tap out the excess aggressively. This gives the batter something to grip onto that it can later let go of! It’s the secret to getting that beautiful crumb intact.
Temperature Matters: Room Temp Ingredients for Red Velvet Bundt Cake
If you try to mix cold eggs and cold buttermilk into oil and sugar, the mixture breaks, or ‘curdles.’ This leaves you with a dense final product because the fats aren’t emulsified properly. To get that wonderfully tender crumb that everyone raves about in my red velvet bundt cake, pull out your eggs and buttermilk at least an hour ahead of time. When they are all the same temperature, they join together beautifully, creating the smooth batter base we need for a perfectly moist result. For more tips on getting a great consistency, you should check out this great recipe here, too!
Step-by-Step Instructions for Your Red Velvet Bundt Cake Recipe
This is where the magic really happens! It seems like a lot of steps, but honestly, the mixing is super fast because we are avoiding creaming butter. That’s a time saver right there for our busy lives. Follow this flow, and you’ll have the most gorgeous red velvet bundt cake recipe waiting to bake for you. Remember what I always say: don’t rush the beginning, and the middle goes so much smoother.
Mixing the Batter and Incorporating Color
First, take your dry ingredients—the flour, sugar, cocoa, soda, and salt—and whisk them together really well in a big bowl. That’s step one. Then, in a separate bowl, combine all your wet goodies: the buttermilk, oil, room temperature eggs, vinegar, vanilla, and all that vibrant red coloring. Whisk that until it looks absolutely uniform, like bright red paint! Now, slowly pour this wet color bath into the dry stuff. Mix it on low speed with your electric mixer, but listen to me: Do not overmix! We just want the flour streaks gone. The last bit is the wild card: dissolve your coffee granules (if you’re using them) in boiling water. Pour that hot liquid in very carefully and mix on low until it’s just combined. Seriously, it will look thin; that’s totally normal for a moist cake like this! For more ideas on festive baking, check out this wonderful resource here.
Baking Times and Cooling the Red Velvet Bundt Cake
Once the batter is silky and thin, pour it gently into that perfectly prepped bundt pan. Preheat your oven to 325 degrees Fahrenheit before you even start mixing, by the way! Pop it in and let it bake for about 50 to 60 minutes. You’re looking for a wooden skewer inserted near the center to come out clean, maybe with a few moist crumbs clinging on. That’s the sweet spot for a red velvet bundt cake that isn’t dry!
The cooling process is crucial for structural integrity. Do not rush to dump it out! Let the cake rest in that warm pan for exactly 15 minutes on a wire rack. This lets it firm up just enough. After those 15 minutes, we flip it out gently onto the rack to cool completely. If you try to glaze it while it’s warm, the glaze will just melt right off, and nobody wants that messy look!
Crafting the Best Cream Cheese Glaze Cake Topping
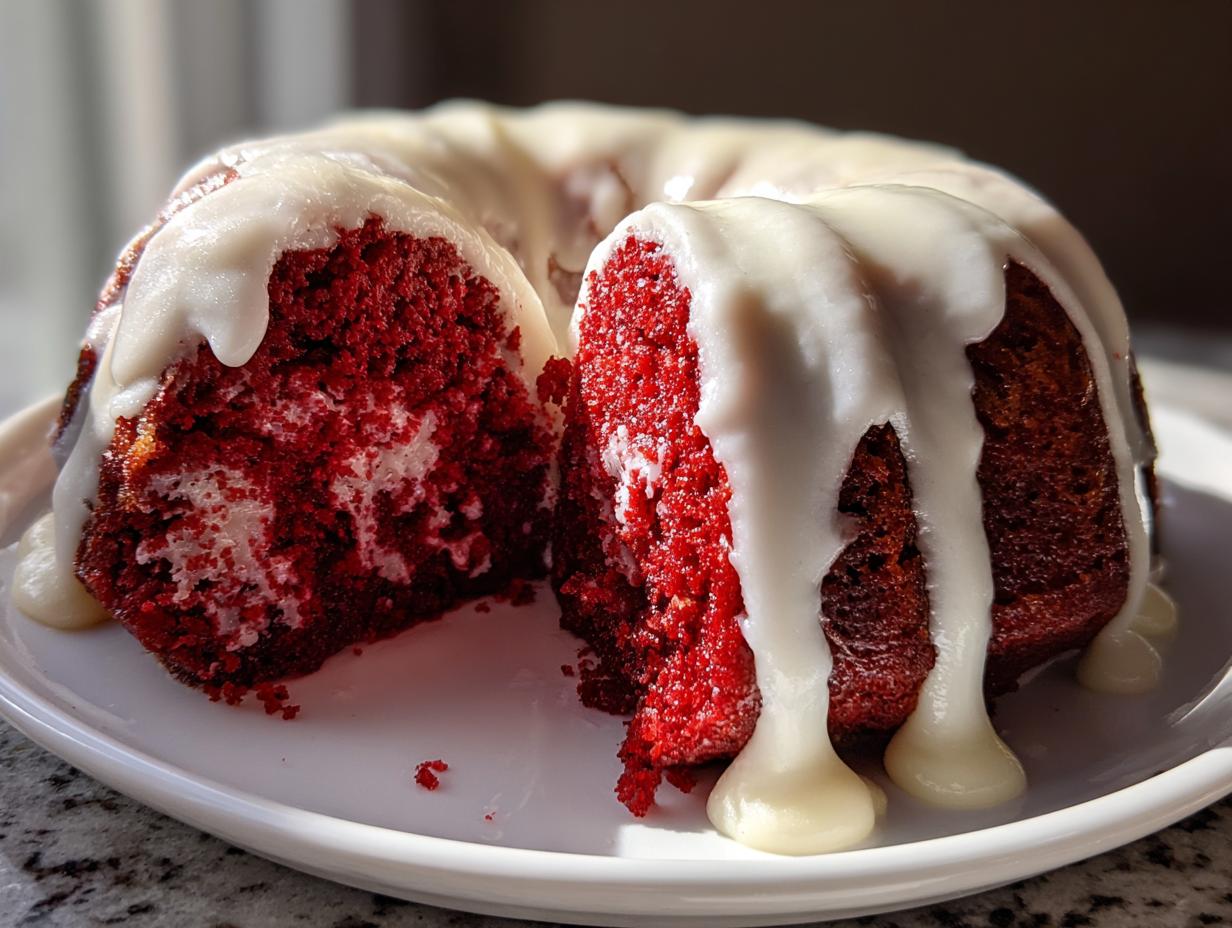
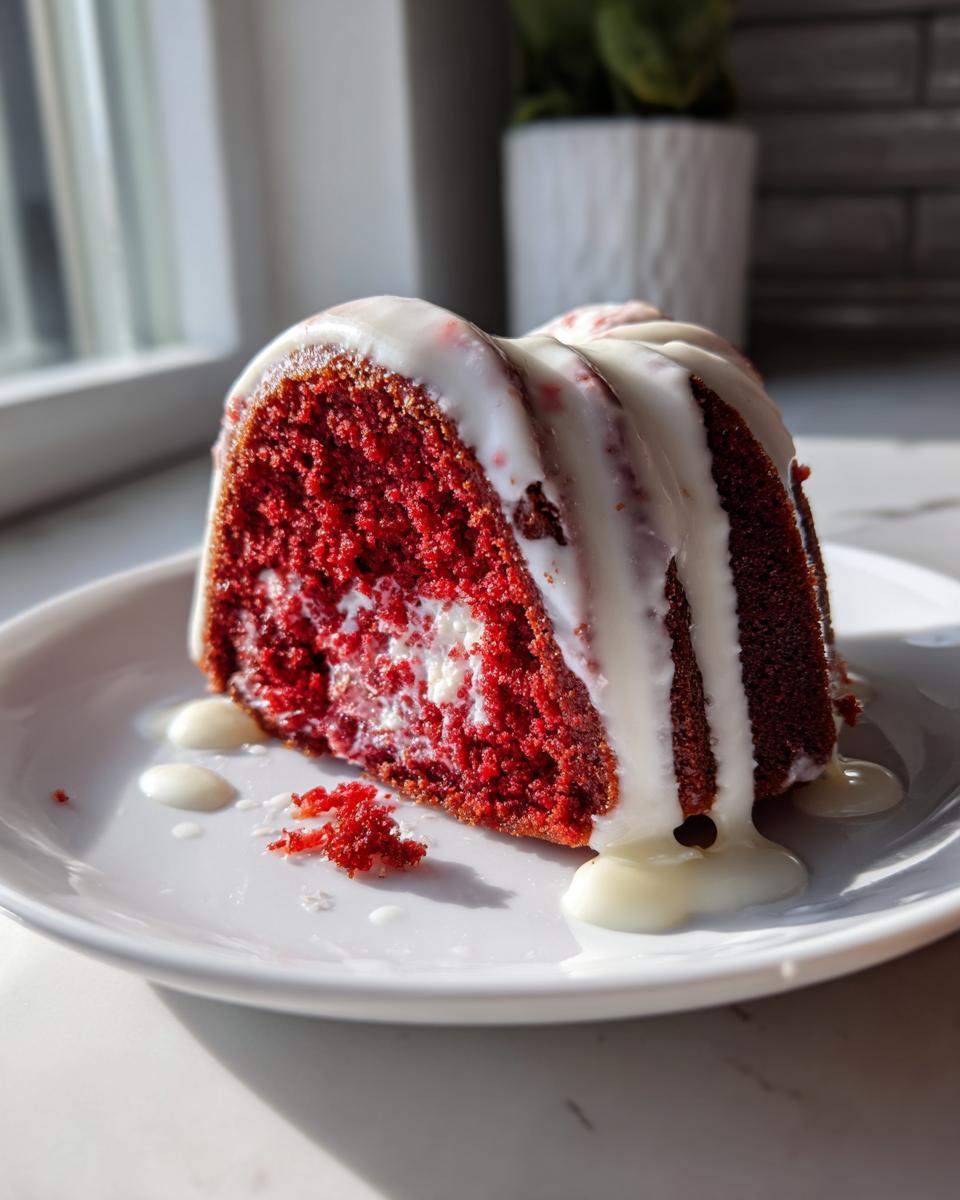
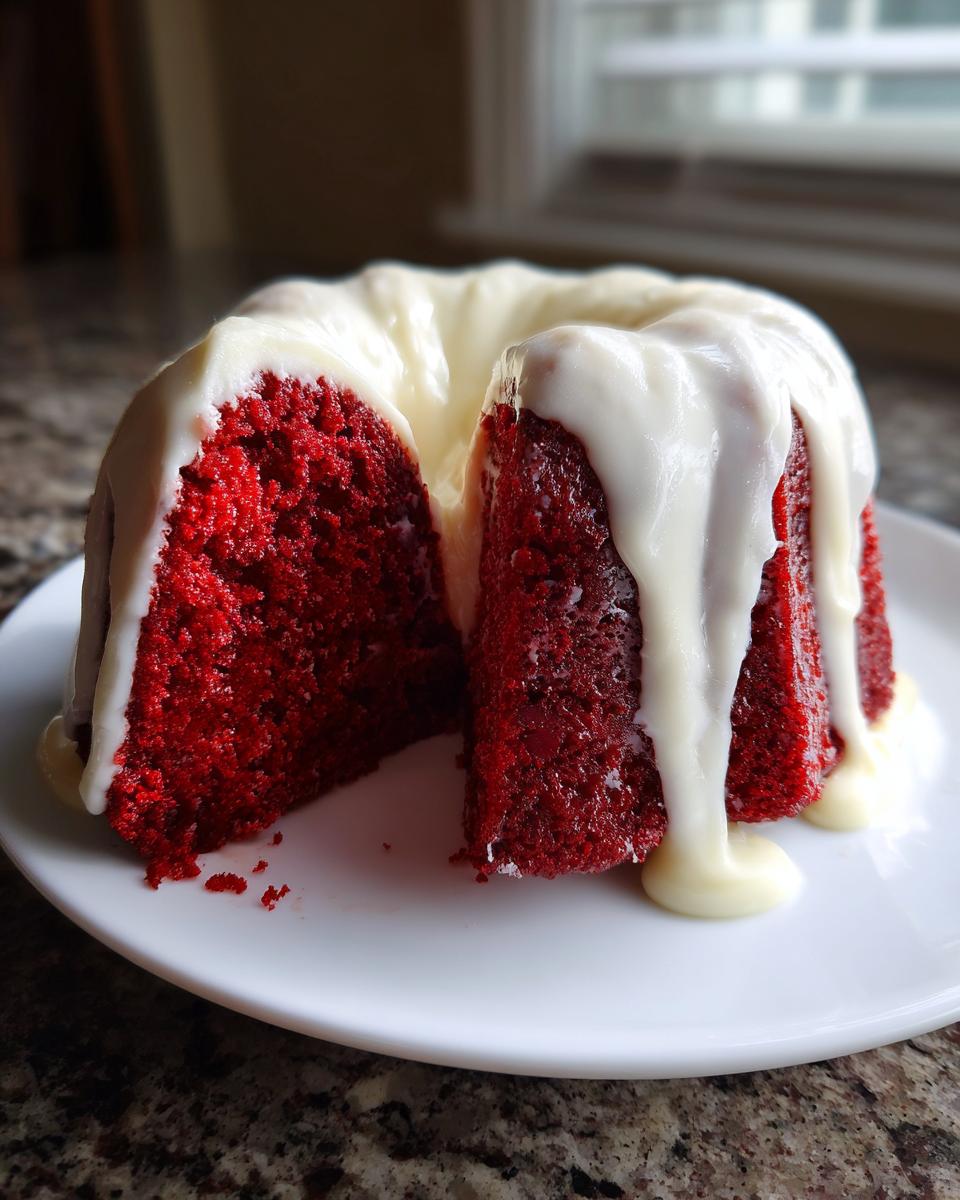
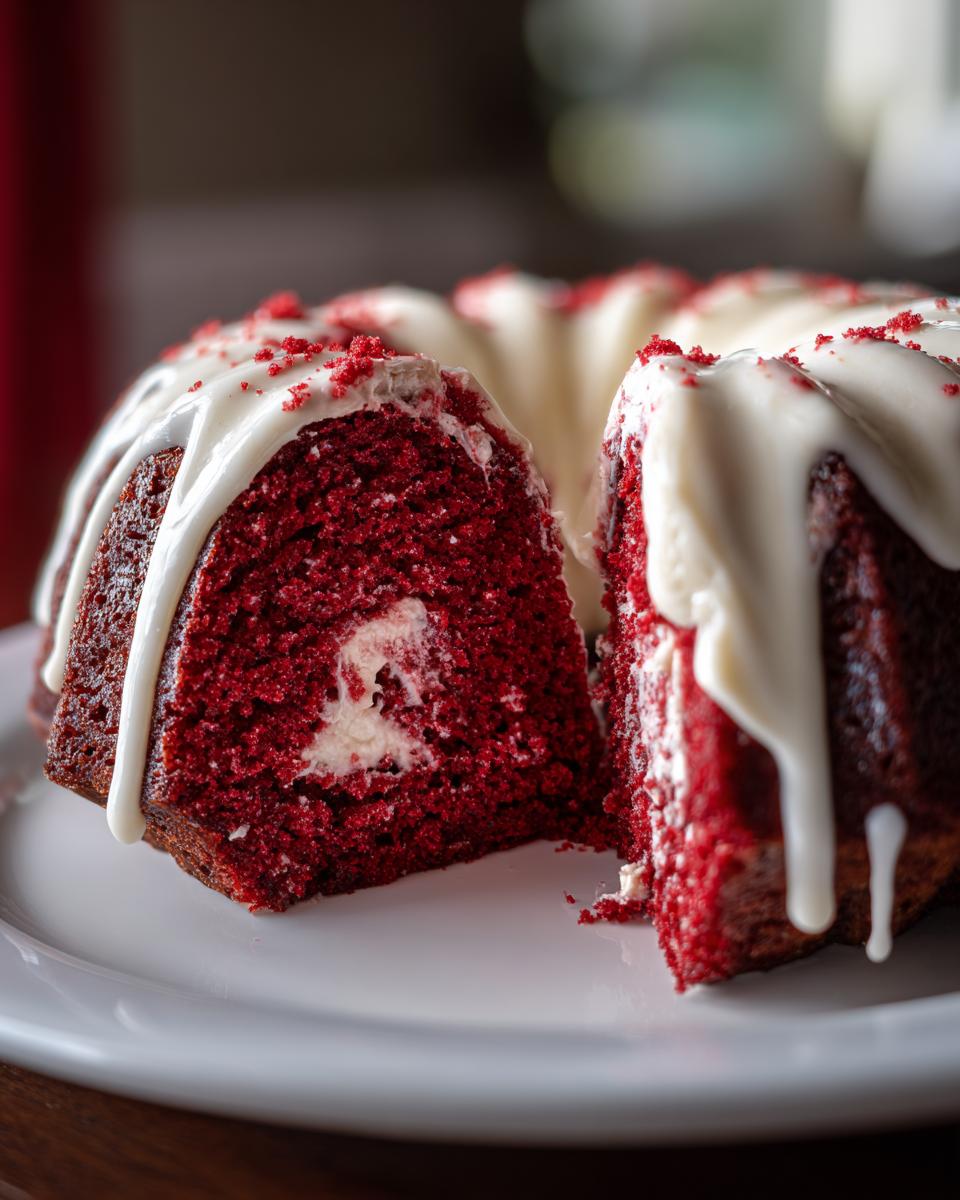
Okay, let’s talk about the crowning glory! A red velvet cake, no matter how moist, truly needs that tangy, slightly salty counterpoint that only a thick cream cheese glaze can provide. This isn’t some runny, thin topping—we are aiming for a beautiful, silky coating that swoops and drips down the sides of your newly baked bundt. This cream cheese glaze cake topping is the perfect foil for that slightly tangy, cocoa-rich cake underneath. It’s easy, but getting that perfect texture is the key to making this dessert look professional!
Achieving the Perfect Drizzle Consistency
Mixing the glaze is simple, but you have to pay attention to the final liquid additions. We start by making sure the cream cheese and butter are perfectly creamy, no lumps allowed! Then we beat in the sifted powdered sugar until it’s thick, almost like putty. This is where you decide how you want it to behave on the cake. If you want big, fat ribbons of glaze that sit heavy on top, use just a tiny splash of milk—maybe just one tablespoon to start. But if you want that gorgeous, flowing drizzle that sinks into the decorative grooves of the bundt tin, you’ll need more liquid.
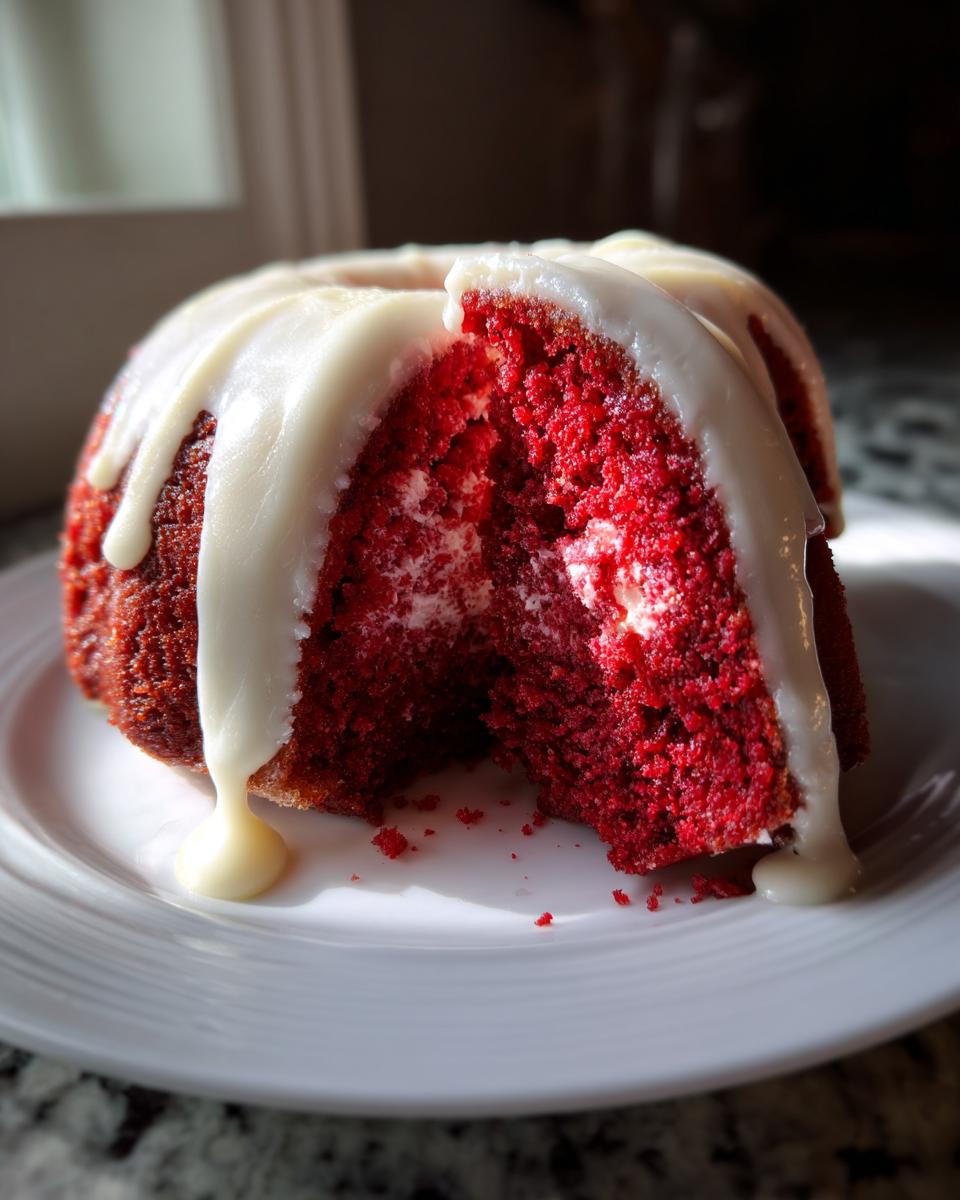
Go slowly with that milk or cream! Add it a teaspoon at a time until you can lift your whisk and the glaze falls in a heavy ribbon that slowly smooths itself out after a second or two. If you happen to overdo it—and trust me, I’ve done that before when I’m distracted—just whisk in an extra tablespoon or two of sifted powdered sugar until you get that perfect pourable consistency. It should coat the back of a spoon nicely but still move freely. Give it a test drizzle on a spare napkin before you commit to pouring it all over your beautiful cake!
For more inspiration on beautiful toppings and how bakers achieve that stunning look, take a peek at what my friends over at The Novice Chef are doing with their red velvet cream cheese bundt cake ideas.
Storage and Serving Suggestions for Your Red Velvet Bundt Cake
We did all this work to create a spectacularly moist cake, so we definitely want to keep it that way! Because this red velvet bundt cake uses oil, it stays fresh way longer than a traditional butter-based cake. I find that if you wrap the entire cooled cake tightly in plastic wrap—or place it in a cake carrier—it’s perfectly happy sitting right out on the counter for about three good days. Seriously, no need to cool it down in the fridge unless your kitchen is super hot!
If you do need to keep this beauty around longer—maybe you want to save some for leftovers after the party—you can absolutely freeze it. Just make sure the glaze is fully set first. Wrap it very well, maybe even put a layer of foil over the plastic wrap, and it’ll be great for about two months. You can find some wonderful tips on keeping frosted cakes fresh by checking out this other great recipe here. When serving, I think it looks just stunning with a light dusting of cocoa powder right before slicing!
Troubleshooting Common Red Velvet Bundt Cake Issues
Don’t you hate it when you follow every step perfectly and something still goes a little sideways? We’ve all been there, friend! Baking is science, but sometimes the kitchen gremlins decide to show up. Since this cake is so rich, it has a few specific quirks, but catching these little problems is easy if you know what to watch for. If your cake didn’t turn out exactly how you planned, don’t worry one bit. We can fix just about anything, and I’ve got my trusty notes from my own kitchen mishaps right here to help you out. For more helpful tips on getting great results, take a look at this guide here.
Why Did My Cake Stick to the Pan?
This is the absolute worst feeling, especially after baking something so beautiful! If your cake got stuck, it almost always comes down to one thing: relying too much on non-stick spray alone. That spray just doesn’t get into those deep crevices of the bundt pan properly. Remember that heavy greasing and flouring I showed you earlier? That’s your insurance policy!
If it still stuck, and you see a little bit of the cake is stuck to the sides, give the bottom of the inverted pan a gentle tap against a cutting board—not a hard slam, just a firm tap—and let it sit for another five minutes before trying to lift it again. Sometimes that little bit of steam trapped underneath needs a moment to release before the cake will slide out cleanly.
My Red Velvet Cake Isn’t Red Enough
Sometimes, even with a full tablespoon of food coloring, your cake might look more pink or brown than that deep, saturated red you see online. This happens because the cocoa powder we use has a natural dark color, and the acid in the buttermilk can sometimes dull the red slightly. It’s going to taste amazing either way, but if you absolutely crave that vibrant look, here’s my big tip:
Always, always, *always* use a high-quality **gel food coloring**. The liquid drops you shake into your soda just don’t pack the same punch. Gel coloring is concentrated, meaning you use less product to get a much stronger, brighter color payoff. I usually add the gel coloring right in with the other wet ingredients so it has plenty of time to mix evenly before it hits the flour. If you go with the gel, you’ll get that stunning, festive color everyone expects!
Frequently Asked Questions About This Red Velvet Bundt Cake
I got so many questions when I first started sharing this recipe, so I figured it’s best to just answer the big ones right here! We want everyone to feel confident tackling this red velvet bundt cake. It’s designed for home cooks, so no question is silly! If you want to see how other folks have styled their beautiful cakes, you can check out the amazing results from the bakers over at Erren’s Kitchen.
Can I make this a Classic Red Velvet Cake without the Bundt Pan?
Absolutely! While I adore how the bundt shape shows off the glaze, this recipe works beautifully in other styles too. If you use two 9-inch round cake pans, you’ll need to reduce the baking time—keep an eye on them around the 30-minute mark. For loaf pans, expect them to take longer, maybe 65 to 75 minutes, because the center is so thick. Just use the toothpick test as your best guide!
How do I make this a Showstopper Dessert for the Holidays?
This cake is already stunning just with the silky glaze, but if you want to take it up a notch for Christmas or Valentine’s Day, here’s my favorite little trick! Wait until the glaze is just slightly set, and then carefully arrange some sugared cranberries around the center opening or the outer edge. A few small sprigs of fresh rosemary tucked in really makes it look like a festive wreath. It transforms your already delicious cake into a true showstopper dessert perfect for any gathering!
What is the secret to the Cocoa Flavor Cake depth?
You noticed that subtle richness, didn’t you? That wonderful depth that makes it taste like sophisticated chocolate rather than just sweet cake? That all comes down to the optional instant coffee granules. Don’t worry, your cake won’t taste like coffee! The coffee acts as a flavor enhancer for the cocoa powder, bringing out its natural dark, earthy notes without adding any recognizable coffee flavor. It’s a brilliant little trick for a more profound classic red velvet taste.
Nutritional Estimate for Your Red Velvet Bundt Cake
Now, I’m the first one to admit that I don’t fuss over macros when I’m baking something this rich and comforting—life is too short to skip butter and sugar! This cake is meant to be an indulgence, a reward for all the hard work you put into the week. However, since I always want to give you the full picture, I compiled an estimate based on the ingredients we used. Please remember, this is just a guideline, and it definitely changes depending on how thick you pour that gorgeous glaze!
If we break down one slice of this moist cake, here is what the numbers generally look like:
- Calories: Roughly 450 per slice. That’s a hearty slice of dessert magic, as expected!
- Fat: Around 25 grams total, with about 10 grams coming from saturated fats (that’s the butter and cream cheese doing their job!).
- Carbohydrates: Expect about 55 grams in total.
- Protein: A bonus little boost of about 4 grams.
It holds a little bit of sugar, over 45 grams, but you simply cannot achieve that classic tender texture without a good amount of sugar and fat. Enjoy it guilt-free because the joy it brings is worth every single gram!
Share Your Elegant Bundt Recipes Creation
Now, the moment of truth! You’ve gone from simple ingredients to a stunning, deep-red, fragrant masterpiece. I’m dying to know what you thought of this recipe! Did it come out as moist as you hoped? Was the cream cheese glaze just the right level of tangy?
Your feedback is honestly the most important part of this whole process for me. When you leave a star rating and tell me how your red velvet bundt cake turned out—whether it was a quiet Tuesday night treat or the star of a big holiday table—it helps the next person who is nervous about baking from scratch feel confident enough to try it!
If you snapped a picture, please tag me on social media so I can see your beautiful work! I love sharing your successes; seeing your gorgeous drizzle and that perfect crumb honestly makes my day. If you want to browse through some other fabulous options for elegant bundt recipes, you can always check out what my friends are baking up over at Weekend Craft.
Go on, tell me everything in the comments below! Happy baking, friends—you totally mastered this showstopper dessert!
PrintMoist Red Velvet Bundt Cake with Silky Cream Cheese Glaze
Bake a showstopper dessert from scratch. This red velvet bundt cake recipe delivers a tender, moist crumb and rich cocoa flavor, topped with a thick, tangy cream cheese glaze.
- Prep Time: 20 min
- Cook Time: 60 min
- Total Time: 1 hour 40 min
- Yield: 12 servings 1x
- Category: Dessert
- Method: Baking
- Cuisine: American
- Diet: Vegetarian
Ingredients
- 1 3/4 cups all-purpose flour
- 1 1/2 cups granulated sugar
- 1 teaspoon baking soda
- 1 teaspoon unsweetened cocoa powder
- 1/2 teaspoon salt
- 1 cup buttermilk, room temperature
- 1/2 cup vegetable oil
- 2 large eggs, room temperature
- 1 teaspoon white vinegar
- 1 teaspoon vanilla extract
- 1 tablespoon red food coloring (gel preferred)
- 1 teaspoon instant coffee granules (optional, for flavor depth)
- 1/2 cup boiling water
- For the Glaze: 8 ounces cream cheese, softened
- 1 1/2 cups powdered sugar, sifted
- 1/4 cup unsalted butter, softened
- 1 teaspoon vanilla extract
- 1–3 tablespoons milk or heavy cream
Instructions
- Preheat your oven to 325 degrees Fahrenheit. Grease and flour a 10-cup bundt pan thoroughly. Dust the inside lightly with flour, tapping out any excess.
- In a large bowl, whisk together the flour, sugar, baking soda, cocoa powder, and salt. Set this dry mixture aside.
- In a separate medium bowl, whisk together the buttermilk, vegetable oil, eggs, vinegar, vanilla extract, and red food coloring until fully combined and the color is uniform.
- Pour the wet ingredients into the dry ingredients. Mix on low speed with an electric mixer until just combined. Do not overmix.
- In a small cup, dissolve the instant coffee granules (if using) into the boiling water. Carefully pour this hot liquid into the batter and mix on low speed until smooth. The batter will be thin.
- Pour the batter evenly into the prepared bundt pan.
- Bake for 50 to 60 minutes, or until a wooden skewer inserted into the center comes out clean or with moist crumbs attached.
- Let the cake cool in the pan on a wire rack for 15 minutes.
- Invert the cake onto the wire rack and allow it to cool completely before glazing, about 1 to 2 hours.
- To make the cream cheese glaze, beat the softened cream cheese and butter together in a medium bowl until smooth and creamy.
- Gradually add the sifted powdered sugar, beating until incorporated. Add the vanilla extract.
- Add milk or cream one tablespoon at a time until the glaze reaches a thick, pourable consistency suitable for drizzling.
- Once the cake is completely cool, drizzle the silky cream cheese glaze generously over the top, allowing it to drip down the sides. Let the glaze set before slicing and serving your tender red velvet cake.
Notes
- For the best texture, make sure your eggs and buttermilk are at room temperature before mixing.
- If you prefer a thicker frosting instead of a glaze, reduce the amount of milk used in the glaze mixture.
- To achieve the deepest red color, use a high-quality gel food coloring rather than liquid drops.
Nutrition
- Serving Size: 1 slice
- Calories: 450
- Sugar: 45
- Sodium: 350
- Fat: 25
- Saturated Fat: 10
- Unsaturated Fat: 15
- Trans Fat: 0
- Carbohydrates: 55
- Fiber: 1
- Protein: 4
- Cholesterol: 75