

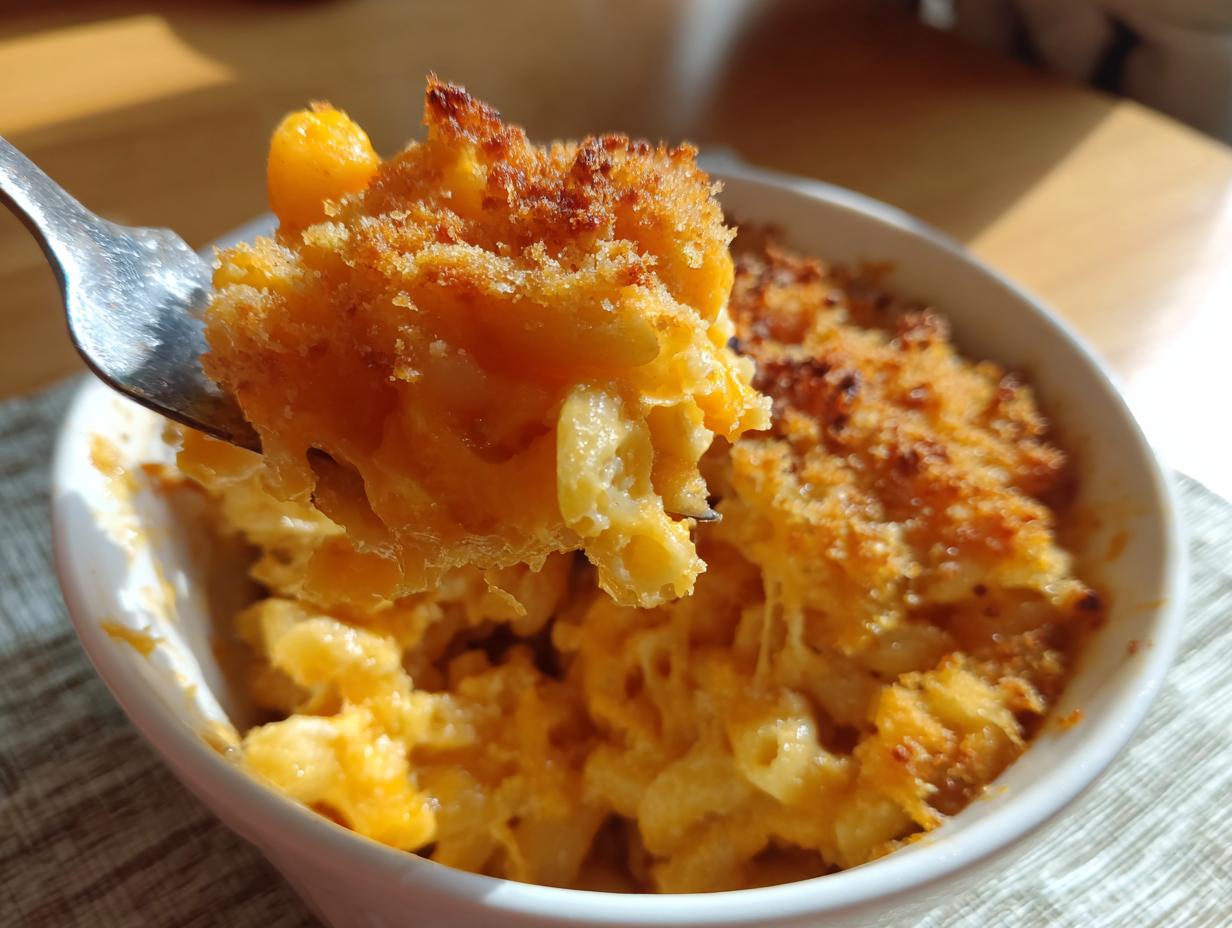
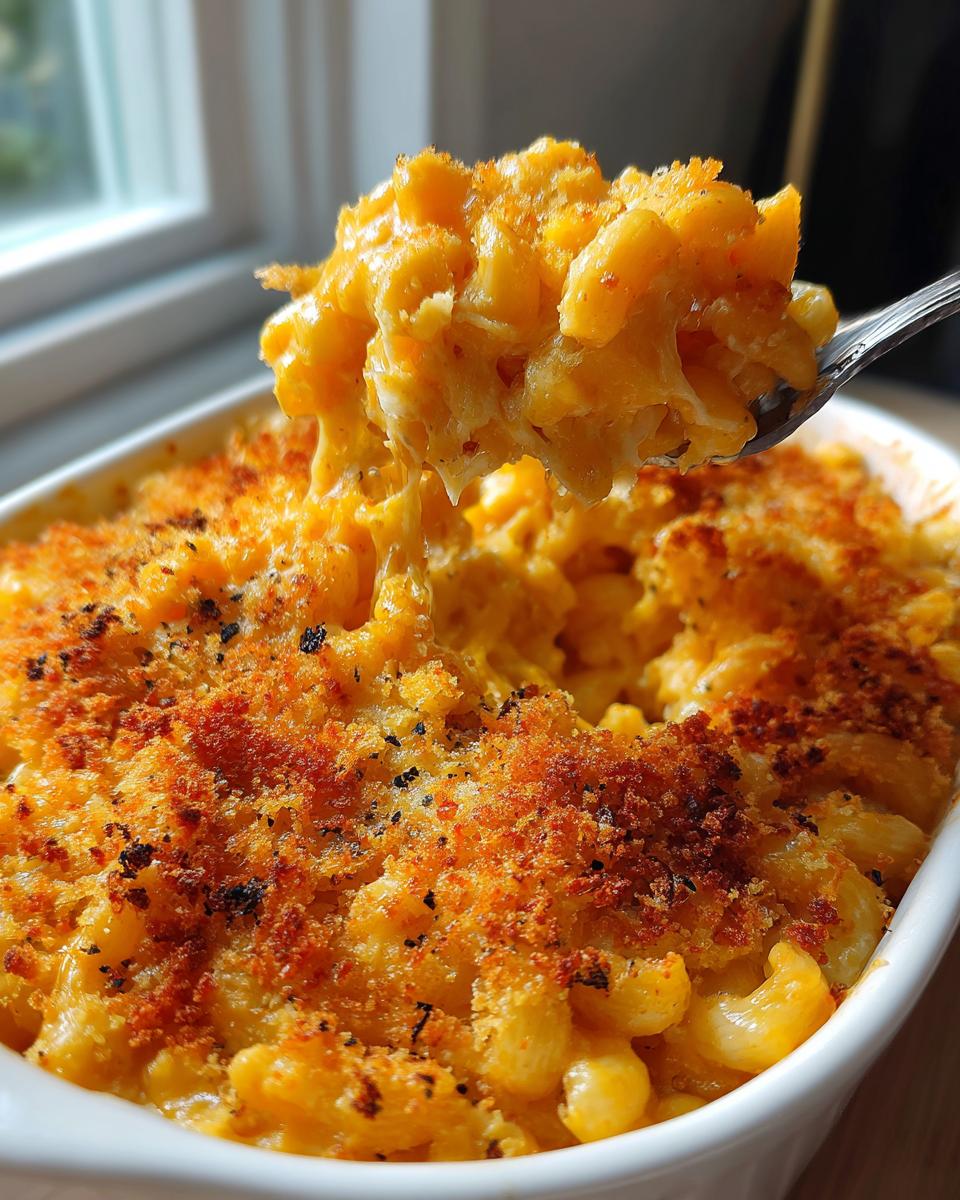
If there is one dish that instantly whispers ‘home’ and promises pure, unadulterated joy, it’s baked macaroni and cheese. Forget dry, grainy imitations; we are here to talk about the real deal. For me, Felix, this baked mac and cheese recipe isn’t just a side dish—it’s the centerpiece of every gathering, from a casual weeknight dinner to chaos reigning on Thanksgiving. I worked hard to nail the perfect balance between a ridiculously creamy interior and that shatteringly crisp, golden top layer. I’ve perfected techniques so good, you’ll want to use them for treats like my sweet potato casserole with a crunchy topping, too. Trust me when I say this recipe is the ultimate comfort food you’ll ever pull out of the oven. I often think back to my Chicago childhood, and honestly, you haven’t lived until you’ve had this version at a big family get-together.
- Why This Baked Mac and Cheese Recipe Guarantees Comfort
- Gathering Your Ingredients for the Ultimate Baked Mac and Cheese Recipe
- Step-by-Step Instructions for Our Baked Mac and Cheese Recipe
- Expert Tips for the Creamiest Baked Mac and Cheese
- Making This Baked Mac and Cheese Recipe Your Family Favorite
- Storing and Reheating Your Comfort Food Macaroni
- Serving Suggestions for This Casserole Side Dish
- Frequently Asked Questions About Our Baked Mac and Cheese Recipe
- Share Your Homemade Macaroni and Cheese Success
Why This Baked Mac and Cheese Recipe Guarantees Comfort
I know the struggle. You want that deep, soulful comfort of baked mac and cheese, but you don’t want to wrestle with grainy sauces or pasta that turns to dust in the oven. That’s why I developed this formula. It’s designed right from the start to meet every craving you have for the perfect cheesy casserole. It’s my secret weapon for feeding a crowd quickly, which is why I bring it to every potluck I attend!
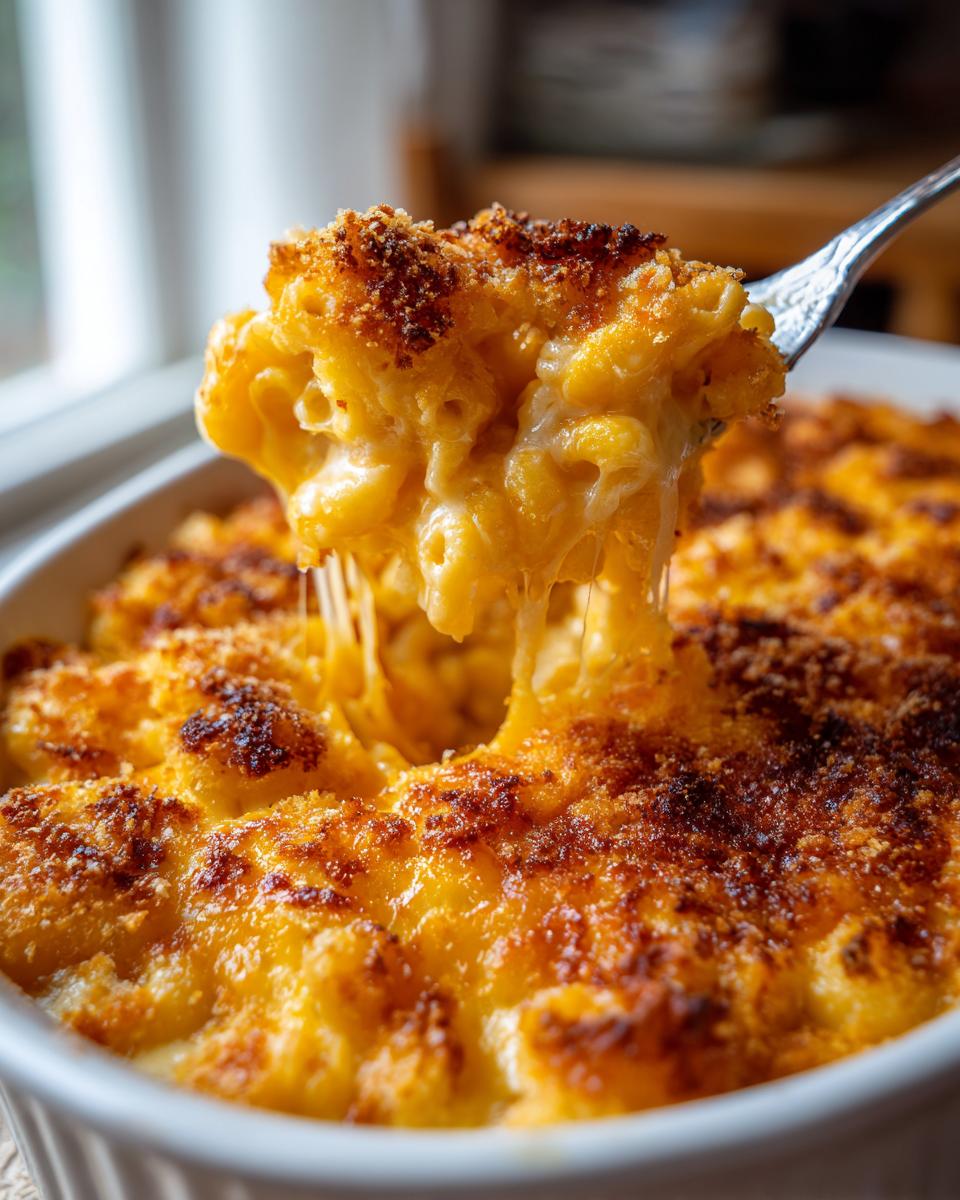
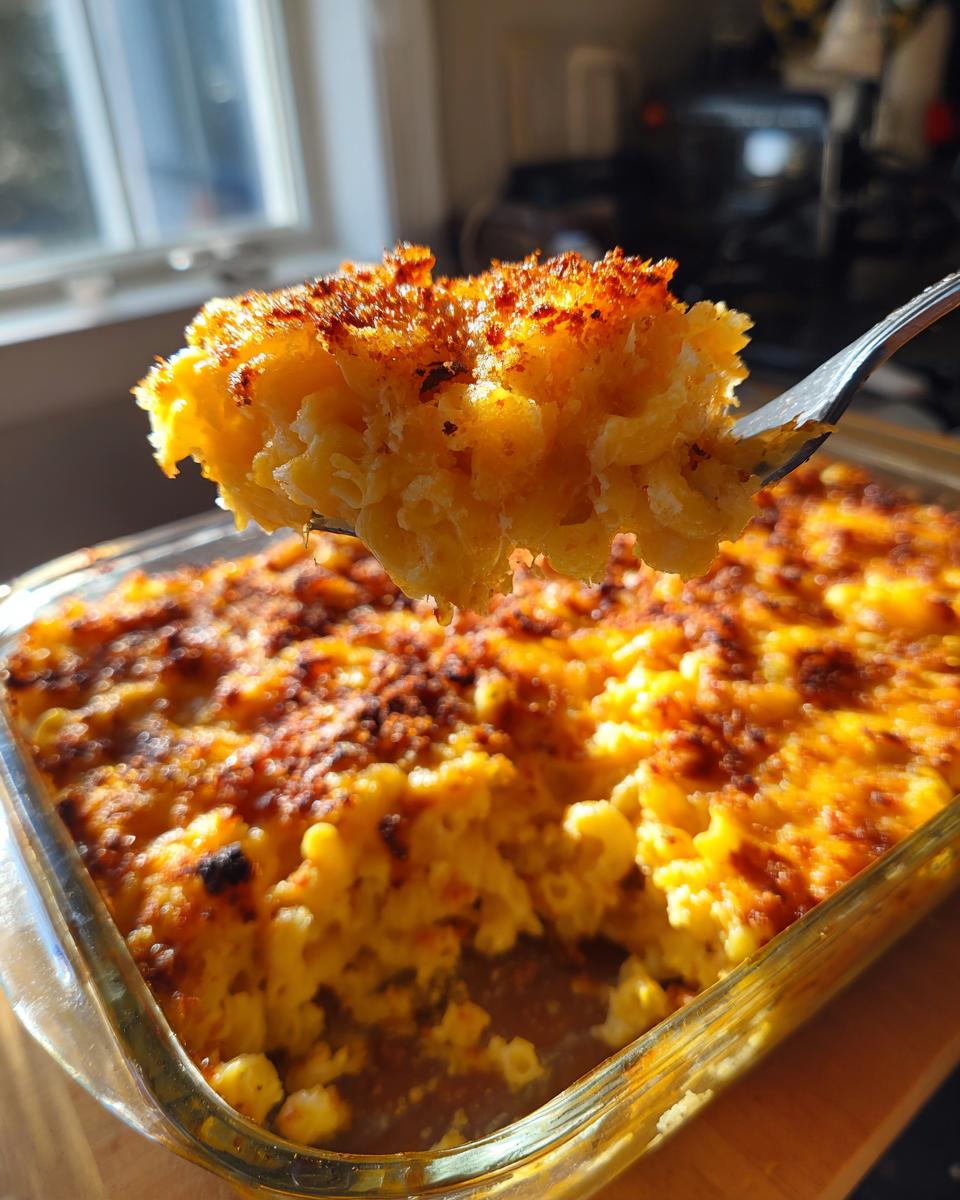
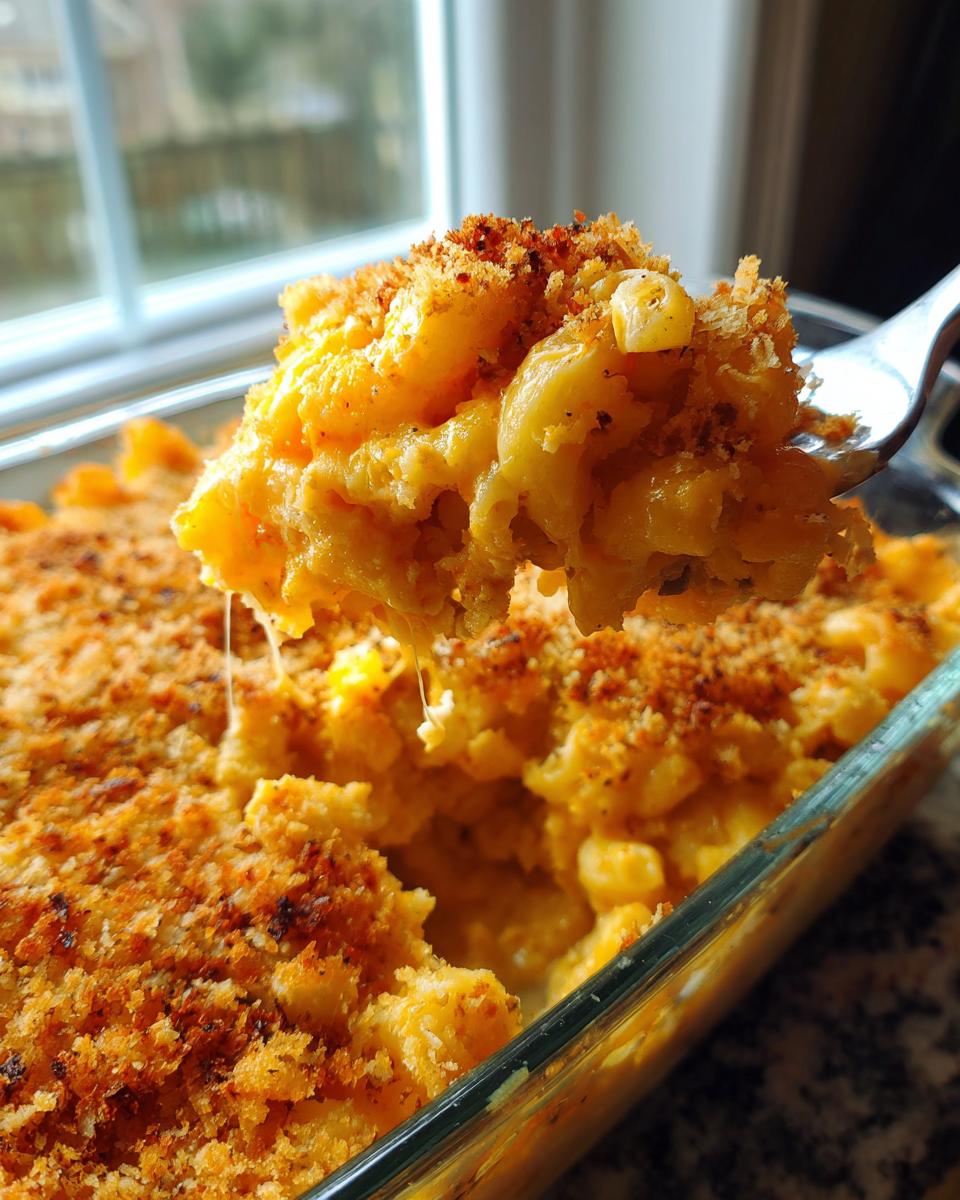
- It delivers the dream combination: a genuinely creamy baked mac and cheese inside while keeping that essential crispiness on top.
- We use a triple cheese blend that melts beautifully, ensuring zero dryness.
- It’s designed for easy assembly, making it perfect for busy weeknights or when you’re juggling other holiday dishes.
- The Panko layer yields that crunchy, golden brown mac and cheese with crispy topping that everyone dives for first.
If you need a dish that travels well and satisfies everyone from little kids to serious foodies, you’ll find that casserole side dish magic right here. It just always turns out right.
Gathering Your Ingredients for the Ultimate Baked Mac and Cheese Recipe
Alright, so you’re ready to make the best baked mac and cheese recipe known to humankind. Amazing! Before we get to the cheese sauce wizardry, we need to gather our crew of ingredients. I need you to do one very important thing for me before you start: if you can, buy blocks of cheese, not the pre-shredded stuff. Trust me, that little bit of extra effort in shredding is what keeps this deeply cheesy and stops it from getting gritty. It’s my little secret for making sure this dish stays rich, gooey, and perfect for any gathering. Think of it as preparing for battle—we need the best weapons!
For the Creamy Baked Mac and Cheese Base
This is the heart of the dish, where we build that gorgeous, rich gooey baked pasta foundation. You’ll need:
- 1 pound elbow macaroni
- 6 tablespoons unsalted butter
- 1/2 cup all-purpose flour
- 4 cups whole milk, warmed—make sure it’s warm!
- 1 teaspoon salt
- 1/2 teaspoon black pepper
- 1/4 teaspoon ground nutmeg
- 1/2 teaspoon dry mustard powder
- 1/4 teaspoon paprika
- 1/4 teaspoon cayenne pepper (if you like a little kick!)
- 8 ounces sharp cheddar cheese, shredded
- 4 ounces Gruyère cheese, shredded
- 4 ounces Monterey Jack cheese, shredded
That blend of sharp cheddar for bite, Gruyère for nuttiness, and Jack for pure meltiness is what makes this so special. Don’t forget to keep those cheddar, Gruyère, and Monterey Jack cheeses handy!
For the Crispy Topping
We aren’t skipping the crunch! This simple layer bumps this casserole up from good to legendary. You just need:
- 1 cup panko breadcrumbs
- 2 tablespoons melted butter (for tossing)
Mix those two together, and we are golden brown and ready to go. If you’re feeling extra fancy, I sometimes toss some candied pecans in here too, but the panko is the real star for that crunch!
Step-by-Step Instructions for Our Baked Mac and Cheese Recipe
Okay, let’s get down to business. This is where the magic happens, and honestly, it moves faster than you think once you get the rhythm down. First things first: get organized! Preheat your oven right now to 375°F (190°C). We want that heat waiting for us. And lightly grease a 9×13 inch baking dish—I like to use a little homemade pumpkin crunch release spray residue in mine, but regular oil works too, just don’t skip this step! If you are looking for more guidance on whipping up easy baked mac and cheese recipes, keep this technique in your back pocket.
Step 1: Cook the Pasta Smartly. Cook your 1 pound of elbow macaroni according to the package, but listen closely here—this is critical for E-E-A-T, folks: cook it until it is just *al dente*. I mean slightly underdone. If you overcook it now, it will turn to mush when we bake it later. Drain it really well and set it aside to cool just a touch.
Step 2: Start the Roux. While that pasta is cooking, grab your big saucepan. Melt the 6 tablespoons of unsalted butter over medium heat. Once it’s shimmering, whisk in that 1/2 cup of flour. You are making a roux, which is the thickening base we need! Whisk it constantly for a good minute or two until it smells a little nutty and looks pale golden. Don’t let it brown or you’ll get a weird flavor!
Step 3: Introducing the Milk. Now, slowly, slowly, whisk in the 4 cups of warm milk. Seriously, pour a little bit in, whisk it until it disappears into the roux—then add a bit more. This prevents lumps, and we do not want lumps in our comfort food! Keep stirring often until the sauce thickens up enough that it coats the back of a spoon nicely. This takes about 5 to 8 minutes.
Step 4: Flavor Time. Take that pan right off the heat! We don’t want to cook the cheese too long. Stir in all your spices: the salt, pepper, that tiny bit of nutmeg (it really elevates it!), dry mustard powder, paprika, and cayenne if you’re brave. Give it a good mix.
Step 5: Cheese Melt. Here’s the fun part—add the shredded cheddar, Gruyère, and Monterey Jack cheeses all at once. Stir gently until it’s all melted down into this gloriously smooth, velvety river of gold. This process is what creates the best cheese sauce for baking imaginable.
Step 6: Combine. Now gently fold the cooked macaroni into that luxurious sauce. Make sure every single piece of pasta is coated in cheesy goodness. Then, pour the whole lot into your prepared 9×13 dish. Try to keep the pasta relatively level. If you are looking for more guidance on whipping up easy weeknight dinners that still feel special, this technique is a game-changer!
Step 7: Don’t Forget the Crunch! In a small bowl, toss your 1 cup of panko breadcrumbs with the 2 tablespoons of melted butter until they look evenly coated. Sprinkle this mixture right over the top of the macaroni. This step is non-negotiable if you want that perfect finish!
Step 8: Bake and Rest. Pop that dish into the 375°F oven for about 20 to 25 minutes. You are looking for bubbling around the edges and a deeply golden, crisp top. When you pull it out, please, please let it rest for 5 to 10 minutes before you cut into it. This lets the sauce settle and makes serving so much cleaner. If you skip the rest, you get soup instead of the perfect bake!
Expert Tips for the Creamiest Baked Mac and Cheese
Want to ensure you get that unbelievably rich and creamy baked mac and cheese every single time? It all comes down to respecting the ingredients and handling the timing just right. I learned early on that shortcuts often lead to big messes later, especially when dealing with dairy and cheese. Follow these pointers, and you’ll be serving up comfort food perfection!
Cheese Selection and Preparation
If you take one thing away from my whole philosophy, let it be this: shred your own cheese! Pre-shredded bags look convenient, but they are coated in things like cellulose to stop them from clumping in the bag. Well, that stuff also stops them from melting smoothly into your sauce. We already talked about the killer combination: sharp cheddar for that punch, Gruyère for a lovely, nutty depth, and Monterey Jack for pure, unadulterated gooiness. Stick to the blocks, freshly grated is the key to avoiding graininess.
Achieving a Southern Baked Mac and Cheese Flavor Profile
If you are making this for a special gathering, say a Sunday dinner or a holiday potluck, you can easily push this toward that deep, ultra-rich flavor profile people expect from Southern baked mac and cheese. If you want extra decadence, swap out about a half-cup of the whole milk for evaporated milk. It adds a richness and density to the sauce that is just heavenly. It’s a simple swap that gives you huge flavor payoff.
Also, don’t forget that wonderful make-ahead tip from the recipe notes! You can totally assemble this whole thing a day before—cover it tightly and keep it in the fridge. Just remember to let it bake for about 10 to 15 extra minutes if you are baking it straight from the cold. This way, you handle all the work before your guests even arrive. You can check out some other great crispy topping ideas here!
Making This Baked Mac and Cheese Recipe Your Family Favorite
Once you have this core recipe down, it’s begging for you to put *your* spin on it! That’s how dishes become a true family favorite mac and cheese, right? This is substantial enough that it can certainly stand on its own as an easy comfort food, but it’s also robust enough to handle any addition you throw at it. It’s always the first thing gone at any party, so having a solid recipe that travels well makes it the ultimate choice for potluck mac and cheese ideas when you need something that wins all the compliments.
Easy Variations for Oven Baked Cheesy Pasta
If you want to level up this oven baked cheesy pasta just before it goes into the oven, I have a few go-to moves. For savory richness, toss in some cooked, crumbled bacon or even some crispy fried onions along with that panko topping. If you enjoy green things, a fine sprinkling of fresh thyme or parsley tossed into the cheese sauce right before mixing the pasta adds a beautiful freshness that cuts through the richness.
And if you want to surprise your guests, a few dashes of your favorite hot sauce mixed right into the cheese base adds a lovely background heat without making it spicy. Everyone seems to love customizing their own plate of cheesy goodness. Be sure to check out how Molly manages her crowd-pleasing bake, too—it’s always inspiring!
Storing and Reheating Your Comfort Food Macaroni
Even the most epic comfort food macaroni gets leftovers! And while this dish is absolutely best right out of the oven, that doesn’t mean you should waste any of those cheesy, creamy ounces the next day. We need a plan to get that richness back without drying out the pasta, which is always the scary part about leftovers.
For refrigeration, let the mac and cheese cool down completely on the counter—this takes about an hour or so. Once cool, cover that baking dish tightly with plastic wrap, then maybe some foil over the top just to be safe. It will keep beautifully in the fridge for 3 or maybe 4 days. If you are making this for a massive holiday meal, you can absolutely freeze leftovers! Transfer the cooled mac and cheese into an airtight, freezer-safe container. It freezes well for up to three months. Make sure you use a heavy-duty container or wrap it super well to avoid freezer burn.
Reheating is where you need to be gentle if you want to recapture that gooey texture. Never, ever reheat this uncovered in the microwave; it just sucks every drop of moisture right out! If you are reheating a small portion, splash in a teaspoon of milk (or even just water) over the serving before microwaving it in short 30-second bursts. Stir in between those bursts until it’s hot.
For larger amounts, or if you want that lovely crispy top back, the oven is your friend. Pop the leftovers (still in the dish, covered loosely with foil) into a 350°F (175°C) oven for about 15 to 20 minutes to warm through. If you want that top to crisp again, take the foil off the last 5 minutes of baking. If you froze it, thaw it overnight in the fridge first, then reheat as directed above, adding a little extra liquid because that pasta soaks up everything while sitting!
These little tricks ensure you get a delicious second (or third!) meal when you whip up a batch of quick, easy one-pot beans and rice while you’re waiting for your mac and cheese encore!
Serving Suggestions for This Casserole Side Dish
Because this is truly the ultimate casserole side dish, you need main courses that can stand up to its cheesy richness! For holiday spreads, I almost always pair this with a beautiful baked ham or perhaps my smoky pulled pork. The saltiness of the meat is the perfect balance to the decadent sauce.
If you’re keeping it simpler, this mac and cheese makes a fantastic partner for something bright. Try it alongside my easy chicken tortilla soup for a surprisingly comforting dinner mashup, or serve it with a crisp green salad that has a sharp vinaigrette. And, of course, you can never go wrong bringing this alongside a big bowl of creamy garlic mashed potatoes when it’s time to feast. You can check out this idea for pairing if you need more inspiration!
Frequently Asked Questions About Our Baked Mac and Cheese Recipe
I get so many questions about this recipe because everyone wants that perfect outcome. These are the things I hear most often, so let’s clear up any confusion so you can focus on the eating!
Is this truly the best baked mac and cheese recipe for a holiday gathering?
Oh, absolutely! This baked mac and cheese recipe is totally designed for holidays. It’s easy to make ahead of time, it feeds a massive crowd without shrinking in the process, and most importantly, the topping stays crunchy even if it sits on the buffet for a little while. It’s robust enough to hold up to the chaos of Thanksgiving dinner, which is where I usually debut it!
How do I ensure I get that rich gooey baked pasta texture every time?
That gooey factor comes down to two little secrets. First, it’s the milk—using whole milk is important. Second, it’s the cheese blend. When you pull that Gruyère and Monterey Jack into the sauce, they melt beautifully. But the biggest trick is making sure you don’t overbake it! Once the topping is golden and the sauce is bubbly, pull it out. Letting it rest for those 10 minutes helps the sauce settle around the noodles, creating that luxurious, thick, gooey texture instead of a watery mess.
Can I substitute the cheese blend if I don’t like Gruyère?
You certainly can experiment, but remember that every cheese plays a role! If you hate Gruyère, try using Gouda or Fontina instead. Both will melt beautifully and provide that creamy slip we need. Just try to keep a good melting cheese (like Monterey Jack) and a sharp flavor cheese (like the Cheddar) in the mix, and keep the total amount the same. I always encourage people to personalize their favorite side dishes!
Can I make this entirely ahead of time?
Yes! I often assemble the whole thing—pasta mixed, sauce poured, topping sprinkled—and then cover it really well and stick it in the fridge overnight. The only catch is that cold pasta soaks up liquid while it chills. So, when you bake it the next day, just add about 10 to 15 extra minutes to the baking time to make sure it heats all the way through evenly.
Share Your Homemade Macaroni and Cheese Success
Now that you’ve pulled that glorious, golden slab of perfection out of your oven, the job isn’t quite done! I truly believe that the best recipes get better with time, especially when everyone starts tinkering a little. I want to see what you did with this ultimate baked macaroni and cheese recipe!
Did you use a mix of smoked Gouda instead of Gruyère? Did you sneak some hidden veggies in there for your picky eaters? Tell me everything in the comments below! Leaving a star rating is super helpful for me and for other home cooks trying to decide on their next big comfort meal.
And please, if you took a photo of your bubbly, cheesy masterpiece, tag me! I absolutely live to see your results. Sharing our kitchen wins is what this whole community is about. Pop over to my About Page if you want to read more about how we share recipes here. I can’t wait to read your feedback on this cheesy goodness!
PrintUltimate Creamy Baked Mac and Cheese Recipe with Crispy Topping

This recipe delivers the ultimate comfort food: a creamy, cheesy interior contrasted by a perfectly golden, crispy topping. It is easy to make and ideal for feeding a crowd at holidays or potlucks.
- Prep Time: 15 min
- Cook Time: 30 min
- Total Time: 45 min
- Yield: 8 servings 1x
- Category: Side Dish
- Method: Baking
- Cuisine: American
- Diet: Vegetarian
Ingredients
- 1 pound elbow macaroni
- 6 tablespoons unsalted butter
- 1/2 cup all-purpose flour
- 4 cups whole milk, warmed
- 1 teaspoon salt
- 1/2 teaspoon black pepper
- 1/4 teaspoon ground nutmeg
- 1/2 teaspoon dry mustard powder
- 1/4 teaspoon paprika
- 1/4 teaspoon cayenne pepper (optional)
- 8 ounces sharp cheddar cheese, shredded
- 4 ounces Gruyère cheese, shredded
- 4 ounces Monterey Jack cheese, shredded
- 1 cup panko breadcrumbs
- 2 tablespoons melted butter (for topping)
Instructions
- Preheat your oven to 375°F (190°C). Lightly grease a 9×13 inch baking dish.
- Cook the elbow macaroni according to package directions until just al dente. Drain well and set aside. Do not overcook the pasta.
- While the pasta cooks, prepare the cheese sauce. In a large saucepan over medium heat, melt the 6 tablespoons of butter.
- Whisk in the flour to create a roux. Cook, stirring constantly, for 1 to 2 minutes until the mixture is smooth and light golden. Do not let it brown.
- Gradually whisk in the warm milk until the mixture is smooth. Continue cooking, stirring often, until the sauce thickens enough to coat the back of a spoon, about 5 to 8 minutes.
- Remove the saucepan from the heat. Stir in the salt, pepper, nutmeg, dry mustard, paprika, and cayenne pepper, if using.
- Add the shredded cheddar, Gruyère, and Monterey Jack cheeses to the sauce. Stir until the cheese is completely melted and the sauce is smooth and rich. This is your best cheese sauce for baking.
- Add the cooked and drained macaroni to the cheese sauce. Stir gently until all the pasta is evenly coated.
- Pour the macaroni and cheese mixture into the prepared baking dish.
- In a small bowl, toss the panko breadcrumbs with the 2 tablespoons of melted butter. Sprinkle the buttered panko evenly over the top of the macaroni and cheese.
- Bake for 20 to 25 minutes, or until the sauce is bubbly and the topping is golden brown and crisp.
- Let the baked mac and cheese rest for 5 to 10 minutes before serving.
Notes
- For the creamiest result, shred your own cheese. Pre-shredded cheese often contains anti-caking agents that prevent smooth melting.
- If you are preparing this for a holiday mac and cheese event, you can assemble the entire dish (steps 1 through 6) a day ahead. Cover and refrigerate. Add 10-15 minutes to the baking time if baking straight from the refrigerator.
- For a Southern baked mac and cheese flavor, substitute a small amount of the milk with evaporated milk.
Nutrition
- Serving Size: 1 serving
- Calories: 550
- Sugar: 5
- Sodium: 650
- Fat: 35
- Saturated Fat: 20
- Unsaturated Fat: 15
- Trans Fat: 1
- Carbohydrates: 40
- Fiber: 2
- Protein: 25
- Cholesterol: 90