

There’s this specific smell—warm yeast mingling with melted cinnamon sugar—that instantly transports me back to my childhood kitchen, even though my life is chaos now. I know that feeling: you just need that perfect, bakery-style moment, but who has the time for complicated overnight doughs? Well, I wrestled with that problem, and I broke the code on the ultimate soft, gooey homemade cinnamon buns that stand up against any professional joint. Forget dry, disappointing rolls; these are the ones that disappear within minutes at any gathering. Baking these specific cinnamon buns is my secret weapon when I need real comfort, and I’m thrilled to share how simple the process actually is.
- Why These Are The Best Homemade Cinnamon Buns Recipe You Will Ever Make
- Gathering Ingredients for Your Soft and Fluffy Buns
- Step-by-Step: Making Cinnamon Buns From Scratch Baking
- Baking Your Warm Sweet Rolls to Golden Perfection
- Preparing the Cream Cheese Frosting Recipe for Cinnamon Buns
- Make-Ahead & Freezer Tips for Overnight Cinnamon Buns
- Tips for Success When Making Cinnamon Buns at Home
- Serving Suggestions for Your Comfort Food Baking
- Frequently Asked Questions About These Cinnamon Buns
Why These Are The Best Homemade Cinnamon Buns Recipe You Will Ever Make
I’ve tested so many recipes trying to nail that perfect texture, and this one works every single time. It’s about balancing moisture and structure in the dough, which is why these turn into truly soft and fluffy buns. You get that genuine bakery style cinnamon rolls quality without needing professional equipment. Seriously, they are next level! If you want a quick version that still honors the yeast process, check out my notes on making these fast-rise yeast rolls recipe adaptation.
- The dough hydrates perfectly during the 8-minute knead for that beautiful elasticity.
- We use two rises—the first is long, the second is short—to develop that amazing flavor depth.
- The filling application method ensures every single roll gets drenched in flavor.
It’s foolproof, which is exactly what we need for weekend brunch ideas, right?
Achieving That Irresistible Gooey Factor in Your Cinnamon Buns
The real magic for gooey factor isn’t just the amount of sugar; it’s how we mix it with the butter. Instead of sprinkling dry sugar, we create a thick paste using the melted butter and packed brown sugar before spreading it. Because the butter is already liquid and spreadable, it permeates the dough better during the roll-up phase. This paste melts perfectly during baking, creating that caramelized, saucy layer that you just can’t beat. Trust me, don’t skip mixing that paste first!
Gathering Ingredients for Your Soft and Fluffy Buns
Okay, before we get into the fun part—the kneading—we have to talk ingredients. For these cinnamon buns to be truly legendary, temperature matters. That milk you warm up for the yeast? It needs to be between 105°F and 115°F. If it’s too hot, you kill the yeast, and we need that yeast awake and bubbly! Also, make sure those two large eggs are sitting out for a bit so they are room temperature; that helps them incorporate smoothly into the dough.
We are using exactly 4 cups of All-Purpose flour, and don’t try to swap it for bread flour here; we want that classic tender texture! If you’re looking for a way to bake these quicker, I talk about a hack using heavy cream alongside the yeast activation in another post, but for this core recipe, stick to the list. You can see the full breakdown below, but remember, room temp for the yeast mixture, softened for the dough butter, and melted for the filling butter!
Ingredient Notes and Substitution Tips
Since we are aiming for a tender crumb, stick with standard all-purpose flour here. Bread flour has too much protein and can make your sweet dough taste slightly chewy, which isn’t what we want for these fluffy sweet dough rolls. Also, see how the butter is listed three different ways? That’s crucial! The butter softened for the dough helps create structure during creaming, while the butter melted for the filling ensures that glorious, gooey swirl.
And pay close attention to the yeast! This recipe specifically calls for active dry yeast for that reliable first rise. If you only have instant, that’s okay, but I’ll cover the slight adjustment if you check out my “Irresistible Cinnamon Buns Recipe with Active Dry Yeast in 2 Hours” guide.
Step-by-Step: Making Cinnamon Buns From Scratch Baking
Alright, this is where the fun starts, and I promise, this entire process is totally manageable, even if you usually stick to box mixes! We begin by getting that yeast active—it needs about five to ten minutes to get foamy, which tells us it’s ready to work magic on our fluffy sweet dough. Once combined, we hit that stand mixer for the kneading phase. If you skip the stand mixer, don’t panic; your arms will get a workout, but we need that smooth, elastic dough! If you’re feeling fancy and want to try a brown butter glaze later, I saw one from Edd Kimber that looked incredible, but for now, let’s nail the basics; you can check out the brown butter cream cheese glaze idea when you’re ready to get experimental.
Next up is waiting—and this is the hardest part! That first rise is non-negotiable; cover that oiled bowl and let it chill and grow for a full hour to an hour and a half, or until it has noticeably doubled in size. This development time is what separates your roll from a chewy disk and a magnificent, soft treat. If you want to see how to make these overnight, check out the details for the ooey-gooey cinnamon buns later in the guide!
Mastering the Cinnamon Swirl Dough
Kneading used to terrify me! My first batch of dough for these sweet rolls came out lumpy and sad. But now, I know the drill: aim for 6 to 8 minutes on medium-low speed in your mixer. You’re looking for the dough to pull cleanly away from the sides of the bowl and look smooth, almost like silk. When the dough is ready, it should pass the windowpane test—you can stretch a small piece thin enough to see light through it without tearing. Once it hits that point, cover it up; the goal for that first rise is that beautiful doubling in size.
Rolling and Cutting Your Cinnamon Buns
Once the dough has had its beauty sleep, gently punch it down, and then it’s time for the roll-out. You need a big, even rectangle here—I always aim for about 12 by 18 inches—not too thin, not too thick. Spread that intensely flavorful cinnamon-butter paste right over the top, but seriously, leave about a half-inch border bare on one of the long sides. That empty edge is what helps you seal the deal! Roll it up super tight, starting from the side with the filling, and make sure you pinch that final seam closed. If you don’t pinch it, your rolls try to unravel in the oven, and nobody wants that disaster! Now, slice it into 12 even portions.

Baking Your Warm Sweet Rolls to Golden Perfection
We’ve done the hard work making the dough and wrapping up those glorious swirls; now we let them rest one last time. Don’t rush this second rise! Cover those rolls loosely in the pan, and let them get nice and puffy for about 30 to 45 minutes. They should look happy and expanded before they hit the heat. While they’re puffing, make sure your oven is humming along at 375°F (190°C). The key to getting that perfect warm sweet rolls look is watching them closely after the 20-minute mark.
You are looking for the tops to be a rich, beautiful golden brown. If they look pale, they probably need a couple more minutes. If the edges near the pan start looking too dark too quickly, you can always loosely tent them with foil. When they come out, the aroma alone will tell you you’ve succeeded, but the golden tops confirm you’ve baked them just right for that soft center.
Preparing the Cream Cheese Frosting Recipe for Cinnamon Buns
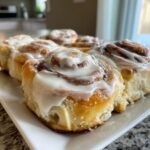
Let’s be honest, these homemade cinnamon rolls aren’t complete without that luscious topping, and the cream cheese frosting recipe here is perfection! While the buns are cooling for just a minute after they come out of the oven—remember, we want them warm, not piping hot—get your mixer ready.
We need to beat the softened cream cheese and softened butter together until they are completely smooth. Then, slowly introduce the powdered sugar and vanilla. The secret to that perfectly spreadable consistency is adding your milk or cream one tablespoon at a time. Don’t just dump it in! You want that frosting just loose enough to melt slightly into the warm tops, creating that famous irresistible gooey layer everyone fights over. Don’t forget to check out the amazing finished look over at Food Meld for some inspiration!
Make-Ahead & Freezer Tips for Overnight Cinnamon Buns
I know, I know, who wants to wake up at 6 AM to start dough? That’s why these are fantastic for having them ready to grace your table when you finally wake up. For my overnight cinnamon buns trick, just assemble everything—roll them up, cut ’em, and place them snugly in that greased 9×13 dish. Then, cover that whole thing super tightly with plastic wrap. I mean, really wrapped! Pop it in the fridge for up to 12 hours.
When morning comes, pull them out, let them sit on the counter for about an hour to start puffing up, and then bake! Just remember, because they start cold, you’ll need to add an extra 5 to 10 minutes onto that bake time we talked about. If you want an idea of what incredible ooey-gooey results look like, you absolutely have to see what they did over at AllRecipes.
Tips for Success When Making Cinnamon Buns at Home
You’ve made the dough, you’ve rolled the spirals, but what happens when the kitchen throws a curveball? Don’t stress! Troubleshooting is part of making cinnamon buns at home, and I’ve got the fixes. If your dough seems sluggish and won’t rise during that first rest, try moving the bowl somewhere warmer—maybe near a pilot light or in an oven with just the light on for a boost. Remember, yeast is alive and needs warmth!
If you don’t have a stand mixer, no worries at all. Hand kneading for these yeast rolls recipe components takes about 10 minutes, just give it a little elbow grease until that dough feels smooth and springs back when poked. I’ve actually shared a few quick tips on my site about kneading techniques if you want a visual guide to keep your fluffy cinnamon rolls coming out perfectly every time. Ultimately, patience with the rise time is the secret handshake for success!
Serving Suggestions for Your Comfort Food Baking
Now that you’ve created these absolute showstoppers, how should you serve them? Honestly, they are fantastic on their own, fresh out of the pan! But if you’re styling these for a big spread, they scream weekend brunch ideas. I always pair them with a strong, dark roast coffee—the bitterness cuts through that rich cream cheese frosting beautifully.
If you’re feeling like this is too much dessert for breakfast, balance it out with something bright! A bowl of fresh berries or sliced oranges adds just the right fresh counterpoint. These are always my go-to holiday morning treats because they smell like Christmas morning, even in July. Have a look at how my friend styled hers after using this recipe; she made them look incredible over at Nom Nom Recipes!
Frequently Asked Questions About These Cinnamon Buns
When you’re deep into from scratch baking, questions always pop up, and that’s totally fine! We want everyone to achieve the same amazing results with these homemade cinnamon rolls. I get asked most often about yeast substitutions. Since this recipe relies on active dry yeast for that robust first rise, if you only have instant yeast, you can skip the bubbling step entirely and mix it straight in with your flour. Easy switch!
Another huge question is about skipping that second rise—please don’t! That brief warm rest before baking is what gives you those puffy, gooey cinnamon glaze-ready tops. If you skip it, you end up with dense rolls. If you’re short on time, however, remember the overnight method is better than skipping the rise entirely. You can find more tips about getting these perfect every time over at Fraiche Living!
How to Store and Reheat Leftover Cinnamon Buns
If, by some miracle, you have leftovers of these irresistible breakfast dessert items, store them in an airtight container at room temperature for up to three days. Don’t refrigerate them unless you absolutely have to, as that dries them out faster! When you crave one, the best way to reheat it is unwrapped in the microwave for about 15-20 seconds. That brings back that fresh-from-the-oven, wonderfully warm texture instantly.
PrintThe Ultimate Soft and Gooey Homemade Cinnamon Buns with Cream Cheese Frosting
Make bakery-style cinnamon rolls at home. This recipe delivers soft, fluffy buns with a rich, gooey cinnamon-sugar filling and a luscious cream cheese glaze. It is perfect for weekend brunch or holiday mornings.
- Prep Time: 30 min
- Cook Time: 25 min
- Total Time: 2 hr 5 min
- Yield: 12 servings 1x
- Category: Breakfast
- Method: Baking
- Cuisine: American
- Diet: Vegetarian
Ingredients
- 1 cup whole milk, warm (105°F to 115°F)
- 2 1/4 teaspoons active dry yeast
- 1/2 cup granulated sugar, plus 1 teaspoon for yeast
- 1/2 cup unsalted butter, softened
- 2 large eggs, room temperature
- 4 cups all-purpose flour, plus more for dusting
- 1 teaspoon salt
- 1/2 cup unsalted butter, melted (for filling)
- 1 cup packed light brown sugar (for filling)
- 3 tablespoons ground cinnamon (for filling)
- 1/2 cup cream cheese, softened (for frosting)
- 1/4 cup unsalted butter, softened (for frosting)
- 2 cups powdered sugar (for frosting)
- 1 teaspoon vanilla extract (for frosting)
- 1–2 tablespoons milk or heavy cream (for frosting)
Instructions
- Activate the yeast: In a small bowl, combine the warm milk, 1 teaspoon of sugar, and the yeast. Let stand for 5 to 10 minutes until foamy.
- Make the dough: In the bowl of a stand mixer fitted with the dough hook, combine the remaining granulated sugar, softened butter, eggs, salt, and the yeast mixture. Mix on low speed until combined.
- Gradually add the flour, mixing on low speed until a shaggy dough forms. Increase speed to medium-low and knead for 6 to 8 minutes until the dough is smooth and elastic.
- First rise: Place the dough in a lightly oiled bowl, turning to coat. Cover the bowl with plastic wrap and let it rise in a warm place for 1 to 1.5 hours, or until doubled in size.
- Prepare the filling: While the dough rises, mix the melted butter, brown sugar, and cinnamon together in a small bowl until it forms a thick paste.
- Shape the rolls: Punch down the risen dough. On a lightly floured surface, roll the dough into a large rectangle, about 12×18 inches. Spread the cinnamon-sugar filling evenly over the dough, leaving a small border on one long edge.
- Roll and cut: Starting from the long edge opposite the border, tightly roll the dough into a log. Pinch the seam closed. Cut the log into 12 equal pieces.
- Second rise: Arrange the rolls cut-side up in a greased 9×13 inch baking dish. Cover loosely and let rise again for 30 to 45 minutes until puffy.
- Bake: Preheat your oven to 375°F (190°C). Bake for 20 to 25 minutes, or until the tops are golden brown.
- Make the frosting: While the buns cool slightly, beat the softened cream cheese, softened butter, powdered sugar, and vanilla extract until smooth. Add milk or cream one tablespoon at a time until you reach a spreadable consistency.
- Frost and serve: Spread the cream cheese frosting generously over the warm cinnamon buns immediately after removing them from the oven. Serve warm for the best gooey texture.
Notes
- For overnight cinnamon buns, assemble the rolls in the baking dish, cover tightly with plastic wrap, and refrigerate for up to 12 hours before the second rise and baking. Add 5-10 minutes to the baking time if baking directly from the refrigerator.
- Use heavy cream instead of milk in the frosting for an extra rich flavor.
- If you do not have a stand mixer, you can knead the dough by hand on a lightly floured surface for about 10 minutes.
Nutrition
- Serving Size: 1 roll
- Calories: 450
- Sugar: 35g
- Sodium: 350mg
- Fat: 22g
- Saturated Fat: 13g
- Unsaturated Fat: 9g
- Trans Fat: 0.5g
- Carbohydrates: 58g
- Fiber: 2g
- Protein: 7g
- Cholesterol: 65mg