

Some desserts are just legendary, right? They get famous for a reason, and you always wonder if you can actually recreate that magic at home without spending a fortune. Well, stop wondering! Because today, we are tackling the incredible, world-famous treat that everyone raves about: the banana pudding.
I spent ages testing and tweaking to perfect my own version of the Magnolia Bakery Famous Banana Pudding copycat. This isn’t just any recipe; this is my promise to you that you can achieve that ultra-creamy banana pudding consistency without any fuss or complicated cooking. It’s easy, it’s glorious, and it really delivers on that comforting, classic flavor we crave. Trust me, once you nail this simple, layered dessert, you’ll never want another recipe.
- Why This Magnolia Bakery Banana Pudding is the Best Dessert for Potluck
- Gathering Ingredients for Your Creamy Banana Pudding
- Step-by-Step Instructions for Perfect Magnolia Bakery Banana Pudding
- Tips for Success When Making This Easy Banana Pudding Recipe
- Ingredient Notes and Substitutions for Your Banana Pudding
- Serving Suggestions for Your Sweet Southern Treat
- Storage and Reheating Instructions for Leftover Banana Pudding
- Frequently Asked Questions About This Banana Pudding Recipe
- Estimated Nutritional Data for Your Creamy Layered Trifle
- Share Your Favorite Comfort Dessert Creations
Why This Magnolia Bakery Banana Pudding is the Best Dessert for Potluck
Listen, if you need something that disappears off the dessert table faster than anything else, this cream-filled wonder is IT. It’s unbelievably easy, which saves my sanity when I’m juggling five other things for a party. Plus, it just tastes like happy gatherings!
Here is why this easy banana pudding recipe is my secret weapon for any big event:
- No-Bake Simplicity: Seriously, zero oven time! Anyone can handle this after a long day.
- Crowd-Pleasing Flavor: Who doesn’t love bananas, vanilla wafers, and rich cream? It hits every note.
- Perfect Texture After Chilling: That magical time in the fridge turns crunchy wafers into a soft, cake-like layer. It’s texture perfection.
- Classic Layered Dessert: Visually, it looks impressive in a big glass dish, even though it took barely any effort.
Gathering Ingredients for Your Creamy Banana Pudding
Okay, get ready for the best part about this specific, amazing recipe: the ingredient list is so short and accessible! This is exactly what makes it such an easy banana pudding recipe. We aren’t fussing with making pudding from scratch today; we are using the magic of instant mixes to get that incredible, creamy banana pudding base sorted quickly.
You don’t need a long shopping list, but you do need to make sure you grab both sizes of the instant pudding boxes—don’t skip one! Also, make sure your bananas are at that perfect stage: ripe enough to be sweet, but still firm enough to hold up once they soak in all that delicious liquid.
Here is everything you need to line up for assembly:
- 1 (14 ounce) can sweetened condensed milk
- 1 (5 ounce) box instant vanilla pudding mix
- 1 (3.4 ounce) box instant vanilla pudding mix (the smaller one!)
- 4 cups cold water
- 1 (8 ounce) container frozen whipped topping, thawed
- 1 (11 ounce) box vanilla wafers
- 4 large ripe bananas, sliced
Step-by-Step Instructions for Perfect Magnolia Bakery Banana Pudding
Now we get to the fun part! This isn’t baking, but the assembly requires the same kind of careful attention if you want that signature creamy banana pudding texture that makes this famous recipe so beloved. We are moving quickly here, so have all your ingredients ready to go. Remember, a little patience during the initial mixing means a world of difference later on.
I always follow these steps religiously when I make this classic layered dessert. If you check out my page on simple, delicious desserts, you know I value method!
Mixing the Pudding Base for Your Banana Pudding
First things first: get your liquids and mixes together right. In a big bowl—the bigger the better, honestly, because splashing is inevitable—you need to whisk the sweetened condensed milk, both boxes of your instant vanilla pudding mix (yes, both!), and all four cups of the *ice-cold* water. Whisk this until it’s totally smooth and there aren’t any dry pockets of powder hiding at the bottom. You’re looking for a uniform color.
After whisking, let it sit there for about five minutes. This gives the magic of instant pudding a tiny head start. Once it’s a little thicker, gently, gently fold in your thawed whipped topping. I mean *fold*, not beat! We want to keep all that air in there. Be patient; you’re aiming for a fluffy, smooth pudding, the absolute dream for any creamy banana pudding.
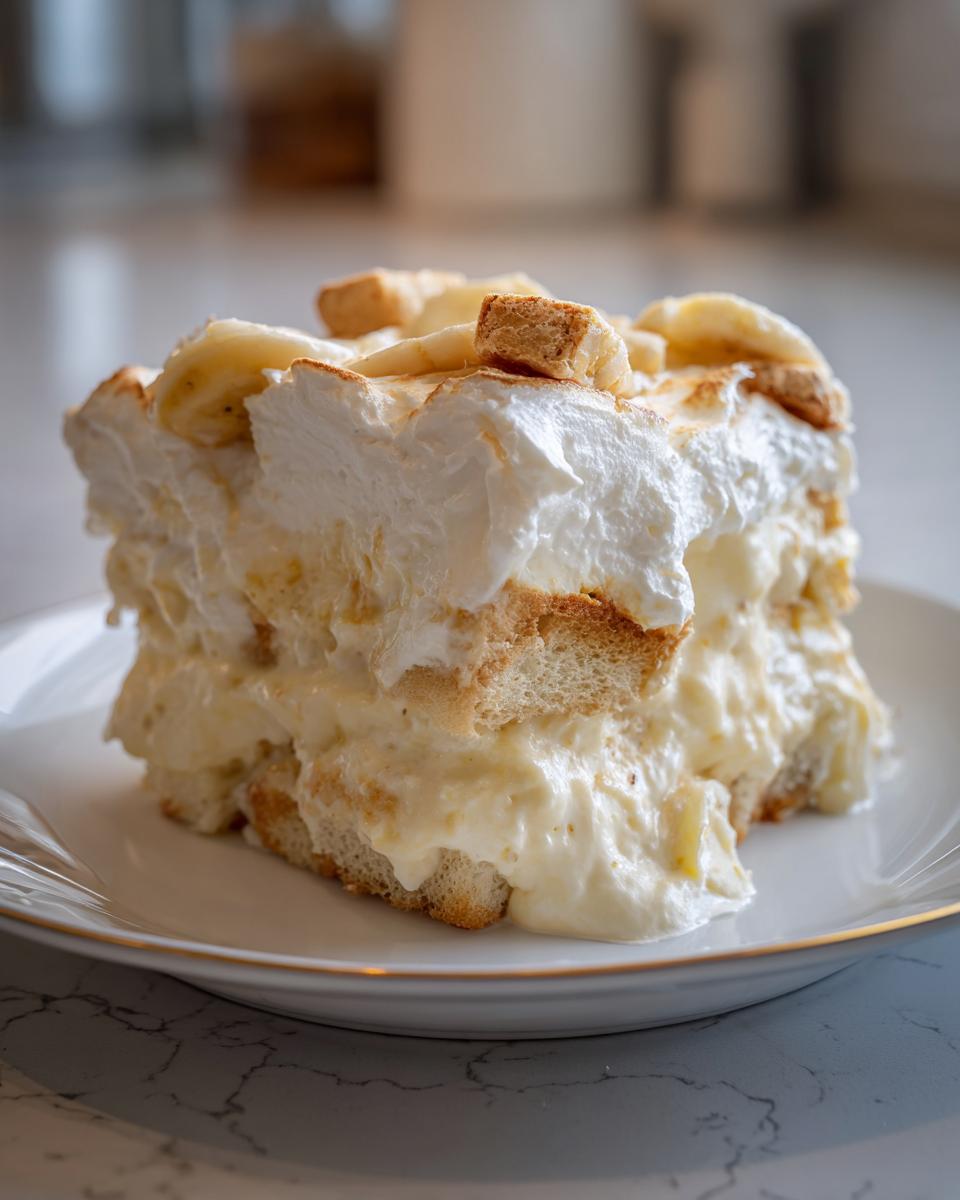
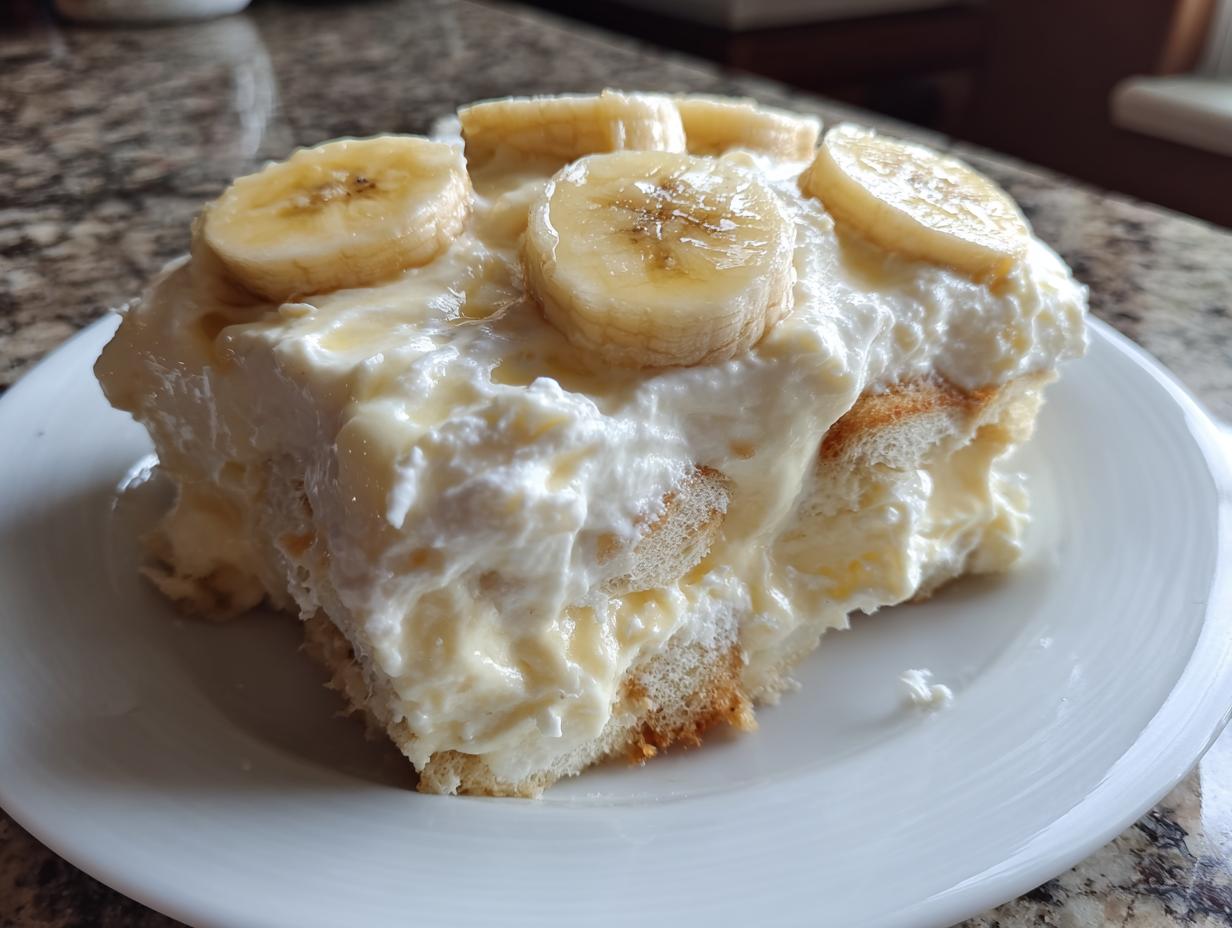
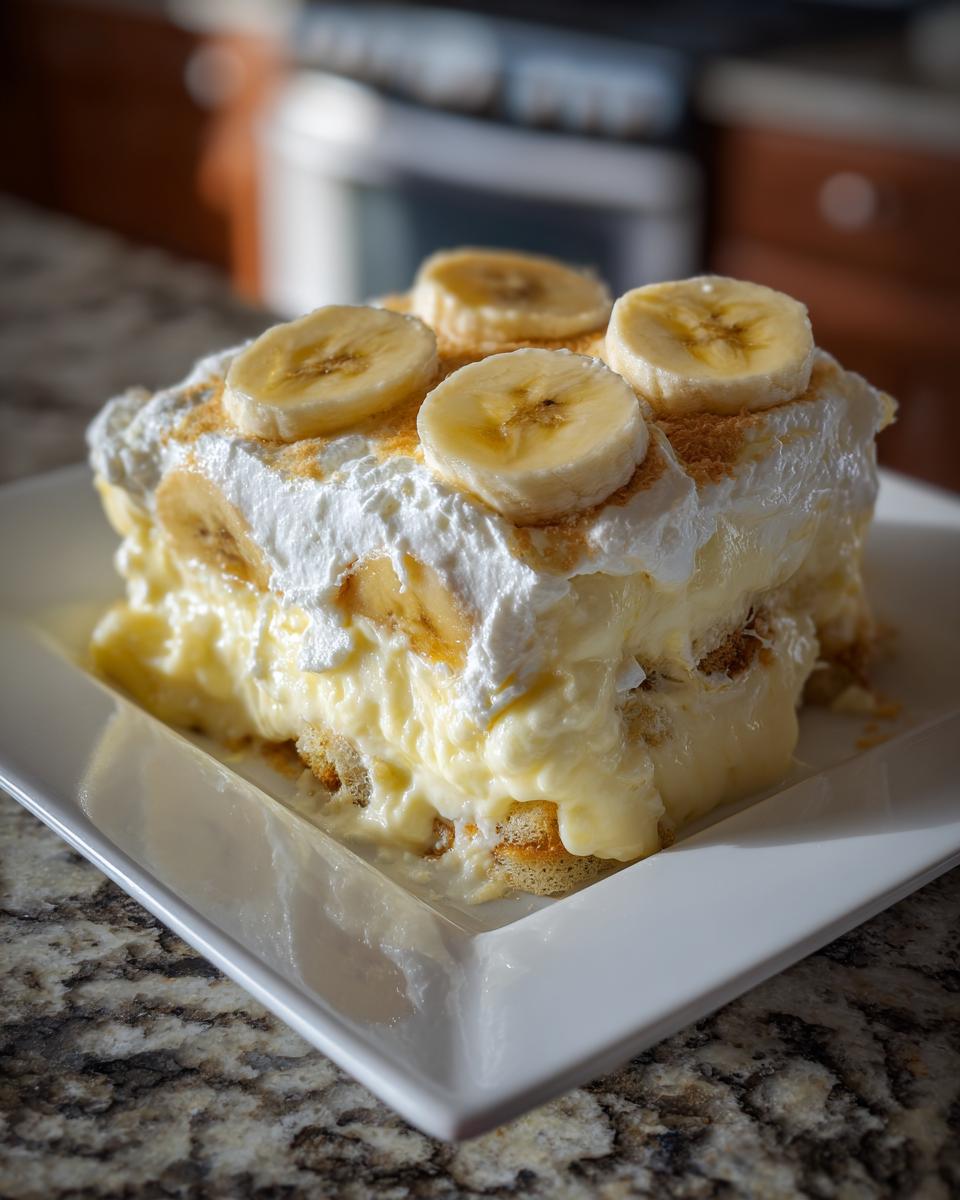
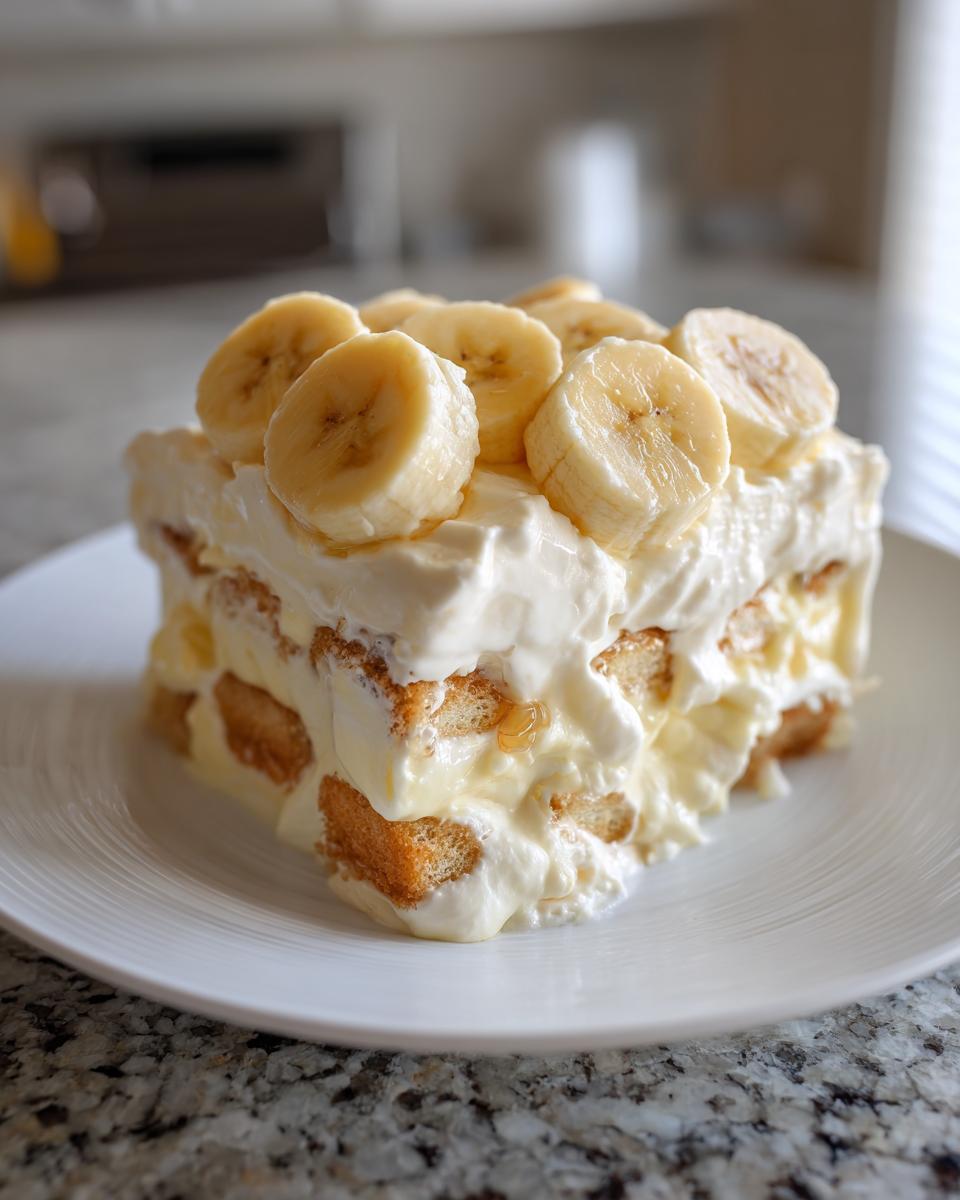
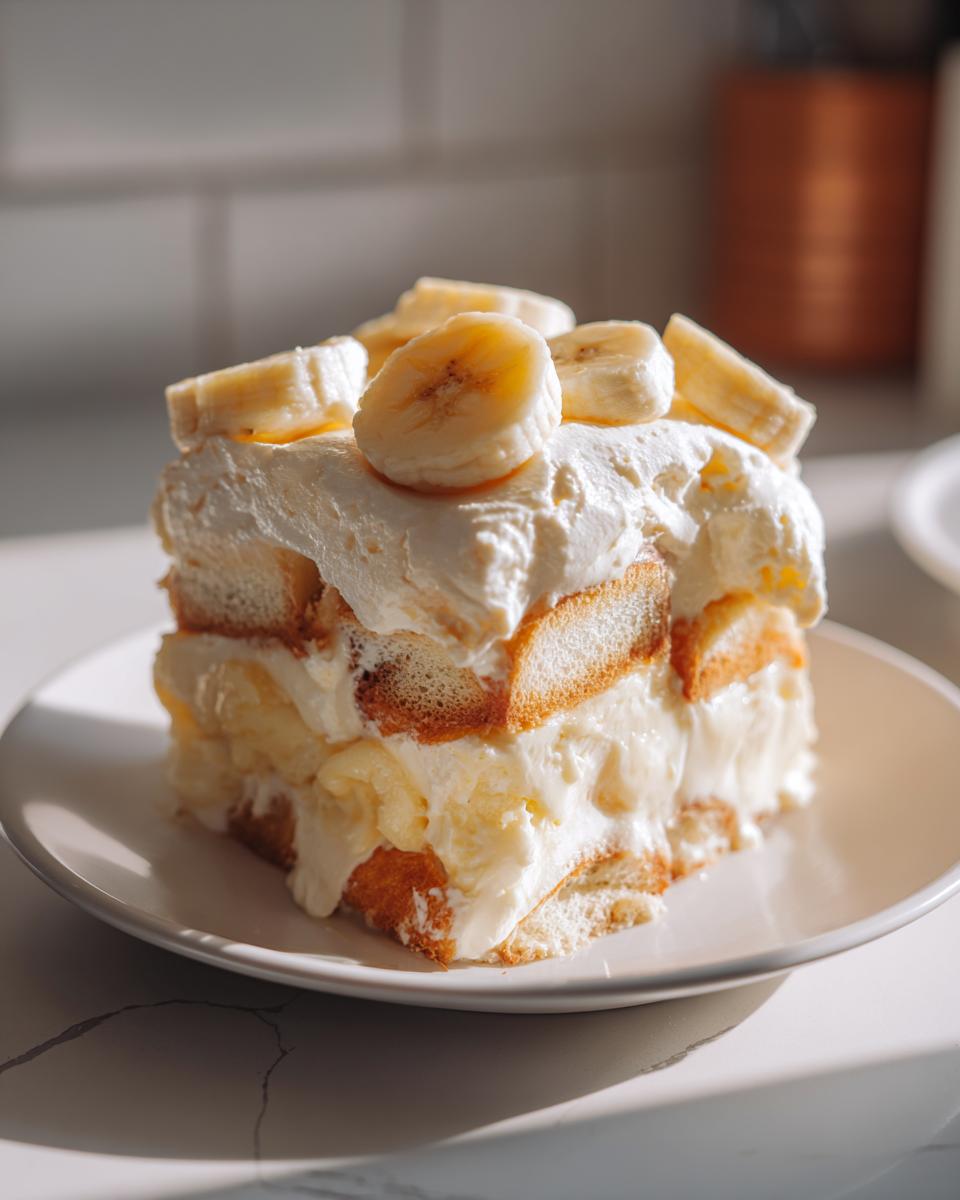
Layering the Classic Layered Dessert
Time to build! Grab your pretty glass bowl or trifle dish—presentation matters for this sweet southern treat. Do not start building until the pudding base is ready to go. Start super light: just a thin, almost sneaky layer of pudding right on the bottom of the dish. This prevents the wafers underneath from getting totally soggy right away.
Next up, we cover that pudding with a layer of vanilla wafers. Don’t stack them perfectly; just make sure they cover the surface edge to edge. Then, lay down a beautiful layer of your sliced bananas. Then we just repeat! Pudding, wafers, bananas. Keep going until your bowl is full, always finishing with that luscious pudding mixture right on top.
Chilling Time: The Secret to Soft Vanilla Wafer Dessert
Now, this next part is the most crucial, and honestly, the hardest part when you are hungry! You must cover that magnificent creation tightly with plastic wrap. This is where the transformation happens. You need to chill this no bake banana pudding for a minimum of four hours. I know, I know, it’s torture.
But trust me on this: chilling is non-negotiable because it allows the wafers to drink up all that creamy pudding. They stop being crunchy cookies and start becoming this tender, slightly cakey layer. If you can swing it, letting this sit overnight is when you achieve the absolute best texture. When it comes out of the fridge, it’s ready to be served cold!
Tips for Success When Making This Easy Banana Pudding Recipe
Since this is designed to be an easy banana pudding recipe, we want to make sure zero hiccups happen! Even though we skip the stove, a few small details make the difference between a good dessert and the best banana pudding ever. I only use instant pudding mixes here because if you mess around with cook-and-serve, you’ll end up with something heavy, not the light, creamy texture we are aiming for.
Also, think about presentation early on. While a big trifle dish is stunning, sometimes using individual banana pudding cups is genius. It makes serving so simple, especially if you’re taking this sweet southern treat to a potluck! No digging around with serving spoons!
Here are my must-know tricks for perfect results every time:
- Don’t Sweat the Ripe Bananas: You want those beautiful yellow bananas just starting to get those little brown sugar spots on the peel. Overly green ones won’t have the sweetness we need, and super mushy ones break down too much during chilling. Firm, ripe is the goal!
- Keep it Cold During Mixing: The colder your water is for activating the pudding, the quicker and firmer your base sets up. Don’t use room-temperature water, even if you’re in a rush.
- Seal It Tight: When you cover the dish for chilling, make sure the plastic wrap doesn’t actually touch the pudding layer if you can help it. If it does, you might get a skin that mars the beautiful creamy surface when you pull it off.
- Wafers First: Always put a small layer of pudding down *before* the first stack of wafers. This acts like glue and lets those wafers start softening immediately.
Ingredient Notes and Substitutions for Your Banana Pudding
Now, I know some of you look at that ingredient list and think, “Can I swap this out for something I already have?” Since this recipe is specifically designed to mimic that famous bakery flavor, we have to be a little careful. If you stray too far here, you might end up with something just good, not the best banana pudding ever!
The fact that we use two different sizes of instant vanilla pudding mix is key. That combination gives us the signature richness and body that distinguishes this from a simple, single-box recipe. Resist the urge to just grab one large box; the ratio of the two boxes gives us that complex, creamy banana pudding base.
The Importance of the Instant Pudding Mixes
This is not the time for cooked pudding, friends! The instant pudding mix is crucial because it interacts perfectly with the cold water and the whipped topping without needing any heat. It sets up quickly but stays incredibly light. That’s the secret sauce for keeping this whole operation a no bake banana pudding miracle. If you try to use a cook-and-serve mix, it will seize up and become thick and heavy when it hits the cold dairy, totally ruining that creamy texture we worked so hard to achieve!
Banana Selection: When is Ripe Too Ripe?
This is an area where a tiny bit of precision really pays off for your sweet southern treat. You want bananas that are fully yellow, maybe showing just a few tiny brown constellation spots. Those are sweet enough! If your bananas are super soft, almost brown all over? Leave those for banana bread. When they are too soft, they turn into banana mush once the wafers start softening, and nobody wants that in their classic layered dessert.
Swapping Out the Thawed Whipped Topping
Most people ask about the whipped topping, and I totally get why. If you prefer using heavy cream and making your own homemade whipped cream, you absolutely can! Just know you’ll need quite a bit more volume of heavy cream (usually about 2 cups) whipped to stiff peaks.
Here’s the catch: homemade whipped cream tends to deflate slightly faster than the stabilized store-bought kind once folded in. If you use homemade, you have to plan on eating this comfort dessert sooner rather than later, ideally within 12 hours. If you need this to hold up for a day-long potluck, stick to the container of thawed whipped topping. It keeps that creamy layered trifle looking perfect for longer.
Serving Suggestions for Your Sweet Southern Treat
Oh, once this beautiful, chilled banana pudding is ready, the real fun begins: eating it! Since this recipe is such a perfect, creamy banana pudding, it feels decadent no matter when you serve it, but it truly shines when paired right.
As a classic comfort dessert, it’s divine when served with a hot cup of coffee after dinner. The slight bitterness of the coffee balances the intense sweetness of the pudding and the wafers perfectly. It’s just comforting, you know? Like a warm hug in a bowl, even when it’s cold!
But let’s be real, this is the best dessert for potluck gatherings across the South. It’s easy to transport—just make sure the lid is secure!—and it feeds a crowd beautifully. If you’re serving it alongside something heavy, like a big holiday spread, you might want to have something bright, like a fresh fruit salad or maybe even something savory and equally iconic like my Southern Sweet Potato Casserole, to balance the richness.
If you made individual banana pudding cups, those are amazing served as a light, pre-dinner treat or even as a satisfying afternoon snack when you need a quick afternoon pick-me-up!
Storage and Reheating Instructions for Leftover Banana Pudding
So, you managed to have leftovers? Congratulations! That means you made something so good people actually stopped eating other things to save room for seconds. This no bake banana pudding is definitely best made fresh, but it keeps shockingly well for a dessert packed with fresh fruit and dairy.
The absolute first rule: cover it up tight and get it back into the refrigerator immediately. Since this creamy banana pudding relies on moisture transfer to soften those wafers, the cold environment helps slow down the banana breakdown process, keeping the structure intact as long as possible.
You can absolutely enjoy this sweet southern treat the next day, and it will still be phenomenal. Honestly, some people argue that the second day is even better because the wafers have fully surrendered to cake status! It usually holds up beautifully for up to three days in the fridge.
Now, let’s talk about freezing. I know, I know, it seems like a good way to save this delicious dessert for later, but please trust me on this one: do not freeze this banana pudding.
Why Freezing Ruins This Classic Layered Dessert
The main culprits here are the whipped topping and the bananas. When you freeze something with whipped topping and then thaw it, it releases all that trapped water. You’ll end up with a watery, separated mess rather than that beautiful, creamy base.
Plus, the bananas just don’t handle the ice crystals well. They end up going brown and mushy the second they start to thaw out. If you absolutely must save some for later, slice off the top layer or two that you know you’ll eat the next day, enjoy that immediately, and then store the rest.
No need to reheat this at all! It’s designed as a cold, refreshing dessert. Just pull it out of the fridge about ten minutes before serving so it loses that severe chill, and it will be absolute perfection!
Frequently Asked Questions About This Banana Pudding Recipe
I get so many questions every time I post this amazing creamy banana pudding! It’s honestly one of my most popular recipes because it’s just so satisfying. Since every cook has slightly different needs, here are answers to the most common things people ask me when they’re getting ready to assemble their layers.
Can I use homemade pudding instead of instant mix for this banana pudding?
Oh, the eternal question! Yes, you *can* technically use a homemade pudding recipe, but I have to give you a heads up: it fundamentally changes what this specific recipe is doing. This Magnolia copycat relies entirely on the reaction between the instant pudding mix, the condensed milk, and the cold water to set up into exactly the creamy, airy texture you see here.
If you are dead-set on having a fully from scratch banana pudding, I totally respect that! But you’ll need a recipe that uses cornstarch or egg yolks and is cooked on the stove. Trying to substitute that in here will likely give you a pudding that never fully sets up, or worse, it breaks when you fold in the whipped topping. For this specific layered dessert, please stick to the instant mix for that classic feel!
What is the best way to make this a no bake banana pudding?
Good news—you’re already doing it! This whole recipe is naturally a no bake banana pudding! That zero cook time is what makes this the perfect dessert for busy days or when you just don’t want to heat up the kitchen. That’s just part of why this is such an easy banana pudding recipe; we skip boiling the milk and tempering eggs entirely.
The only time involved is the chilling time, which is crucial for letting those wafers soften. So, you don’t need to change a thing; the whole process stays stove-free, delivering that delicious, sweet southern treat without turning on a burner!
Estimated Nutritional Data for Your Creamy Layered Trifle
Okay, real talk time. Since we are using specific packaged goods like instant pudding mixes and whipped topping, these numbers are always going to be a little bit of an approximation, but I always like to give you a general idea of what you’re diving into with this amazing creamy layered trifle!
This information is based on the recipe yielding 8 servings. Please know that because we all measure and use different brands of vanilla wafers or condensed milk, your final numbers might shift a little bit. Think of this as a helpful guide rather than a strict guarantee for your comfort dessert.
Here are the general estimates for one generous serving:
- Serving Size: 1 serving
- Calories: 450
- Sugar: 55g (Yes, it’s a treat, but worth every bit!)
- Sodium: 350mg
- Fat: 20g
- Saturated Fat: 10g
- Unsaturated Fat: 10g
- Trans Fat: 0g
- Carbohydrates: 65g
- Fiber: 2g
- Protein: 5g
- Cholesterol: 30mg
I always tell people when you make a dessert like this—a true, indulgent sweet southern treat—you do it because you love it and you want that amazing flavor. We focus on that incredible taste resulting from the easy steps. If you’re watching sugar intake closely, maybe load up on the wafers and bananas and skimp just a tiny bit on the pudding layers, but for the best banana pudding ever experience, enjoy every sweet component!
Share Your Favorite Comfort Dessert Creations
Phew! We made it! You have successfully whipped up what I truly believe is the best banana pudding ever made using simple ingredients. I am so excited for you to try this iconic dessert. It’s such a personal joy for me to share a recipe that brings so much comfort, and seeing your results is what makes all the testing worth it!
Now that you’ve tasted that amazing, creamy banana pudding, I desperately want to know what you thought! Did you make it for a big gathering? Did it totally dominate the dessert table at your last potluck? Did you manage to wait the whole 6 hours before digging in?
Please, pretty please, head down to the comments section below and tell me how it went! If you followed my steps for this incredible sweet southern treat, I’d be thrilled if you could leave this recipe a five-star rating right there on the page. It helps other home cooks find this amazing, easy banana pudding recipe, too!
And if you snap a picture of your beautiful, layered dessert—especially if you made those fun banana pudding cups—tag me on social media! I absolutely adore seeing how you all put your own spin on these classic comfort desserts. Happy eating, friends!
PrintMagnolia Bakery Famous Banana Pudding (Copycat)

Make the classic, creamy layered banana pudding famous from Magnolia Bakery. This no-bake dessert uses simple ingredients for a comforting, satisfying treat.
- Prep Time: 20 min
- Cook Time: 0 min
- Total Time: 4 hr 20 min
- Yield: 8 servings 1x
- Category: Dessert
- Method: No Bake
- Cuisine: American
- Diet: Vegetarian
Ingredients
- 1 (14 ounce) can sweetened condensed milk
- 1 (5 ounce) box instant vanilla pudding mix
- 1 (3.4 ounce) box instant vanilla pudding mix (smaller box)
- 4 cups cold water
- 1 (8 ounce) container frozen whipped topping, thawed
- 1 (11 ounce) box vanilla wafers
- 4 large ripe bananas, sliced
Instructions
- In a large bowl, whisk together the sweetened condensed milk, both boxes of instant vanilla pudding mix, and the cold water until fully combined.
- Let the mixture sit for 5 minutes to allow the pudding to start setting.
- Gently fold in the thawed whipped topping until the mixture is smooth and creamy. This is your pudding base.
- In a large glass bowl or trifle dish, begin layering the ingredients. Start with a thin layer of the pudding mixture on the bottom.
- Arrange a single layer of vanilla wafers over the pudding.
- Place a layer of sliced bananas over the wafers.
- Repeat the layers: pudding, wafers, bananas, until all ingredients are used, ending with a layer of pudding on top.
- Cover the dish tightly with plastic wrap.
- Refrigerate for at least 4 hours, or preferably overnight. This chilling time allows the vanilla wafers to soften into a cake-like texture.
- Serve cold.
Notes
- For the best texture, chill the pudding for a full 8 hours or overnight so the wafers absorb moisture.
- Use firm, ripe bananas; overly soft bananas can become mushy.
- If you want individual servings, assemble this recipe in small cups for easy distribution at potlucks.
Nutrition
- Serving Size: 1 serving
- Calories: 450
- Sugar: 55g
- Sodium: 350mg
- Fat: 20g
- Saturated Fat: 10g
- Unsaturated Fat: 10g
- Trans Fat: 0g
- Carbohydrates: 65g
- Fiber: 2g
- Protein: 5g
- Cholesterol: 30mg