

Oh, the party panic! You know the feeling—the game is on in an hour, or the in-laws are pulling up, and you realize you need something truly delicious that doesn’t require you to spend all afternoon chained to the oven. Trust me, I’ve been there countless times since I left that frantic marketing life! That’s why these incredible, flavor-packed, impossibly easy Ham and Cheese Sliders are my absolute secret weapon for any gathering. These Hawaiian roll sliders bake up golden and gooey in minutes. They are reliable, they taste a million times better than they have any right to, and they make cleanup a breeze!
- Why These Ham and Cheese Sliders Are Your New Go-To Party Sandwich
- Essential Ingredients for Flavorful Ham and Cheese Sliders
- Step-by-Step Instructions for Baked Sliders
- Tips for Perfect Make Ahead Appetizers
- Serving Suggestions for Game Day Sliders
- Storing and Reheating Leftover Ham and Cheese Sliders
- Frequently Asked Questions About These Party Sandwiches
- Estimated Nutritional Profile for Ham and Cheese Sliders
- Share Your Tailgate Food Success
Why These Ham and Cheese Sliders Are Your New Go-To Party Sandwich
When you’re hosting, you need food you can trust. These little sandwiches deliver big flavor without any fuss. They are quick, reliable, and always the first thing gone at any tailgate or holiday spread. Honestly, I think they taste even better as leftovers!

- They are the ultimate make ahead appetizers; assemble them early and bake right before serving!
- They transition perfectly from a big potluck food contribution to a simple weeknight dinner—no one complained about those in my house!
- The entire bake time leaves you free to focus on everything else going on.
Quick Prep Time for Maximum Flavor
I am serious about the speed here. You only need about ten minutes to stack everything up. Seriously, ten minutes! You lay down the bottom half of the rolls, pile on the meat and cheese, top it, glaze it, and pop it in the oven. It’s that simple to get something that looks show-stoppingly good.
The Secret to Perfect Ham and Cheese Sliders: The Buttery Mustard Glaze
What separates these from every other boring baked sandwich on a roll? It’s the glaze, hands down. That little drizzle of melted butter mixed with Dijon and Worcestershire takes our Ham and Cheese Sliders from a two-ingredient effort to something truly memorable. That savory, slightly sharp topping melts right into the soft rolls—it’s pure magic.
Essential Ingredients for Flavorful Ham and Cheese Sliders
When you’re making something this simple, ingredient quality is everything. Don’t skimp here, because every item pulls its weight! We are building this flavor from the ground up, and that starts with the right sweet rolls and sharp cheese. We need precision, but we need flavor more. Don’t worry, the list is short and sweet, and you likely have most of it right now!
- One full package of those glorious Hawaiian sweet rolls (you need the whole 12-count package!).
- A pound of good quality deli ham, sliced thin—no thick, chunky stuff!
- A pound of Swiss cheese, thin-sliced too, so it melts evenly across every sandwich.
- And for the glaze, we need melted butter, Dijon mustard, Worcestershire sauce, and poppy seeds.
Ingredient Notes and Substitution Tips for Your Hawaiian Roll Sliders
If you can’t find good Swiss, don’t panic! Provolone is a solid, melty backup, or if you want a real punch of nutty flavor, go for Gruyère. But please, spend a little extra on your deli meat. Ask them to slice it paper-thin. Thin layers stack up beautifully in these Hawaiian Roll Sliders and melt better than thick slices do.
For the glaze, if you don’t like Dijon, whole grain mustard works well for texture, but you lose a bit of that classic sharpness. The key is making sure you balance the sweet roll with something savory and slightly tangy!
Step-by-Step Instructions for Baked Sliders
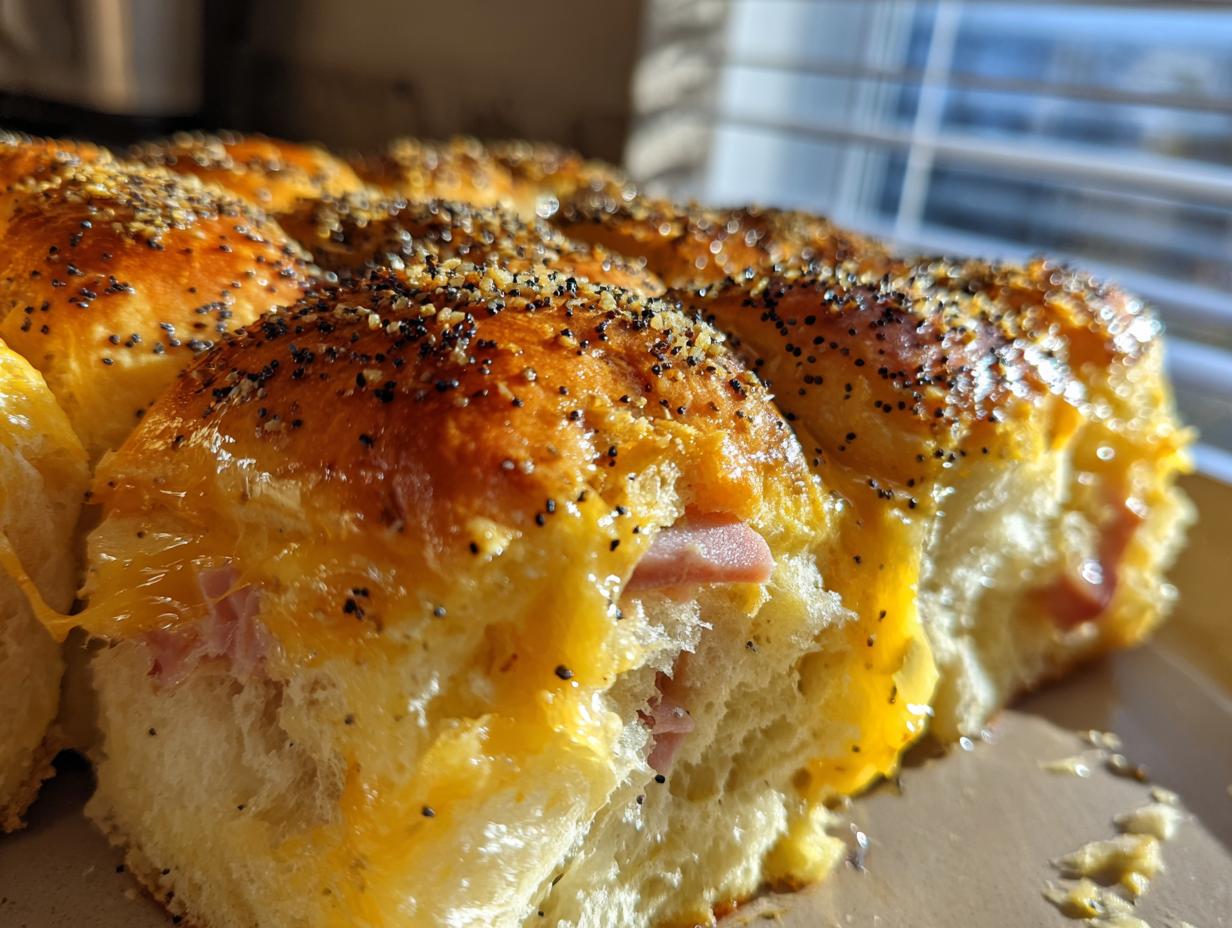
Okay, here is where the magic happens, and I promise it feels like cheating it’s so easy! First things first, get that oven preheating to 350 degrees F, and go ahead and grease your 9×13 dish. Now for the crucial part that makes these the best Ham and Cheese Sliders: take your whole package of Hawaiian rolls and slice them horizontally, like you’re splitting a giant loaf of bread. IMPORTANT: Do not separate them! They need to stay connected like a sweet little bread train. Place the bottom half down in that greased dish, layer on all your beautiful ham, then stack that Swiss cheese on top. Put the top half of the rolls back on—voilà, they are stacked!
Creating the Signature Buttery Glaze for Your Ham and Cheese Sliders
This glaze is everything! Grab a small bowl; it doesn’t need to be huge. Whisk together your melted butter, your Dijon mustard, and that splash of Worcestershire sauce until it looks happy and combined. Now, take a pastry brush—or even the back of a spoon if you’re in a rush—and gently brush that mixture all over the very top of the connected rolls. Make sure you get into the little gaps! Then, sprinkle those poppy seeds everywhere. This buttery topping is what gives the final baked sandwiches their shiny, savory crust. That’s the key to amazing flavor, trust me on this with your Ham and Cheese Sliders.

Baking Times and Achieving Golden Perfection
We bake these in two stages, which really helps melt the cheese without burning the tops immediately. First, cover that nice dish tightly with foil. Pop it in the preheated oven for 15 minutes. This step is vital because it steams everything slightly and gets the ham hot all the way through. After those 15 minutes, take the foil off! Let them bake uncovered for another 5 to 10 minutes. You are looking for two things: that Swiss cheese should be completely melted and gooey, and the tops of the rolls should be lightly golden brown. If you want to peek at my philosophy on timing, I always like them just slightly browned for the best texture, but don’t let them dry out!
Tips for Perfect Make Ahead Appetizers
This is where these sliders truly shine, especially when you’re feeding a crowd for a big game or a holiday party! One of the best things about them is that they qualify as amazing make ahead appetizers. You can totally assemble the whole thing—rolls, ham, cheese, brushed with the glaze, seeds sprinkled on top—and then just cover the dish tight with plastic wrap. Stick it in the fridge!
Now, here’s the little tweak you need to remember: the cold changes things slightly. If you are baking them straight from the refrigerator, you need to add a little extra time to that initial covered baking phase. I always add about 5 to 10 extra minutes when I’m baking them cold. This gives the heat time to work its way through the chilled layers before you take the foil off to get that gorgeous golden top.
I usually assemble them the morning of the party, or even the night before if I know I’m going to be slammed right before everyone arrives. They hold up beautifully in the fridge for up to four hours. When it’s time to serve, just pop them onto the adjusted baking schedule, and bam—hot, gooey perfection with zero last-minute chopping or fuss!
Serving Suggestions for Game Day Sliders
Once these babies come out of the oven looking all golden and melty, you have to serve them right! A hot, gooey slider loses a tiny bit of its charm if it sits around getting sticky. That’s why I always make sure to slice the connected rolls *just* before I set them on the table. Use a serrated knife—it cuts cleanly right between the rolls without squishing all that lovely melted cheese out onto your platter. This little trick makes these game day sliders look professional!

When I’m planning these for a big football afternoon, the toppings and sides are just as important as the sliders themselves. Since we already have that savory ham and sweet roll combination, I like serving them with sharp, vinegary things to cut through the richness. A small bowl of tangy, homemade coleslaw keeps things fresh. Or, if you want something super easy, just set out a few little cups of spicy brown mustard or some quality dill pickle chips!
These Ham and Cheese Sliders are hearty enough to be the main event, but they pair fantastically with something crunchy, too. Think about setting up a little dipping station. A side of creamy ranch dressing for dipping, or even a simple roasted red pepper dip, gives everyone an option. The key is keeping it easy, because you’re busy watching the game, right? Keep the focus on easy assembly and even easier satisfaction!
Storing and Reheating Leftover Ham and Cheese Sliders
Now, let’s talk about the sad day after the party—when you realize you have leftovers! Good news: these sliders are incredibly resilient. If you have any of these amazing Ham and Cheese Sliders left over, the cleanup is simple because they store so well. Once they are completely cooled down, you just want to tuck them away in an airtight container.
Don’t leave them sitting out! Make sure that container is sealed up tight so they don’t dry out overnight in the fridge. I’m serious about airtight storage; it keeps that moisture locked in so you can enjoy them again the next day.

When it comes time to reheat them later—maybe for a quick lunch—you absolutely, positively MUST use the oven or an air fryer. Please, for the love of gooey cheese, skip the microwave if you can! The microwave makes the bread soggy and tough, and we just cannot have that happen to these soft sweet rolls.
If you’re using the oven, wrap the portion you want to eat loosely in aluminum foil. Heat them at about 325 degrees F until they are warmed through—usually about 10 minutes. The foil traps the steam and warms the ham and cheese without letting the top get brittle. They come out tasting almost as amazing as fresh, retaining so much of that fantastic moisture. Trust me, reheating them correctly keeps the spirit of these Ham and Cheese Sliders alive!
Frequently Asked Questions About These Party Sandwiches
I know when you’re relying on a simple recipe for a crowd, you have questions! It pays to run through a few things before you start layering. I get asked these all the time, usually because everyone wants to make sure these party sandwiches turn out perfectly gooey and never, ever soggy. If you’re ever curious about my site policies, you can always check out my Privacy Policy!
Can I use different types of bread instead of Hawaiian rolls for these Ham and Cheese Sliders?
You totally can, but I always steer people back to the Hawaiian rolls if they can find them! The sweetness they bring is the secret sauce that balances out the salty ham and the kick from the Dijon mustard in the glaze. It’s that sweet-and-savory combo that makes these Ham and Cheese Sliders addictive.
If you must switch bread, look for soft white dinner rolls—the King’s Hawaiian brand makes a few varieties, and sometimes their regular sweet rolls work well, too. Avoid anything too crusty or dense, like sourdough or baguette slices, because they won’t soak up that buttery glaze nicely. A soft roll gives you that pure, melting texture we are aiming for!
What is the best way to keep these Hawaiian Roll Sliders from getting soggy?
This is my number one expert tip! Sogginess comes from two places: too much moisture in the ham or letting the raw glaze sit on the bread for ages before it bakes. First, if your deli ham looks really wet, just quickly pat it dry with a paper towel before layering. Second, when you brush on the glaze, be generous, but try to brush it smoothly over the top surface instead of letting it pool heavily in one spot.
My other trick for perfect results with these Hawaiian Roll Sliders has everything to do with timing. If you assemble them and let them sit in the fridge overnight—which is totally fine!—you cover them extremely tightly so no air dries them out. Then, when you bake, you start them covered for that extra initial 10 minutes. The slight steam is helpful when everything is cold, and it prevents the bottom from getting wet while ensuring the center heats up perfectly. Bake them fresh if you can, and definitely don’t let assembled, unbaked sliders sit out at room temperature for more than an hour!
Estimated Nutritional Profile for Ham and Cheese Sliders
I always get asked about the specifics, especially when I talk about feeding a crowd! Since these Ham and Cheese Sliders are loaded with buttery glaze and good deli meat, they are definitely best saved for special occasions or game days, not necessarily an every-day lunch. Keep in mind that these numbers are just estimates based on one standard slider serving size and the ingredients I listed. Your specific brand of rolls or ham could bump those numbers up or down a bit, so take them as a good guideline!
Here is a quick look at what’s in one of those glorious, gooey, pull-apart sandwiches:
- Serving Size: 1 slider
- Calories: 280
- Fat: 14g (with 8g Saturated Fat—that’s the butter talking!)
- Carbohydrates: 25g
- Protein: 15g
- Sugar: 8g
- Sodium: 750mg (Be aware of this one, folks! Deli meat adds up fast!)
It’s important to remember that these figures reflect the full, glorious recipe, including the poppy seeds and the Dijon glaze. If you’re making these for friends, it’s good to know the general profile, but honestly, when they are piled high on the platter, no one is counting calories!
When you’re making food for big events like tailgate food feasts, it helps to know generally what you are serving. But the primary goal here is simple satisfaction, and these sliders deliver that in spades, regardless of the exact sodium count!
Share Your Tailgate Food Success
And just like that, we’re done! Seriously, can you believe how easy these buttery, savory Ham and Cheese Sliders are? Now that you’ve got a platter of these guaranteed crowd-pleasers, I really want to see them in action! Whether you made them for a busy Tuesday night dinner (hey, I do it too!) or they were the star of the show at your big tailgate food spread, please head down to the comments section below.
Tell me how they turned out! Did you stick with Swiss, or did you try Gruyère? Did they vanish in five minutes flat? I thrive on hearing about your successes in the kitchen; it reminds me why I started Cooking by Felix in the first place—to make sure everyone can reclaim joy at the dinner table, even when life is moving at warp speed!
If you share photos online, please tag me! I love seeing these in your kitchens. And hey, since you’re making things easy on yourself and relying on my tested recipes, you should definitely take a look at our site’s Terms of Use to see how we keep things running smoothly behind the scenes. Happy eating, everyone!
PrintButtery Ham and Cheese Sliders with Mustard Glaze

Assemble easy ham and cheese sliders using Hawaiian rolls, topped with a savory buttery mustard glaze, perfect for parties or quick meals.
- Prep Time: 10 min
- Cook Time: 25 min
- Total Time: 35 min
- Yield: 12 sliders 1x
- Category: Lunch
- Method: Baking
- Cuisine: American
- Diet: Vegetarian
Ingredients
- 1 package (12 count) Hawaiian sweet rolls
- 1 pound thinly sliced deli ham
- 1 pound thinly sliced Swiss cheese
- 4 tablespoons unsalted butter, melted
- 2 tablespoons Dijon mustard
- 1 teaspoon Worcestershire sauce
- 1 teaspoon poppy seeds
Instructions
- Preheat your oven to 350 degrees Fahrenheit. Lightly grease a 9×13 inch baking dish.
- Slice the entire package of Hawaiian rolls horizontally, keeping the rolls connected. Do not separate them.
- Place the bottom half of the rolls in the prepared baking dish.
- Layer the ham evenly over the bottom rolls.
- Layer the Swiss cheese slices evenly over the ham.
- Place the top half of the rolls over the cheese layer.
- In a small bowl, whisk together the melted butter, Dijon mustard, and Worcestershire sauce.
- Brush the entire top surface of the rolls generously with the butter mixture.
- Sprinkle the poppy seeds evenly over the top.
- Cover the baking dish tightly with aluminum foil.
- Bake for 15 minutes covered.
- Remove the foil and bake for an additional 5 to 10 minutes, or until the cheese is melted and the tops are lightly golden brown.
- For easy serving, slice the sliders crosswise between each roll before serving.
Notes
- You can assemble these sliders up to 4 hours ahead of time. Cover and refrigerate them before baking. Add 5 to 10 minutes to the covered baking time if baking directly from the refrigerator.
- Use a serrated knife to slice through the connected rolls for clean pull-apart portions.
Nutrition
- Serving Size: 1 slider
- Calories: 280
- Sugar: 8
- Sodium: 750
- Fat: 14
- Saturated Fat: 8
- Unsaturated Fat: 6
- Trans Fat: 0.2
- Carbohydrates: 25
- Fiber: 1
- Protein: 15
- Cholesterol: 40