

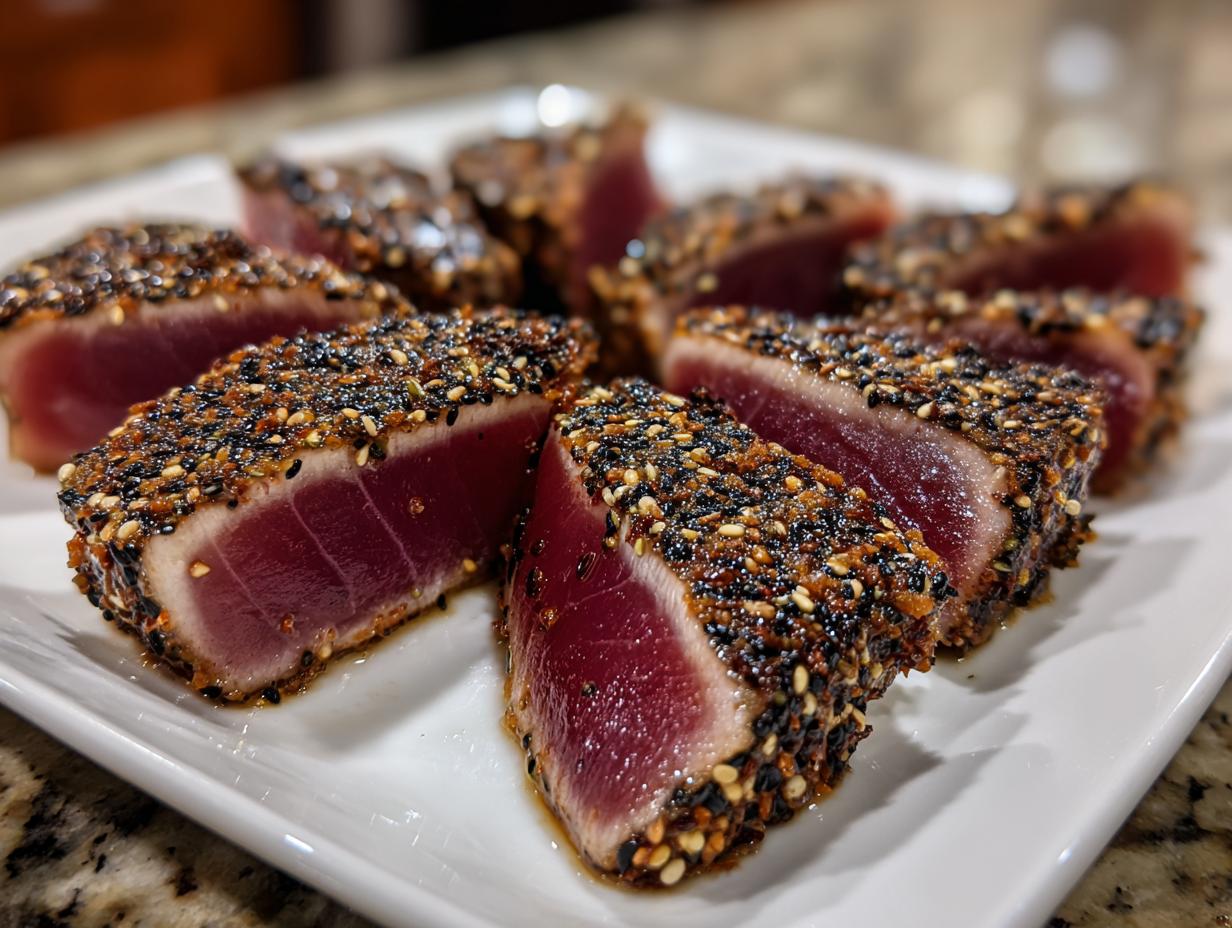
You know how sometimes you just crave something that tastes like you spent an hour fussing over it, but really, you only had about fifteen minutes? That’s exactly where this recipe lives. Forget complicated sauces and endless chopping; we’re diving straight into mastering the perfect sear on high-quality tuna. Trust me, achieving restaurant-level **Seared Ahi Tuna** is surprisingly fast because I built this recipe around my core belief: great food shouldn’t punish your busy schedule. If you have great, fresh ingredients, the technique is simple elegance. My goal is to give you that moment of, “Wow, I just made that,” even on a difficult Tuesday evening. If you want to know more about why I focus on these quick, elegant meals, you can check out my story on the About Us page.
- Why You Will Master This Seared Ahi Tuna Recipe
- Essential Components for Perfect Seared Ahi Tuna
- The Technique: How to Prepare Seared Ahi Tuna
- Tips for Perfect Seared Ahi Tuna Every Time
- Serving Suggestions for Your Seared Ahi Tuna
- Storage and Reheating Instructions for Leftover Seared Ahi Tuna
- Frequently Asked Questions About Seared Ahi Tuna
- Nutritional Estimates for This Gourmet Tuna Dish
- Share Your Seared Ahi Tuna Success
Why You Will Master This Seared Ahi Tuna Recipe
I promise you, this isn’t one of those fussy gourmet recipes that just sits on a shelf collecting dust. You are going to nail this. It’s satisfying, incredibly flavorful, and shockingly fast. That’s the trifecta we always aim for in this kitchen!
- You get a beautiful crust and a cool, rare center in literally minutes.
- It’s so light and fits perfectly into a busy week without hours of prep.
- Everyone will think you ordered this amazing **gourmet tuna** out!
Quick Preparation for a Healthy Dinner
Seriously, we’re looking at maybe 10 minutes of prep and barely 3 minutes of cooking time total. How great is that for a weeknight **healthy dinner**? We use simple, vibrant flavors—that little bit of ginger and soy sauce gives it a wonderful Asian-inspired kick that keeps things interesting.
Achieving Gourmet Tuna Results
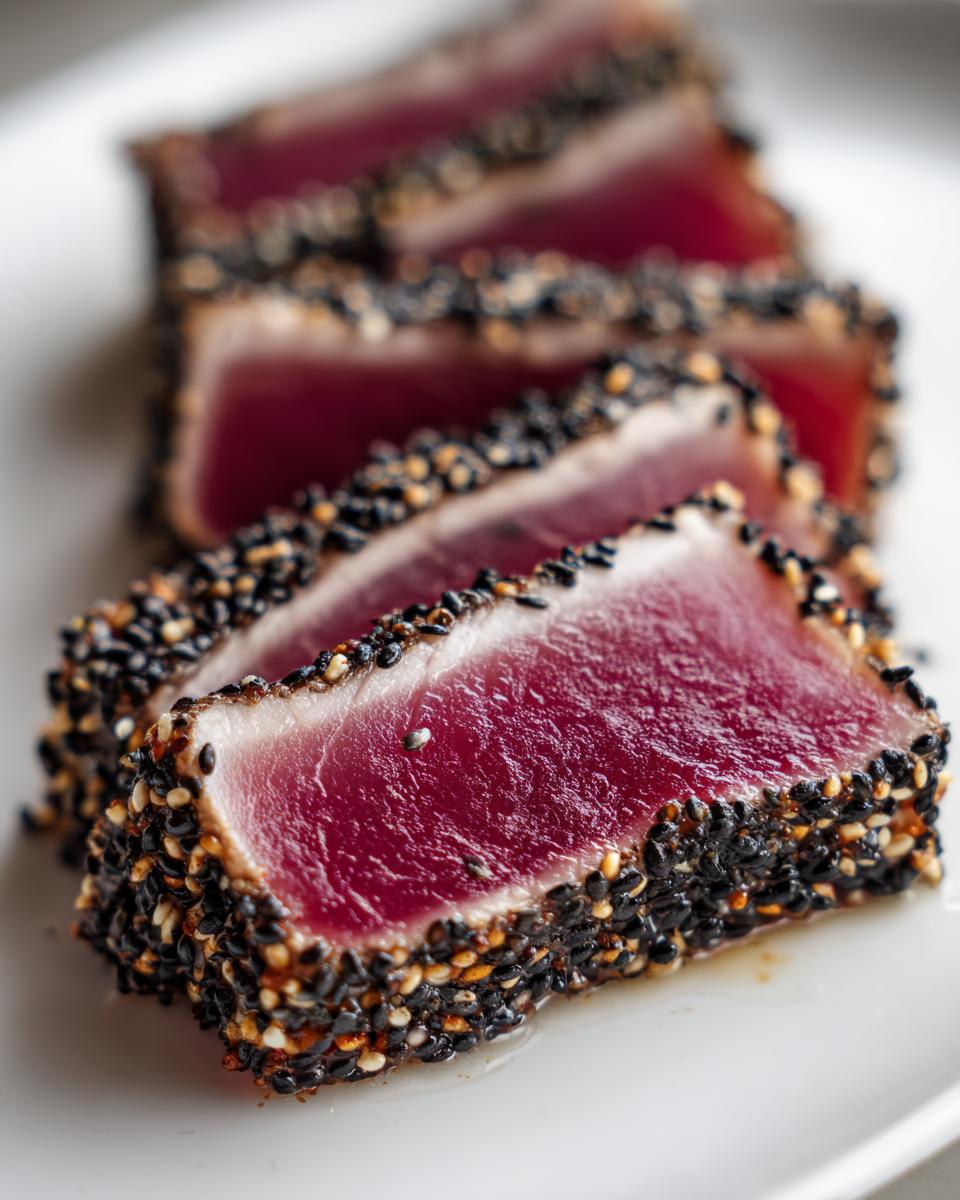
The difference maker here is using real, high-quality **sushi grade tuna**. When you treat that beautiful fish right, the sear technique automatically elevates it. Think of the sesame seed coating—it’s like putting a fancy suit on your meal. It looks and tastes unbelievably professional, yet it requires zero fuss.

Essential Components for Perfect Seared Ahi Tuna
Okay, we need to talk about what goes into the pan because these ingredients are non-negotiable if you want that perfect crust. This recipe is so simple, which means ingredient quality really sings. Don’t try to cut corners here, trust me!
Ingredient Clarity for Your Seared Ahi Tuna
Here is exactly what you need for two lovely servings. Make sure your measurements are spot on!
- Two six-ounce **sushi grade tuna** steaks (the star of the show!)
- One tablespoon sesame oil
- One tablespoon soy sauce or tamari
- One teaspoon grated fresh ginger
- One clove garlic, minced super fine
- One tablespoon black sesame seeds
- One tablespoon white sesame seeds
- A tiny pinch of black pepper
Ingredient Notes and Substitutions
When shopping, look for beautiful, deep red **yellowfin tuna**—if it looks dull, walk away. That high-quality fish is what allows us to cook it so quickly. Also, if you are doing low-sodium or gluten-free, you can absolutely swap the standard soy sauce out for tamari. It works just as well with the ginger and garlic to create that wonderful flavor base for our *Asian tuna recipe*.
The Technique: How to Prepare Seared Ahi Tuna
This is where we separate the good tuna meals from the absolutely spectacular ones. Honestly, the technique for **Seared Ahi Tuna** is all about controlling two things: dryness and heat. If you skip the first step, you end up steaming your fish instead of searing it, and nobody wants soggy tuna!
Preparing the Yellowfin Tuna for Searing
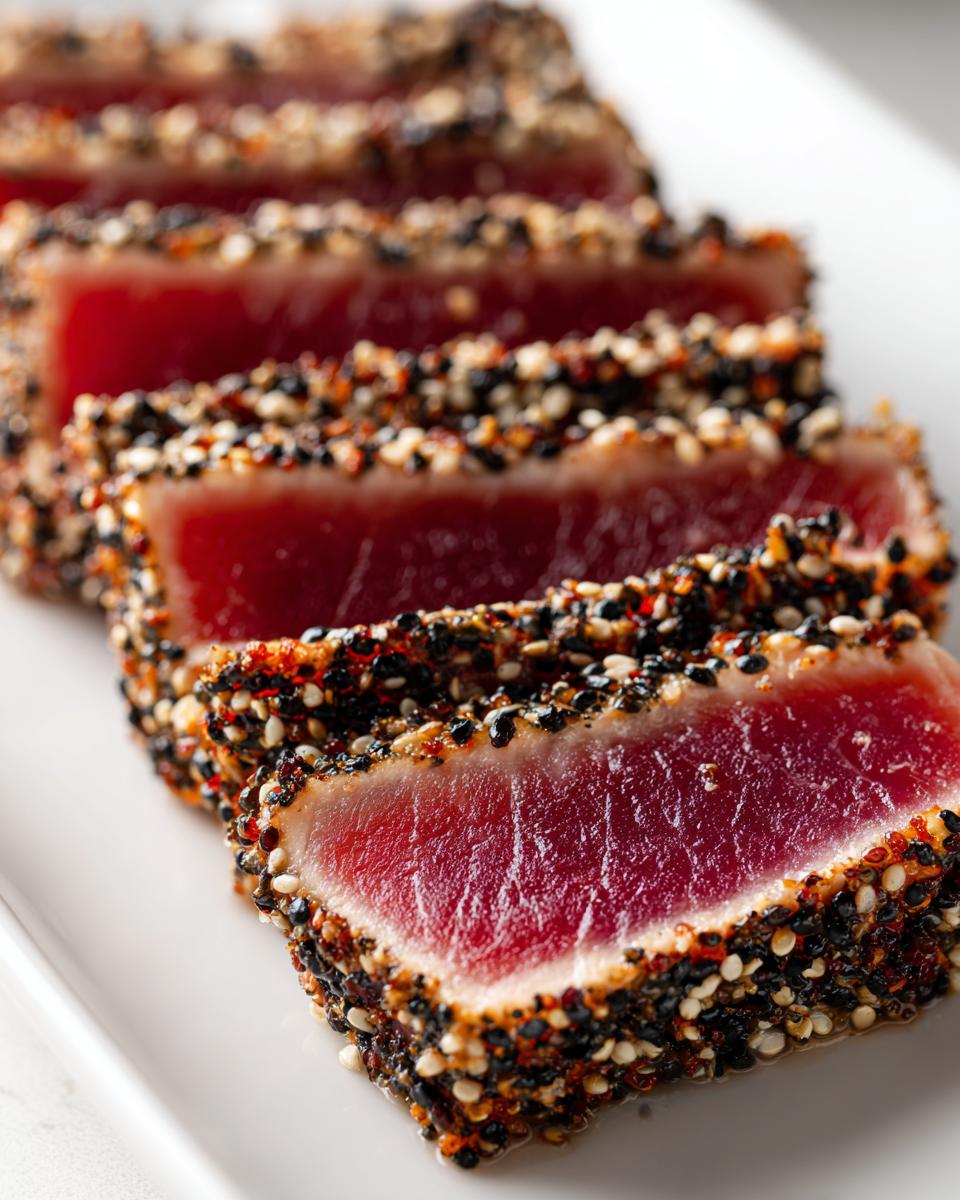
First, grab some paper towels—and I mean lay those things on thick. You have to pat your **yellowfin tuna** steaks until they feel completely, totally dry. That’s our secret weapon! While that’s happening, whisk together your oil, soy sauce, fresh ginger, and garlic to make a quick little bath. Brush that mixture all over the steaks. Then, mix up your black and white sesame seeds in a shallow dish. Press each side of the tuna firmly into the seeds so it gets a beautiful, thick coat. You want that crust to be dense!
Executing the High-Heat Sear on Your Seared Ahi Tuna
Time for the drama! Get your cast iron skillet on the highest heat you’ve got. You want it so hot that you can see just a wisp of smoke when you put the pan on the burner—don’t add any oil to the pan yet! Gently lay those crusted tuna steaks down. Now, watch the clock! For that perfect rare center that we love in an *Asian tuna recipe*, sear for just 60 to 90 seconds per side. You have to be quick to pull it off the fire the second that time is up, or it keeps cooking! We are aiming for a perfect sear on the outside.

Resting and Slicing the Tuna
Don’t skip the rest period! I know waiting is hard when something smells this amazing, but you need to let the tuna rest on a cutting board for five minutes. This lets the juices settle back in. When you slice it, you must cut against the grain. This makes every single piece incredibly tender. If your sear was right, you’ll see a gorgeous ring of cooked sesame seed crust around a deep red center. Perfection!
Tips for Perfect Seared Ahi Tuna Every Time
Even with great instructions, sometimes things go sideways, right? Cooking high-quality seafood means small details matter a whole lot. I call this my ‘Trust Me, I Learned the Hard Way’ section for making amazing **Seared Ahi Tuna**. Follow these few pointers, and you’ll skip the frustration and go straight to the amazing-tasting part.
The biggest mistake people make is trying to use a thin, flimsy pan. You risk losing heat the second those cold steaks hit the metal, and then you get that disappointing grey band instead of a nice crust!
Choosing the Right Equipment for Your Quick Seafood Recipe
You absolutely need a heavy skillet. Seriously, go find your cast iron pan! If you don’t have cast iron, a sturdy stainless steel pan will work, but cast iron holds onto intense heat like nothing else. Why does this matter for our **quick seafood recipe**? Because the sear has to happen instantly. That high, even, retained heat is what locks in the juices while simultaneously crisping up your beautiful sesame seed coating. It’s all about creating a powerful, brief heat shock!
Serving Suggestions for Your Seared Ahi Tuna
Now that you have this incredible, perfectly seared *gourmet tuna*, how should you eat it? The best part is that this dish is so flexible, but since we’re aiming for a lovely, light meal, I have a few go-to pairings. You want things that complement the soy and ginger crust, not bury it!
For the easiest **healthy dinner**, serve a few slices over steamed white or brown rice. A drizzle of extra tamari works great there. If you want something greener, try a simple quick-pickle cucumber salad or thinly sliced avocado—it adds a creamy coolness against the hot sear. It just sings!
Storage and Reheating Instructions for Leftover Seared Ahi Tuna
Honestly, if you have any leftovers, you’ve already defied the odds because this **Seared Ahi Tuna** disappears fast! But, just in case you manage to save a few slices, let’s talk storage. I have to be upfront here: reheating this tuna is just not the move. It’s cooked perfectly rare, and any attempt to warm it up later will turn that lovely texture chalky and dry. We want to preserve that melt-in-your-mouth quality!
The best way I’ve found to handle extras is to serve them cold. If you have leftover slices that were properly rested, wrap them tightly in plastic wrap or pop them into an airtight container. They should be stored right in the coldest part of your fridge. They’ll honestly keep well for a day, maybe two if you’re lucky.
Don’t try to microwave them or put them back in a hot pan! Instead, think of those cold slices as ready-made protein for lunch the next day. They are absolutely fantastic chopped up over a crisp green salad, maybe with a light vinaigrette, or tucked into lettuce cups. It keeps that *quick seafood recipe* vibe going without any extra cooking stress!
Frequently Asked Questions About Seared Ahi Tuna
It’s normal to have questions when you’re working with such a fantastic but quick-cooking fish! I’ve put together the main things I hear people ask about when they are making this *Asian tuna recipe* for the first time. Getting these details right makes all the difference between great and unforgettable.
What is the difference between Ahi and Yellowfin tuna?
This trips up more people than you’d think! Simply put, Ahi is the Hawaiian name, and it usually refers to either *yellowfin tuna* or Bigeye tuna. What matters most isn’t the name, but the quality stamp. You absolutely must ensure whatever you buy is labeled **sushi grade tuna**. That label tells you it’s safe to eat raw or very rare, which is key for our ultra-fast sear!
Can I use frozen tuna for this Asian tuna recipe?
If you must, you can, but I always pray you can get it fresh! If you start with frozen, you have to thaw it *very* slowly in the refrigerator—never on the counter. Once thawed, you still need to pat it bone-dry, but honestly, the texture just isn’t quite as firm as fresh. For the best sear, fresh is the winner every single time.
How long should I sear the tuna for well-done?
Look, if you want it well-done, you certainly can cook it that way, but I have to warn you, you lose a lot of that luxurious, steak-like character that makes **Seared Ahi Tuna** so special. If you insist, push it to about 2 full minutes per side. Even then, pull it off quickly! Anything more than that, and you’re basically serving up tuna jerky, not a *gourmet tuna* experience.
Nutritional Estimates for This Gourmet Tuna Dish
I know some of you are keeping track of macros, and since this is such a fantastic light meal, I wanted to give you a general idea of what you’re looking at! Remember, these numbers are just estimates based on the core ingredients and the amounts listed. If you use a heavy-handed pour of sesame oil or a super salty brand of tamari, things shift a little bit. But for a foundational understanding of this *gourmet tuna* dish, here are the details!
The beauty of this dish is how high in protein it is, while keeping the overall fat content pretty reasonable, especially considering how rich it tastes. It’s a fantastic way to get serious nutrition without feeling weighed down!
- Serving Size: 1 steak (about 6 oz post-sear)
- Calories: Around 250 per serving
- Protein: A whopping 32 grams! Like I said, powerhouse!
- Fat: About 12 grams total
- Carbohydrates: Very low, typically around 3 grams or less
See? That’s why this makes my list for a perfect **healthy dinner** solution. It’s clean fuel, packed with flavor.
Share Your Seared Ahi Tuna Success
Alright, food family, now that you’ve mastered the high-heat dance and achieved that perfect, rosy center on your **Seared Ahi Tuna**, I absolutely want to see it! Cooking should always be a celebration, and nothing makes me happier than hearing that one of these quick recipes worked perfectly for your busy life.
Did it taste like a million bucks? Did the sesame crust crisp up exactly right? Don’t be shy! Head down to the comments section below and leave me a star rating right there on the recipe card—it helps other busy cooks feel confident trying this out. And please, please share photos on social media!
Take a snap of your plate—whether you paired it with rice or a fresh salad—and tag us. I love seeing your individual styles come through. Sharing your success genuinely helps build our community here. Also, just a friendly reminder, if you ever have questions about how we handle your information or what happens when you sign up for our newsletter, you can always check out our Privacy Policy. Now go enjoy that amazing, *gourmet tuna* you just made!
PrintPerfectly Seared Ahi Tuna Steaks
Learn to sear sushi-grade ahi tuna quickly for a flavorful, healthy dinner with an Asian-inspired crust.
- Prep Time: 10 min
- Cook Time: 3 min
- Total Time: 18 min
- Yield: 2 servings 1x
- Category: Dinner
- Method: Pan Searing
- Cuisine: Asian Fusion
- Diet: Low Fat
Ingredients
- 2 (6 oz) sushi grade tuna steaks
- 1 tablespoon sesame oil
- 1 tablespoon soy sauce or tamari
- 1 teaspoon grated fresh ginger
- 1 clove garlic, minced
- 1 tablespoon black sesame seeds
- 1 tablespoon white sesame seeds
- Pinch of black pepper
Instructions
- Pat the tuna steaks completely dry using paper towels. This step is crucial for a good sear.
- In a small bowl, whisk together the sesame oil, soy sauce, ginger, and minced garlic. Brush this mixture evenly over all sides of the tuna steaks.
- On a plate, mix the black sesame seeds, white sesame seeds, and black pepper. Press each side of the tuna steaks firmly into the seed mixture until well coated.
- Heat a heavy-bottomed skillet (cast iron works best) over high heat until it is very hot, almost smoking.
- Carefully place the coated tuna steaks into the hot, dry skillet.
- Sear for 60 to 90 seconds per side for rare to medium-rare (the center should remain cool and deep red). Adjust time slightly based on steak thickness.
- Remove the tuna from the skillet immediately.
- Let the tuna rest on a cutting board for 5 minutes before slicing thinly against the grain.
Notes
- For best results, use high-quality, sushi-grade yellowfin or bigeye tuna.
- If you prefer a slightly more cooked center, sear for 2 minutes per side.
- Serve immediately with a side of steamed rice or a light salad.
Nutrition
- Serving Size: 1 steak
- Calories: 250
- Sugar: 1
- Sodium: 350
- Fat: 12
- Saturated Fat: 2
- Unsaturated Fat: 10
- Trans Fat: 0
- Carbohydrates: 3
- Fiber: 1
- Protein: 32
- Cholesterol: 80