

It’s game day (or Tuesday, who’s counting?), and you need something spectacular but simple, right? Trust me, I know that feeling! When the chaos of life hits, the last thing you want is a complicated appetizer that requires constant stirring. That’s why I’m handing you my absolute favorite, can’t-fail recipe for the **buffalo chicken dip**. This isn’t some fancy, overly complicated creation; this is pure comfort food glory, built around that classic, tangy Frank’s RedHot flavor we all crave.
For years, I’ve been perfecting these simple, high-impact recipes for busy people just like me. This baked buffalo chicken dip is the ultimate crowd-pleaser. Seriously, if you bring this to any gathering, you won’t bring any home! It’s quick, it’s reliable, and it delivers big flavor with almost zero fuss.
- Why This Buffalo Chicken Dip is Your New Game Day Appetizer Essential
- Ingredients for Authentic Buffalo Chicken Dip
- How to Make Baked Buffalo Chicken Dip Step-by-Step
- Alternative Method: Slow Cooker Buffalo Chicken Dip
- Tips for Success with Your Make Ahead Hot Dip
- Serving Suggestions for Your Buffalo Chicken Dip
- Storage and Reheating Instructions for Leftover Buffalo Chicken Dip
- Frequently Asked Questions About Franks RedHot Dip
- Estimated Nutritional Data for This Spicy Party Dip
- Share Your Game Day Appetizers Experience
Why This Buffalo Chicken Dip is Your New Game Day Appetizer Essential
When you’re planning a big spread for the game or trying to keep costs down for a huge Halloween party, you need anchors—and this dip is it. It’s the definition of a crowd-pleaser because it hits all the right notes without stressing you out.
- It uses that iconic, bright, tangy flavor you expect from a great Franks RedHot dip.
- It’s incredibly reliable; it works perfectly baked or in the slow cooker.
- It vanishes instantly! No one ever leaves any behind.
Quick Prep for the Best Buffalo Dip
Honestly, this is why I love it so much for those last-minute needs. We’re talking **10 minutes of prep time**, tops. You just mix happy ingredients together! Because success is everything when you’re cooking for a big group, you can count on this recipe to come out perfectly cheesy and bubbling every single time. You just can’t beat that simplicity for tailgate recipes.
Ingredients for Authentic Buffalo Chicken Dip
Okay, friend, let’s talk about what you need for this amazing **spicy party dip**. It’s only a handful of things, which is why it’s so fast! You absolutely need 8 ounces of cream cheese, making sure it’s perfectly **softened**—don’t try to rush this part, or it won’t mix right! We also need 1 cup of **cooked, shredded chicken** and about half a cup of that glorious **Buffalo wing sauce (Frank’s RedHot style)**.
Then we layer in the meltiness: half a cup of shredded cheddar and a splash of your favorite dressing. That’s the core of our **best buffalo dip**!
Ingredient Notes and Substitutions for Your Spicy Party Dip
Listen, I’m all about making life easier. If you don’t want to poach and shred chicken? Totally fine! Grab a rotisserie chicken; it’s a lifesaver for these kinds of **game day appetizers**. For the dressing, you can choose ranch or blue cheese—whatever your family prefers. I stick to blue cheese because those crumbles add little pockets of zing, but if someone hates them, skip the crumbles altogether!
Also, those optional crumbles only go in during the last few minutes of baking. Don’t dump them in at the start or they just disappear into the cheese.
How to Make Baked Buffalo Chicken Dip Step-by-Step
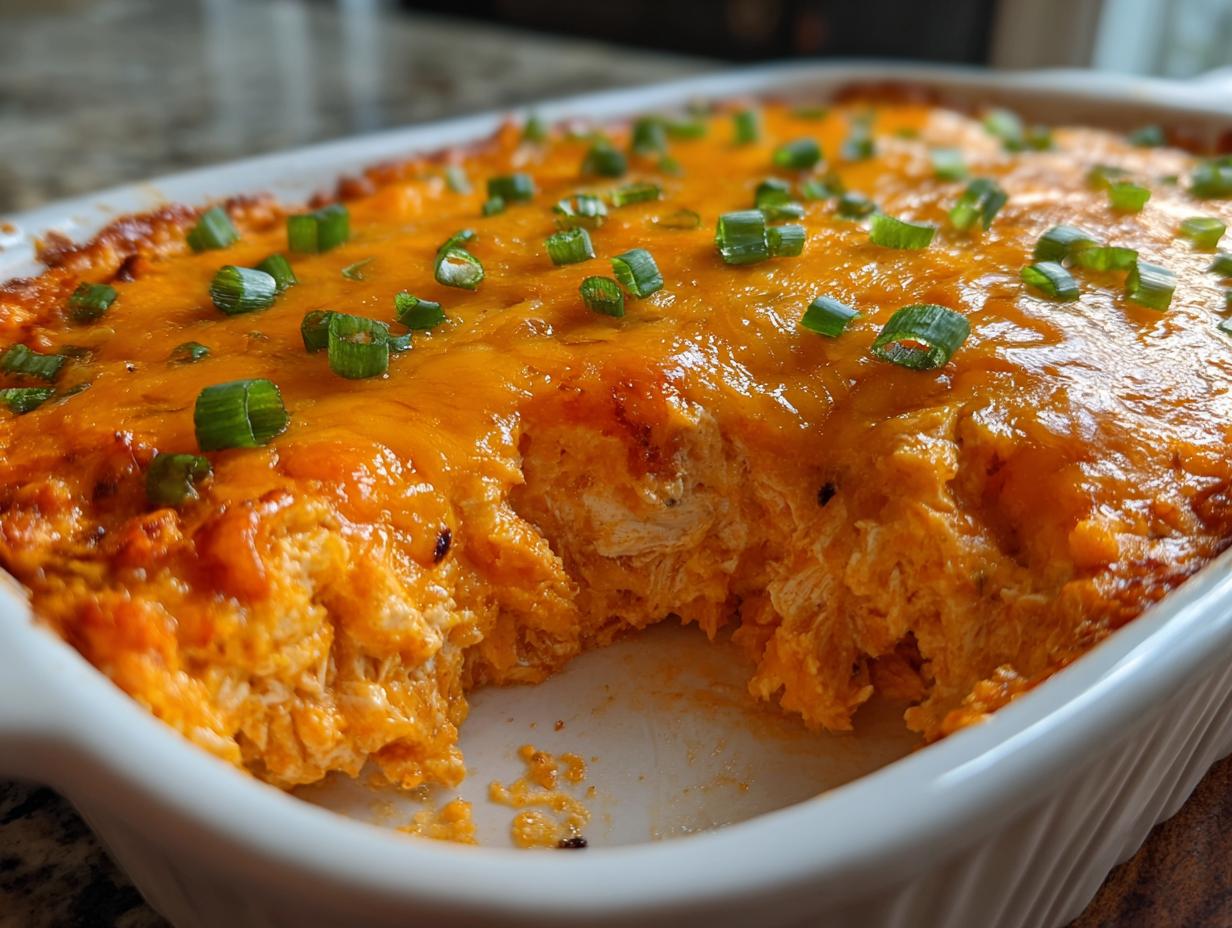
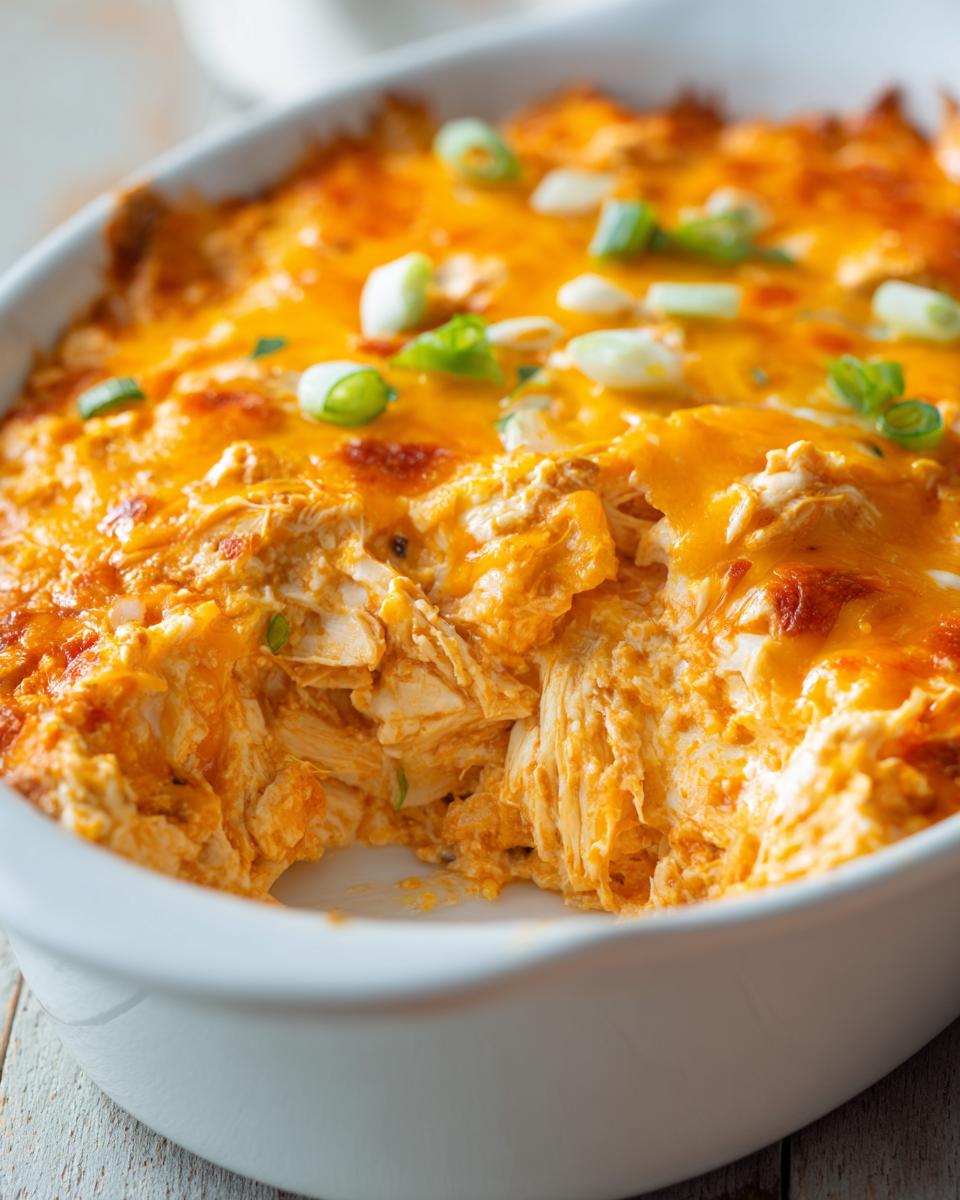
This is where the magic happens! You’ll find that this recipe is wonderfully straightforward, proving that you don’t need a massive tool kit or hours of time to create an amazing **baked buffalo chicken dip**. First things first: get that oven warming up to 375 degrees Fahrenheit. While it’s heating, lightly grease your 8×8 baking dish. You don’t want anything sticking later—trust me, scraping baked cheese is nobody’s idea of fun!
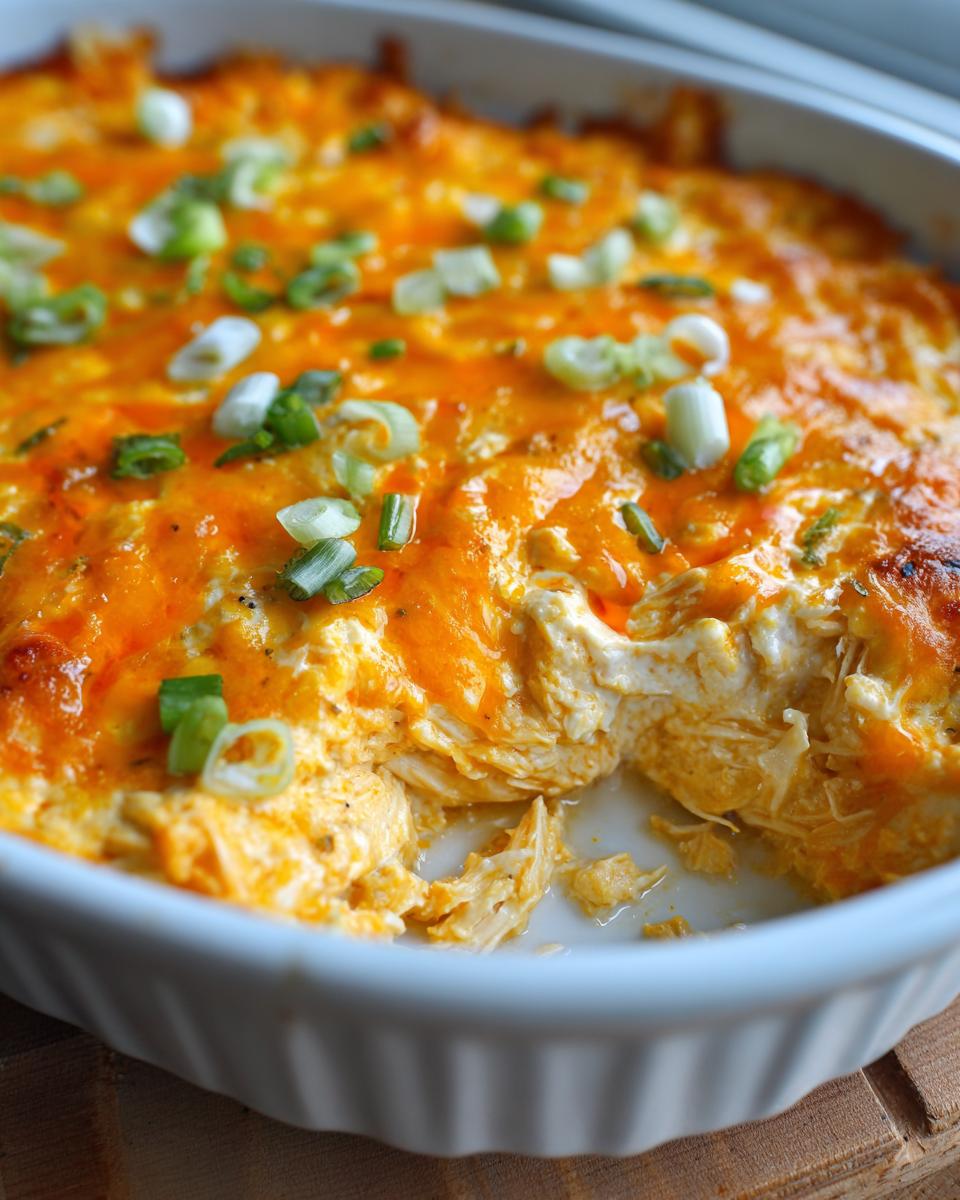
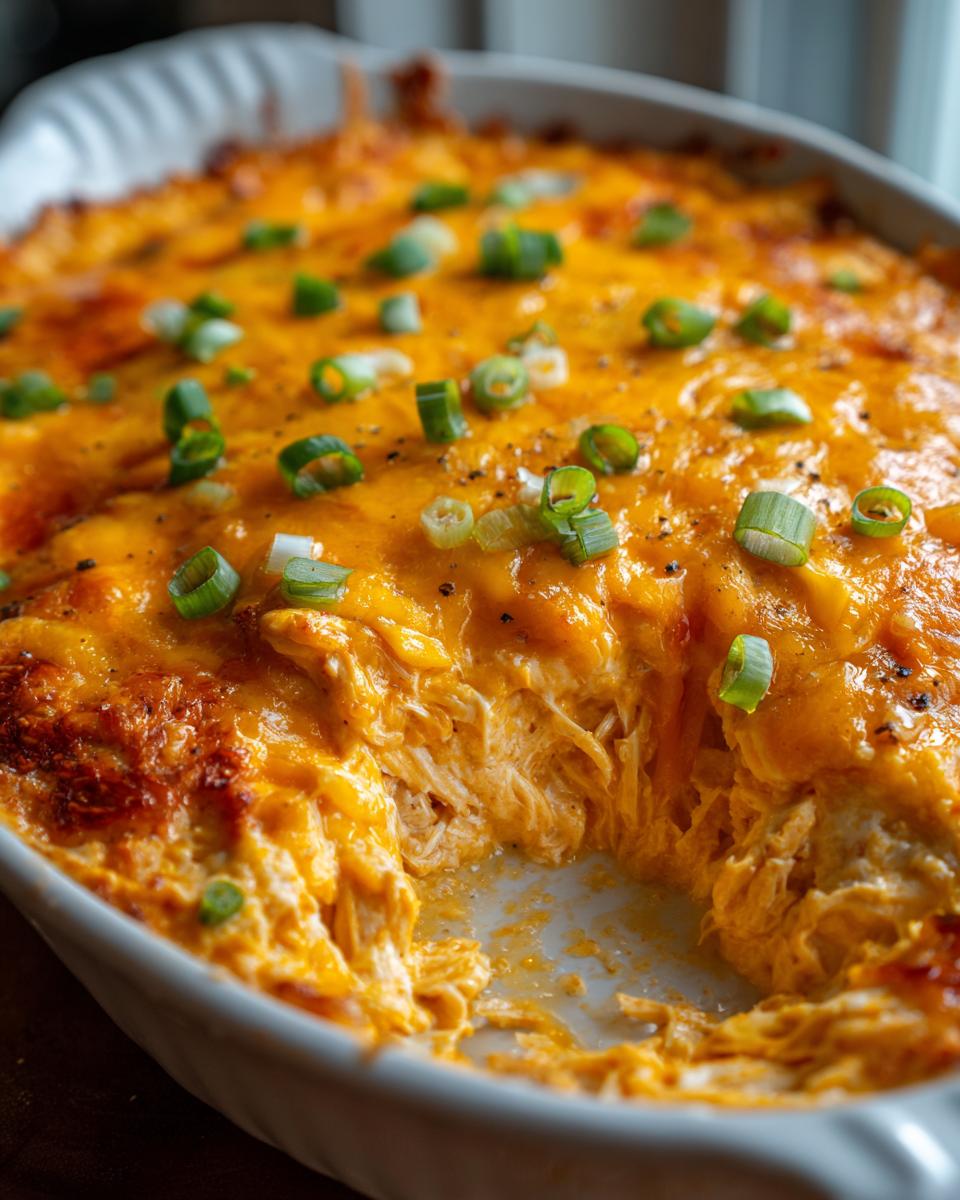
Grab a medium bowl. The absolute first thing you mix is that softened cream cheese until it’s silky smooth. Then, you just throw everything else in there: the shredded chicken, the spicy sauce, the cheddar, and your dressing. Mix it gently until you see everything coming together into one glorious, reddish-orange mass. Spread that mixture evenly into your prepared dish. See? We’re already halfway there!
Achieving the Perfect Melt: Baking the Buffalo Chicken Dip
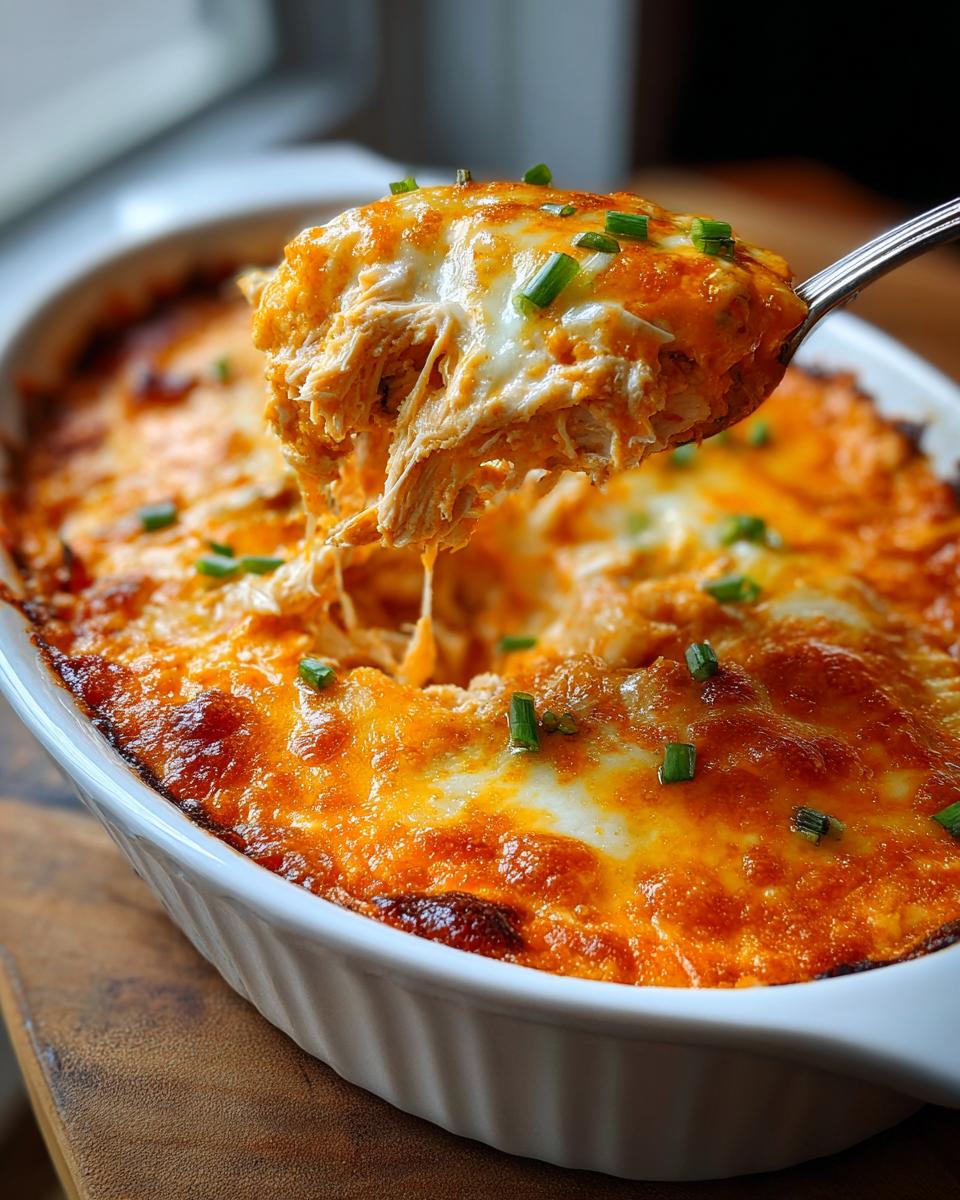
Pop that dish into the oven for about 20 to 25 minutes. You aren’t looking for brown edges here; you’re looking for satisfaction! The dip is ready when it’s heated all the way through and you see those little pockets of cheese starting to bubble happily across the top. If you’re using those optional blue cheese crumbles, sprinkle them on top during the last five minutes so they warm up but don’t burn up.
This next step is crucial, so pay attention! Take it out and let it rest on the counter for a mandatory 5 minutes before anyone digs in. It’s too hot right out of the oven, and this resting time lets the dip firm up just a tiny bit so it holds its shape on your chip. Garnish it with some fresh green onions for color, and you’re done! That’s how you nail the **best buffalo dip** every time.
Alternative Method: Slow Cooker Buffalo Chicken Dip
Now, I know some of you aren’t baking today, maybe you’re heading out to a tailgate or you are like me and just don’t want another hot oven running in the summer. If you’re looking for the perfect **slow cooker buffalo chicken dip** that you can just set and forget until game time, this recipe works beautifully that way too!
It’s my preferred method when I’m busy setting up the snack table or trying to organize everything for a big party. You just throw all the core ingredients into your slow cooker—the cream cheese, chicken, sauce, cheddar, and dressing. Don’t add those specific blue cheese crumbles yet, save those for the end application.
For the cooking time, you have flexibility, which is wonderful for **tailgate recipes**. Cook it on LOW for about 2 to 3 hours, or if you’re running short on time, high for about an hour. The main thing you must remember, no matter which speed you choose, is to stir it halfway through. Seriously, resist the urge to walk away for three hours! Stirring halfway ensures that smooth, creamy texture we are aiming for and prevents the cheese from settling strangely on the bottom.
Tips for Success with Your Make Ahead Hot Dip
Even though this recipe is already built for speed, one of the greatest party tricks is knowing you can get ahead of the game. This truly shines as a **make ahead hot dip**! I often whip this up the day before a big event, like Halloween or when we have friends over for a weekend watch party. It gives me one less thing to worry about the morning of!
Here’s the rule: mix everything according to the instructions, spread it out in your 8×8 dish, cover it up TIGHTLY with plastic wrap, and stick it in the fridge. You can do this up to 24 hours ahead of time. Easy, right?
Texture and Flavor Building: Don’t Skip the Rest
When you pull it out of the fridge the next day, it will look stiff and cold—that’s perfect! But because it’s starting off chilled, you need to adjust your baking time. Since it’s already assembled and cold, you’ll need to add about 5 to 10 extra minutes to that bake time. You are looking for the same visual cues—bubbly, melted, and hot all the way through.
Also, let me share a huge flavor secret. While you can substitute ingredients, the richness of this **franks redhot dip** comes from *not* being super cold when it hits the heat. If you can, let the assembled dip sit on the counter for about 30 minutes before you put it in the 375-degree oven. That little bit of warming time lets the flavors mingle better and helps the cream cheese soften just enough for that velvety texture that everyone raves about later.
Trust me on this one; a little patience before baking makes this **buffalo chicken dip** taste like you spent hours on it!
Serving Suggestions for Your Buffalo Chicken Dip
Okay, the dip is hot, bubbly, and resting perfectly. Now comes the best part: figuring out how to get all that incredible flavor into your mouth! Getting the right dipping vehicle is almost as important as the dip itself. I always make sure I have a good assortment because everyone has their favorite way to tackle a great **spicy party dip**.
The absolute classic, of course, has to be sturdy tortilla chips. Look for the thick, restaurant-style ones—you need something that can hold up to that creamy, cheesy weight without snapping off halfway through!
My Go-To Dippers for Every Occasion
If you’re focused on keeping some things lighter, or if you have folks avoiding gluten, you need crunchier freshness on the snack board lineup. Celery sticks are non-negotiable for me. They offer that cool, crisp snap that cuts through the rich heat of the dip beautifully. It’s the perfect palate cleanser between scoops.
Don’t forget carrots! Fresh carrot sticks work really well, too. Sometimes I even chop up some bell peppers—get creative with colors, especially if you’re serving this for a **Halloween party dip**!
Here’s my favorite way to present it when I’m having friends over for a big event:
- Arrange the serving dish right in the center of a big platter.
- Surround the dip with a colorful ring of blue corn chips, regular tortilla chips, celery cuts, and baby carrots.
- Tuck in some pre-cooked chicken wings tossed in a tiny bit of extra sauce around the edges for visual appeal!
It turns something simple into a full-on centerpiece for your **game day appetizers**. Seriously, a little effort on the presentation makes this **buffalo chicken dip** look gourmet, even though it took you 10 minutes of work!
Storage and Reheating Instructions for Leftover Buffalo Chicken Dip
Now, if you manage to have leftovers of this incredible **buffalo chicken dip**—which, honestly, is a miracle in itself—don’t worry about storage! Leftovers are great for a quick lunch the next day, or honestly, often taste even better once the flavors have really settled overnight.
When you’re finished dipping for the night, let the extra dip cool down on the counter for just a bit, maybe 30 minutes or so, and then make sure it’s covered up tight. I always use plastic wrap pressed right down onto the surface of the dip, followed by a layer of aluminum foil over the top of the container. Keep that covered dish refrigerated. It should stay perfectly good for about 3 to 4 days this way.
Warming It Up for Encore Performance
Reheating is super simple, but how you do it changes the final texture slightly, so pick the method that suits you best. If you want that fresh-from-the-oven, bubbly, cheesy top again, your best bet is the oven. Transfer any leftover dip to a small, oven-safe dish—I usually use a small glass ramekin or a half-size 8×8 dish if I have a lot left. Bake it at a slightly lower temperature, say 325 degrees Fahrenheit, until it’s heated through and gooey, usually about 10 to 15 minutes. You might need to add a tiny splash of milk or a drop more hot sauce if it seems dry.
If you just need a quick scoop right now because you can’t wait, the microwave is your friend! Put a portion in a microwave-safe bowl. Heat it in 30-second intervals, stirring well between each burst. Be patient with the microwave; if you overheat it, the cream cheese can get grainy, and we definitely don’t want that! A few gentle zaps usually gets my quick-fix **spicy party dip** ready in under a minute.
No matter which way you warm it up, I highly recommend a fresh sprinkling of green onions or maybe an extra dash of Frank’s RedHot on top before you dig in the second time around!
Frequently Asked Questions About Franks RedHot Dip
When you’re making a recipe this popular, people always have great questions, and I love hearing from you! These are the things I get asked the most by folks prepping for big events like the Super Bowl or just wondering about substitutions. Because you’re trusting me with your **game day appetizers**, I want to make sure we cover all the bases here.
It’s important to remember that this recipe is based on the original, classic flavor profile, but we can certainly play around with it. I pulled together a few FAQs to make sure your **buffalo chicken dip** is exactly what you pictured!
How to Adjust the Heat Level in This Buffalo Chicken Dip
That’s always the first question! The heat level in this recipe is firmly set somewhere in the middle—tangy, zesty, but manageable for most people. That’s thanks to using a standard amount of Buffalo wing sauce and balancing the heat with plenty of creamy cheese and dressing.
If you’re serving a crowd that loves serious heat, you can absolutely crank it up! My suggestion is to replace about half of the standard Buffalo sauce with a pure hot sauce that has a higher Scoville rating. Or, try swapping out one of the dressings—if you’re already using ranch, add just a tablespoon of chopped fresh jalapeños mixed into the cream cheese phase.
Now, if you are serving this to kids or people who prefer milder flavors (maybe for a **Halloween party dip** where you have all ages!), you need to dial it back gently. For a milder **franks redhot dip**, only use 1/3 cup of the sauce instead of 1/2 cup, and substitute the missing liquid volume with just a splash of unsalted chicken broth or extra ranch dressing. It keeps the mixture moist without bringing the fire!
Can I freeze this buffalo chicken dip successfully?
Yes, you certainly can freeze this! It holds up surprisingly well, making it a fantastic **make ahead hot dip**. Mix everything together as if you were going to bake it, but don’t put it in the oven yet. Spread the unbaked mixture into a freezer-safe, oven-safe dish—make sure it’s totally covered and sealed tight with plastic wrap and foil. Freeze it flat for up to three months. When you’re ready to use it, thaw it in the fridge overnight before baking, remembering to add that extra 5 to 10 minutes to your cook time as mentioned before.
What is the best way to serve this for a tailgate spread?
For tailgates or anything on the go, I always recommend the slow cooker version we talked about! Keep the dip on the “Warm” setting in the slow cooker; it stays perfectly dippable and creamy for hours. We usually bring a big thermos of extra sauce just in case someone wants to spike their own portion later. It’s the easiest way to keep a large batch of **tailgate recipes** hot without juggling hot pans!
I hope these answers help you plan your next party! For more tips on making life easier in the kitchen, you can always check out my story about how this whole thing started over at my ‘About’ page.
Estimated Nutritional Data for This Spicy Party Dip
Look, I’m happy to share the magic, but I’m a cook, not a registered dietitian, so take these numbers with a grain of salt!
When you’re making a huge batch of addictive goodness like this **buffalo chicken dip**, it’s smart to have a general idea of what’s in it, especially if you’re managing a big food spread for game day or navigating dietary needs. This information is based on the recipe as written, serving 8 people generously.
Keep in mind that factors like the brand of ranch dressing you choose or exactly how much oil is in your chicken can change things slightly. This is just a helpful guideline!
- **Calories:** Around 180 per serving (which is pretty good for something this satisfying!).
- **Fat:** About 15 grams total.
- **Protein:** A solid 10 grams, thanks to all that chicken and cheese!
- **Carbohydrates:** Very low, just about 3 grams.
- **Sodium:** This one runs a little high, coming in around 450mg, which is expected when you use cured cheese and tangy bottled sauces.
If you are watching sodium for your **tailgate recipes**, you can easily cut that number down by choosing low-sodium cream cheese or rinsing off your rotisserie chicken a little bit before shredding. But honestly, how often are you going to eat this dip when it’s *not* a celebration? Enjoy it guilt-free!
Share Your Game Day Appetizers Experience
Well, we made it! You now have all the secrets to crafting the creamiest, tangiest, most unbeatable **buffalo chicken dip** ever to grace a snack table. I truly hope this recipe becomes a staple at your house, whether it’s for a casual Tuesday when you need a win or the main event for your huge **game day appetizers** spread.
Now that I’ve shared my tried-and-true methods for the perfect **baked buffalo chicken dip**, I really want to hear how it went for you! Did you make the slow cooker version? Did your guests devour it in five minutes flat? Did you try adding extra jalapeños like I suggested? I love knowing which little tweaks you make to personalize things.
Tell Me What You Thought!
Please, please leave me a rating right down below. Knowing that this recipe helped you serve up some genuine joy and simplicity when you needed it most is what Cooking by Felix is all about. We all need reliable recipes that prove eating well doesn’t have to steal all our time!
If you snapped a picture of your dip—especially one surrounded by happy, dipping friends—tag me! Nothing makes my day more than seeing your food success stories pop up. If you have any last-minute questions that I didn’t cover, don’t hesitate to pop over to the contact page, and I’ll do my best to help you out. Happy dipping, friend, and thanks so much for trusting me with your party planning!
You can always reach out here: Send a message to the kitchen!
PrintEasy Baked Buffalo Chicken Dip

Make this simple, crowd-pleasing hot dip for your next party using classic Frank’s RedHot flavor.
- Prep Time: 10 min
- Cook Time: 25 min
- Total Time: 35 min
- Yield: 8 servings 1x
- Category: Appetizer
- Method: Baking
- Cuisine: American
- Diet: Vegetarian
Ingredients
- 8 ounces cream cheese, softened
- 1 cup cooked, shredded chicken
- 1/2 cup Buffalo wing sauce (Frank’s RedHot style)
- 1/2 cup shredded cheddar cheese
- 1/4 cup ranch or blue cheese dressing
- 2 tablespoons blue cheese crumbles (optional)
- Green onions, chopped, for garnish
Instructions
- Preheat your oven to 375 degrees Fahrenheit. Lightly grease an 8×8 inch baking dish.
- In a medium bowl, mix the softened cream cheese until smooth.
- Stir in the shredded chicken, Buffalo wing sauce, cheddar cheese, and ranch or blue cheese dressing until everything is combined.
- Spread the mixture evenly into the prepared baking dish.
- Bake for 20 to 25 minutes, or until the dip is heated through and the cheese is melted and bubbly.
- If desired, sprinkle the blue cheese crumbles on top during the last 5 minutes of baking.
- Remove from the oven and let it cool for 5 minutes before serving. Garnish with chopped green onions.
Notes
- For a slow cooker version, combine all ingredients except the blue cheese crumbles and cook on low for 2-3 hours or high for 1 hour, stirring halfway through.
- Serve this spicy party dip hot with tortilla chips, celery sticks, or carrot sticks for dipping.
- You can assemble this make ahead hot dip up to 24 hours in advance; cover and refrigerate, then add 5-10 minutes to the baking time.
Nutrition
- Serving Size: 1/8 of recipe
- Calories: 180
- Sugar: 1
- Sodium: 450
- Fat: 15
- Saturated Fat: 8
- Unsaturated Fat: 7
- Trans Fat: 0
- Carbohydrates: 3
- Fiber: 0
- Protein: 10
- Cholesterol: 45