

If the thought of cooking a giant roast—the centerpiece of every serious holiday dinner—makes your palms sweat, I totally get it. For years, I thought achieving that mythical perfect, juicy and tender standing rib roast was reserved for professional chefs! It felt like this huge gamble right before the whole family sits down. But trust me, that pressure vanishes once you commit to the right technique.
That’s why I swore by figuring out the absolute most reliable way to deliver a stunning main course every time. This recipe, which leans heavily on the incredible reverse sear method and a deeply flavorful garlic herb crust, removes all the guesswork. We’re making the star of your holiday dinner absolutely foolproof so you can actually enjoy the party!
- Why This Garlic Herb Standing Rib Roast Recipe Works (No Fail Prime Rib)
- Gathering Ingredients for Your Bone In Rib Roast Recipe
- Step-by-Step Reverse Sear Rib Roast Instructions
- Achieving the Perfect Prime Rib Temperature Guide
- Tips for a Showstopper Beef Roast Centerpiece
- Serving Suggestions for Your Holiday Roast Dinner Ideas
- Storage and Reheating Instructions for Leftover Standing Rib Roast
- Frequently Asked Questions About the Classic Standing Rib Roast
- Estimated Nutritional Data for Garlic Herb Prime Rib
- Share Your Impressive Beef Roast Success
Why This Garlic Herb Standing Rib Roast Recipe Works (No Fail Prime Rib)
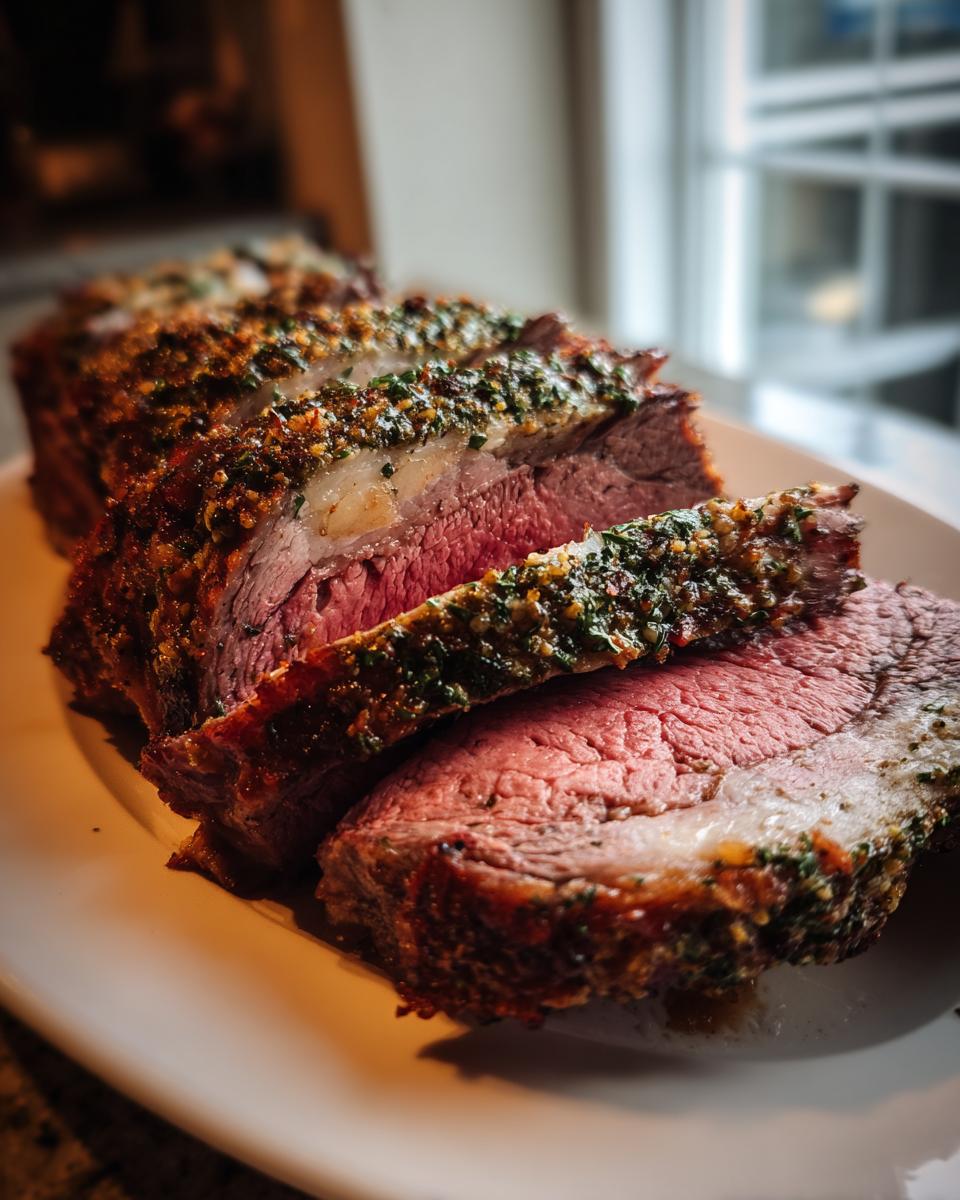
Okay, friends, this is where the magic happens, and honestly, it’s the reason I call this my no fail prime rib. We aren’t just throwing a huge piece of beef in a hot oven and hoping for the best. That’s stressful, and we aren’t doing that anymore! This technique guarantees you get that beautiful, edge-to-edge color, which is the secret to a truly juicy roast beef centerpiece every single time you make it.
I’ve tested every method out there, and nothing beats the reliability of this process for a genuinely impressive, special occasion meal. If you want a centerpiece that actually tastes as amazing as it looks, stick with me here. For something else unbelievably tender, check out my recipe for melt-in-your-mouth pot roast, but today, we are ruling the roast!
The Magic of the Reverse Sear Method for Your Standing Rib Roast
The reverse sear sounds fancy, but it’s just cooking low and slow—way down at 250 degrees—until the oven gently warms the whole roast right up to temp. Think of it like slow-cooking for maximum tenderness! Then, right at the end, we crank the heat up to a blazing hot 450 degrees for a quick sear. That blast of heat creates that incredible brown crust without overcooking the middle. It’s genius!
Flavor Profile: The Essential Garlic Herb Crust/Butter
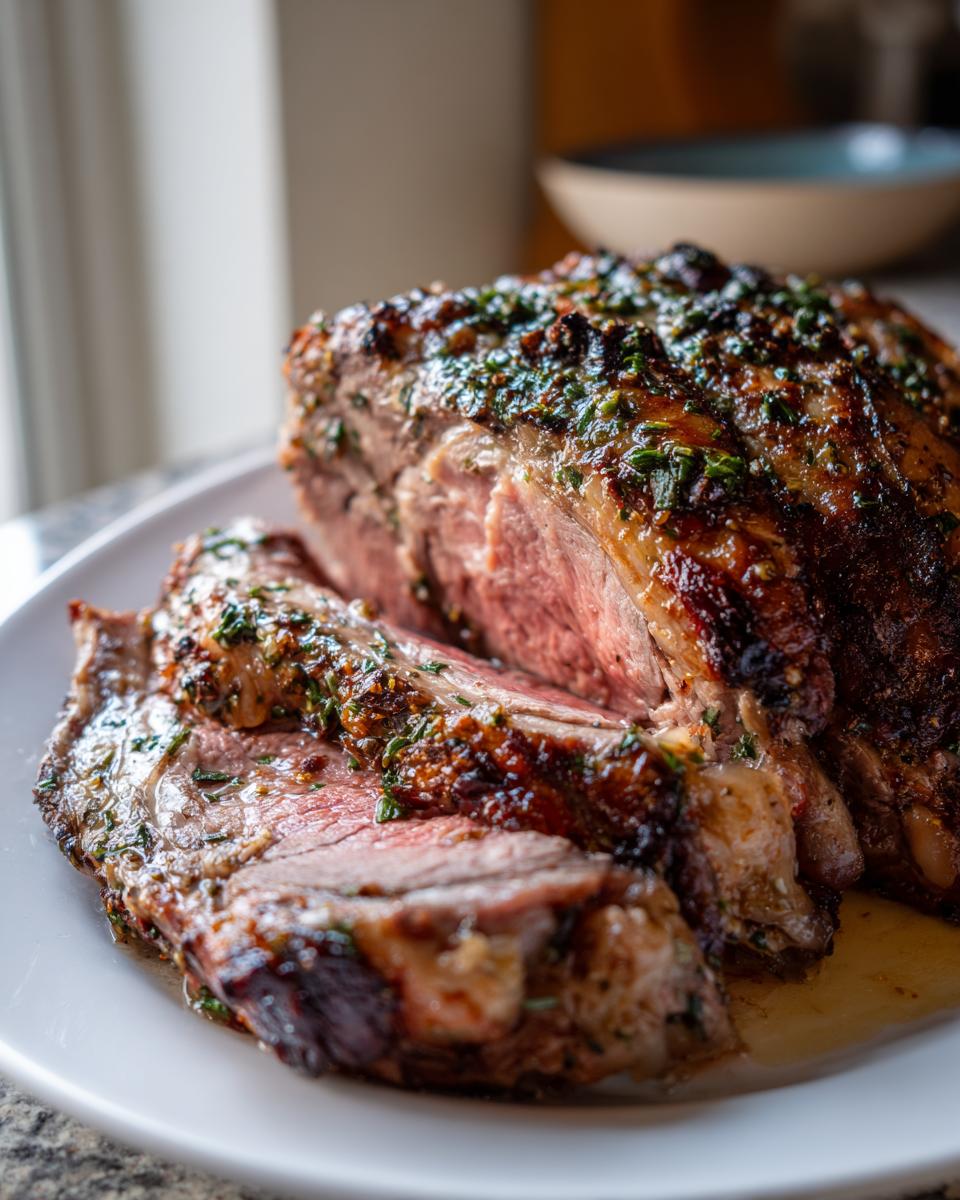
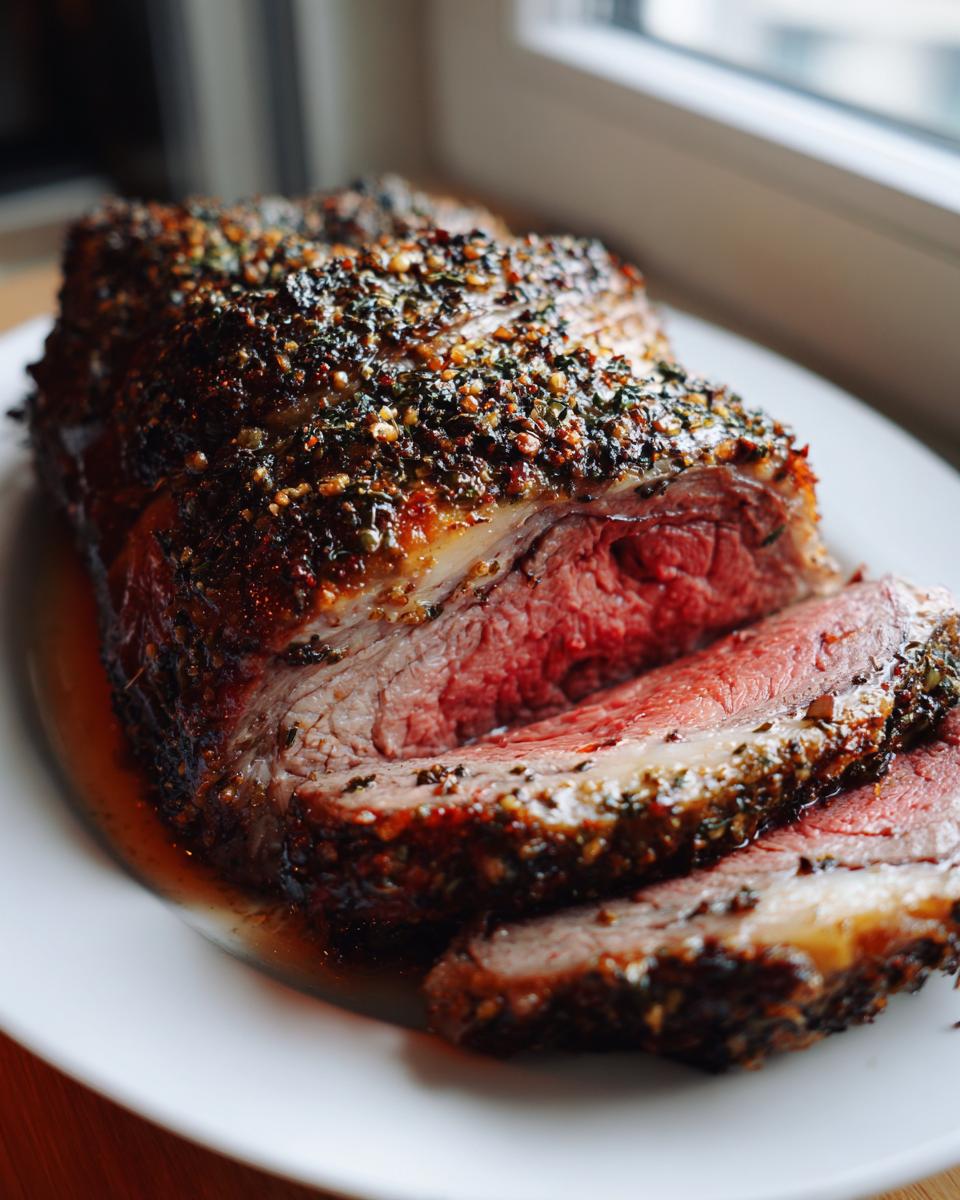
While the low heat guarantees texture, the flavor comes from smothering the outside in our vibrant garlic herb crust/butter before it even sees the oven. We’re loading it up with rosemary, thyme, and tons of garlic. This paste melts down during the slow cook, basting the beef constantly. It turns a good roast into an instantly impressive beef roast that smells fantastic when you serve it.
Gathering Ingredients for Your Bone In Rib Roast Recipe
Okay, let’s talk supplies! Since this standing rib roast is the star, you need to start with a great one. When you’re at the butcher shop asking for your bone-in rib roast, don’t be shy! I always ask them to separate the bones and then tie them right back underneath the roast. This little trick is a game-changer when it comes time to carve later. Everything else is pretty straightforward, but high-quality ingredients really make a difference here. If you love bold garlic flavors, you might want to check out my garlic parmesan chicken skillet while you’re stocking up!
Ingredient Notes and Substitutions for Standing Rib Roast
When you mix up that glorious herb paste, make sure your butter is truly soft—not melted and greasy. We need that creamy texture to hold all those aromatics! And please, please use kosher salt here; it coats the surface much better than table salt does. As for the garlic, mince it fine; you want that flavor dispersed everywhere, not big chunks. Remember that butcher note about the bones? That’s the one thing you can’t skip preparing beforehand!
Step-by-Step Reverse Sear Rib Roast Instructions
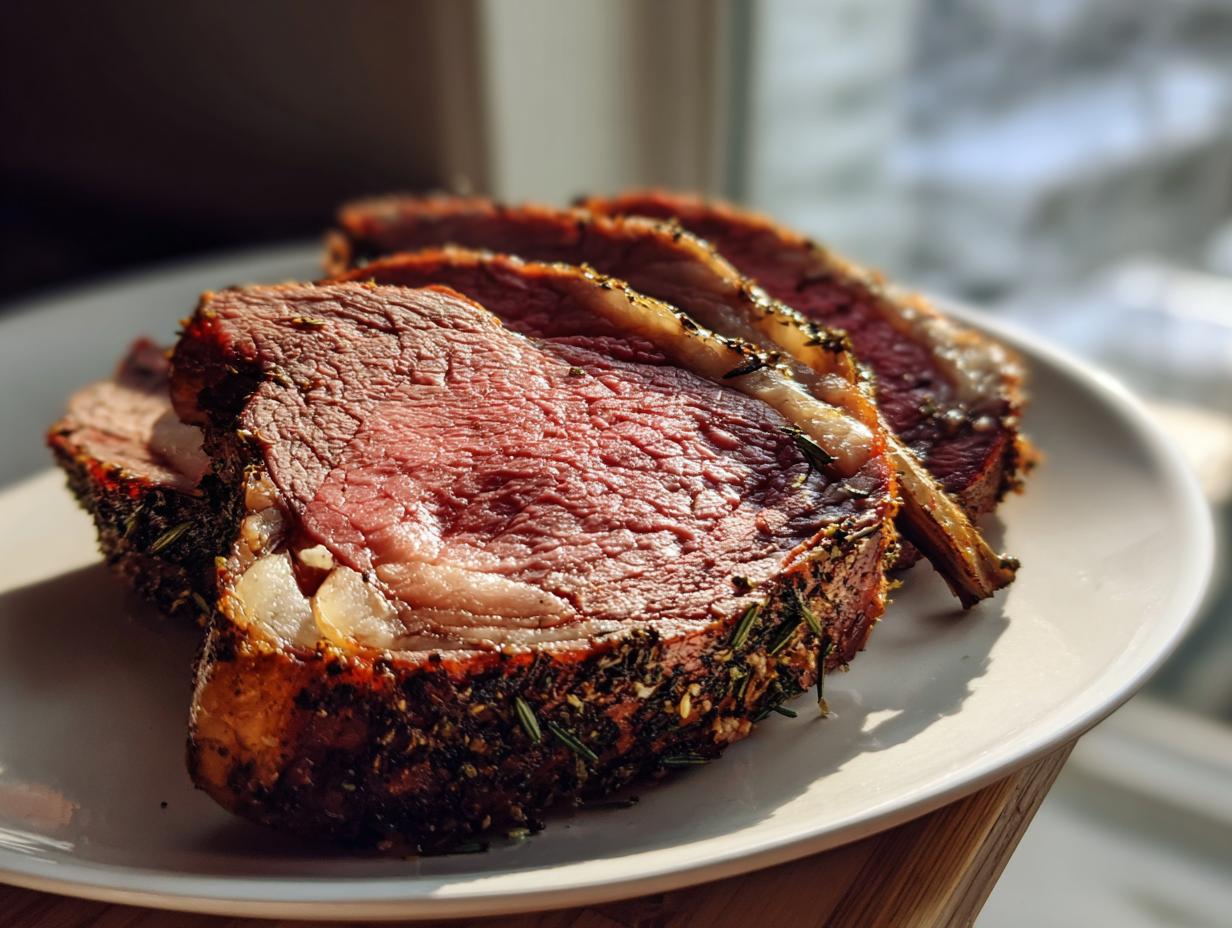
Following these Reverse Sear Rib Roast Instructions is key to getting that beautiful edge-to-edge pink that makes this the best prime rib recipe out there. It feels like a long process because of the resting time, but your actual active cooking time isn’t bad at all, I promise! Because we cook it slow, we get a spectacular result without hovering nervously over the oven door.
Preparing the Garlic Herb Prime Rib
First things first, don’t skip letting your roast sit out! We need that big piece of beef to come up to room temperature for about three or four hours before it even thinks about going into the oven. This helps with even cooking. While it’s warming up, whip up that garlic herb butter paste. Once it’s ready, grab some paper towels and seriously pat the entire surface of the roast dry. If it’s moist, you’ll steam it instead of searing later! Then, use your hands and rub that beautiful paste all over every single inch of the meat. Don’t be shy!
The Slow Roast Phase of Your Standing Rib Roast
Next, we set the oven low—we’re talking 250°F. Place the roast on a rack in the pan and pop it in. This is where that reliable meat thermometer I always talk about becomes your best friend. I watch it carefully until it hits 115°F for rare or maybe 120°F if you like it just a hair past that. This slow, gentle cook allows the collagen to break down perfectly, ensuring that juicy and tender texture we’re aiming for. It might take a couple of hours depending on your size, so put on some music and relax! You can find a great guide over at Simple Whisk if you want to compare timing.
Finishing the Standing Rib Roast with a High-Heat Sear
Once we hit that target temp internally, we pull *everything* out. Now, crank that oven up to 450°F! When it’s ripping hot, slide that roast back in for just about 10 to 15 minutes. This is the sear! We’re aiming for a deep, crisp, mahogany crust. Don’t walk away during this part, though; it can go from perfect crust to burnt real fast! My tip for the garlic parmesan chicken bake is the same here: watch it like a hawk at the high heat stage! Finally, and this is non-negotiable, take it out and let it rest, tented loosely with foil, for a full 20 minutes before slicing. That rest lets the juices redistribute—if you slice too early, all that hard work just runs onto the cutting board!
If you want to dive deeper into the methods, check out my other post on how to cook standing rib roast perfect!
Achieving the Perfect Prime Rib Temperature Guide
Listen, I know this is the point where a lot of people get nervous, which is why I want to give you a super clear Prime Rib Temperature Guide. When you’re making a standing rib roast, guesswork is the enemy of moisture. We’ve already done the hard work in the oven during that slow phase, but the very last couple of degrees are crucial for avoiding dry meat!
When you are reading the thermometer, which you MUST be using (seriously, toss out the idea of poking it with your finger!), you have to stop cooking slightly *before* your final goal temperature. This is called carryover cooking, and it’s when the roast keeps cooking for a few minutes even after you pull it out of the heat. It’s reliable, but you need to account for it. It’s much easier than trying to get perfectly poached eggs, I promise!
For a beautiful, show-stopping centerpiece, here are the targets I stick to. Remember, the internal temp will rise about 5 degrees while it rests:
- Rare: Pull it out around 120°F to 125°F. It will finish right around 125°F to 130°F. That deep red, buttery texture.
- Medium-Rare: This is my sweet spot for prime rib. I pull it at 130°F to 135°F, aiming for that perfect 135°F to 140°F finish.
- Medium: If you prefer a bit more done, aim to pull it at 135°F to 140°F, knowing it settles closer to 140°F to 145°F. I try not to push past this, honestly, or you start losing that melt-in-your-mouth quality we’ve worked so hard for.
Getting this timing right means you’re not just cooking beef; you’re mastering the science of a spectacular meal. Just trust the thermometer, and you’ll nail this every time.
Tips for a Showstopper Beef Roast Centerpiece
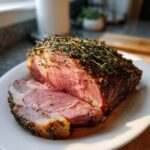
Now that your standing rib roast is cooked to perfection, carving it correctly is the final step to earning those kitchen hero points! My number one rule for getting those gorgeous, even slices that people admire is to slice *between* the bones, just like your butcher does when they separate them for you. You’ll notice the bones are tied tightly underneath; if you can, slip your knife right under the whole roast, remove the string, and gently separate the bones before slicing. This is one of the best tender roast cooking tips I can share!
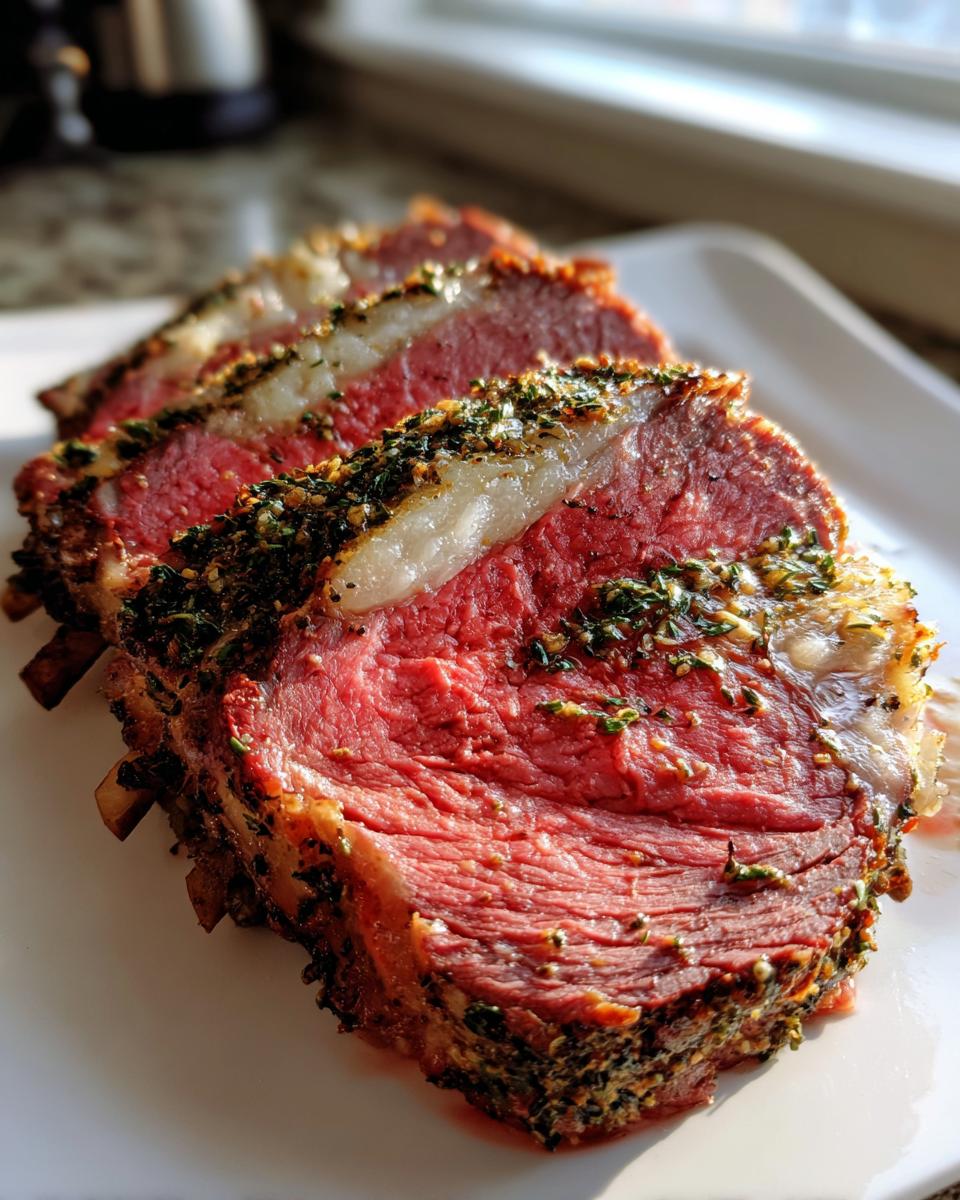
Also, when you serve, make sure you are cutting against the grain whenever possible. This breaks up the muscle fibers, which immediately makes every slice feel more tender in your mouth. You want your guests complimenting how incredible this impressive beef roast is, not struggling to cut it!
For even more tips on handling spectacular beef cuts, check out my go-to guide for steak fajitas—the same concepts of slicing apply! And if you want to see fantastic visuals on how to manage the carving stage, folks over at Drive Me Hungry have some great pointers.
Serving Suggestions for Your Holiday Roast Dinner Ideas
Okay, your standing rib roast is resting perfectly, the house smells amazing, and now we need to build the perfect supporting cast! A roast this rich and luxurious deserves sides that complement it without fighting for attention. When I’m planning my holiday roast dinner ideas, I like to pick one really creamy starch and one bright, simple green vegetable. It just balances the plate beautifully.
You absolutely cannot go wrong with mashed potatoes. I’m talking about my famous garlic mashed potatoes—they are so creamy and soak up all those delicious pan drippings (often called au jus, if you want to get fancy about it!). You need that pillowy softness to contrast with the crispy herb crust.
For the green, I keep it simple. Roasted asparagus tossed lightly with olive oil, salt, and pepper works wonders, or if you want to lean into that holiday flavor profile, you could try something sweeter. I adore making my sweet potato casserole with the pecan crunch topping—it adds a needed bit of texture contrast to the tender meat. Anything that feels comforting and luxurious works alongside this impressive beef roast. Just avoid anything too heavily seasoned, because that roast flavor should always be the main event!
Storage and Reheating Instructions for Leftover Standing Rib Roast
Don’t you just love having leftover prime rib? It’s like getting a second special occasion meal the next day! But how you handle those leftovers is crucial, because we need to protect that amazing juiciness we worked so hard to achieve with the reverse sear method. If you just zap a thick slice in the microwave, you end up with dry, sad beef, and we are simply not having that!
First, make sure you’ve let the roast cool down completely before you even think about wrapping it up. Get the biggest pieces of meat off the bone and slice them thinly—and I mean thin! This maximizes the surface area for moisture absorption later. Pop those thin slices into an airtight container. I usually find that a glass container works best to keep things fresh. Honestly, this roast should stay perfect in the fridge for about three to four days. If you need to store it longer, wrapping it tightly in plastic wrap before putting it in the container helps seal out any fridge smells.
Now, for the reheating—this is the secret sauce! Never reheat a thick chunk. Instead, slice what you want to eat, put it in a small oven-safe dish, and pour just a little bit of flavorful liquid over it. This could be water, beef broth, or better yet, the pan drippings if you saved them! Cover that dish tightly with foil and heat it gently in a 300°F oven until it’s just warmed through. This method steams the meat slightly, keeping it soft and moist. If you’re looking for another recipe that benefits from slow-simmering magic later on, check out my best chili recipe—reheating leftovers right is an art form!
Frequently Asked Questions About the Classic Standing Rib Roast
I know when you’re tackling something as magnificent as a Classic Standing Rib Roast, you’re going to have questions! That’s totally normal. I’ve been asked everything from how to handle the bones to what to do if the power goes out mid-roast (kidding, mostly!). I want to make sure you feel completely confident serving up your special occasion beef!
Can I use this recipe for a boneless standing rib roast?
Yes, absolutely, you can adapt this recipe for a boneless cut! It’s a little less traditional for a centerpiece, but the flavor profile is so good it works every time. The biggest difference is the timing since the heat penetrates the meat faster without those bones insulating the center. Since the cooking time will be shorter overall in the low-temperature phase, start checking your temperature about 20 to 30 minutes sooner than you would for a bone-in cut. You’ll still need to rest it for 20 minutes after searing, though—don’t skip that rest!
What if I don’t have a meat thermometer for my prime rib?
Oh, boy. I really, truly wish I could say, “Just eyeball it!” But when you’ve invested in a gorgeous prime rib, you need precision. My entire philosophy on making an easy rib roast cooking experience is based on knowing the internal temperature. If you don’t have a thermometer, you are gambling with the difference between perfectly juicy and tender and totally overdone. You can try cutting a tiny slit near the center to peek, but honestly, a reliable probe thermometer is the single most important piece of equipment here. Don’t risk ruining the main event of your Christmas dinner by guessing! If you need a great one, make sure you check out the recommendations in my chicken cobbler casserole recipe post—it’s a good guide for dependable kitchen tools!
Can I omit the garlic and herbs for a simpler standing rib roast?
That’s completely fine if you want a more traditional, purely beef-forward flavor! If you skip the whole garlic herb paste, you can still make a fantastic roast. Just make sure you are extremely generous with the kosher salt and freshly ground black pepper on all sides instead. That simple salt crust will help create a nice sear in the high-heat stage. It won’t be quite as aromatic while cooking, but it keeps that focus truly on the quality of the beef itself. It’s a quick shift for a very simple approach to cooking this glorious roast!
Estimated Nutritional Data for Garlic Herb Prime Rib
Okay, so we need to talk fuel! When you’re planning your big holiday dinner, sometimes it’s helpful to know what you’re working with—especially when the star of the show is this ridiculously rich, showstopper beef roast. Since every cut of meat is a little different—how much fat is trimmed, where you slice it from, etc.—these numbers are just estimates for our purposes here.
This data is based on a standard serving size of about 5 ounces of the cooked roast, using the recipe details provided. Remember, this is the result of our amazing, juicy meat achieved through that low-and-slow reverse sear—it brings out the flavor without making it overly heavy!
- Serving Size: 5 oz cooked
- Calories: approximately 450
- Protein: around 40 grams
- Fat: roughly 30 grams total
- Saturated Fat: about 12 grams
- Carbohydrates/Sugar: Zero! See? It’s pure protein and flavor heaven.
- Sodium: Approximately 350 mg (and remember, much of that is the kosher salt we used in our crust!)
A quick disclaimer, just because I like things clear: these numbers are an estimate. If you use a fattier piece of meat or skim significantly less fat after resting, your fat content will go up. This is the beauty and the uncertainty of preparing the ultimate roast beef at home. But even with the fat factored in, this prime rib feels like a special treat for any occasion!
Share Your Impressive Beef Roast Success
So there you have it! We’ve taken a potentially intimidating holiday centerpiece—that magnificent standing rib roast—and turned it into a completely achievable, utterly delicious reality using the reverse sear method. Now that you’ve conquered this recipe, I’m dying to hear all about it!
Did you manage to get that perfect rosy medium-rare center? Were your guests absolutely blown away by that crunchy, fragrant garlic herb crust/butter? Please, tell me everything in the comments below! Dropping a rating (even if you’re just giving it five stars in your head right now!) helps other home cooks feel confident tackling this showstopper next time.
If you took a picture of your final impressive beef roast—maybe sitting on a platter right before slicing—I would absolutely love to see it! Tag me on social media or send me a photo through the contact page. Seeing your success is genuinely the best part of sharing these recipes with you. Go forth and enjoy that incredible, juicy roast beef centerpiece tonight!
PrintThe Ultimate Garlic Herb Standing Rib Roast (Prime Rib)
Achieve a perfectly juicy and tender standing rib roast every time using the reverse sear method and a flavorful garlic herb crust. This recipe is ideal for your next holiday dinner centerpiece.
- Prep Time: 20 min
- Cook Time: 3 hr
- Total Time: 3 hr 20 min
- Yield: 6 servings 1x
- Category: Dinner
- Method: Oven Roasted
- Cuisine: American
- Diet: Low Fat
Ingredients
- 1 (4 to 6 pound) bone-in standing rib roast (prime rib)
- 2 tablespoons kosher salt
- 1 tablespoon freshly ground black pepper
- 1 tablespoon dried thyme
- 1 tablespoon dried rosemary
- 6 cloves garlic, minced
- 4 tablespoons unsalted butter, softened
- 1 tablespoon olive oil
Instructions
- Remove the roast from the refrigerator 3 to 4 hours before cooking to allow it to come to room temperature. This step is key for even cooking.
- Preheat your oven to 250 degrees Fahrenheit.
- Prepare the herb butter: In a small bowl, combine the softened butter, minced garlic, thyme, rosemary, salt, and pepper. Mix until you have a uniform paste.
- Pat the entire surface of the roast dry with paper towels.
- Rub the garlic herb butter mixture evenly over the entire surface of the roast.
- Place the roast, fat-side up, on a wire rack set inside a sturdy roasting pan. Drizzle the olive oil lightly over the top.
- Place the roast in the preheated 250°F oven. Cook until the internal temperature reaches 115°F for rare or 120°F for medium-rare. Use a reliable meat thermometer inserted into the thickest part, avoiding bone contact. This slow cooking process can take 2 to 3 hours depending on size.
- Once the target internal temperature is reached, carefully remove the roast from the oven.
- Increase the oven temperature to 450 degrees Fahrenheit.
- Place the roast back into the hot oven and sear for 10 to 15 minutes, or until the exterior crust is deep brown and crisp. Monitor closely to prevent burning.
- Remove the roast from the oven and transfer it to a cutting board. Tent it loosely with foil. Let the roast rest for at least 20 minutes before slicing. The internal temperature will rise several degrees during resting.
- Slice between the bones to serve your showstopper beef roast.
Notes
- For a bone-in rib roast recipe, ask your butcher to separate the bones and tie them back onto the roast. This allows for easier carving after resting.
- If you prefer a specific temperature, use this guide: Rare (120-125°F), Medium-Rare (130-135°F), Medium (135-140°F). Remember carryover cooking adds 5 degrees.
- This no-fail prime rib technique works best when you allow the roast to fully rest.
Nutrition
- Serving Size: 5 oz cooked
- Calories: 450
- Sugar: 0
- Sodium: 350
- Fat: 30
- Saturated Fat: 12
- Unsaturated Fat: 18
- Trans Fat: 0
- Carbohydrates: 0
- Fiber: 0
- Protein: 40
- Cholesterol: 130