


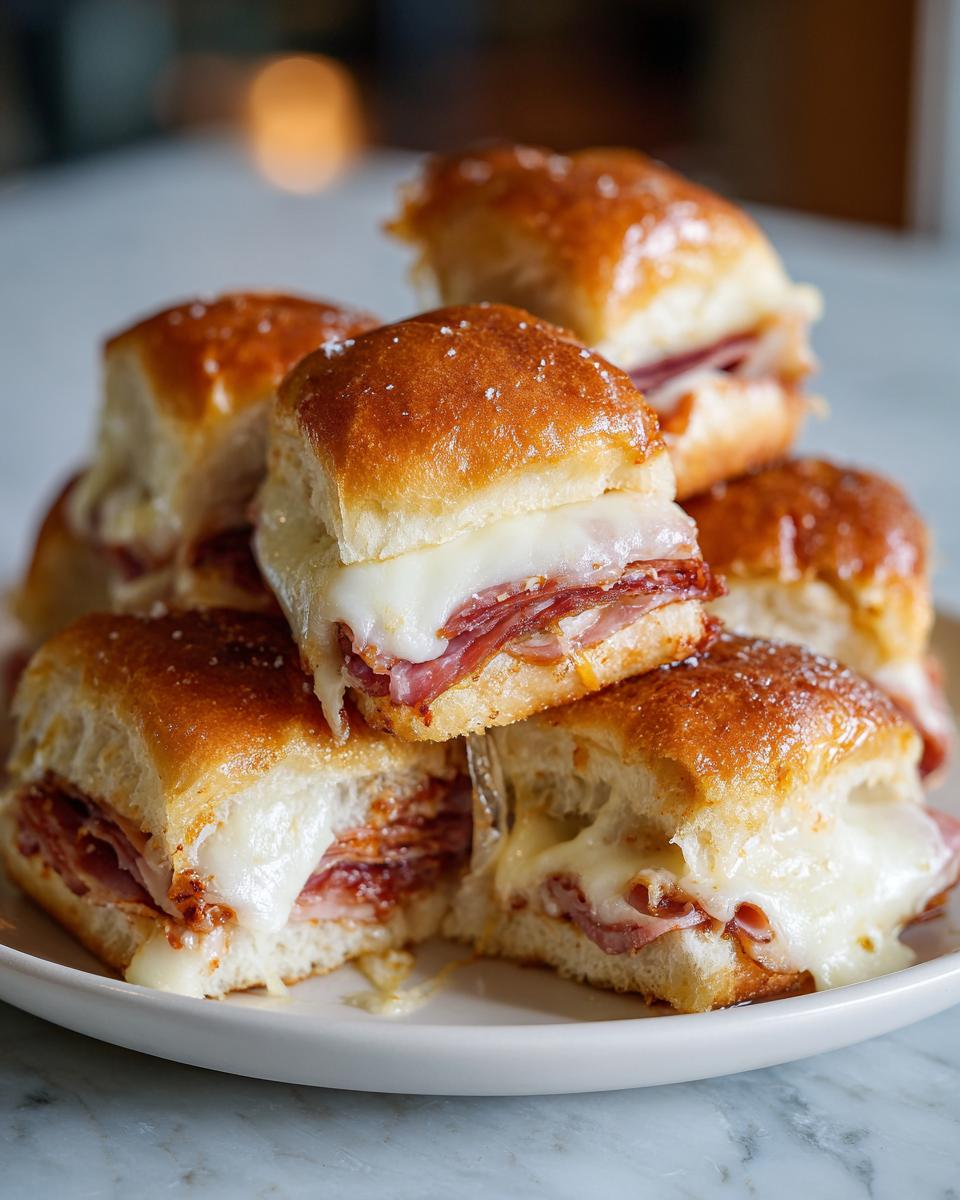
Are you constantly scrambling when game day rolls around or when unexpected guests drop by? We’ve all been there—craving that huge, satisfying flavor of a real deli Italian sandwich but with zero time to mess around with individual construction. Trust me, I lived that marketing marathon life for years, and I promise you, delicious doesn’t have to mean difficult. That’s why I developed the fix for all your appetizer and quick-dinner woes: the Ultimate Baked Italian Grinder Sliders. These aren’t just cute little sandwiches; they’re flavor bombs packed into soft rolls. We are talking bold Italian flavor, gooey cheese, and assembly so simple you’ll wonder why you waited so long to try these!
I used my experience creating fast, exceptional meals to make these grinder sliders the ultimate crowd-pleaser. They assemble in under ten minutes, bake up beautifully cheesy, and deliver everything you love about a classic grinder in one glorious sheet.
- Why You Will Make These Italian Grinder Sliders Again and Again
- Essential Ingredients for Perfect Grinder Sliders
- Step-by-Step Instructions for Baked Grinder Sliders
- Expert Tips for Making the Best Grinder Sliders
- Ingredient Notes and Substitutions for Your Grinder Sliders
- Serving Suggestions for Your Party Appetizers
- Storage and Reheating Instructions for Leftover Grinder Sliders
- Frequently Asked Questions About Italian Grinder Sliders
- Nutritional Estimates for These Mini Deli Sandwiches
Why You Will Make These Italian Grinder Sliders Again and Again
I’ve perfected a lot of fast recipes over the years, but these Italian Grinder Sliders truly hit the sweet spot. They tackle every kitchen hurdle you run into when trying to feed a crowd quickly.
- They are the definition of Crowd Pleaser Recipes; everyone grabs one (or three!) right away.
- Ready in under 35 minutes total—it’s a fantastic Quick Dinner Idea.
- Using Hawaiian rolls means zero fuss with buns, and they bake up perfectly soft and slightly sweet!
If you love easy but need big flavor, this is your new go-to. You might also love how quickly my Reuben Dip comes together for your next party!
Essential Ingredients for Perfect Grinder Sliders
You know I’m all about flavor, and with these Italian Grinder Sliders, the flavor starts with quality ingredients. Since we aren’t doing much to them other than baking, the meats and cheeses have to shine! I swear, using good, thinly sliced deli cuts makes all the difference here. If you’re looking for more incredible layered meals, you have to try my Chicken Alfredo Lasagna next!
For the Savory Meat and Cheese Layers
You’ll need the sweet rolls as your base—they are non-negotiable for the classic texture.
- One standard 12-count package of sweet slider rolls (Hawaiian rolls work like a charm).
- About half a pound each of thinly sliced ham, salami, and pepperoni. Don’t skimp here; that salty, spicy mix is what gives you the true grinder kick.
- Half a pound each of provolone cheese and Swiss cheese, also thinly sliced so they melt beautifully over everything.
For the Signature Garlic Butter Glaze on Your Grinder Sliders
This buttery topping is the secret weapon that turns simple sandwiches into a must-have Baked Sliders Recipe.
- A quarter cup of unsalted butter, melted until smooth.
- Two cloves of garlic, minced super fine—I mean really fine, so you don’t get big chunks.
- One teaspoon of dried Italian seasoning and half a teaspoon of onion powder.
- A small dab, about a quarter teaspoon, of Dijon mustard for tang.
- One tablespoon of poppy seeds—these are totally optional, but they give the tops a nice little crunch that I just love!
Step-by-Step Instructions for Baked Grinder Sliders
Okay, this is the fun part where everything comes together so fast! Seriously, you’ll have these ready for the oven before you can even decide what movie to put on for Game Day. Clarity is key here, so follow these quick steps to ensure maximum cheesy success. If you have little helpers, they can totally help mix the butter topping! For another incredibly fast meal, check out my recipe for Easy Chicken Cobbler Casserole.
Preparing the Rolls and Oven for Your Grinder Sliders
First things first, get your oven warming up to 350 degrees Fahrenheit. Grab a 9×13 baking dish and just give it a light spray of non-stick or grease it lightly with butter. Now, the most important action: take your entire package of slider rolls and carefully slice them right through the middle horizontally. You want them to stay connected in one big piece! Place that bottom half gently into your prepared dish.
Layering the Meats and Cheeses for Optimal Melt
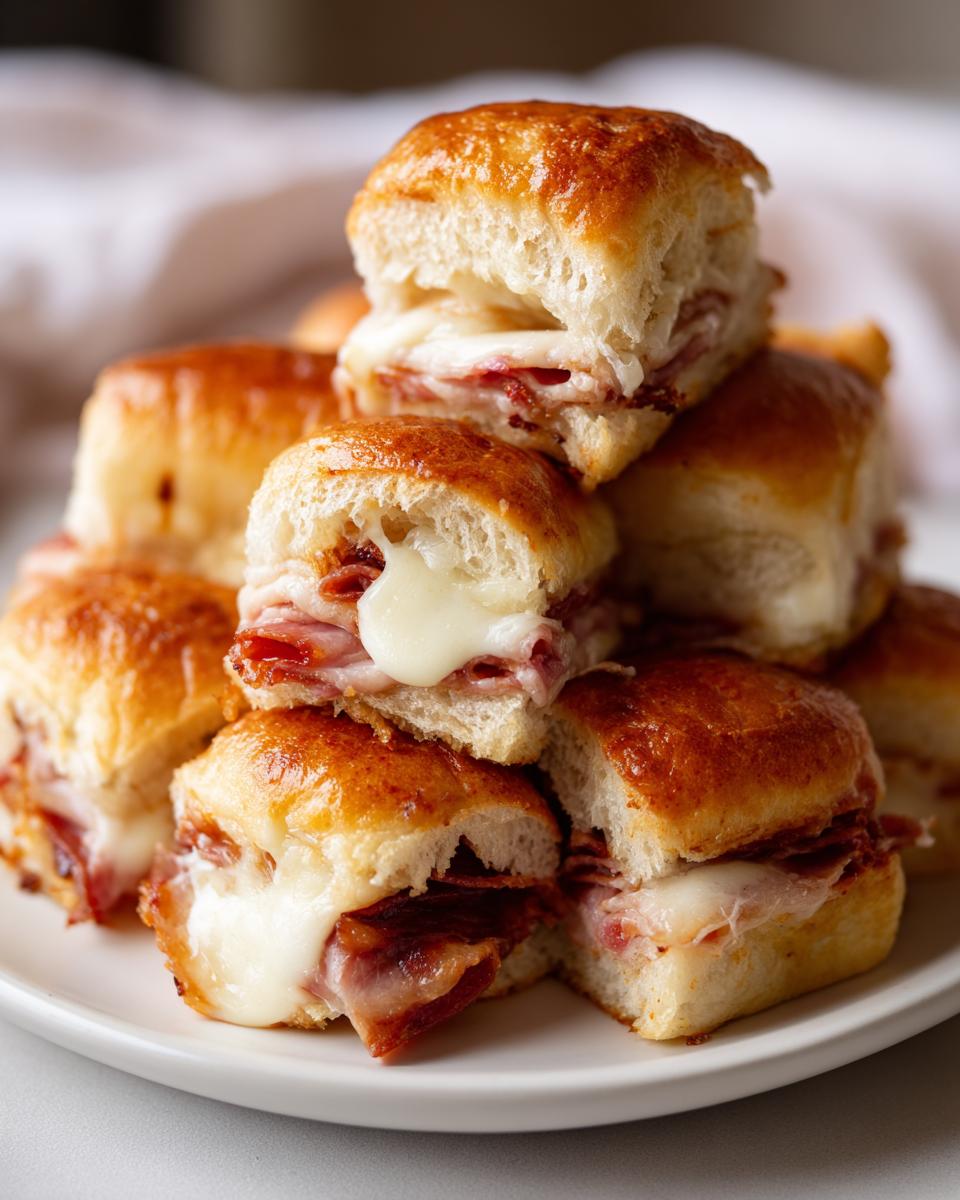
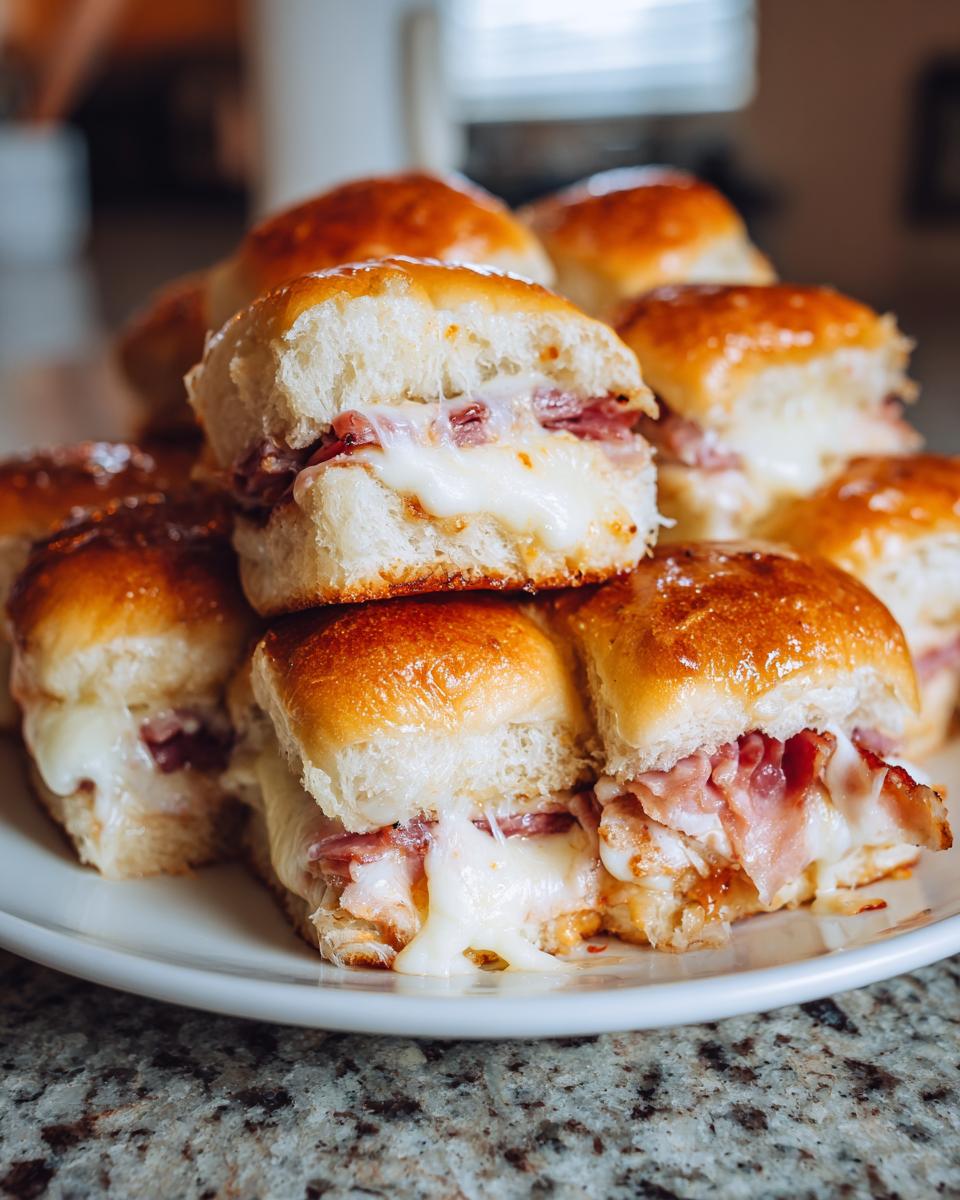
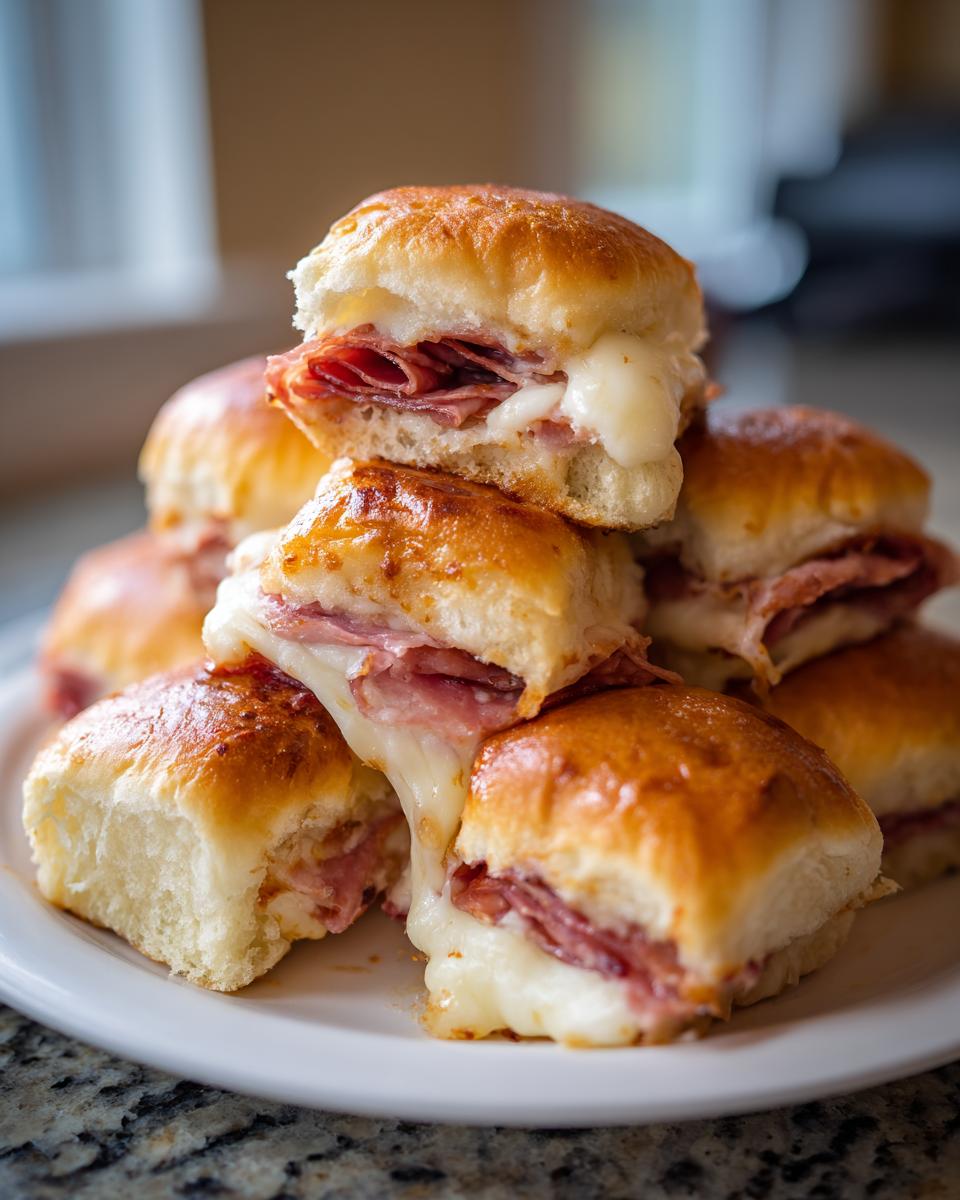
Time to stack this flavor! Layer your meats evenly across the bottom rolls. I like to go Ham first, then Salami, and then Pepperoni right on top. Make sure they hang over the edges just a little bit so you get coverage everywhere. Next, alternate your cheeses. Place the Provolone down, then the Swiss. Try to get all your meat and cheese distributed across your Hawaiian Roll Sliders so that every single little square gets that perfect melt.
Creating and Applying the Garlic Butter Brush for Hot Italian Sliders
While you’re stacking, whisk together your glaze ingredients in a small bowl—that’s your melted butter, minced garlic, Italian seasoning, onion powder, and Dijon. Give it a good whisk until it’s combined. Once everything is layered, take a brush and coat that entire top half of the rolls—edges and middle—generously with this butter mixture. Don’t be shy; this is what makes them those amazing, savory Hot Italian Sliders!
Baking and Resting Your Grinder Sliders
Cover that dish tightly with aluminum foil, and pop it into the preheated oven for 15 minutes. This steams the inside and melts the cheese perfectly. After 15 minutes, pull the foil off and bake for another 5 to 10 minutes. You’re looking for golden brown tops and totally ooey, gooey cheese. This is crucial for these Easy Slider Sandwiches: let them sit on the counter for 5 minutes after they come out. Trust me, this quick rest helps them hold their shape when you slice them apart!
Expert Tips for Making the Best Grinder Sliders
Okay, so you’ve followed the steps, and you’re already on your way to making some incredible grinder sliders. But because I want these to be the best party appetizers you’ve ever made, I have a few extra pro-tips I learned from testing this recipe over and over again. Remember how I said the key is flavor? Let’s boost that Italian profile!
If you want that authentic, zesty kick you find at the deli, you absolutely need to try adding a thin layer of mayonnaise mixed with just a tiny splash of red wine vinegar right over the bottom layer of rolls before you even put the ham down. It sounds weird, I know, but that subtle acidity really cuts through the richness of the meats and that gooey cheese. It’s a game-changer for Hot Italian Sliders.
When you’re brushing on that glorious garlic butter topping, make sure you get right to the edges of the rolls. Those edges tend to dry out first, and we want every single square to soak up that seasoning and stay moist. That’s how you guarantee that every single person gets that perfect, flavorful bite they are expecting from these comfort food sandwiches.
And listen, if you are using those sweet rolls, they do cook pretty quickly. Make sure you have your foil ready to go on the counter. Pulling them out at the 15-minute mark covered to steam them just right prevents the cheese from running everywhere when you take the foil off. These are perfect for game day, and you can find my recipe for the best French Onion Soup if you need another hearty side!
Ingredient Notes and Substitutions for Your Grinder Sliders
So, what happens if you’re dying to make these grinder sliders but you don’t have those sweet Hawaiian rolls? Don’t panic! I get this question all the time. While the sweetness of the Hawaiian roll really balances out the saltiness of the Italian meats, you absolutely have alternatives. If you can’t find them, any basic soft, small dinner roll will work just fine for your Hawaiian Roll Sliders.
The real thing to remember when swapping rolls—or any ingredient, really—is to keep the function in mind. The roll needs to be soft enough to absorb that garlic butter glaze but sturdy enough to hold all that meat and cheese without immediately falling apart when you bake it. If you use a very crusty roll, it just won’t get that wonderful, soft texture we are aiming for.
When it comes to the deli meats, you want them thinly sliced. Super thin! If the meat is thick, you end up needing way more volume to cover the bread, and when you bake it, those thick edges get a little tough. Thin slices stack beautifully and ensure that when you melt that cheese, everything fuses together into one unified, delicious bite. This is true whether we’re making these Deli Meat Sliders or trying out my Chicken Lettuce Wraps!
Could you use different cheeses? Of course! But Provolone and Swiss are there for a reason. Provolone brings the classic Italian tang, and Swiss melts into the silkiest, creamiest layer underneath. If you swap them out, just make sure your substitute melts well. Something like Monterey Jack will give you great melt, but you’ll lose a little bit of that traditional Italian flair in your Easy Slider Sandwiches.
Serving Suggestions for Your Party Appetizers
When you bring out these amazing grinder sliders, you definitely need a few simple sides because they are so hearty already! Since they have that amazing Italian flavor profile, you don’t want to overpower them. I always keep things easy so I can actually enjoy the party too.
For Game Day, forget anything complicated. A big bowl of crunchy kettle chips is perfect for salty snacking in between bites. If you want something slightly fresher, a simple side salad with a bright, acidic vinaigrette keeps things light. And if you’re hosting, you should totally try my recipe for Easy Stuffed Mushrooms—they pair perfectly with these deli meat sliders!
You really don’t need a dip since they are already so saucy from that garlic butter glaze, but if you must serve one, go for something creamy to balance the spice, like a cool ranch or a simple aioli.
Storage and Reheating Instructions for Leftover Grinder Sliders
I know, I know, there are never really leftovers when I make these grinder sliders, but if you somehow manage to keep a few hidden away, let me tell you how to store them safely so they taste almost as good the next day. Because these sandwiches are loaded with mayo, meats, and cheese, you have to treat them like any other deli sandwich.
Make sure they cool down almost completely, but don’t leave them sitting out too long—we want to keep those meats safe. Once they are room temperature, cover the whole leftover section tightly with plastic wrap or foil. You can store them in the fridge for up to three days. Honestly, if you try longer than that, the rolls start to get a little sad and soggy, even if the flavor is still okay. If you want something simple to pair with lunch the next day, try my Easy One-Pot Spanish Rice!
Now, for the best part: reheating! While you *can* pop a few in the microwave, I strongly advise against it unless you are in a severe time crunch. Microwaving these instantly turns the beautiful texture of the Hawaiian rolls into something rubbery, and nobody wants a soggy slider.
The best way to bring these back to life is in the oven. Preheat your oven to about 325 degrees Fahrenheit. Place the leftovers (still connected if possible, or close to it) on a baking sheet. Cover them loosely with foil—we are looking for gentle reheating, not browning. Bake them for about 10 to 12 minutes. That gentle heat will warm everything through, get that cheese gooey again, and slightly crisp up the topping without drying out the interior.
If you are only reheating one or two easy slider sandwiches, you can use an air fryer on about 300°F for 4-5 minutes, watching them closely so the poppy seeds don’t burn! They’ll come out tasting just like they did fresh from the oven.
Frequently Asked Questions About Italian Grinder Sliders
I get so many questions about these Italian Grinder Sliders because everyone wants to make them perfectly for their gatherings! Since they are so ideal for Game Day Food, people often ask about making them in advance. I want to make sure your hosting experience is zero-stress!
Can I make these Grinder Sliders ahead of time?
Yes, you absolutely can assemble these grinder sliders ahead of time, which is great for hosting! I’d say you can put all the meat and cheese layers together up to about 4 hours before you plan to serve them. Just keep the whole thing tightly covered in the fridge. The trick, though, is the garlic butter glaze. Don’t brush that on until you are literally ready to put the foil over them and get them into the oven. If you put the butter on too early, the rolls soak it up too much, and you end up with soggy bottoms instead of that yummy texture we love in these Baked Sliders Recipe.
What cheese works best besides Provolone and Swiss in these Baked Sliders Recipe?
The Provolone and Swiss combo is my tried-and-true favorite because of that beautiful tang and smooth melt, but if you love experimenting, I totally get it! For great meltiness, try substituting some of the Swiss with Monterey Jack. It gets wonderfully stretchy and gooey. If you want a slightly sharper, milder flavor than Provolone, you could try thin slices of mild white cheddar, but keep in mind it won’t melt quite as uniformly. As long as your cheese melts nicely, you’re good to go!
Are these suitable for Game Day Food?
Oh my gosh, yes! These grinder sliders were practically *invented* for Game Day. Honestly, they are my favorite of all the Crowd Pleaser Recipes because they feed so many people with almost no effort. You can make a double batch just as easily as you make a single batch, and everyone can grab one or two standing up by the TV without needing a plate and fork. They are the perfect Bite Sized Sandwich for tailgating or watching football! If you’re looking for more easy game-day bites, check out my Buffalo Chicken Sliders recipe!
Nutritional Estimates for These Mini Deli Sandwiches
I always feel a little nervous sharing nutrition facts because, let’s be honest, these mini deli sandwiches are packed with salty meats and glorious, gooey cheese! But since you deserve to know what you’re putting into your body—especially when serving them as a quick dinner idea—here are the estimated nutritional breakdowns. Remember, these numbers are based strictly on the recipe ingredients listed and a yield of 12 sliders, so think of them as a guideline, not gospel.
This information is provided for those who like to track everything, but my main goal is always flavor and satisfaction! If you’re looking for something sweet to balance out this savory feast, you absolutely have to try my Easy Pumpkin Fluff Dip. The contrast is fantastic!
- Serving Size: 1 slider
- Calories: 350
- Fat: 18g
- Saturated Fat: 9g
- Carbohydrates: 28g
- Protein: 18g
- Sodium: 850mg (Yep, they are salty, thanks to those delicious cured meats!)
- Sugar: 6g
Enjoy these amazing grinder sliders knowing they’re worth every single calorie for your next party or easy weeknight meal!
PrintUltimate Baked Italian Grinder Sliders

Make these easy, crowd-pleasing Italian Grinder Sliders using Hawaiian rolls. They are packed with deli meats, melted cheese, and a savory garlic butter glaze, perfect for game day or a quick family dinner.
- Prep Time: 10 min
- Cook Time: 25 min
- Total Time: 35 min
- Yield: 12 sliders 1x
- Category: Lunch
- Method: Baking
- Cuisine: American
- Diet: Vegetarian
Ingredients
- 1 (12 count) package sweet slider rolls (like Hawaiian rolls)
- 1/2 pound thinly sliced ham
- 1/2 pound thinly sliced salami
- 1/2 pound thinly sliced pepperoni
- 1/2 pound thinly sliced provolone cheese
- 1/2 pound thinly sliced Swiss cheese
- 1/4 cup unsalted butter, melted
- 2 cloves garlic, minced
- 1 teaspoon dried Italian seasoning
- 1/2 teaspoon onion powder
- 1/4 teaspoon Dijon mustard
- 1 tablespoon poppy seeds (optional)
Instructions
- Preheat your oven to 350 degrees Fahrenheit. Lightly grease a 9×13 inch baking dish.
- Carefully slice the entire package of slider rolls horizontally, keeping the rolls connected in one piece. Place the bottom half of the rolls in the prepared baking dish.
- Layer the meats and cheeses evenly over the bottom half of the rolls. Start with ham, then salami, then pepperoni, followed by alternating layers of provolone and Swiss cheese.
- Place the top half of the rolls back onto the meat and cheese layers.
- In a small bowl, whisk together the melted butter, minced garlic, Italian seasoning, onion powder, and Dijon mustard. If using, stir in the poppy seeds.
- Brush the entire top surface of the assembled sliders generously with the garlic butter mixture.
- Cover the baking dish tightly with aluminum foil.
- Bake for 15 minutes covered.
- Remove the foil and bake for an additional 5 to 10 minutes, or until the cheese is fully melted and the tops are lightly golden brown.
- Let the sliders rest for 5 minutes before slicing between the rolls. Serve warm as a party appetizer or quick dinner idea.
Notes
- For an extra zesty flavor, you can add a thin layer of mayonnaise mixed with a dash of red wine vinegar over the bottom layer of rolls before adding the meat.
- If you do not have Hawaiian rolls, use any soft, small dinner rolls.
- These sliders reheat well in the oven or microwave the next day.
Nutrition
- Serving Size: 1 slider
- Calories: 350
- Sugar: 6
- Sodium: 850
- Fat: 18
- Saturated Fat: 9
- Unsaturated Fat: 9
- Trans Fat: 0.5
- Carbohydrates: 28
- Fiber: 1
- Protein: 18
- Cholesterol: 45