

There’s nothing quite like the smell of a baked apple pie wafting through the kitchen, right? It’s pure comfort food, a true slice of Americana that just screams cozy afternoon. But when you’re juggling a killer marketing job like I was, finding the time to achieve that perfect, flaky double crust feels impossible. Trust me, chasing authentic flavor shouldn’t mean sacrificing your entire evening! That’s why I spent ages perfecting this Classic Flaky Double Crust Apple Pie Recipe. It delivers all that incredible traditional taste without needing you to work overtime for it. Get ready to impress everyone!
- Why This Classic Apple Pie Recipe Works for Busy Cooks
- Ingredients for the Best Homemade Apple Pie
- Step-by-Step Instructions for a Perfect Apple Pie
- Tips for Success with Your Flaky Pie Crust Tutorial
- Variations: Crumb Topping or Dutch Apple Pie Recipe Ideas
- Serving Suggestions for Your Traditional Apple Pie
- Storing and Reheating Your Delicious Homemade Apple Pie
- Frequently Asked Questions About Making Apple Pie
- Estimated Nutritional Data for Classic Apple Pie
- Share Your Perfect Apple Pie Creation
Why This Classic Apple Pie Recipe Works for Busy Cooks
When I first started Cooking by Felix, my biggest challenge was proving that amazing flavor doesn’t have to equal hours chained to the stove. This Easy Apple Pie for Beginners is built around that philosophy. I know, I know—pie crust is the scary part! But hear me out: we use two 9-inch unbaked crusts here for speed. This lets us focus 100% on making that filling absolutely sing.
This recipe elevates that simple structure because we treat the filling right, turning a quick bake into serious Comfort Food Desserts magic. I remember rushing this home for a potluck; I had 45 minutes max. I tossed the apples, sprinkled in my flavor-boosters, dotted with butter, and slapped the top on. It came out golden, bubbly, and nobody suspected I cheated on the dough! It’s about making smart choices so you can enjoy the process and the result.

Ingredients for the Best Homemade Apple Pie
Okay, let’s talk about what goes into this incredible pie. Clarity is everything when baking, especially when you want that perfect texture so you don’t end up with mush! I’ve listed everything precisely below so you get that traditional apple pie flavor spot on. We need 6 large Granny Smith apples—make sure you peel, core, and slice them exactly 1/4 inch thick. Precision here matters for even cooking!
For the rest of the filling flavor, we’re using a mix of sugars and the magic spices. Don’t skip the secret weapons: we need 1/8 teaspoon of salt and 1/8 teaspoon of ground black pepper. I promise you won’t taste pepper, but it makes the cinnamon glow! And yes, we always start with 2 cups of pre-made crusts—no shame in saving that crucial time. Grab your ingredients and let’s move on to assembly.
Step-by-Step Instructions for a Perfect Apple Pie
Now for the fun part—putting this gorgeous creation together! It’s honestly less complicated than people think. We are going to move through this in three main phases: prep the base, seal it up prettily, and then bake it until it smells like heaven.
Preparing the Crust and Filling for Your Apple Pie
First thing’s first, get that oven preheated to 425 degrees F. We need that initial high heat blast for a beautiful lift on the crust! Take one of your pie crusts—whether homemade or store-bought for speed—and gently ease it into your 9-inch pie plate. Don’t stretch it, just let it settle in there properly.
In a big bowl, toss those beautifully sliced Granny Smith apples with all your sugars, flour, cinnamon, nutmeg, salt, and that secret pepper. You’ve got to toss gently! I learned the hard way that aggressive stirring turns perfect apple slices into sauce before they even hit the oven. Just ensure every piece is coated evenly.
Assembling and Sealing the Double Crust Apple Pie
This is where we build the texture. Pour that coated apple mixture right into the bottom crust. Then, take your 2 tablespoons of cold, unsalted butter, cut into tiny little squares, and dot them over the filling. These little gems melt down and create pockets of richness!
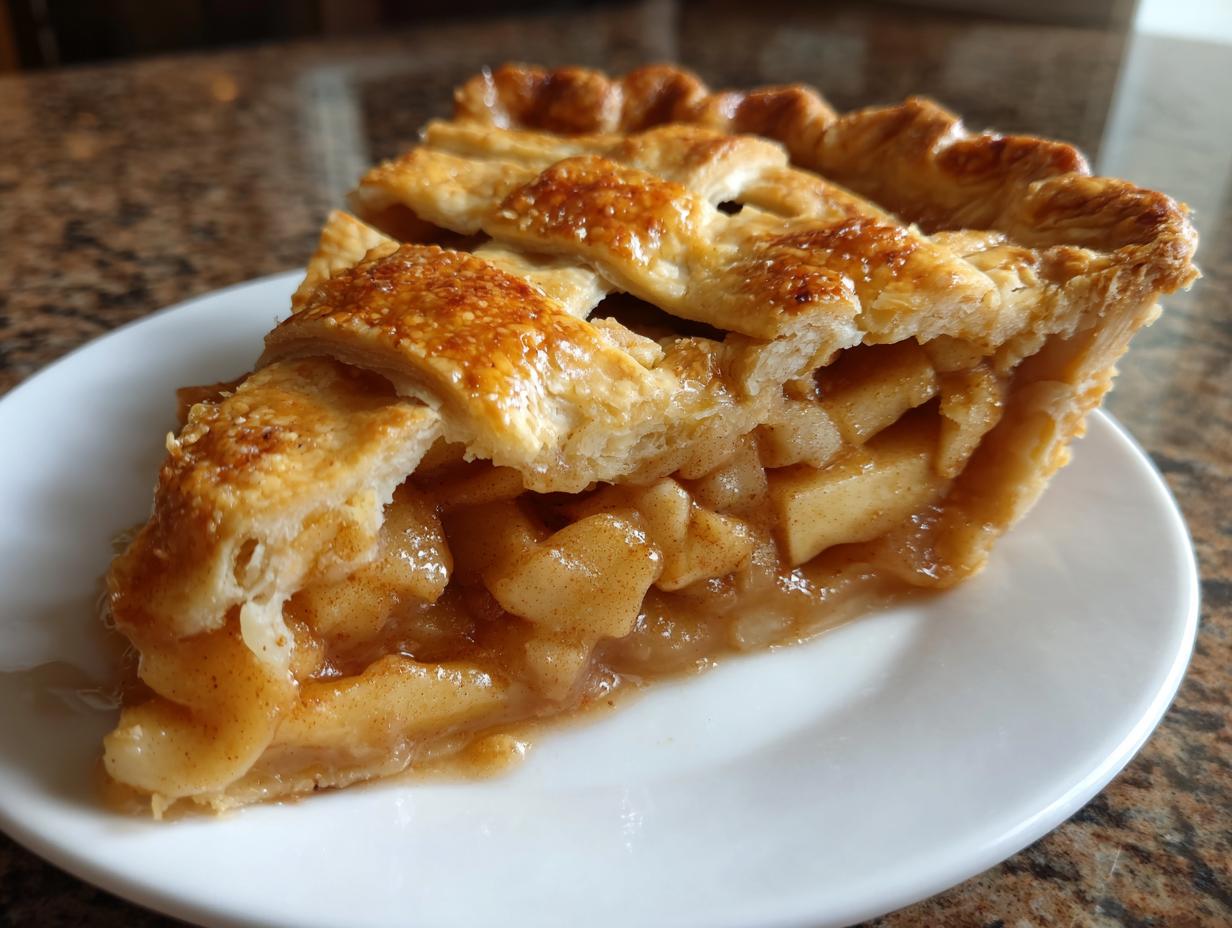
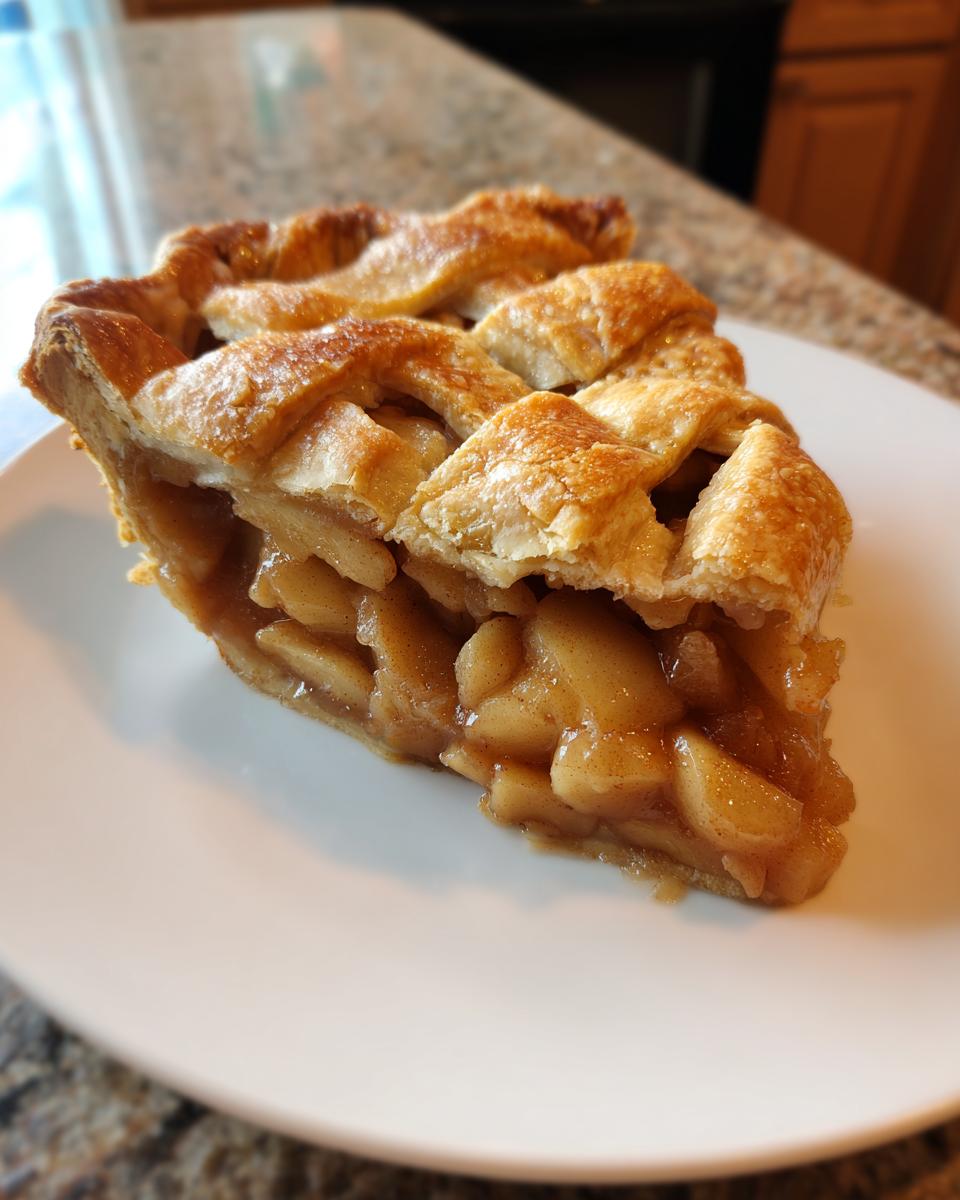
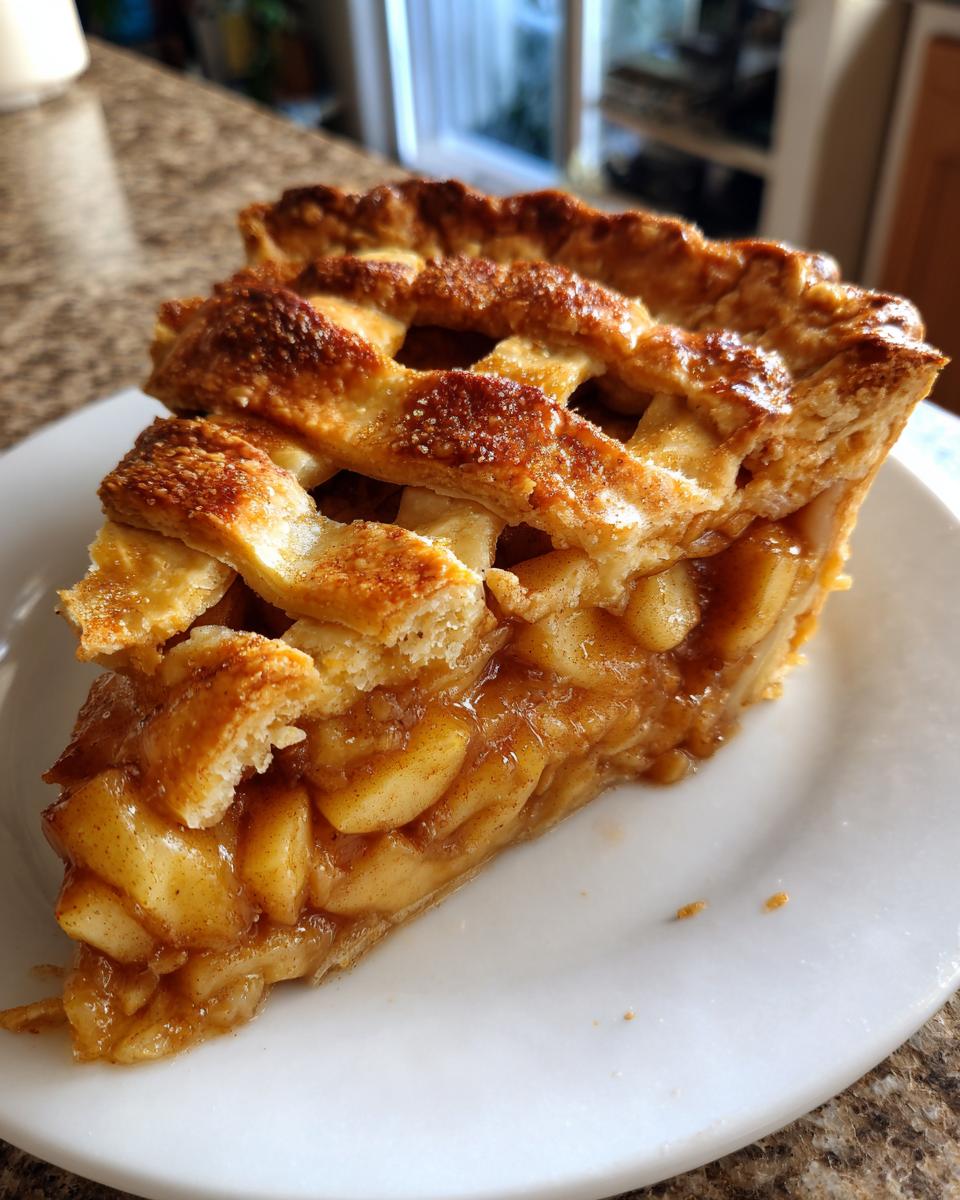
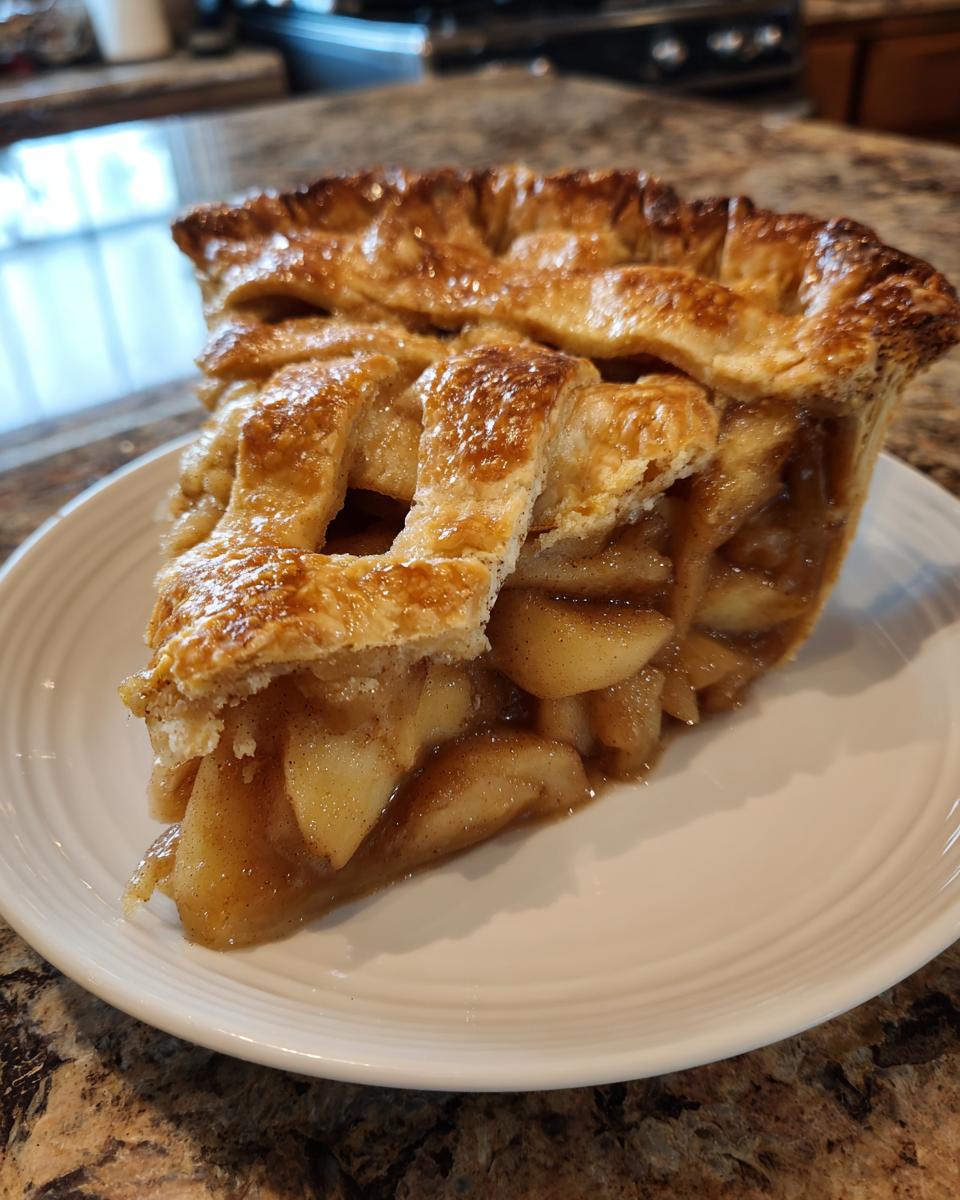
Lay that second crust right over the top. Now, here’s where you add the aesthetic appeal. Trim both crust edges, then pinch them together firmly to create a seal. I like to do a simple fork crimp all the way around, but you can do little twists if you want something fancier! Remember to cut several slits in the top layer; steam absolutely has to escape, otherwise, you get a soggy event! Finally, brush the whole top with that egg wash mixture—it’s like gold for getting that deep, gorgeous color.
Baking Times and Cooling for the Ideal Apple Pie
We bake in two stages, which is crucial for the best results. Start by baking at 425 degrees F for exactly 15 minutes. Then, drop that temperature down to 375 degrees F and let it continue baking for another 35 to 45 minutes. If you see the edges getting too dark too fast—totally normal—just loosely wrap little foil strips around them. You’ll know it’s done when the filling is visibly bubbly through those vents, not just softened apples. Check out this tip if you want visual confirmation!
But hold on! The hardest part is next: cooling. You must let this apple pie cool on a wire rack for at least two full hours. If you rush this, the filling won’t set, and when you slice it, it turns into soup on the plate. Patience pays off here, trust me!
Tips for Success with Your Flaky Pie Crust Tutorial
Achieving that *flaky* texture isn’t just about the butter; it’s about respecting the ingredients, which is part of my whole philosophy here. Since we’re keeping things quick with store-bought shells, we need to maximize the filling flavor to sell the homemade vibe! My biggest tip for that classic flavor profile, which you might think sounds crazy, is using that tiny bit of black pepper alongside the cinnamon. It really wakes up the sweetness of the apples. I learned that trick years ago exploring traditional apple pie secrets.
Also, remember I insisted on tart Granny Smith apples? They hold their shape so much better than sweeter varieties. To prevent the dreaded soggy bottom, which ruins any Flaky Pie Crust Tutorial, try brushing the inside bottom crust lightly with a whisked egg white before adding the filling. It creates a moisture barrier. Bake it hot initially, cool it completely, and you’ve just mastered the best homemade apple pie!
Variations: Crumb Topping or Dutch Apple Pie Recipe Ideas
I always love seeing how folks make this recipe their own! While the double crust is truly classic, sometimes you want texture over structure, right?
If you’re dreaming of that buttery, sugary crunch, you can easily switch to an Apple Pie with Crumb Topping. Instead of the second full crust, just mix up 1 cup of flour, 1/2 cup brown sugar, 1/2 cup cold butter (cut into small pieces), and a dash of cinnamon. You just cut that together until crumbly, sprinkle it generously over your apples, dot with butter, and bake! It’s fantastic for a more rustic look.
If you’re looking for a totally different profile, think about a Dutch Apple Pie Recipe. The main difference, visually, is that the Dutch version *always* has that heavy, glorious streusel topping instead of just a plain crust or a lattice. It’s usually richer and often uses slightly less sugar in the filling because the topping brings so much sweetness. Either way, you get amazing results!
Serving Suggestions for Your Traditional Apple Pie
The work is done! This beautiful, bubbling, golden apple pie deserves the spotlight. If you want to embrace that full ‘Slice of Americana’ feeling, you absolutely have to serve it warm with a big scoop of good quality vanilla bean ice cream. The contrast between the hot spiced apples and the cold creamy dairy? Perfection!
But here’s a regional secret I adore: a thin slice of sharp cheddar cheese melted right on top of your warm slice. It sounds wild, but the saltiness cuts through the sweetness perfectly. It’s genuinely how my Aunt Carol always served it at Thanksgiving. Definitely try it out!
Storing and Reheating Your Delicious Homemade Apple Pie
Once you manage to wait for it to cool (that 2-hour stretch is tough!), keeping this Best Homemade Apple Pie perfect is simple. Since it is filled with fruit and butter, I cover the cooled pie snugly with plastic wrap and leave it on the counter for up to two days. If your kitchen is super warm, the fridge is fine, but you need to manage the crust!
To reheat, skip the microwave unless you love a steamed, soft crust. Instead, pop a slice—or the whole thing—back into a 350-degree oven for about 10 minutes. That little blast of dry heat crisps the pastry right back up. It smells like you just baked it all over again!
Frequently Asked Questions About Making Apple Pie
I know everyone has little concerns when baking something as iconic as a traditional apple pie. Don’t worry about imperfections! These are the questions I get asked most often after people try this recipe.
Can I skip the pepper you mentioned?
You absolutely can skip the pepper if the idea of putting black pepper in a dessert makes you nervous! However, I highly recommend trying it just once. It’s one of those **Traditional Apple Pie Secrets** that professional bakers use. That tiny pinch doesn’t add savory flavor; it just cuts through the richness and makes the cinnamon and nutmeg taste brighter and deeper. It’s a subtle trick for an amazing result! For more easy baking wins, check out my tips for incredible chocolate crinkle cookies.
What if I don’t have Granny Smith apples?
Granny Smiths are my go-to because they are firm and tart, which balances the sugar. If you only have sweeter apples, like Honeycrisp, you need to adjust. For the **Perfect Apple Slices Dessert**, try using a 50/50 mix of your sweet apples and something that still holds its shape, like Gala or Fuji, and maybe cut back the granulated sugar in the filling by about 2 tablespoons. We want structure, not mush!
How do I prevent a runny filling?
A runny filling usually comes down to two things: not enough thickener or cutting the pie too soon. This recipe uses flour, but if you are using very watery apples, you can increase that flour to 1/3 cup. The single most important thing, though, is allowing the pie to cool completely—that two-hour rest is non-negotiable! That rest period is essential for setting up the juices so you get clean slices across your whole **Classic Apple Pie Recipe**.
Can I manage this pie if I’m an easy apple pie for beginners?
Yes! That’s why we rely on those store-bought crusts to start. As long as you gently mix the filling, ensure you seal the edges well, and trust the two-stage baking temperature, you’re golden. This really is excellent for **Comfort Food Desserts** beginners because the challenging part is already handled for you!
Estimated Nutritional Data for Classic Apple Pie
Look, I’m all about honest, home-cooked food, not complicated charts! But since we’re talking about eating really well, I wanted to give you a rough idea of what you’re digging into when you have that perfect slice. Keep in mind these numbers are just estimates based on the ingredients listed, assuming 8 uniform servings. If you use extra sugar or a much butterier crust, things will shift!
This calculation is for one standard slice of this delicious comfort dessert, made with standard store-bought or homemade double crust. It gives you a good baseline for tracking what’s in your favorite **Fall Baking Recipes**.
- Serving Size: 1 slice
- Calories: Approximately 410
- Fat: About 22g (with 10g being saturated fat)
- Total Carbohydrates: Roughly 53g
- Sugar: Around 35g (Natural sugars from apples + added sugar!)
- Protein: 4g
See? It’s a legitimate dessert, meant to be savored! If you want to check out some recipes that are often a little lighter on the sugar front, you might enjoy my recipe for fudgy strawberry brownies. But for a true holiday or weekend treat, this pie is totally worth it. Enjoy!
Share Your Perfect Apple Pie Creation
Alright, now that you have the complete roadmap to the best, flakiest, most comforting apple pie you’ve ever made, I absolutely need to hear about it! Seriously, seeing your creations is honestly the best part of my day as Felix over here at Cooking by Felix.
When you pull that golden beauty out of the oven, please jump over to the recipe card and give this whole thing a solid 5 stars if you loved it! Your feedback helps other busy home cooks, just like you, feel confident enough to try baking something spectacular for their families.
And don’t forget to snap a picture! Post it up on social media and tag me using the hashtag #FelixBakesApplePie. I want to see those perfectly crimped edges and that beautiful bubbly filling!
Drop a comment below, too. Tell me what your favorite part was! Was it how easy the filling came together? Did you use the pepper trick? Did you manage to wait the full two hours to slice it? I’m dying to know what tweaks you made. Happy baking, everyone!
PrintClassic Flaky Double Crust Apple Pie Recipe

Make a traditional, comforting apple pie with a flaky double crust. This recipe simplifies the process while delivering rich, classic flavor perfect for any occasion.
- Prep Time: 25 min
- Cook Time: 55 min
- Total Time: 80 min
- Yield: 8 servings 1x
- Category: Dessert
- Method: Baking
- Cuisine: American
- Diet: Vegetarian
Ingredients
- 2 9-inch unbaked pie crusts (store-bought or homemade)
- 6 large Granny Smith apples, peeled, cored, and sliced 1/4 inch thick
- 1 cup granulated sugar
- 1/4 cup packed light brown sugar
- 1/4 cup all-purpose flour
- 1 teaspoon ground cinnamon
- 1/4 teaspoon ground nutmeg
- 1/8 teaspoon salt
- 1/8 teaspoon ground black pepper
- 2 tablespoons unsalted butter, cut into small pieces
- 1 large egg, beaten with 1 teaspoon water (for egg wash)
Instructions
- Preheat your oven to 425 degrees F. Place one pie crust into a 9-inch pie plate. Trim the edges if needed.
- In a large bowl, combine the sliced apples, granulated sugar, brown sugar, flour, cinnamon, nutmeg, salt, and pepper. Toss gently until the apples are evenly coated.
- Pour the apple mixture into the pie crust. Dot the top of the filling evenly with the small pieces of butter.
- Place the second pie crust over the filling. Trim the top crust edges and crimp the top and bottom crusts together to seal. Cut several slits in the top crust to allow steam to escape.
- Brush the top crust lightly with the egg wash mixture.
- Bake at 425 degrees F for 15 minutes.
- Reduce the oven temperature to 375 degrees F. Continue baking for an additional 35 to 45 minutes, or until the crust is golden brown and the filling is bubbly. If the crust edges brown too quickly, cover them loosely with aluminum foil.
- Remove the apple pie from the oven and let it cool on a wire rack for at least 2 hours before slicing. This allows the filling to set properly.
Notes
- Using a mix of tart apples like Granny Smith provides the best texture and flavor balance for this classic apple pie.
- The small addition of black pepper subtly brightens the spice notes in the filling without making the pie taste savory.
- If you prefer a crumb topping over a double crust, substitute the top crust with a mixture of 1 cup flour, 1/2 cup brown sugar, 1/2 cup cold butter (cut in), and 1/2 teaspoon cinnamon.
Nutrition
- Serving Size: 1 slice
- Calories: 410
- Sugar: 35g
- Sodium: 250mg
- Fat: 22g
- Saturated Fat: 10g
- Unsaturated Fat: 12g
- Trans Fat: 0g
- Carbohydrates: 53g
- Fiber: 3g
- Protein: 4g
- Cholesterol: 35mg