

When you need that incredible, indulgent dessert but the thought of turning on the oven sends you running for the hills, this recipe is your saving grace! I promise you, this ultimate creamy, no-bake **butterfinger pie** is going to knock your socks off. It’s rich, it’s crunchy, and it screams ‘special occasion’ even though it takes practically zero effort. That’s exactly what Felix taught me—we shouldn’t have to sacrifice amazing flavor just because life is hectic. We can whip up something truly special using simple, accessible ingredients, and this pie is proof. You can read more about how this philosophy came to be on our About Page. Pull out your pie plate; we’re making magic in minutes!
- Why This Creamy No-Bake Butterfinger Pie is Your New Favorite Easy Butterfinger Dessert
- Gathering Ingredients for Your No Bake Butterfinger Pie
- Step-by-Step Instructions for the Best No Bake Butterfinger Pie
- Tips for Success with Your Simple Frozen Pie Recipe
- Serving Suggestions for Your Indulgent Dessert Ideas
- Storage and Make Ahead Candy Pie Instructions
- Frequently Asked Questions About Making Butterfinger Pie
- Estimated Nutritional Data for This Butterfinger Dessert Recipe
- Share Your Experience Making This Easy Butterfinger Dessert
Why This Creamy No-Bake Butterfinger Pie is Your New Favorite Easy Butterfinger Dessert
Honestly, if you’re looking for the easiest, yet most decadent dessert in your entire repertoire, stop looking right now. This **butterfinger pie** checks every single box. You don’t even need to preheat your oven, making it perfect for those scorching summer days or when you just don’t feel like baking. It comes together in about 20 minutes of active work, and then it lets the fridge do the heavy lifting!
When you bring this to a gathering—a potluck, a birthday, or just a Tuesday—people will rave. It offers that perfect hit of salty, sweet, peanut buttery crunch that everyone quietly craves.
Key Features of Our Butterfinger Pie Recipe
- No Oven Needed: That’s right, zero heat required! This is one of those truly simple frozen pie recipes.
- Crowd-Pleaser Flavor: The combination of chocolate, peanut butter, and that Butterfinger crunch is simply unbeatable.
- Make-Ahead Magic: You intentionally make this ahead of time. It sits beautifully in the fridge, saving you stress later.
- Incredible Texture: It’s legitimately creamy, not dense or gummy, thanks to that whipped cream folding step we do later on.
Gathering Ingredients for Your No Bake Butterfinger Pie
Okay, let’s talk about what you need! Since this is a no-bake recipe, gathering everything first is key so you can move fast once you start mixing. Don’t stress; you probably have most of this sitting around already. We need the basics for the crust, the creamy filling components, and of course, the star—the Butterfinger candy bars. Trust me, seeing the list gets you excited because you know how simple this **butterfinger pie** truly is to pull together for a crowd!
Ingredient Notes and Substitutions for Your Creamy Candy Bar Pie
A couple of quick notes before you shop! For the crust, you absolutely need chocolate sandwich cookies—the ones with the cream filling still inside work best because that extra fat helps bind things up. Make sure your cream cheese is truly softened; cold cream cheese means lumpy filling, and we want smooth sailing here!
I always recommend creamy peanut butter for the silkiness, but if you only have crunchy, that’s fine, it just adds a little extra texture below the top layer. If you don’t have Oreos or just want a different twist, you can absolutely swap that out for graham cracker crumbs, though the chocolate really enhances that peanut butter chocolate pie profile.
Step-by-Step Instructions for the Best No Bake Butterfinger Pie
This is where the magic happens, and look, the total active time is only about 20 minutes. How amazing is that? Since we aren’t actually cooking anything, the success of this **butterfinger pie** relies almost entirely on your mixing technique and remembering to let it chill. Follow these steps closely, and you’ll have the creamiest dessert you’ve ever made without turning your stove on once!
Creating the Oreo Crust Pie Recipe Base
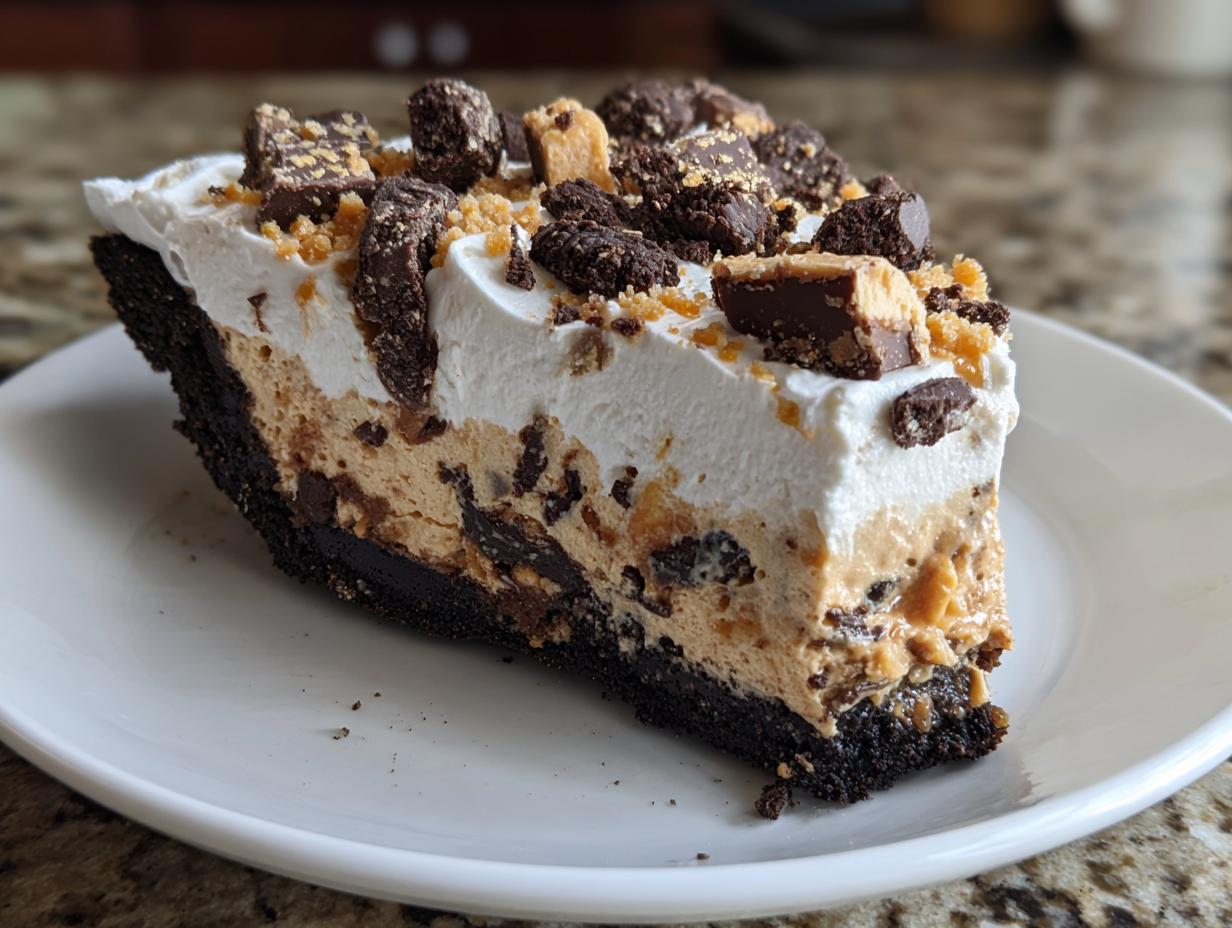
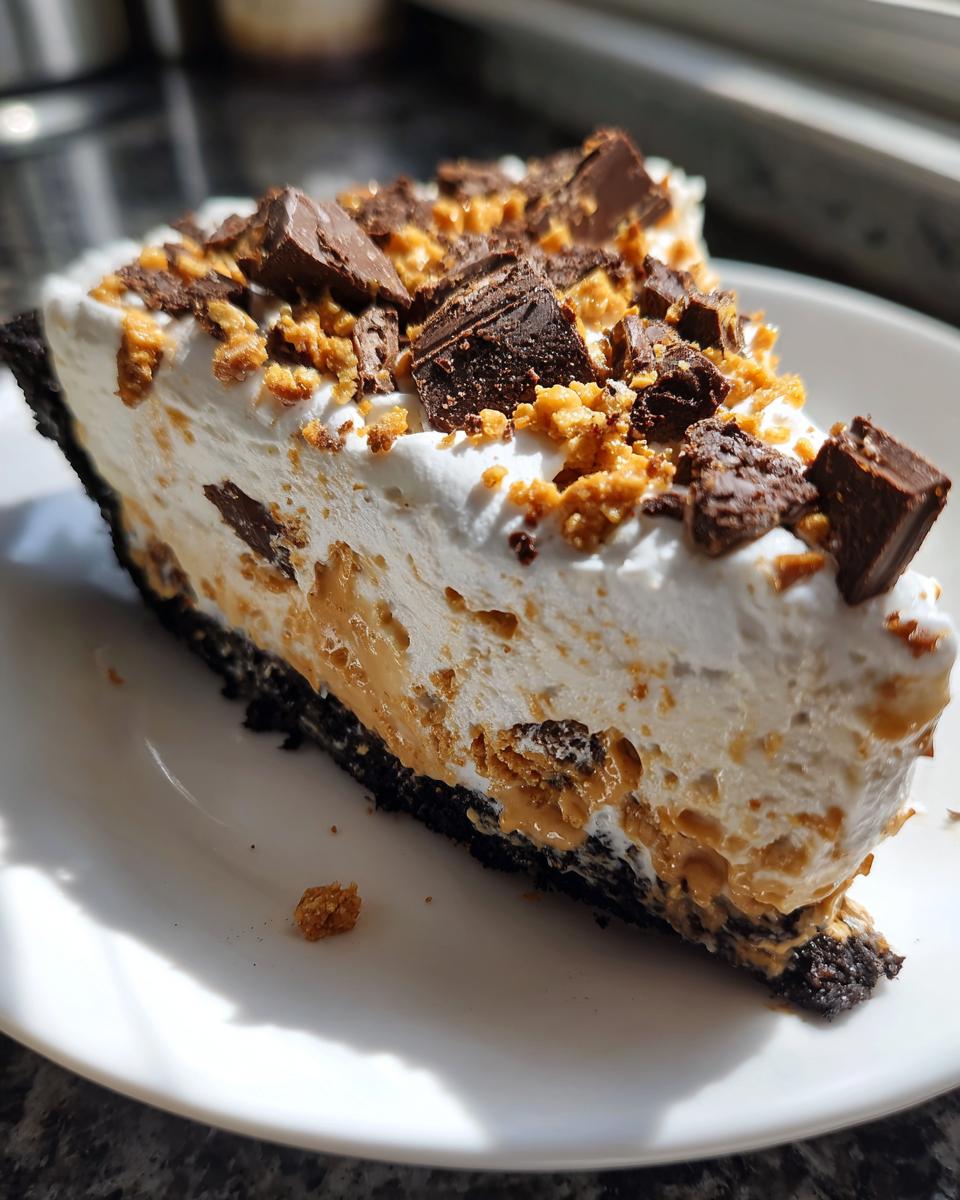
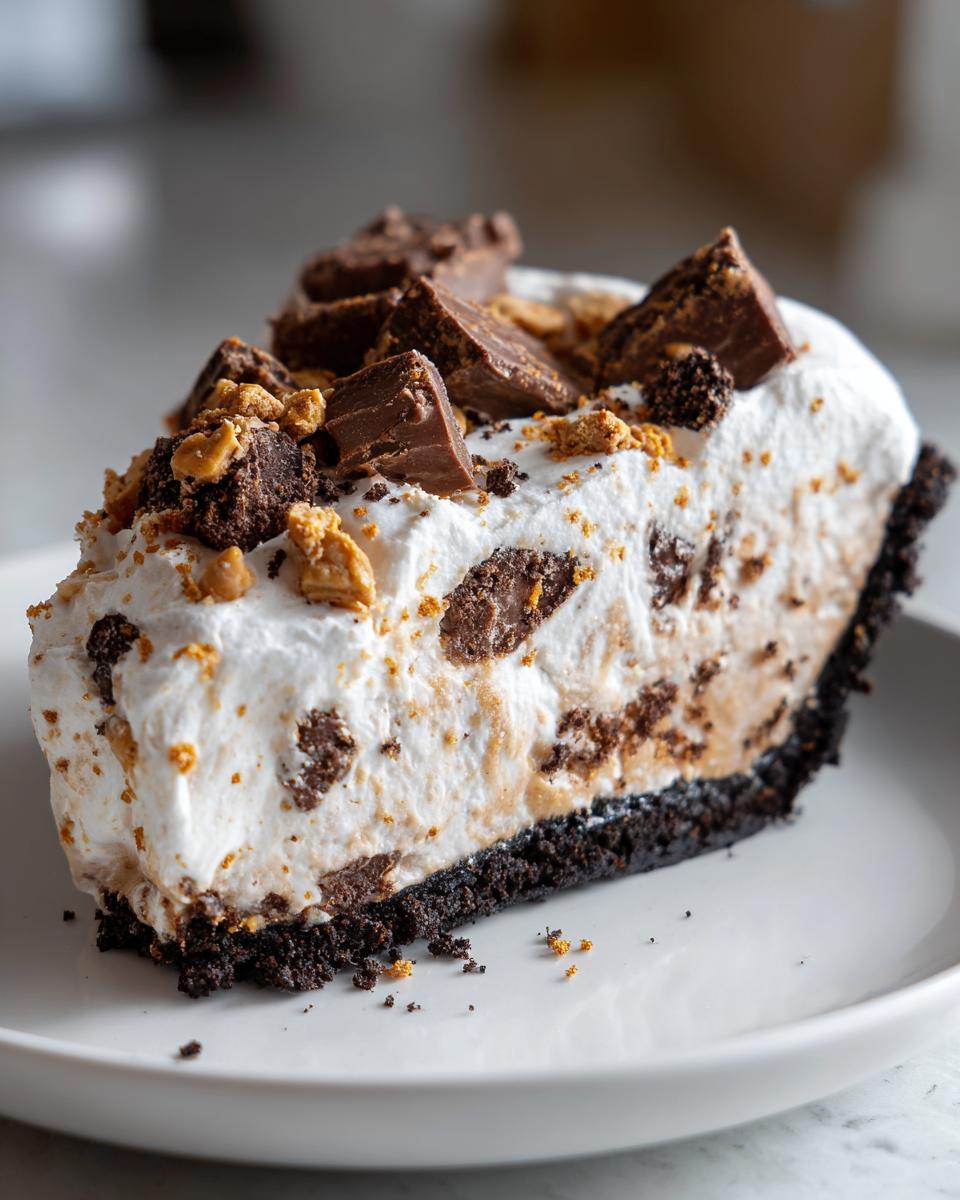
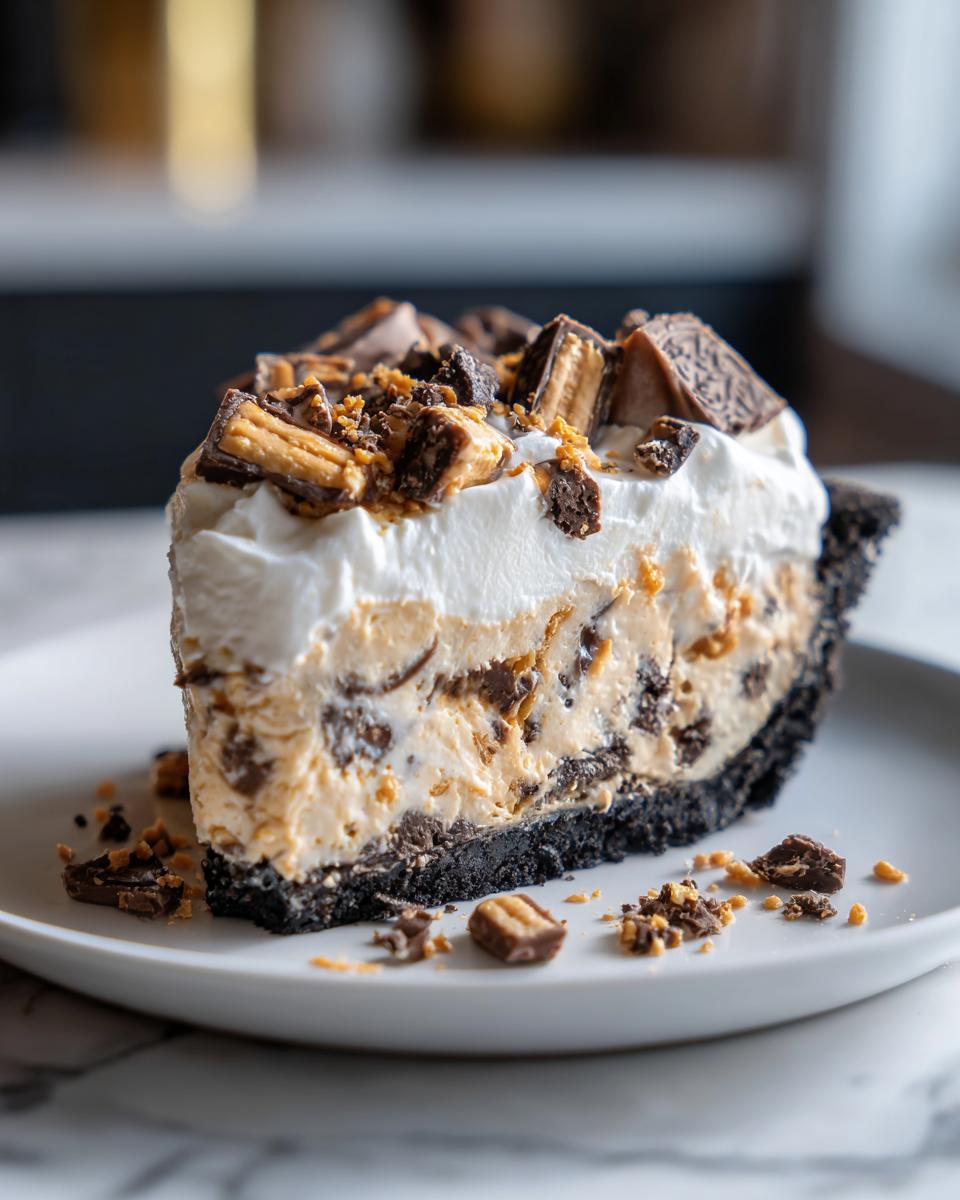
First things first, we make that crunchy, chocolatey foundation. Just toss your chocolate cookie crumbs right into a bowl with those 6 tablespoons of melted butter. Use a fork or your fingers to really mix it up until it looks like wet sand. Now, press that mixture firmly into the bottom and up the sides of your 9-inch pie plate. Get it nice and tight! Pop that entire plate straight into the freezer while you work on the filling. This sets the crust super fast, and remember, we have zero cook time here!
Mixing the Peanut Butter Chocolate Pie Filling
Grab a big bowl—the main event! Use your electric mixer to beat that softened cream cheese and the powdered sugar until it’s perfectly smooth. No lumps, please! Then, slowly add in your peanut butter and vanilla extract. Mix that until it’s all one gorgeous color. Next, whip your cold heavy cream in a separate bowl until you get stiff peaks. This is crucial for that signature light texture! Now, gently—and I mean gently—fold that fluffy whipped cream into the peanut butter mixture. You want to keep all those airy bubbles in there for that lovely creamy result.
Assembling and Chilling the Butterfinger Pie
Once your base filling is smooth, gently fold in about three-quarters of your crushed Butterfinger candy bars. Spoon this entire wonderful mixture right into your chilled Oreo crust and smooth the top out with a spatula. Now, it needs time to firm up so you can slice it neatly. Cover it loosely and stick it in the refrigerator for a minimum of 4 hours. I know patience is hard when dessert is waiting, but I promise, this chilling time transforms it into the perfect make-ahead candy pie.
Tips for Success with Your Simple Frozen Pie Recipe
We’ve all been there, right? You rush a no-bake recipe, and suddenly you have a gritty texture or a wobbly filling that refuses to cooperate. Not with this **butterfinger pie**! Because it’s so simple, small details make a huge, impressive difference in the final outcome. These aren’t just steps; these are little secrets I picked up after learning the hard way about chunky cream cheese!
The single best thing you can do to guarantee that amazing, clean crunch is to crush those Butterfinger bars right before you fold them into the filling. If they sit around crushed, they start absorbing moisture from the air, and they lose that satisfying snap. You really want that textural contrast against the soft cream filling.
Also, back to the cream cheese—I cannot stress this enough: make sure it’s completely soft. I usually leave mine out on the counter for at least an hour before I plan to start assembling. If you try to microwave it, you risk having weird hot, melty spots that will destroy the aeration when you mix in the whipped cream. For a super smooth **creamy candy bar pie**, trust the room temperature method!
Another thing to keep in mind is how you chop the candy. Don’t let your food processor turn them into dust! You want chunky little bits. Pulse them lightly, maybe 5 or 6 quick taps, just until they resemble coarse sand mixed with larger pebbles. That variety in size is what makes every bite interesting in this **quick candy dessert**.
Serving Suggestions for Your Indulgent Dessert Ideas
So, you nailed the chilling time, and now you have this gorgeous, towering **butterfinger pie** staring back at you. What’s the best way to present this fantastic **potluck dessert**? Honestly, it doesn’t need much doctoring up because that crushed candy topping is doing most of the heavy lifting! But if you want to be extra flashy for your guests, here are my favorite ways to serve it.
First, when you take it out of the fridge, let it sit on the counter for just five minutes. Not longer! This lets the filling soften just a tiny bit so it scoops out like a dream, much better than if it’s straight-from-the-freezer hard.
My go-to topping, besides the leftover Butterfingers, is a big dollop of freshly whipped cream—not the aerosol stuff if you can help it. Whipping heavy cream yourself takes two minutes and makes the whole dessert feel restaurant-quality. I just use a whisk and a tiny bit of vanilla extract. It balances that intense peanut butter flavor beautifully.
This pie is so rich, it pairs perfectly with something slightly strong or acidic to cut through the richness. Think about serving a slice alongside a really strong cup of black coffee or a hot espresso. If you’re serving it after a big family dinner, a small glass of cold milk is honestly the most nostalgic pairing. It’s all about making the moment feel special, even if the prep was super easy!
Storage and Make Ahead Candy Pie Instructions
One of the best things about this **butterfinger pie**—and why it’s such a winner for **make ahead candy pie** planning—is that it *needs* to chill. You can’t rush perfection, especially when dealing with that lovely creamy filling. I usually aim to make this the day before we plan to serve it. Seriously, letting it sit overnight lets the peanut butter fully firm up and makes the crust the perfect texture for clean slicing.
When you make it ahead, just cover the pie plate loosely with plastic wrap. I try not to let the plastic touch the whipped topping layer, especially if you added that extra whipped topping before serving. If you do need to store leftovers (ha! If there are any!), cover the leftovers the same way and pop them right back into the refrigerator. It stays fantastic chilled for about three to four days, although I rarely see it last that long!

Now, here’s the tricky part: reheating. Since this is totally no-bake and relies on the stability of chilled fats and cream cheese, we absolutely *don’t* reheat this pie. Don’t even think about it! If it gets too warm, that creamy filling turns Soupy fast. To serve, if you’ve kept it in the fridge, just pull it out about 10 or 15 minutes before you plan to cut into it. If you stored it in the freezer to speed things up, give it a solid 30 minutes on the counter to soften up just slightly. This ensures you get that perfect serving temperature where it’s cold, firm, but still delightfully scoopable!
Frequently Asked Questions About Making Butterfinger Pie
When you’re diving into a new recipe, especially one that involves just chilling instead of baking, questions always pop up! I totally get it. I’ve collected the most common things folks ask me about this **butterfinger pie** so you can feel 100% confident before you even start crumbling those cookies. If you make this and have another burning question, don’t hesitate to send a message through our contact form!
Can I use a different crust for this No Bake Butterfinger Pie?
Yes, you absolutely can! While I totally adore the chocolatey depth the Oreo crust adds, it’s not the only option for this **No Bake Butterfinger Pie**. If you don’t have Oreos on hand, you can easily swap them out for graham cracker crumbs, just the same way you would for many other **creamy candy bar pie** recipes. Just use the same amount of crumbs and melted butter ratio. A vanilla wafer crust would also be delicious if you want something a little less intense than chocolate!
How long does this Creamy Candy Bar Pie need to set?
This is the most asked question about any **easy dessert** that skips the oven! For the best results, where the filling is firm enough to cut cleanly without looking totally frozen? You need a minimum of 4 hours in the refrigerator. That time allows the cream cheese and the whipped cream structure to fully stabilize around those Butterfinger bits. If you’re in a massive hurry and need it sooner, you can definitely transform it into a **Simple Frozen Pie Recipe** by setting it in the freezer for 1 to 2 hours. That’s super refreshing on a hot day!
What’s the easiest way to crush the Butterfingers?
Oh, that’s a good one! You don’t want dust, you want crunch! I like putting them in a heavy-duty zip-top bag, sealing out most of the air, and then just taking a rolling pin or the bottom of a heavy saucepan and gently smashing them. Quick, effective, and then cleanup is just tossing out the bag. If you look over at the recipe from Hana, she has some great visual guides on how to break up your candy bars too, which might help! Check out her method for inspiration.
Estimated Nutritional Data for This Butterfinger Dessert Recipe
Look, I’m not a nutritionist, and this is definitely an indulgent dessert, not something we eat every day! That said, I like to give you a general idea of what you’re diving into with this amazing **butterfinger pie**. These values are estimates based on the standard ingredients we used to develop this recipe, so yours might vary slightly depending on your brand of peanut butter or cookies. We always encourage people to treat themselves when the moment is right. If you want more general info on dessert making, check out this video on Tastemade for some inspiration!
- Serving Size: 1 slice
- Calories: 450
- Fat: 30g
- Carbohydrates: 40g
- Protein: 7g
Because this treat is so rich, a single slice is usually more than enough to feel satisfied! Enjoy every last bite!
Share Your Experience Making This Easy Butterfinger Dessert
Now that you’ve successfully navigated the glorious world of **no-bake pies** and created what is arguably the most irresistible **easy butterfinger dessert** around, I have one last favor to ask! Sharing your successes is the biggest joy for me. Did this **creamy candy bar pie** totally win over your family? Did you manage to save a slice for yourself?
Please, please, please let me know how it went! Drop a comment down below. I love hearing about what you loved most—was it that quick Oreo crust coming together, or was it cracking into that cold, crisp Butterfinger topping?
And hey, if you took a picture of your finished **Butterfinger Pie**, I would truly love to see it! Tag me on social media if you feel generous enough to share your creation. Seeing your beautiful results is what keeps me testing new recipes and making sure every one of Felix’s time-saving principles works perfectly for you. Don’t be shy; tell me everything about your success making this **indulgent dessert**!
PrintThe Ultimate Creamy No-Bake Butterfinger Pie with Oreo Crust

Make this easy, creamy no-bake Butterfinger Pie featuring a chocolate Oreo crust, rich peanut butter filling, and crushed Butterfinger candy bars. It is a simple, indulgent dessert perfect for gatherings.
- Prep Time: 20 min
- Cook Time: 0 min
- Total Time: 4 hr 20 min
- Yield: 8 servings 1x
- Category: Dessert
- Method: No Bake
- Cuisine: American
- Diet: Vegetarian
Ingredients
- 1 1/2 cups chocolate sandwich cookie crumbs (like Oreos)
- 6 tablespoons unsalted butter, melted
- 1 (8 ounce) package cream cheese, softened
- 1 cup powdered sugar
- 1/2 cup creamy peanut butter
- 1 teaspoon vanilla extract
- 1 cup heavy whipping cream, cold
- 1 cup crushed Butterfinger candy bars, divided
- Whipped topping, for topping
Instructions
- Combine the chocolate cookie crumbs and melted butter in a bowl. Press the mixture firmly into the bottom and up the sides of a 9-inch pie plate. Place the crust in the freezer while you prepare the filling.
- In a large bowl, beat the softened cream cheese and powdered sugar until smooth. Add the peanut butter and vanilla extract, mixing until fully combined.
- In a separate, clean bowl, whip the heavy whipping cream until stiff peaks form. Gently fold the whipped cream into the peanut butter mixture until just combined.
- Fold in 3/4 cup of the crushed Butterfinger bars into the filling.
- Spoon the filling evenly into the chilled crust. Smooth the top with a spatula.
- Cover the pie loosely with plastic wrap and chill in the refrigerator for at least 4 hours, or until firm. For a quicker set, you can freeze it for 1 to 2 hours.
- Before serving, spread a layer of whipped topping over the pie. Sprinkle the remaining 1/4 cup of crushed Butterfinger bars over the top.
- Slice and serve this easy dessert immediately.
Notes
- You can substitute a pre-made graham cracker crust if you prefer not to make the Oreo crust.
- For the best texture, crush the Butterfinger bars just before assembling the pie.
- This pie is best served cold directly from the refrigerator or freezer.
Nutrition
- Serving Size: 1 slice
- Calories: 450
- Sugar: 35g
- Sodium: 300mg
- Fat: 30g
- Saturated Fat: 12g
- Unsaturated Fat: 18g
- Trans Fat: 0.5g
- Carbohydrates: 40g
- Fiber: 1g
- Protein: 7g
- Cholesterol: 45mg