

Let’s be honest, that can hidden in your pantry just doesn’t cut it. We all crave that real cherry goodness, that burst of sweet-tart perfection, but who has hours to simmer fruit? That’s where I come in! I created this recipe because just like you, I need food that’s exceptional without taking over my entire evening. This is my go-to Easy Homemade Cherry Pie Filling From Scratch (Quick & Thick Recipe). I promise you, once you taste this cherry pie filling, you’ll never look back. Drawing on my family’s love for real flavor, I streamlined the process so you get amazing results in under 30 minutes. It’s the perfect shortcut for modern life without sacrificing quality. You’re going to love how simple this is! If you want to know more about why I focus on simple, exceptional food, check out my story over at Cooking by Felix.
- Why This Easy Cherry Pie Filling Recipe Beats Store-Bought
- Ingredients for the Best Cherry Pie Filling From Scratch
- How To Make Cherry Pie Filling: Step-by-Step Instructions
- Tips for Success When Making Your Cherry Filling From Scratch
- Storage and Canning Cherry Pie Filling For Later Enjoyment
- Creative Ways to Use Your Versatile Cherry Pie Filling
- Frequently Asked Questions About Cherry Pie Filling Recipe
- Estimated Nutritional Data for Cherry Pie Filling
- Share Your Homemade Cherry Pie Filling Creations
Why This Easy Cherry Pie Filling Recipe Beats Store-Bought
Honestly, nothing compares to the homemade version. Store-bought fillings are often way too thick or, worse, taste strangely artificial. When I make this for my family, the fresh, bright flavor is unmistakable. It just tastes like summer!
Here is why I stand by this quick recipe over anything bottled:
- Real Fruit Flavor: You control the sweetness and the type of cherry. No weird fillers hiding the taste!
- Perfect Texture: It doesn’t have that weird, slightly gluey quality that some canned ones do.
- Speed: It’s faster than driving to the store sometimes!
Achieving the Perfect Thick Cherry Pie Filling Consistency
The secret weapon here is the cornstarch slurry, which is so much better than what the big companies use. When you whisk it separately and add it slowly, you control exactly when and how it sets up. This gives you that luxurious, Juicy Cherry Pie Filling that coats the spoon perfectly instead of turning into tasteless goo. It sets up naturally as it cools, which is exactly what we want.
Versatile Cherry Filling Recipe for All Your Desserts
Once you have this perfect batch made, you’ll realize how often you need it! It’s not just for the classic double-crust pie, though it’s amazing there. Remember, this is a truly Versatile Cherry Filling Recipe. I use it:
- Spoonably thick over vanilla ice cream (my favorite!).
- Swirled into cheesecake batter before baking.
- Drizzled over pancakes or waffles on lazy Sunday mornings.
Ingredients for the Best Cherry Pie Filling From Scratch
Okay, let’s talk cherries! The quality of your fruit dictates the quality of your Cherry Filling From Scratch, so choose wisely. I always lean on fresh when cherries are in season, but don’t stress if they aren’t—frozen works wonderfully too! We keep the ingredient list super short to let the fruit shine.
Here is what you’ll need for about 4 cups of filling:
- 4 cups fresh or frozen sweet or tart cherries, pitted
- 1 cup granulated sugar (yes, a cup—they need that sweetness!)
- 1/4 cup cornstarch
- 1/4 cup cold water
- 1 tablespoon lemon juice
- 1/2 teaspoon almond extract (optional, but trust me on this one)
- 1/4 teaspoon ground cinnamon (optional)
Ingredient Notes and Substitution Tips
This is where we get down to the details, because knowing your ingredients is key to any great baking component. If you are using tart cherries, like Montmorency, you might want to sneak in that extra quarter cup of sugar—they pack a real zing! For sweet cherries, like Bing, you can often pull back a touch on the sugar since they are already so sweet.
The almond extract is my little secret for making the filling taste extra homemade. Don’t skip it if you can swing it! It just deepens that beautiful cherry flavor. And remember, frozen cherries go straight from the freezer into the pot; no need to thaw them first. That extra bit of juice they release cooks right down with the sugar.
How To Make Cherry Pie Filling: Step-by-Step Instructions
Alright, this is the fun part where the magic truly happens! Don’t be intimidated; this is such a Quick Cherry Filling Recipe. We want to maximize that amazing color and flavor. First, put your pitted cherries and the sugar into a medium pot. Give them a gentle stir and just walk away for about 10 minutes. That resting time is crucial because it lets the sugar work its way into the fruit and pull out some beautiful juice for us. You want that nice, watery base before we start cooking this cherry pie filling.
Once those ten minutes are up, it’s time to get everything on the heat. Bring it up to a gentle simmer—don’t let it boil furiously. While that’s heating up, quickly get your slurry ready.
Creating the Thickening Slurry for Juicy Cherry Pie Filling
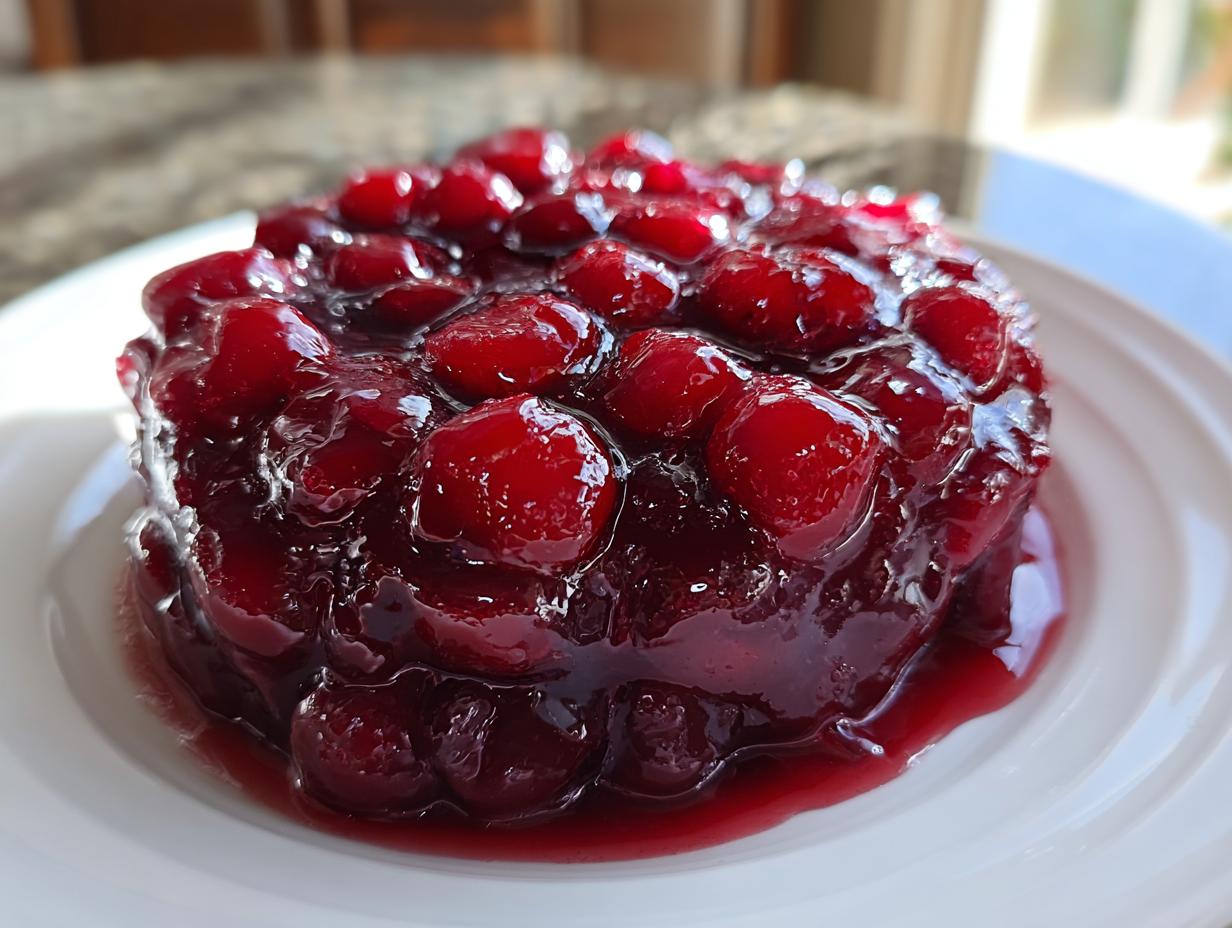
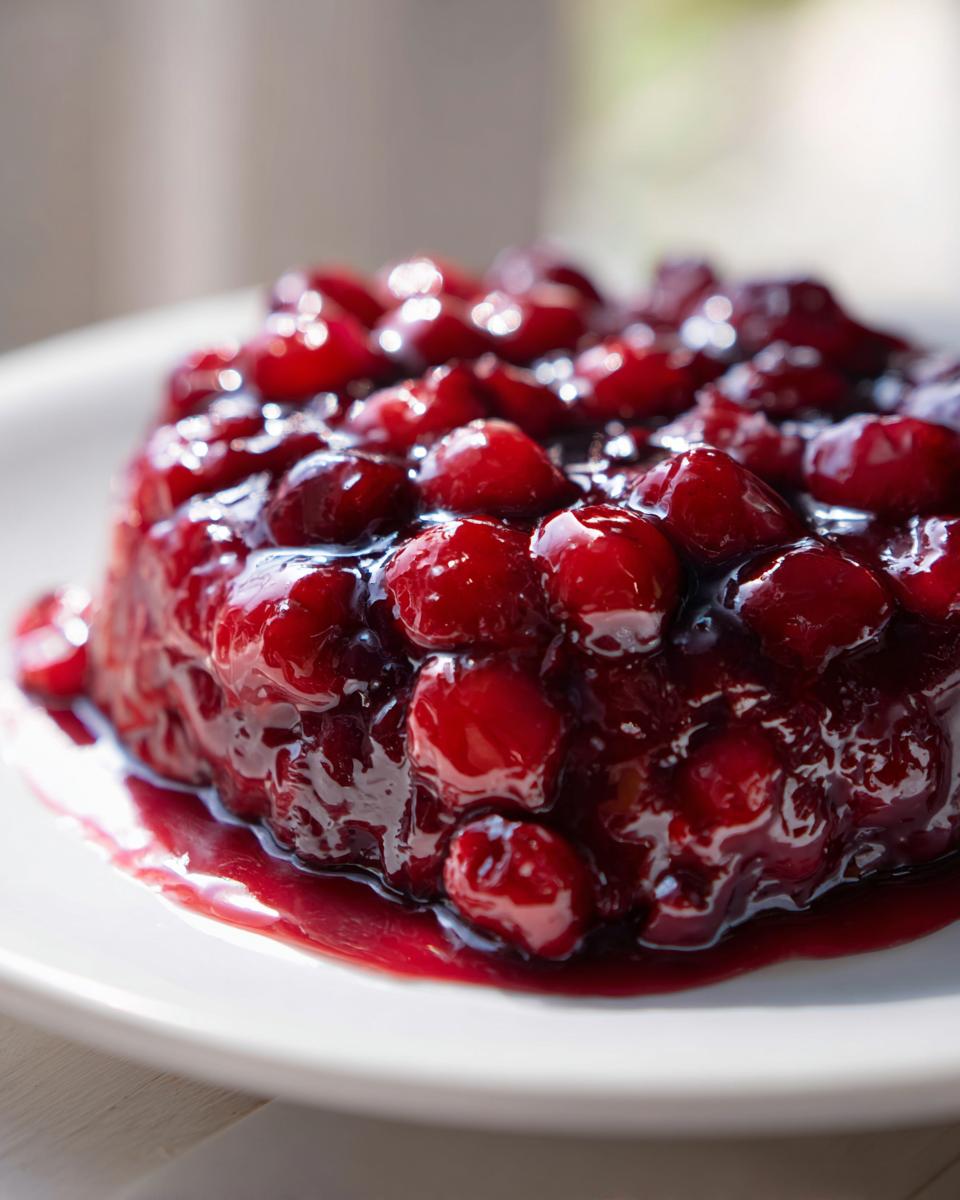
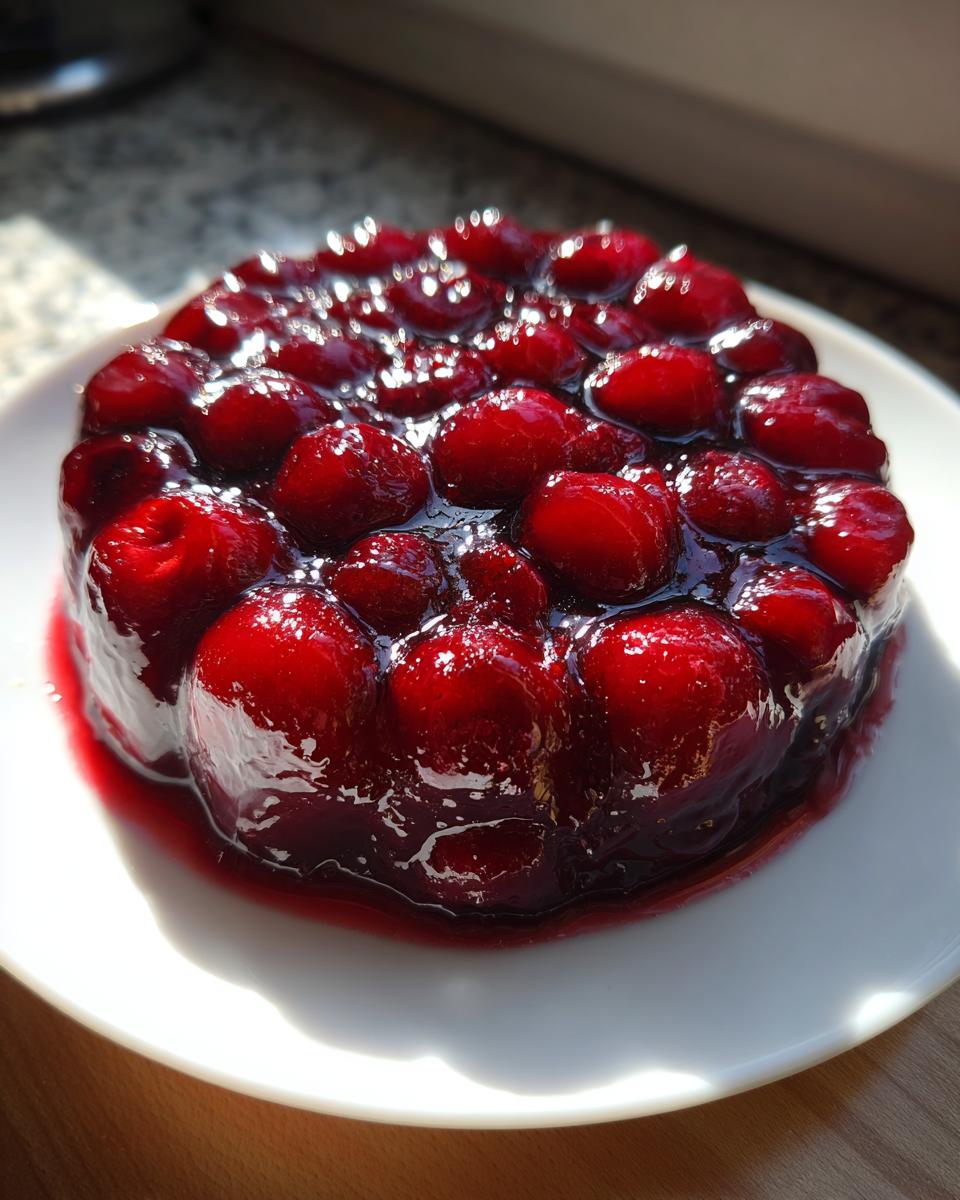
Don’t dump the cornstarch straight into the hot fruit, or you’ll get nasty lumps! That’s rookie move number one. Instead, take your 1/4 cup of cornstarch and whisk it really well with the 1/4 cup of cold water in a separate little bowl. You need to whisk until it looks totally smooth, like milk—no white clumps allowed! This slurry is the secret to that incredible, shiny, Thick Cherry Pie Filling consistency we are aiming for. When the cherries are simmering, slowly dribble that whisked slurry into the pot while stirring constantly. Keep going for about 2 to 4 minutes; you’ll see it go from watery muck instantly transforming into perfect, thick sauce. Wow!

Cooling and Setting the Homemade Cherry Pie Filling
As soon as it coats the back of a wooden spoon, pull it off the heat right away! Stir in your flavor boosters—the lemon juice, plus that optional almond extract and cinnamon. Now, here’s a big tip: you absolutely cannot use this hot! You have to let the Homemade Cherry Pie Filling cool completely on the counter before you put it in a crust or anything else. It thickens up significantly more as it cools down, so don’t be tempted to add more cornstarch if it still seems a little runny right off the stove. If you want to get faster results, I often use a piece of parchment paper to transfer ours to a shallow dish to speed up cooling! If you have any questions while you’re cooking, feel free to reach out via my contact page.
Tips for Success When Making Your Cherry Filling From Scratch
Even though this is an easy recipe, I’ve learned a few little tricks over the years of whipping this up. Taking these quick steps guarantees that gorgeous, bright flavor and keeps you from wasting those beautiful cherries. Trust me, mastering these small things moves you from a good cook to a genuinely reliable one!
Here are my top tips for making a flawless batch of Cherry Filling From Scratch:
- Don’t Rush the Juice Draw: That initial 10 minutes where the sugar sits with the fruit? Don’t skip it! That soaking time releases the natural fruit syrups, meaning you don’t need as much added water, which concentrates the cherry flavor beautifully.
- Stir Constantly Near the End: Once that cornstarch hits the heat, you must keep stirring! The bottom of the pan scorches fast, and you don’t want burnt spots ruining the fresh cherry taste of your cherry pie filling.
- Pitting Check: Always double-check your fruit, even if you bought pre-pitted. A couple of missed pits can ruin a whole pie crust or chip a tooth, so give things a final visual scan before they hit the pot.
- Frozen Cherry Rule: If you are using frozen fruit, I cannot stress this enough: DO NOT THAW THEM. If you thaw them, you’ll end up adding way too much water to your process, and trying to fix a watery filling is a headache you don’t need. Toss those icy beauties straight in!
Storage and Canning Cherry Pie Filling For Later Enjoyment
One of the best things about making a big batch of this filling is that you don’t have to use it all right away! If you’re not planning on using it in a pie tomorrow, storage is super easy. Pop any extra cherry pie filling into an airtight container and stick it right in the fridge. It stays beautifully thick and vibrant for about a week. It’s my favorite way to grab that ready-made dessert component when I need it later in the week.
But what about saving those summer cherries for winter? That’s where Canning Cherry Pie Filling comes in! Now, I’m a huge advocate for cooking from scratch, but when it comes to home canning, you have to be mindful of safety. I always recommend checking the latest, official USDA guidelines for preserving fruit fillings. Seriously, never guess when you are talking about canning processes!
When done correctly, your home-canned jars become little treasures ready for holiday pies or quick dessert toppers, giving you that deep cherry flavor even in the middle of January. Just remember: proper sterilization and processing times are non-negotiable for safe storage.
Creative Ways to Use Your Versatile Cherry Pie Filling
So you made this incredible, glossy, perfectly thick batch of cherry pie filling. Fantastic! Now, what if you’re staring at a pie crust that’s gone stale or you just don’t have time for a full baked dessert? That’s fine, because this filling shines outside the oven, too. This recipe truly is a Cherry Pie Topping superstar; it’s so much better than anything you can buy in a jar. This is where the “versatile” part of the recipe really comes into play for us busy home cooks.
I once served this over plain vanilla yogurt for breakfast because I was rushing out the door, and honestly, it felt like a vacation! It’s genuinely that good.

Think beyond the pie tin. You can use this for:
- A decadent layer for Cherry Filling For Cheesecake—just pour it over the top after it’s completely cooled.
- Swirled into bowls of oatmeal or cottage cheese in the morning.
- As a fantastic soak for pound cake slices before frosting them.
- To top fluffy buttermilk pancakes instead of maple syrup!
If you need inspiration on other ways folks are using their homemade spreads, check out some great ideas over at Food Plus Words.
Frequently Asked Questions About Cherry Pie Filling Recipe
I get so many questions about this recipe—it’s clearly a big hit! Most folks are just trying to get that perfect texture at home, or they’re wondering if they can adapt it for what they already have on hand. Don’t stress; I’ve gathered the most common queries right here about our Cherry Pie Filling Recipe so you can get cooking right away!
Can I use canned cherries for this Quick Cherry Filling Recipe?
Yes, you absolutely can! If fresh or frozen cherries are totally out of season, canned sweet cherries will work in a pinch for this Quick Cherry Filling Recipe. The catch is that the canned ones are already suspended in syrup. You’ll want to use the cherries but drain off about half of that syrup. Because the liquid content is already higher, I usually suggest cutting the initial 1/4 cup of added water down to maybe 2 tablespoons, or just watch your slurry very closely as you add it. You might use less!
What is the difference between sweet and tart cherry pie filling?
This is a great question, especially if you look at the different cherries in the store! With sweet cherries, like Bings, you get a richer, almost syrupy flavor—they are wonderful for Cherry Pie Topping over cheesecake or eating straight from the bowl. Tart cherries, like Montmorency, provide that classic, slightly sour kick that cuts through the sugar and makes for the traditional American pie flavor. If you use tart ones, plan on sticking to the full amount of sugar listed in the recipe, or maybe taste, taste, taste!
For longer storage, remember to check out the tips on Canning Cherry Pie Filling in the section above!
Estimated Nutritional Data for Cherry Pie Filling
Now, listen up! Because we’re cooking from scratch and controlling every single ingredient, you know exactly what’s going into your dessert. I always prepare this recipe knowing exactly what we are eating. Remember, all of these numbers are just estimates based on the list above, serving size, and standard ingredient databases, so they are a great guideline but not gospel.
For a standard serving of about 1/2 cup of this vibrant cherry pie filling, here’s what you can generally expect:
- Calories: 210
- Sugar: 35g
- Fat: 0.3g
- Carbohydrates: 54g
- Protein: 0.8g
It’s pretty amazing how much flavor you get for those calories, right? That’s the beauty of using real fruit! If you are ever concerned about how we handle your data on this site, you can always check my privacy policy. Happy baking!
Share Your Homemade Cherry Pie Filling Creations
Well, that’s it! You’ve conquered the can opener forever and now you’re officially making the best homemade cherry pie filling around. I genuinely hope you enjoyed this process as much as I do when I whip up a batch. Since you took the time to create something so special from scratch, I really want to hear about it!
Did you use tart cherries or go sweet? Did you pour it over ice cream like I suggested, or perhaps you braved a full pie? Don’t keep your success secret! Please take a moment to drop a rating down below—it truly helps other busy cooks like us know that this recipe is worth their time.
If you snap a picture of your beautiful pie, your cheesecake topping, or just your spoonful of that thick, glossy goodness, tag me on social media! Seeing your baking triumphs—and knowing I helped you reclaim some joy in your busy kitchen—is honestly my favorite part of running this whole site. Keep cooking wonderfully, and I’ll catch you in the next recipe!
PrintEasy Homemade Cherry Pie Filling From Scratch (Quick & Thick Recipe)
Make thick, juicy cherry pie filling at home using fresh or frozen cherries. This quick recipe beats store-bought versions and works as a topping for cheesecake, ice cream, or pancakes.
- Prep Time: 10 min
- Cook Time: 15 min
- Total Time: 25 min
- Yield: About 4 cups 1x
- Category: Dessert Component
- Method: Stovetop Cooking
- Cuisine: American
- Diet: Vegetarian
Ingredients
- 4 cups fresh or frozen sweet or tart cherries, pitted
- 1 cup granulated sugar (adjust to taste based on cherry sweetness)
- 1/4 cup cornstarch
- 1/4 cup cold water
- 1 tablespoon lemon juice
- 1/2 teaspoon almond extract (optional)
- 1/4 teaspoon ground cinnamon (optional)
Instructions
- Combine the cherries and sugar in a medium saucepan. Let the mixture sit for 10 minutes to allow the sugar to draw out some juice.
- In a small bowl, whisk together the cornstarch and cold water until completely smooth. This is your slurry.
- Place the saucepan over medium heat. Bring the cherry mixture to a gentle simmer, stirring occasionally.
- Once simmering, slowly pour the cornstarch slurry into the simmering cherries while stirring constantly.
- Continue to cook, stirring constantly, until the filling thickens significantly, about 2 to 4 minutes. It should coat the back of a spoon.
- Remove the saucepan from the heat. Stir in the lemon juice, almond extract (if using), and cinnamon (if using).
- Allow the cherry pie filling to cool completely on the counter before using it in a pie or storing it. The filling will thicken further as it cools.
- For canning, process according to safe home canning guidelines for fruit fillings.
Notes
- If you use frozen cherries, do not thaw them before starting the recipe. The extra liquid will be absorbed by the cornstarch.
- For a sweeter filling, use sweet cherries. For a classic pie flavor, use tart cherries or a mix of both.
- Use this versatile cherry filling as a topping for vanilla ice cream, yogurt, waffles, or spooned over cheesecake.
- If you plan to can this filling, follow tested, up-to-date canning instructions for safety.
Nutrition
- Serving Size: 1/2 cup
- Calories: 210
- Sugar: 35
- Sodium: 2
- Fat: 0.3
- Saturated Fat: 0
- Unsaturated Fat: 0.1
- Trans Fat: 0
- Carbohydrates: 54
- Fiber: 3
- Protein: 0.8
- Cholesterol: 0