

Oh my gosh, when you need a dessert that tastes like pure childhood nostalgia but doesn’t demand you babysit an oven, this is the one. Forget all those fussy recipes! I’m talking about the Ultimate No-Bake Oreo Dirt Cake, and it is everything good that ever happened in a trifle dish. This is creamy, it’s layered, and the best part? Zero oven time. That’s right, this entire dirt cake comes together with just mixing and chilling. That simplicity is exactly what I focus on here at Cooking by Felix—creating reliable recipes that fit into your real, busy life, Felix-style. If you need a winner for a birthday or just a Tuesday night, trust me, you might want to bookmark this one now for all your simple delicious desserts!
- Why This Classic Dirt Cake Recipe is a Must-Make
- Gathering Ingredients for Your Oreo Dirt Cake Recipe
- Step-by-Step Instructions for the Creamy Chocolate Dessert
- Tips for the Best Dirt Cake Recipe Success
- Making the Dirt Cake with Gummy Worms Decorations
- Ingredient Notes and Substitutions for Your Chocolate Cream Cheese Dessert
- Storage and Make Ahead Dessert Guidelines
- Frequently Asked Questions About This Dirt Cake
- Sharing Your Simple Layer Cake Creation
Why This Classic Dirt Cake Recipe is a Must-Make
I want you to start making this recipe because it is truly foolproof. When I was juggling my marketing job and trying to keep up with family meals, I needed desserts that delivered huge flavor payoff for minimal effort. This recipe is my answer to that problem. It just works, every single time, and always gets rave reviews.
- It’s completely No Bake Dirt Cake, meaning your oven stays cool and your hands stay clean!
- The texture is unbelievably creamy thanks to that genius combination of filling ingredients.
- It’s inherently scalable, making it one of the best Potluck Desserts you can bring.
The Ultimate No Bake Dirt Cake Experience
Listen, we’re all busy, right? That’s the core of what I do here. This No Bake Dirt Cake is your secret weapon when company shows up unexpectedly. You can seriously mix this up in about 25 minutes and then forget about it until serving time. It respects your schedule, which I think is just as important as respecting the ingredients!
Perfect Party Desserts and Kid Friendly Dessert Success
This is the definition of a Kid Friendly Dessert that adults secretly love even more. Whether you present it in one big dish or make individual ‘Dirt Cups,’ it’s instantly fun. Stick those gummy worms in, and you’ve got an instant hit for any birthday or even just a silly weeknight when you need something special. It’s guaranteed Party Desserts perfection.
Gathering Ingredients for Your Oreo Dirt Cake Recipe
Okay, for the absolute best results in this Oreo Dirt Cake Recipe, you want ingredients that are ready to go. Because this is a no-bake situation, we rely on temperature and texture, not heat, to bring everything together beautifully. I’ve designed this to use items you can grab from the fridge or pantry! Remember, my mission is getting great, flavorful desserts on the table without fuss, and accessible ingredients are key to that reliability.
You’ll see a list below that looks straightforward, but there are a couple of crucial steps—which I detail next—that make the difference between good dirt cake and *great* dirt cake. You’re going to want to check out my full guide on making this Oreo Dirt Cake, but make sure you pay attention to the state of your dairy items!
Ingredient Clarity and Preparation Notes
This part right here is where many people slip up! For all the dairy items—the cream cheese and the butter—they absolutely must be fully softened. I mean bench-temperature soft, not ‘I just microwaved it for ten seconds’ soft. If they are too cold, you’ll get lumps, and we want this base silky smooth, remember? The frozen whipped topping needs to be completely thawed too; pop it out a few hours ahead of time.
Now for the Oreos—don’t bother trying to scrape out the filling! Use the entire cookie. The filling melts right into the cream cheese mixture and adds necessary fat and sweetness. Crush them finely until they look like nice, dark soil. Crucially, reserve about one cup of those glorious crumbs because they are going to be for that final, crowning layer on top. Don’t skip that spare cup!
Step-by-Step Instructions for the Creamy Chocolate Dessert
Alright, this is where the magic—the delicious, no-bake magic—really happens! We are going to create that beautiful, decadent texture that makes this Creamy Chocolate Dessert a showstopper. Don’t rush the folding steps; that’s how we keep everything airy and light instead of dense and heavy. It’s all about technique, even when we’re not using the oven! If you’re ever looking for an even faster chocolate element, I have a great easy 5-minute chocolate frosting recipe, but trust me, for this dirt cake, we stick to the pudding base.
Creating the Cream Cheese Base and Pudding Mix
First things first, grab that large bowl where you’ve got your softened butter, cream cheese, and powdered sugar. Beat these together until you get something that looks pale and completely smooth. I mean, zero lumps allowed! Once that’s perfect, gently fold in one container of your thawed whipped topping. Be gentle, okay? We’re incorporating air here, not beating out the volume we just created.
Now, switch gears to a separate bowl for the pudding. Whisk the instant chocolate pudding mix with the three cups of cold milk. You only need to whisk this for about two minutes until it just starts getting thick. Let it sit for five minutes so it can really set up. Then, and this is critical for structure, gently fold that thickened pudding into your glorious, fluffy cream cheese mixture. Seriously, use a spatula and fold, don’t stir wildly! We want that velvety texture.
Assembling the Layered Pudding Dessert
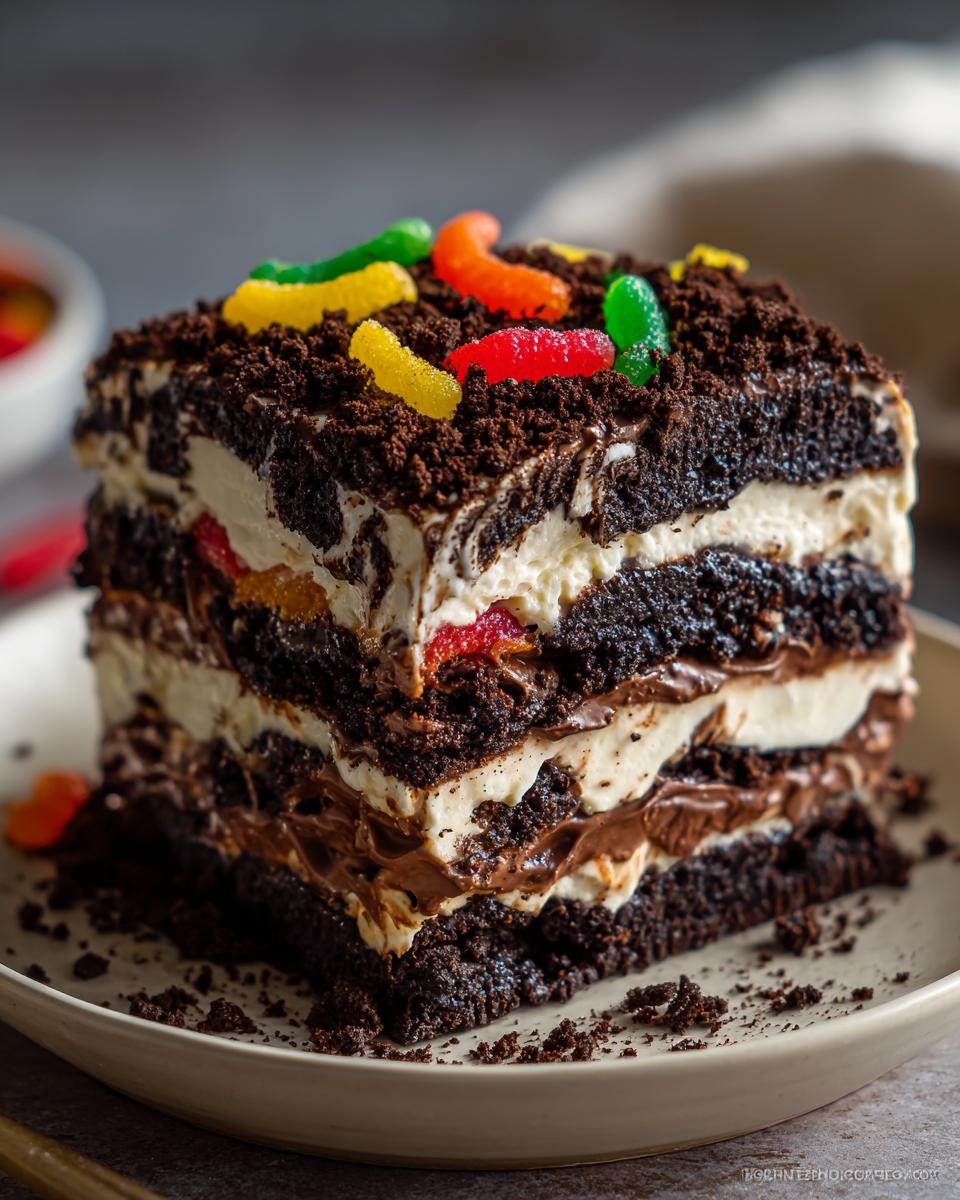
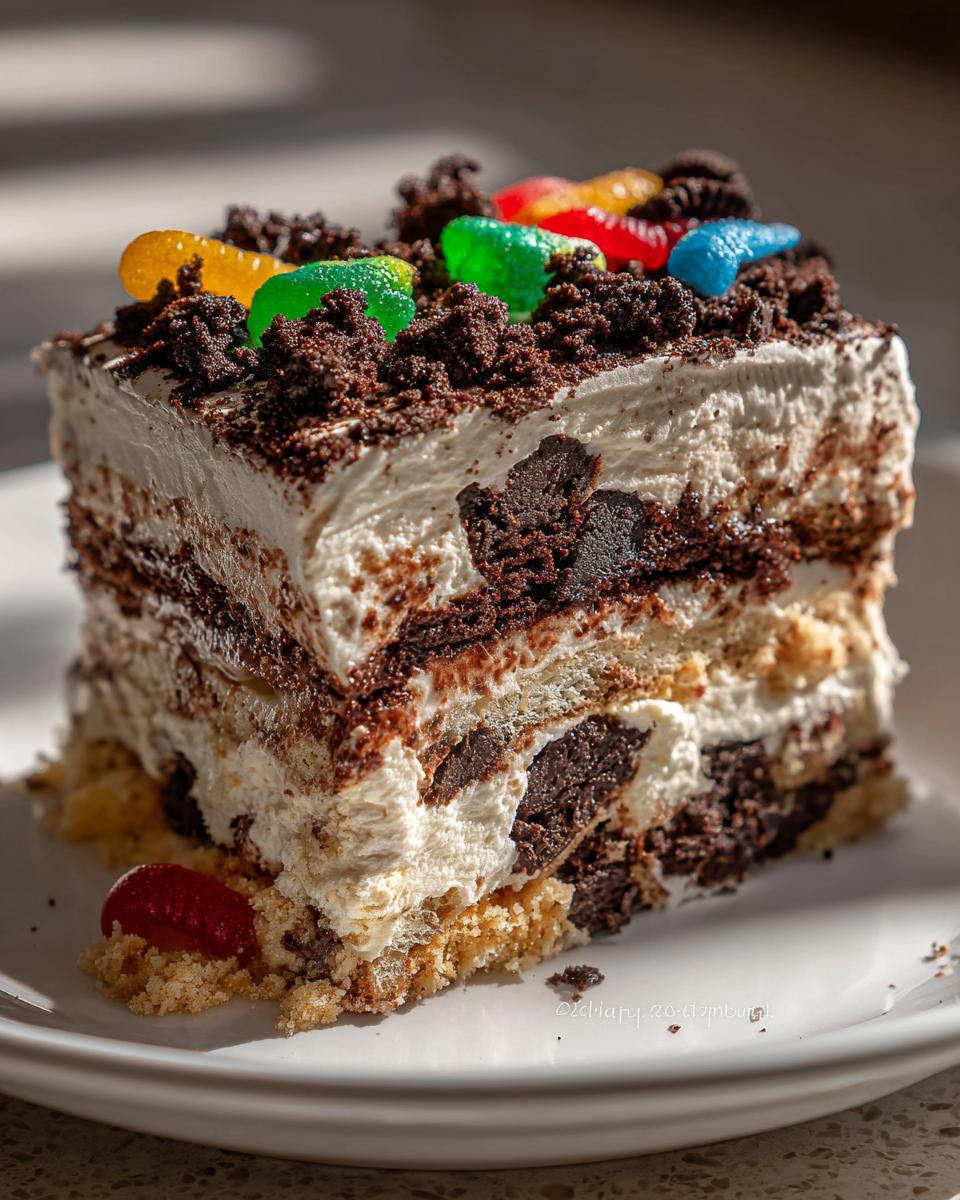
Time to build your masterpiece! Grab your trifle dish or 9×13 pan—whatever you chose. Start by spreading about half of your reserved crushed Oreos right on the bottom. Don’t pack them down too hard; a light layer is fine. Next, gently spread half of that incredible chocolate cream cheese filling right over the crumbs. That contrast between the dark cookie and the light filling is what makes this look so appealing in this Layered Pudding Dessert.
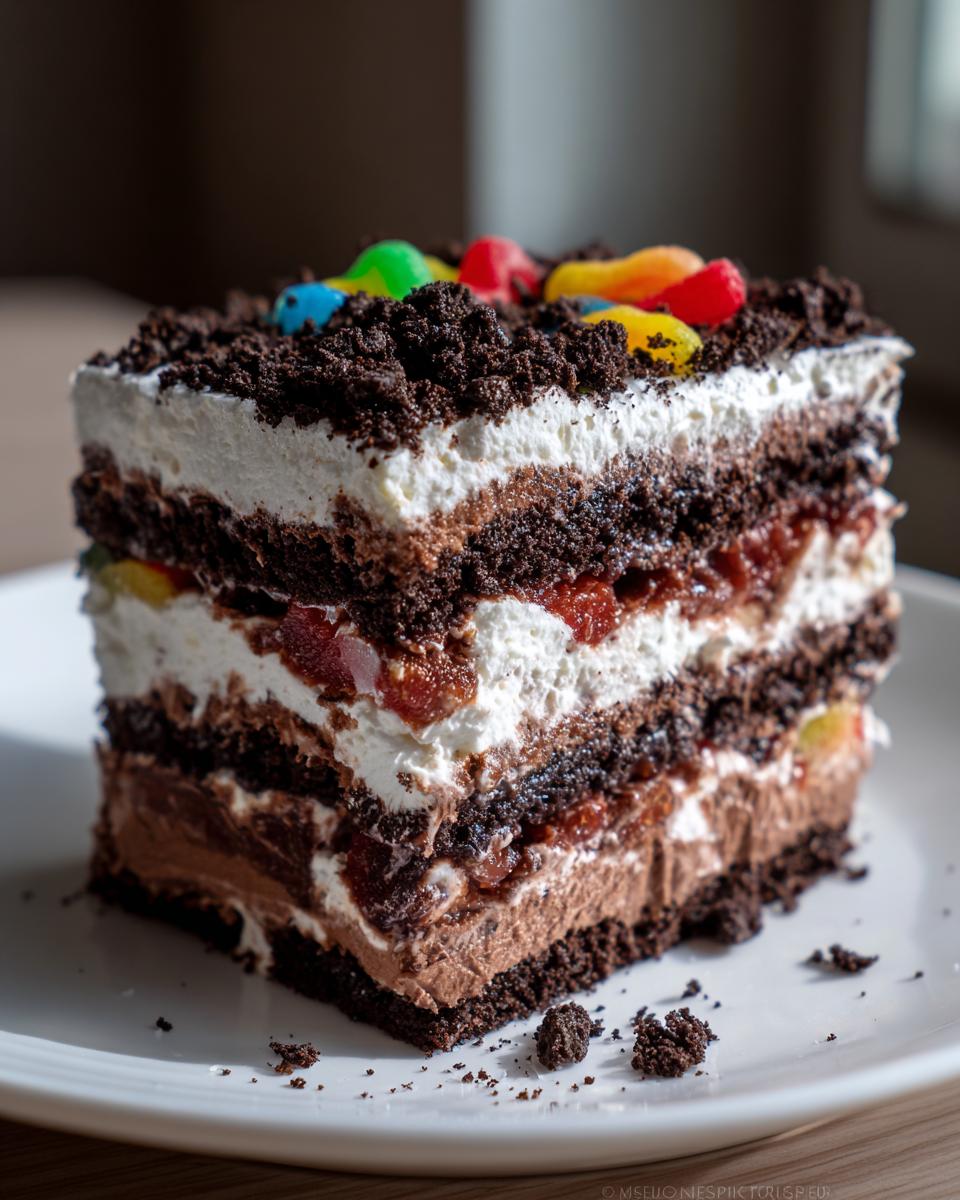
You just repeat that sequence once more: the remaining crushed Oreos go down, followed by the rest of the chocolate filling. Smooth out the top layer—this is the base for your fluffy blanket. Then, take that second container of thawed whipped topping and spread it evenly across the very top. Don’t worry about making this layer perfect; it’s just going to be hidden under more “dirt” soon enough! This layering ensures that every bite is a complete mix of all the intended flavors and textures. We’ll add the final toppings and get this chilling very soon!
Tips for the Best Dirt Cake Recipe Success
Look, making the mixture is easy, but getting that perfect, sliceable but still creamy texture? That takes a little insider knowledge. Since I focus on recipes that work reliably, let me give you the key takeaways that turn this from just ‘good’ to the absolute Best Dirt Cake Recipe you’ll ever try. If you follow these two simple rules, you’ll never have a runny dessert again. When I first started making refrigerator desserts, patience was not my strong suit, but trust me on the time element—it truly changes the result. You can check out my advice on best sugar cookie dough holds shape for more thoughts on recipe patience!
Chilling Time for Optimal Dirt Cake Texture
This is my non-negotiable pointer: you cannot rush the chill time. I know you probably want to dig in immediately, but at least four hours is required. Ideally, make this the day before you plan to serve it. When you chill it overnight, those pudding layers fully hydrate all the dairy components and firm up perfectly around the cookies. If you cut it early, the layers might try to slide apart, and you won’t get that satisfying slice. We want set layers, not soup!
Presentation Variations: Dirt Cups Recipe Ideas
If you aren’t serving a crowd in a big dish, making individual servings is so much fun, especially for kids! Try assembling this in clear small glasses or mason jars to create a gorgeous Dirt Cups Recipe. When you do this, be really thoughtful about where you put those gummy worms. Instead of just plopping them on top, try sticking one or two worms halfway into the filling layer near the edge of the glass so they look like they are actively climbing out! It’s those little touches that make this Easy Dirt Cake so memorable for parties.
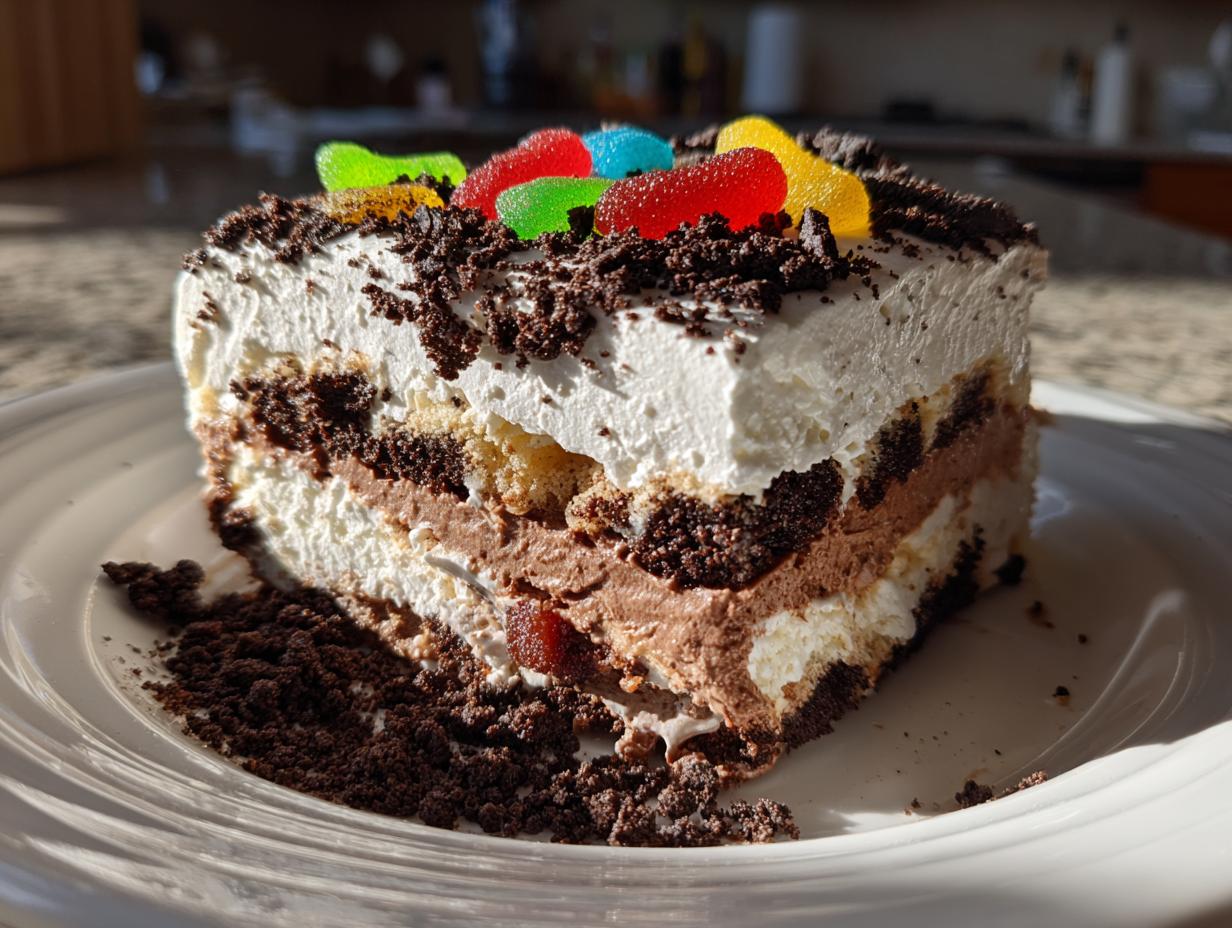
Making the Dirt Cake with Gummy Worms Decorations
This is my favorite part! Honestly, the taste is already amazing, but the presentation of the Dirt Cake with Gummy Worms is what transitions this from just a great dessert to a genuine showstopper, especially if you are making this for a Halloween party or a kid’s birthday. Presentation matters, even if it’s “dirt,” right?
Remember when we saved that final cup of finely crushed Oreos? Now is the moment to use them. Sprinkle that reserved ‘dirt’ generously and evenly over the top layer of whipped topping. You want that gorgeous, dark, rich blanket. Don’t be shy! You are trying to fully cover the white topping so it looks like, well, actual perfectly turned earth.
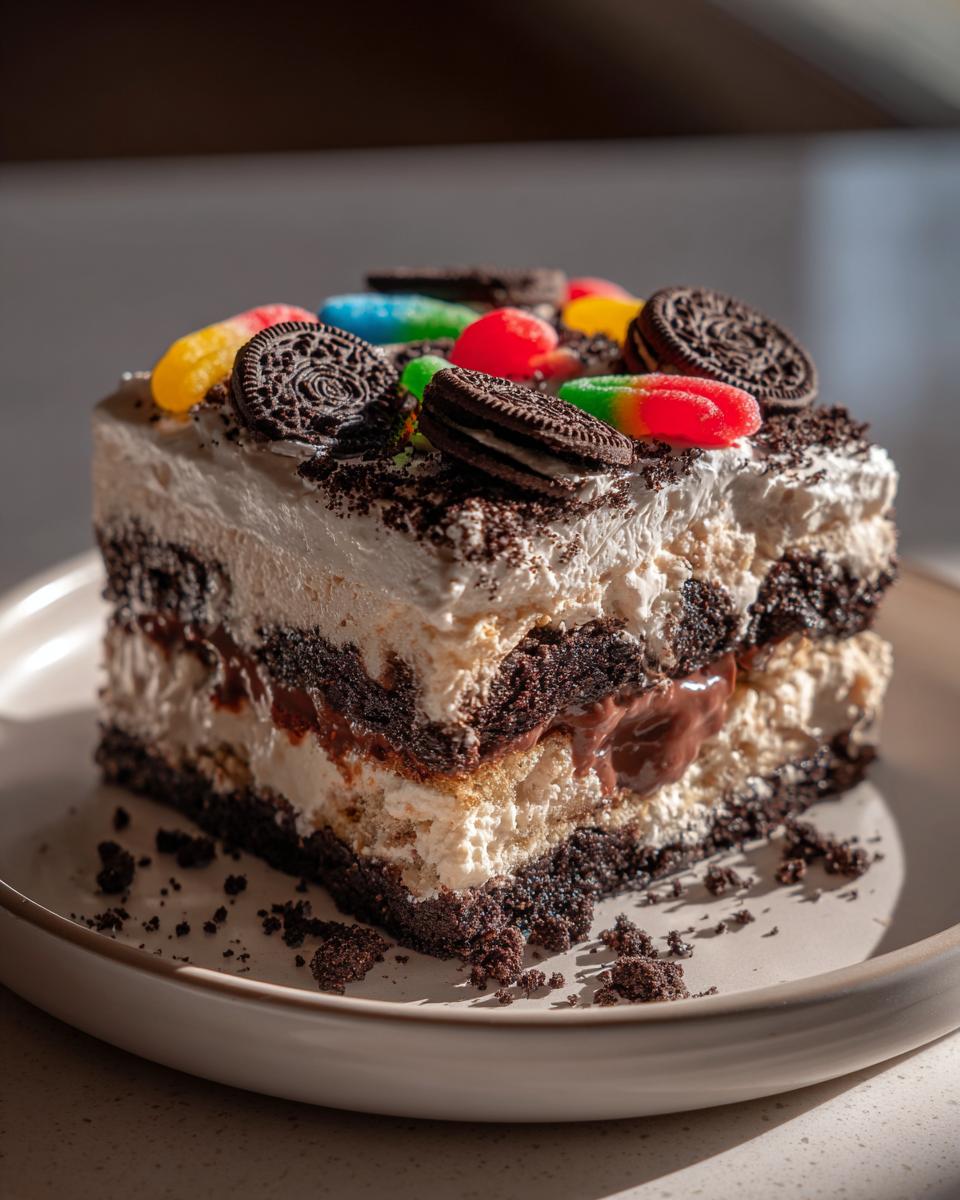
Once the crumbs are down, it’s time for the wildlife! Grab those gummy worms. I like to arrange them in a few different ways. Some worms I stick straight down, nose-first, so it looks like they are burrowing deep into the goodness. Others I might lay right across the surface, maybe draped over the edge of the dish if you’re feeling dramatic. It’s all about making it look playful and fun!
Pro tip: If you are making individual Oreo Dirt Cake Recipe cups, you can really go wild by sticking two worms sticking completely out of the top of each cup. Kids absolutely love this detail! Once the worms are placed, you must get this cake into the fridge immediately. Those gummy creatures look best when they are resting on a slightly chilled, stable surface, waiting for you to serve a big scoop!
Ingredient Notes and Substitutions for Your Chocolate Cream Cheese Dessert
I always get questions about swaps, and that’s fair! We all have different pantries. Since this Chocolate Cream Cheese Dessert relies so heavily on instant mixes for that quick set time, substitutions can sometimes change the final texture, so proceed with caution. If you absolutely cannot find instant pudding mix—maybe you’re stranded on a dessert desert island—you can try making pudding from scratch, but you’d need to cook it down and then chill it until it’s quite thick before folding it into the cream cheese base. That adds a lot of time!
For those of you who want to peek at how others handle their versions, I found a helpful reference on how they assemble their Oreo Dirt Cake. Generally, try to stick to full-fat ingredients here; low-fat cream cheese just won’t achieve that classic rich, dense mouthfeel we are aiming for. If you are out of Oreos, any chocolate sandwich cookie will work, but trust me, the flavor really shines when you use the original for that authentic taste!
Storage and Make Ahead Dessert Guidelines
One of my absolute favorite things about this recipe is that it’s the perfect Make Ahead Dessert. Seriously, you can make this the day before your big event, and honestly? It tastes even better the next day! When you’re planning for big gatherings or trying to manage your time before a big lunch, knowing you have the dessert sorted is a huge relief.
If you’re taking this to a potluck—which is what this is practically begging to be used as—you just need to keep it well covered. Use plastic wrap or a tight-fitting lid on your trifle dish or 9×13 pan. It needs to stay in the refrigerator the whole time. Because it is full of dairy and pudding, leaving it out on the counter for too long isn’t safe, and frankly, it loses that wonderful chilled snap that makes it so good.
Now about freezing… this is where I draw the line, unfortunately. While I preach about adaptable cooking, freezing a dessert packed with whipped topping and pudding just doesn’t work out well. The structure deflates horribly when it thaws, and the texture goes from wonderfully creamy to watery and sad. Stick to making it a day ahead and keeping it chilled. If you want tips on other great make-ahead meals that *can* handle the freezer, like my slow cooker chicken pozole rojo, check that out!
This dessert usually holds up beautifully for about three or maybe four days covered tight in the fridge, but let’s be real: with this recipe, there usually aren’t any leftovers past day one. It’s just too tempting!
Frequently Asked Questions About This Dirt Cake
I know everyone has a few questions when tackling a retro favorite like this! It’s always better to ask than to risk the texture, right? I’ve collected the questions I get most often about making the best dirt cake so you can feel totally confident before you start building those glorious layers. Also, if you’re looking for other easy-win recipes that save you time in the kitchen, you should definitely check out my inspiration for easy crescent roll apple dumpling recipe!
Can I use homemade pudding instead of instant for this dirt cake?
You absolutely can, but you have to treat it differently. See, instant pudding relies on chemical reactions to set up super fast with the milk, which is what helps suspend that heavy cream cheese mixture later on. If you make stovetop pudding, you MUST cook it completely, get it very thick, and let it cool down almost completely before you even think about folding it into the cream cheese layer. If you fold hot pudding in, you’ll end up melting all the good air out of your cream cheese base, and it won’t hold height. It’s just so much easier and more reliable to stick to the instant kind for this recipe!
How long does this easy dirt cake stay fresh in the refrigerator?
This is such a great question, especially if you’re prepping for a party! Because this is such an easy dirt cake packed with dairy, I really recommend serving it within three days maximum. Day one is fantastic because things are extra fresh, and Day Two is arguably the best once the flavors have really married. By Day Four, the cookie layer at the bottom starts getting a bit too soggy for my taste, although some people don’t mind that ultra-soft texture. Just make sure that whatever container you use is tightly sealed to prevent dry spots or fridge odors from sneaking in!
What if I don’t have Oreos? Can I use another cookie for my layered pudding dessert?
Well, I’m going to be honest here—it won’t be the same! The entire appeal of the dirt cake is that unmistakable, slightly bitter, dark chocolate flavor and crunchy texture of the Oreo wrapper. But if you are truly desperate, a chocolate wafer cookie works okay. If you use a chocolate chip cookie instead, you are adding nuts and chocolate chips into the mix, which completely changes the mouthfeel of this layered pudding dessert. It becomes a totally different, albeit still tasty, dessert. For the classic experience, stick to the original sandwich cookie whenever you can!
Sharing Your Simple Layer Cake Creation
Now that you’ve got this amazing, creamy, no-bake masterpiece ready to go, I genuinely want to see it! Whether you stuck to the big trifle dish or made those adorable individual Dirt Cups, sharing what you create is half the fun of cooking.
Please leave a rating for this Simple Layer Cake right below this section. Let me know how many stars you give it and what occasion you made it for—was it a big birthday bash or just a Tuesday treat? I read every single comment, and your feedback helps me know which recipes to focus on next.
And if you snapped a picture, tag me on social media! I love seeing your gummy worms peeking out of the dirt. It makes my day to see my recipes living happily in your kitchens. If you want to learn more about my philosophy on keeping meals simple and delicious, check out my About page!
PrintUltimate No-Bake Oreo Dirt Cake with Gummy Worms

Make this creamy, layered Oreo Dirt Cake without turning on your oven. This easy, no-bake dessert uses crushed Oreos, chocolate pudding, and a cream cheese filling, making it a perfect make-ahead treat for parties or family gatherings.
- Prep Time: 25 min
- Cook Time: 0 min
- Total Time: 4 hr 25 min
- Yield: 12 servings 1x
- Category: Dessert
- Method: No-Bake
- Cuisine: American
- Diet: Vegetarian
Ingredients
- 1 package (14.3 ounces) Oreo cookies
- 1 package (8 ounces) cream cheese, softened
- 1 cup unsalted butter, softened
- 1 cup powdered sugar
- 1 container (12 ounces) frozen whipped topping, thawed
- 2 packages (3.9 ounces each) instant chocolate pudding mix
- 3 cups cold milk
- 1 container (8 ounces) frozen whipped topping, thawed (for topping)
- Gummy worms, for decoration
Instructions
- Crush all Oreo cookies until they resemble fine dirt. Set aside 1 cup of the crushed cookies for the final layer.
- In a large bowl, beat the softened cream cheese, softened butter, and powdered sugar together until the mixture is smooth and creamy.
- Fold in one container of the thawed whipped topping until just combined. This is your cream cheese layer.
- In a separate medium bowl, whisk together the instant chocolate pudding mix and cold milk for about two minutes, or until the mixture begins to thicken. Let it stand for five minutes.
- Gently fold the thickened chocolate pudding into the cream cheese mixture until fully incorporated.
- In a large trifle dish or 9×13 inch pan, begin layering the dessert. Place half of the remaining crushed Oreos on the bottom.
- Spread half of the chocolate cream cheese mixture evenly over the cookie layer.
- Repeat the layers: add the remaining crushed Oreos, followed by the remaining chocolate cream cheese mixture.
- Spread the second container of thawed whipped topping evenly over the top layer.
- Sprinkle the reserved 1 cup of crushed Oreos over the whipped topping to create the final ‘dirt’ layer.
- Press gummy worms into the top layer for decoration.
- Cover the dish and chill in the refrigerator for at least four hours, or preferably overnight, before serving.
Notes
- For individual servings, assemble this recipe in small clear cups to create ‘Dirt Cups’.
- If you do not have gummy worms, you can use chocolate-covered raisins or malted milk balls for extra texture on top.
- Use whole Oreos, filling and all, for the best flavor in the cookie crumbs.
Nutrition
- Serving Size: 1 slice
- Calories: 450
- Sugar: 45
- Sodium: 350
- Fat: 28
- Saturated Fat: 15
- Unsaturated Fat: 13
- Trans Fat: 0.5
- Carbohydrates: 48
- Fiber: 2
- Protein: 5
- Cholesterol: 55