

There is just something about a chilly evening that screams for comfort food, and honestly, nothing shouts ‘cozy’ louder than sinking a spoon into a thick, creamy soup cradled inside an edible vessel. If you’ve ever stood staring longingly at those perfect, sturdy bread bowls at the bakery, wishing you could whip them up last minute, I’ve got you covered. My whole philosophy at Cooking by Felix is proving that exceptional food doesn’t need hours of fuss, and that absolutely holds true for these artisan creations. We’re going to make bread bowls that are beautifully crusty on the outside but surprisingly soft and chewier on the inside—the exact structure you need to hold back that hungry bowl of potato soup or chili without getting soggy. Trust me, achieving this level of homemade magic is simpler than you think!
- Why You Will Love This Easy Homemade Bread Bowl Recipe
- Ingredients for Making Sturdy Bread Bowls From Scratch
- Step-by-Step Instructions: How to Make Bread Bowls
- Tips for Achieving Bakery Style Bread Bowls
- What to Fill Your Homemade Bread Bowls With
- Variations: Pretzel Bread Bowl Recipe and Savory Options
- Storing and Reheating Your Homemade Bread Bowls
- Frequently Asked Questions About Making Bread Bowls
- Nutritional Estimates for These Simple Bread Bowls
- Share Your Homemade Bread Bowl Success
Why You Will Love This Easy Homemade Bread Bowl Recipe
I know you’re busy, so I wouldn’t waste your time on a recipe that doesn’t deliver. These aren’t just any loaves; they are engineered to be the perfect food delivery system! When you make these homemade bread bowls, you get that artisanal bakery look without needing a brick oven or specialized gear. Felix knows the struggle, so we aim for success every time.
- Sturdy Walls, Soft Center: The balance is key here. They are strong enough for chunky chowder but tender enough to tear off and dip.
- One Dough, Endless Meals: This recipe uses basic pantry staples to create incredible bread bowls, which means no stressful ingredient hunts.
- That Incredible Crust: We’re using a little steam trick to guarantee that satisfying, deeply golden, crusty exterior on your finished product.
- Total Control: Forget those thin, store-bought versions. You decide how big these bowls are and exactly how thick those edible walls need to be!
Ingredients for Making Sturdy Bread Bowls From Scratch
Okay, this is the point where people panic because they think baking means they need 40 specialty items. Nope! The secret to beautiful, sturdy bread bowls is sticking to the basics and trusting the process. Everything you need is right here. Make sure you measure accurately, especially the yeast and salt, and you’ll be golden!
Here is exactly what you need for 4 perfect, hearty bowls:
- 1 packet active dry yeast (that’s about 2 1/4 teaspoons, just so you know!)
- 1 teaspoon granulated sugar
- 1 cup warm water (and listen, this needs to be between 105°F to 115°F—too hot kills the yeast, too cool does nothing!),
- 3 cups all-purpose flour, plus a little extra just for dusting later,
- 1 1/2 teaspoons salt,
- 1 tablespoon olive oil, plus a touch more for coating the bowl,
- 1 egg white, beaten lightly with 1 teaspoon water (this is our magic shine agent for the crust!).
See? Nothing complicated! We turn these simple things into something restaurant-quality, I promise.
Step-by-Step Instructions: How to Make Bread Bowls
This is where the magic happens! Making delicious, sturdy bread bowls is all about managing your time and letting the dough do the hard work. Follow these steps closely, trust your intuition when you feel the dough, and you’ll be serving up gorgeous edible soup bowls in no time. Remember, success in baking comes down to a few key moments, and we’ll hit them all right here.
Activating Yeast and Mixing the Dough for Your Bread Bowls
We have to wake up that yeast first! In a small bowl, gently dissolve your teaspoon of sugar right into the warm water—and I mean *warm*, not hot! We are aiming for that sweet spot between 105°F and 115°F. Once your sugar is gone, sprinkle the yeast right on top. Don’t stir it, just let it peacefully sit there for about five to ten minutes. When it gets foamy and bubbly, that means your yeast is happy and ready to work its magic in our bread bowls mix.
While that froth is building, whisk your flour and salt together in a big bowl. Once your yeast mixture is blooming, pour that in, along with the olive oil, straight into your dry ingredients. Start stirring everything with a wooden spoon until you get a shaggy, messy collection of dough. That’s exactly what it should look like!
Kneading and the First Rise for Soft Bread Bowls From Scratch
Now we build the structure needed for those soft bread bowls from scratch. Turn that shaggy mess out onto a lightly floured counter. You need to knead this dough for about six to eight minutes until it feels smooth and elastic. If you’re a stand mixer person, use the dough hook on medium-low for about five minutes—keep an eye on it! The dough should pass the poke test and mostly spring back.
Time for a nap! Lightly oil a clean bowl—any bowl will do—and place your dough inside, giving it a little roll so it gets coated in oil. Cover it up tight with plastic wrap or a clean kitchen towel. Find a nice, warm spot for it to hang out for 75 to 90 minutes, or until it has genuinely doubled in size. Patience here is vital for that light interior we want!
Shaping and Final Proofing the Bread Bowl Dough
Once it’s huge and puffy, gently punch the air out of the dough—that’s the fun part! Now, evenly divide that dough into four equal pieces. Roll each piece quickly between your palms until you form a nice, tight ball. Think of a perfectly smooth bowling ball shape. Place these four balls onto a baking sheet lined with parchment paper, making sure they have plenty of breathing room between them.
Cover them loosely and let them proof again for about 30 to 45 minutes. They won’t double this time, but they absolutely must look puffy and pillowy when they’re ready for the oven. This second rest is what makes them bake up beautifully round.
Baking the Crusty Bread Bowls
Preheat your oven to 400°F (200°C). This is when you want to perform my favorite trick for bakery-style bread bowls: put a shallow pan on the bottom rack while it heats up! We need that steam for our crust! Just before baking, brush the tops of those puffy dough balls lightly with that egg white wash you mixed. It gives them that gorgeous shiny finish.
Carefully slide them into the oven. Bake them for 20 to 25 minutes. You’re looking for a deep, rich golden brown color, and they should sound satisfyingly hollow when you tap the bottom. Don’t pull them out too soon, or they won’t be sturdy enough to hold your chili later!
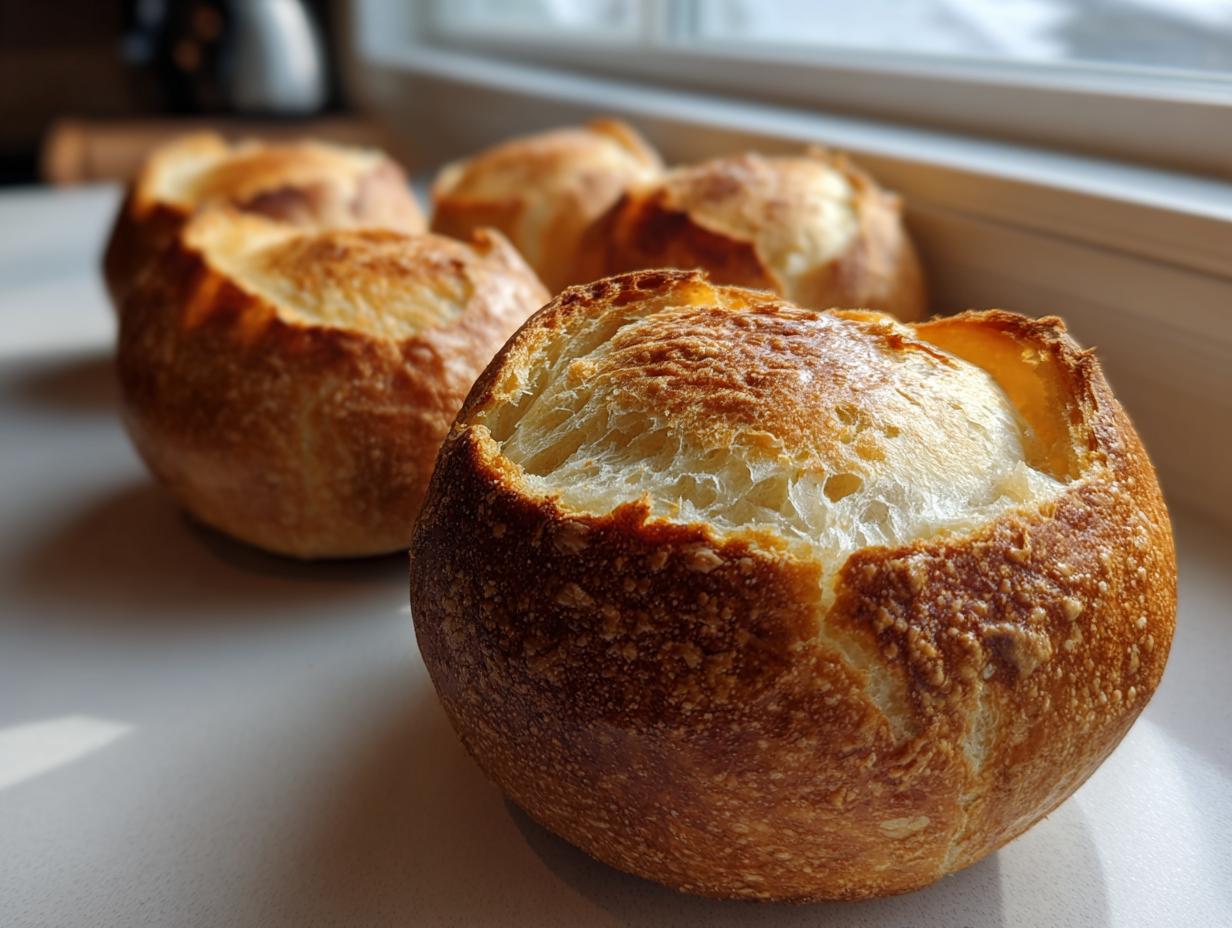
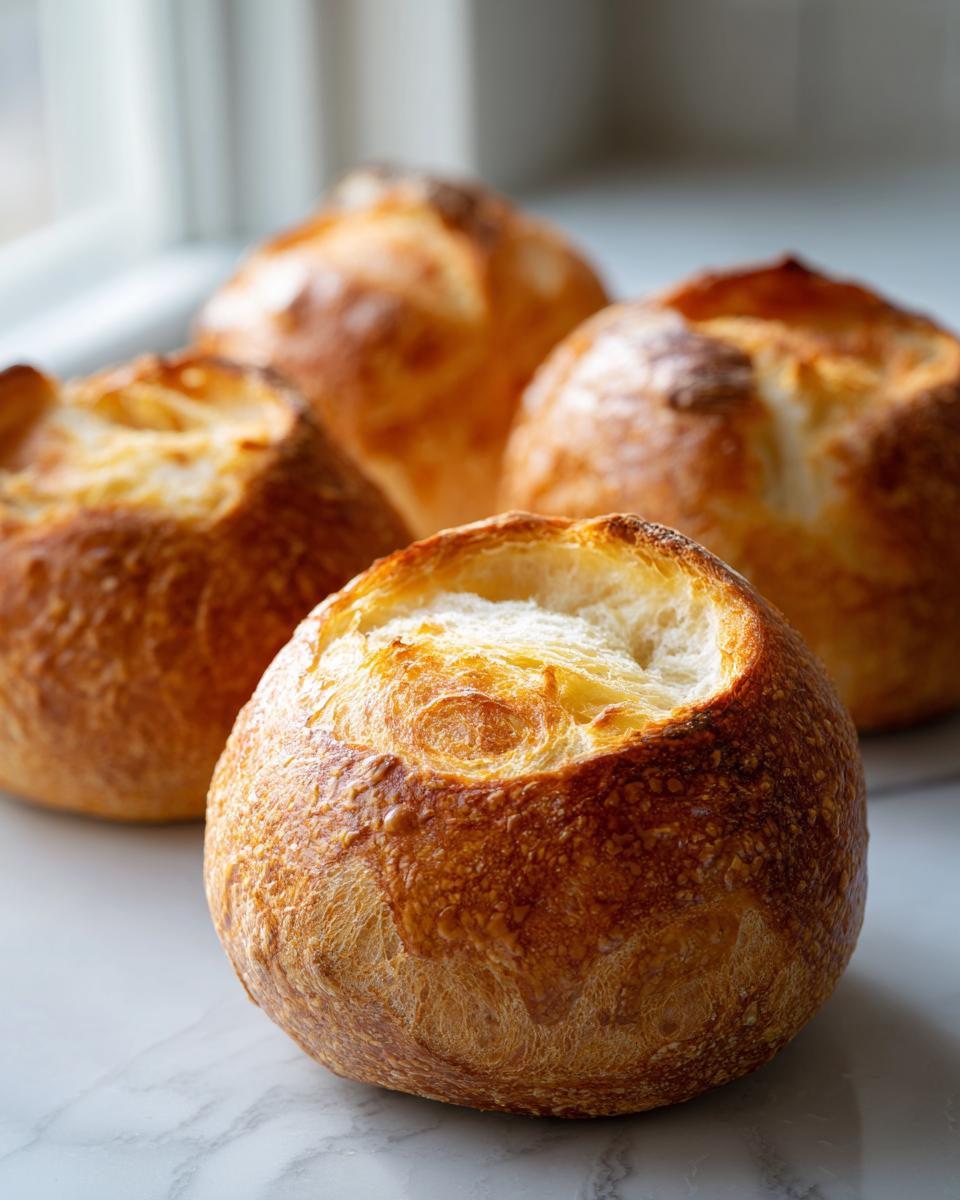
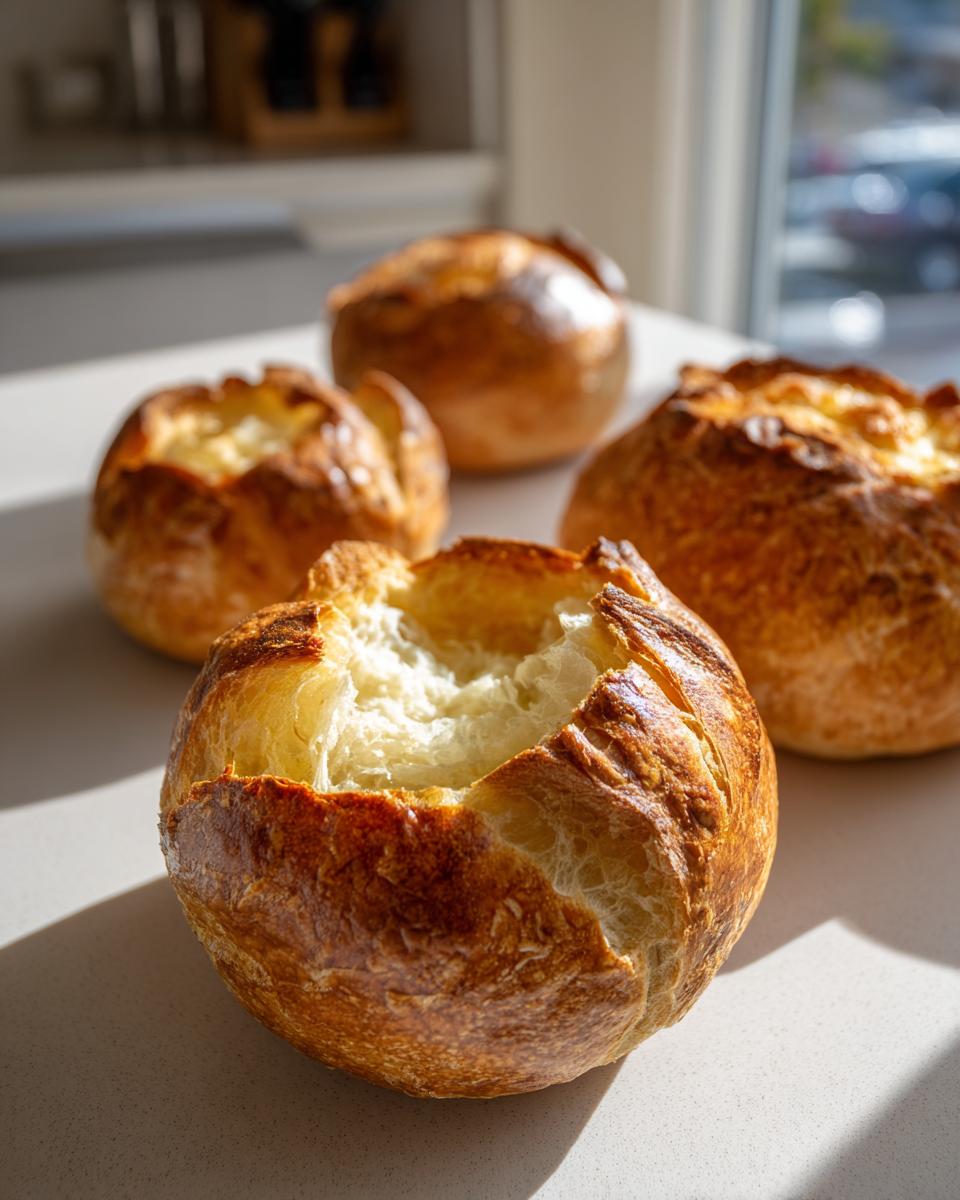
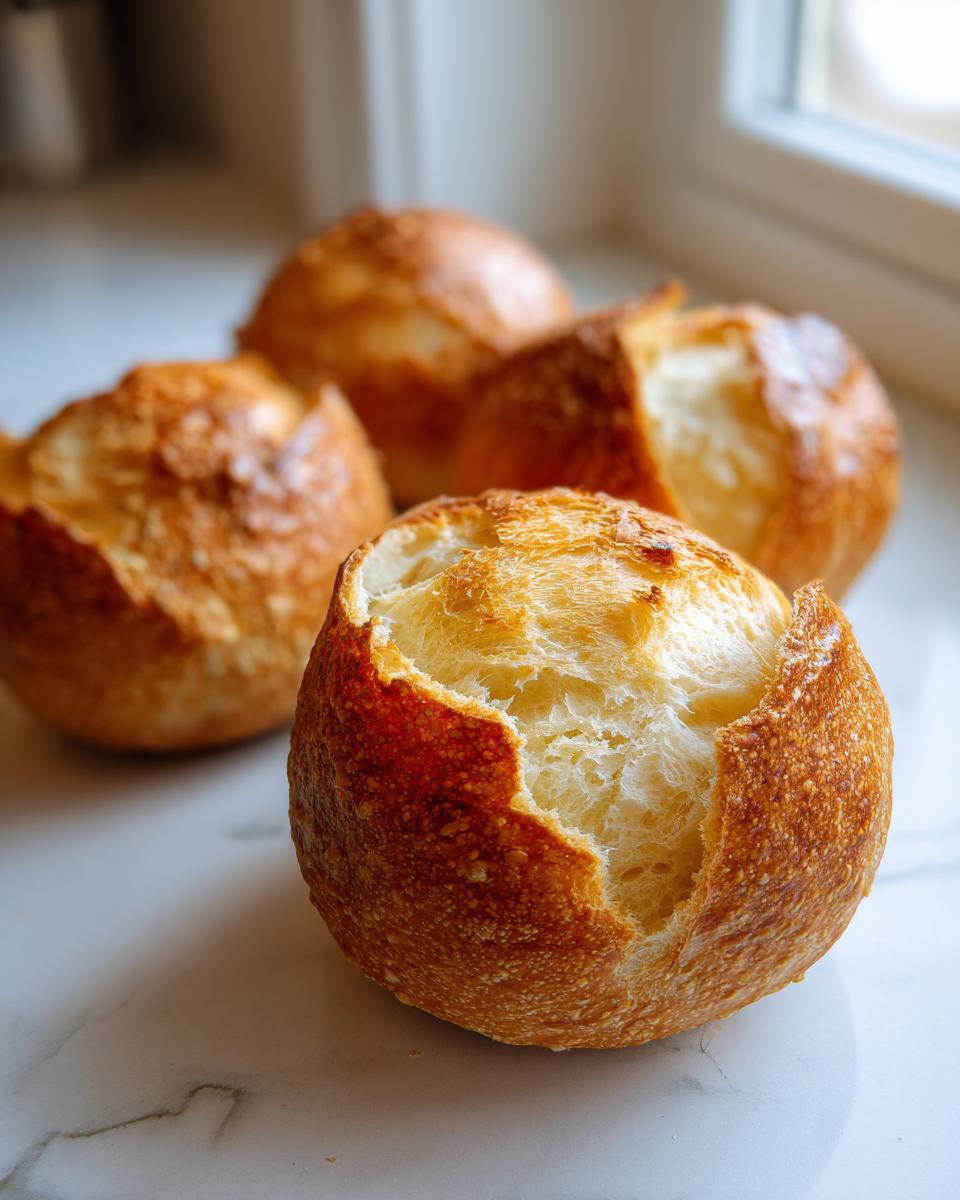
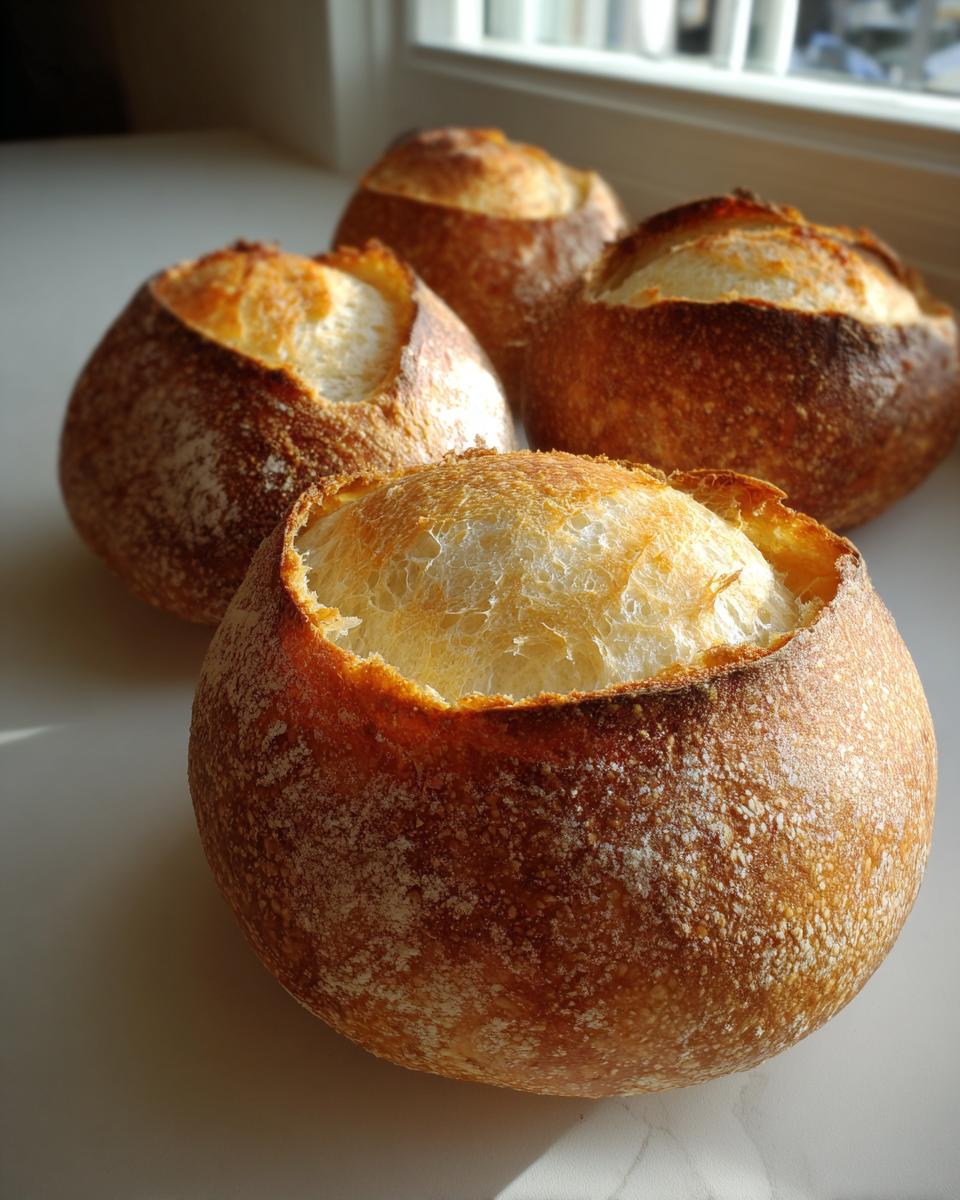
Cooling and Hollowing Out Your Edible Soup Bowls
This is the hardest part—waiting! You must let the crusty bread bowls cool on a wire rack for at least 15 minutes. If you try to cut them open piping hot, they will steam themselves apart and collapse. Seriously, fight the urge!
Once cooled slightly, take a sharp knife and cut a circle right into the top center of each loaf. Try to cut almost straight down. Gently scoop out the soft interior bread, but stop when you have a wall that’s about one inch thick all the way around. Don’t forget to save that scooped-out bread—it’s perfect for dipping! You have successfully made your own edible soup bowls!
Tips for Achieving Bakery Style Bread Bowls
So, you nailed the bake, but maybe you’re still dreaming of that super-thick crust you get from the fancy bakeries? I have a couple of little tricks Felix passes down that really up the ante! The absolute best thing you can do for a bowl that won’t break under pressure—especially if you’re using a watery soup—is to give the hollowed-out shells a quick second bake.
Toss those empty bowls back into the 400°F oven for about five more minutes. This dries out the interior walls just enough, making them incredibly sturdy. It also toasts the inside beautifully. Speaking of crust, don’t forget that steam pan trick we used during the initial bake! That humidity is what makes the exterior shatter perfectly when you bite into it. We want that crisp shell, right? For more fantastic ways to use your baking skills, check out this guide on my moist apple bread.
And please, please let them cool! If you scoop out the insides too soon, the steam trapped inside will turn that perfect crust soft. If you want to see another great recipe for making beautiful loaves, check out this inspiration here!
What to Fill Your Homemade Bread Bowls With
Okay, you’ve baked these gorgeous, sturdy shells. Congratulations! They are just waiting to play host to some magnificent comfort food. This is where the fun really starts, because these homemade bread bowls are versatile beyond just the usual suspects. Forget those flimsy, store-bought things—these can handle anything you throw at them!
When people ask me for the absolute best soup for bread bowls, my answer always comes down to structure. You need something thick! Thick soups and stews are where these shine brightest. Of course, nobody can argue with a classic batch of creamy potato soup or that amazing Broccoli Cheddar we all crave. However, if you really want to impress, you have to go for a dense chili. I have the absolute best recipe for bread bowls for chili because the beans and meat don’t instantly soak through the walls.
But don’t limit yourself to just soup! Remember how sturdy these bake up? They are fantastic for thick dips. My husband loves when I make a giant bowl of spinach artichoke dip and bake the bread shell until it’s extra crisp. Then, you just tear off pieces of the soft interior bread for dipping! Total game-changer for game day.
For a really hearty dinner idea that blows spaghetti out of the water, try filling one of these edible masterpieces with a thick Philly Cheese Steak Soup, which you can find my recipe for right here. Or, if you want something rich, go for a cream-based pasta sauce like Alfredo—though you might want to bake that shell a little extra long just to be safe! Sometimes I even use them to serve baked mac and cheese. Honestly, once you have the dough down, your options are endless!
If you are looking for something different, maybe you should even look into those salty versions—I saw a fantastic pretzel bread bowl recipe that would be amazing filled with beer cheese dip. Just an idea for your next baking adventure!
Variations: Pretzel Bread Bowl Recipe and Savory Options
I know what you’re thinking: “Okay, Felix, these look amazing for soup, but what about game day? Can I make pretzel bread bowls?” The answer is a resounding YES! That’s the beauty of mastering a reliable dough like this one; you can pivot quickly. If you want that iconic salty, slightly chewy pretzel flavor that screams game-day appetizer, you just need one extra step.
For your pretzel bread bowl recipe, after you shape your dough balls (Step 6 in the instructions), you need to introduce them to a baking soda bath. This is what gives them that classic pretzel color and taste! Bring six cups of water and a half cup of baking soda to a gentle simmer in a wide pot. Carefully lower two dough balls into the simmering water for about 30 seconds total—flip them once halfway through! Then, pull them out quickly, let them drain for a minute on a rack, and then brush them with the egg wash and bake them just like the regular recipe instructed.
It’s really that simple! The baking soda slightly cooks the exterior starch, yielding that distinctive flavor and texture. These salty, crusty beauties are obviously incredible for dips—think about serving my creamy beer cheese dip (recipe right here!) inside a warm pretzel bowl. That salty, cheesy combo is next level comfort food, and it totally beats chips!
For other savory bread bowls, you can skip the baking soda bath entirely, but I highly recommend adding a savory element right into the dough during the mixing stage (Step 3). Think about mixing in a tablespoon of dried Italian herbs or some sharply grated Parmesan cheese along with your flour and salt. That makes for the perfect vessel to serve something like a thick garlic chicken alfredo or even a hearty, cheesy pasta bake. These are truly versatile canvas bread bowls!
Storing and Reheating Your Homemade Bread Bowls
So, you made four perfect bread bowls, filled two, and suddenly realized, “Oh my gosh, what do I do with the other two?” Don’t fret! Storing these beauties correctly is key to keeping that crust a little crisp and the interior soft for later use. We worked hard to get that structure right, so let’s protect it!
For any hollowed-out bread bowls you aren’t using right away, you must treat them like regular artisan bread: airtight storage at room temperature is the way to go. Do not, under any circumstances, stick them in the refrigerator. The fridge is bread’s enemy; it dries it out and makes it stale way faster. Pop them into a large Ziploc bag or wrap them tightly in plastic wrap, and they should be great for two, maybe three days.
Saving the Removed Bread Interior
Listen, you absolutely cannot throw away that soft, delicious crumb you scooped out! That’s the best part for dippers! I usually keep mine separate from the actual bowls. If I know I’ll use it soon, I just keep it in a lightly covered container on the counter. But here is Felix’s favorite trick for maximizing leftover bread:
- Tear the leftover bread into small chunks.
- Toss them lightly with a tiny bit of olive oil and maybe some garlic powder if you’re feeling fancy.
- Toast them on a baking sheet at 350°F (175°C) for about 10 minutes until they are golden and crunchy.
Boom! You’ve just made instant croutons for your next salad or some fantastic dippers for that leftover soup. If you have too much, you can totally save these toasted crumbs to make breadcrumbs later! Need a great recipe for soft bread while you’re waiting? My easy naan bread recipe is another fantastic quick dough to master!
How to Reheat Hollow Bread Shells
If your bread bowls have been sitting out for a day or two or you just want that fresh-from-the-oven crust again before filling, reheating is simple. You want to revitalize that crust without turning the inside rock-hard and dry.
Take your empty bowl—yes, empty! Never reheat a bowl already full of soup unless you want soup lava everywhere—and lightly spritz the exterior with water, or just quickly run the outside under the tap. This moisture helps steam the crust back to life! Pop it directly onto the oven rack at 350°F (175°C) for just 5 to 8 minutes. That’s it. It comes out warm, that crust is crackly, and it’s ready to hold whatever deliciousness you have planned!
Frequently Asked Questions About Making Bread Bowls
I know baking can sometimes lead to questions, even with the clearest instructions! Once you get the hang of yeast, baking these simple bread recipe for bowls gets almost automatic. Here are a few things readers often ask me when they are planning their soup night.
Can I use bread flour instead of all-purpose flour?
Oh, absolutely! If you want the absolute best structure for your bowls, bread flour is actually a slight upgrade. Bread flour has more protein in it, which means more gluten development when you knead. For these sturdy bread bowl recipe, that extra structure helps prevent collapse when you start scooping out the inside. Just use the flour cup-for-cup like the recipe calls for, but know that your dough might feel a tiny bit stiffer during kneading.
Can I make these bread bowls ahead of time?
Yes, and this is a lifesaver for entertaining! You can definitely complete the entire process right up until the point of baking—Steps 1 through 6. Once you have shaped the balls but before the second rise (Step 7), you can cover them tightly and place them in the refrigerator. They can chill there for up to 24 hours. This slow, cold fermentation builds amazing flavor! When you’re ready to bake, pull them out and let them rest at room temperature for about an hour before brushing with egg wash and baking. It works like a charm!
Why are my bread bowls flat instead of round and poofy?
This usually happens for one of two reasons, and it’s frustrating when you’re hoping for that restaurant quality look! First, check your yeast. If it wasn’t foamy (Step 1), it was dead or sluggish, and your dough never developed enough lift. Second, check your final proofing time (Step 7). If you rush that final 30 to 45 minutes, the dough hasn’t built up enough gas to puff up nicely in the heat of the oven. Remember, if your kitchen is cold, the final rise will always take longer. Don’t guess; if it doesn’t look visibly puffy, give it more time!
How much liquid can the final bread bowl hold?
That depends on how thick you made those walls! If you followed my instruction to leave about a one-inch thick wall on your edible soup bowls, they generally hold around 1.5 to 2 cups of soup, depending on the size of the ball you started with. If you are using them for something really wet, like chowder, I always recommend that second bake (my tip in the previous section!) to dry those inner walls just a bit more so they hold up even better.
Nutritional Estimates for These Simple Bread Bowls
Look, I’m a cook, not a nutritionist, and I’m focused on things tasting heavenly—not counting every single gram! But I know many of you want a handle on what these gorgeous homemade bread bowls are packing, especially when you’re making something rich like chili or chowder to go inside them.
I’ve done my best to plug the ingredients from this recipe into a calculator so you have a general idea. Please take this as a guideline—a ballpark figure—because how much flour you use, or how thick you cut those walls, is going to change the numbers!
These estimates are based on dividing the recipe into 4 standard-sized, hollowed-out bread bowls. If you eat the whole thing, including the interior bread for dipping (and who doesn’t?), the numbers will be higher!
- Serving Size: 1 bread bowl (just the shell)
- Calories: Approximately 320
- Fat: Around 3 grams
- Carbohydrates: Roughly 65 grams
- Protein: About 10 grams
- Sodium: 350mg (This can change based on the salt you use!)
If you are serving these loaded with a creamy potato soup, you are definitely tipping into serious comfort food territory, but honestly, that’s why we make them, right? It’s homemade goodness, and that counts for something!
Share Your Homemade Bread Bowl Success
Now, here’s the real fun part: seeing what you’ve created! At Cooking by Felix, we’re not just about publishing recipes; we’re building a community of cooks who prove that amazing home food is totally achievable, even when life gets hectic. You just mastered making perfect bread bowls from scratch, and that deserves some applause!
I absolutely live to hear about your takes on my recipes. Did you manage to get that beautiful, crackly crust? Did you fill them with your famous chili, or did you go rogue and try them with a dip? Don’t keep all that glorious carb-filled success to yourself!
I always encourage my readers to leave a star rating right there on the recipe card below. Honestly, those quick ratings help other busy cooks decide if this recipe is worth their time, and I read every single one of them. It helps me know I’m hitting that sweet spot between flavor and ease.
Show Me Your Edible Soup Bowls!
And if you took a picture—and let’s be real, you definitely did—please share it! Tag me on social media when you serve up your homemade bread bowls. Seeing those sturdy, golden shells filled with creamy goodness always makes my day brighter. It’s proof that we can all find time to bring something truly soulful to the dinner table.
I can’t wait to see what you’re cooking up. Happy baking, friend!
PrintEasy Homemade Artisan Bread Bowls: Soft Inside, Crusty Outside (Perfect for Any Soup or Chili)

Make sturdy, edible bread bowls from scratch that are soft inside and have a satisfying crust. This simple recipe yields bakery-style bowls perfect for holding your favorite soups, stews, or dips.
- Prep Time: 20 min
- Cook Time: 25 min
- Total Time: 185 min
- Yield: 4 servings 1x
- Category: Dinner
- Method: Baking
- Cuisine: American
- Diet: Vegetarian
Ingredients
- 1 packet active dry yeast (about 2 1/4 teaspoons)
- 1 teaspoon granulated sugar
- 1 cup warm water (105°F to 115°F)
- 3 cups all-purpose flour, plus more for dusting
- 1 1/2 teaspoons salt
- 1 tablespoon olive oil, plus more for coating
- 1 egg white, beaten with 1 teaspoon water (for egg wash)
Instructions
- Activate the yeast: In a small bowl, dissolve the sugar in the warm water. Sprinkle the yeast over the top and let it sit for 5 to 10 minutes until foamy.
- Combine dry ingredients: In a large bowl or the bowl of a stand mixer, whisk together 3 cups of flour and the salt.
- Mix the dough: Pour the yeast mixture and the olive oil into the dry ingredients. Mix with a wooden spoon or the dough hook attachment until a shaggy dough forms.
- Knead the dough: Turn the dough out onto a lightly floured surface and knead for 6 to 8 minutes until the dough is smooth and elastic. If using a stand mixer, knead on medium-low speed for 5 minutes.
- First rise: Lightly oil a clean bowl. Place the dough in the bowl, turning to coat. Cover the bowl with plastic wrap or a clean kitchen towel. Let the dough rise in a warm place for 1 to 1.5 hours, or until doubled in size.
- Shape the bowls: Gently punch down the risen dough. Divide it into 4 equal pieces. Shape each piece into a tight ball. Place the balls on a baking sheet lined with parchment paper, leaving space between them.
- Second rise: Cover the dough balls loosely and let them rest for another 30 to 45 minutes. They should look puffy.
- Preheat and prepare: Preheat your oven to 400°F (200°C). Place a shallow pan on the bottom rack to create steam later.
- Bake the bowls: Brush the tops of the dough balls lightly with the egg white wash. This helps create a shiny, crusty exterior. Bake for 20 to 25 minutes, or until the bread bowls are deep golden brown and sound hollow when tapped on the bottom.
- Cool and hollow: Let the bread bowls cool on a wire rack for at least 15 minutes before hollowing them out. Use a sharp knife to cut a circle in the top of each loaf. Gently pull out the soft interior bread, leaving a sturdy wall about 1 inch thick to create your edible soup bowls.
- Serve: Fill your homemade bread bowls with your favorite soup, chili, or dip.
Notes
- For a sturdier bowl that holds liquid better, bake the hollowed-out bread shells for an additional 5 minutes before filling.
- Save the removed bread interior to toast for dipping or to make breadcrumbs.
- If you want a bakery style bread bowl, place a small pan of hot water on the bottom rack of the oven during baking to create steam.
Nutrition
- Serving Size: 1 bread bowl
- Calories: 320
- Sugar: 2
- Sodium: 350
- Fat: 3
- Saturated Fat: 0.5
- Unsaturated Fat: 2.5
- Trans Fat: 0
- Carbohydrates: 65
- Fiber: 3
- Protein: 10
- Cholesterol: 0