

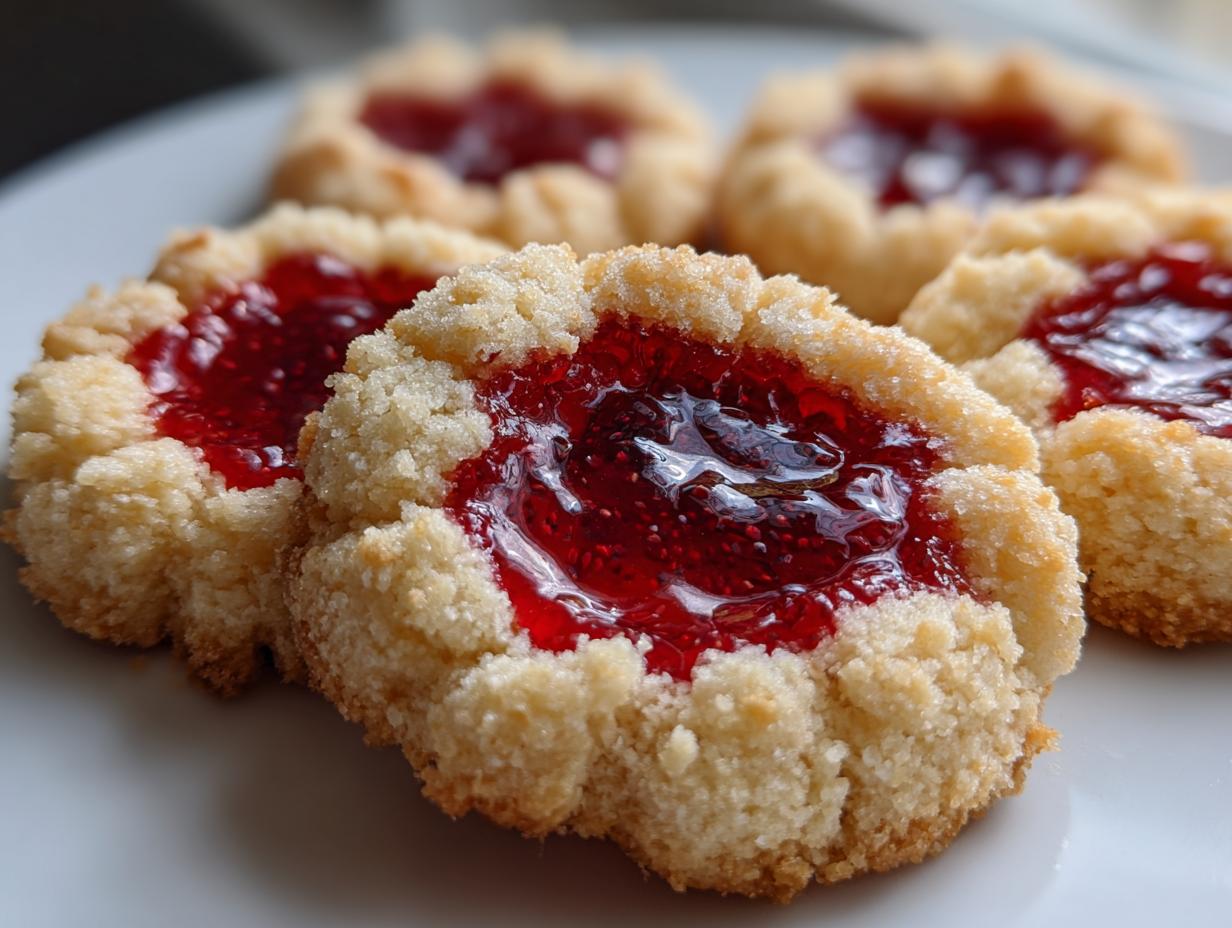
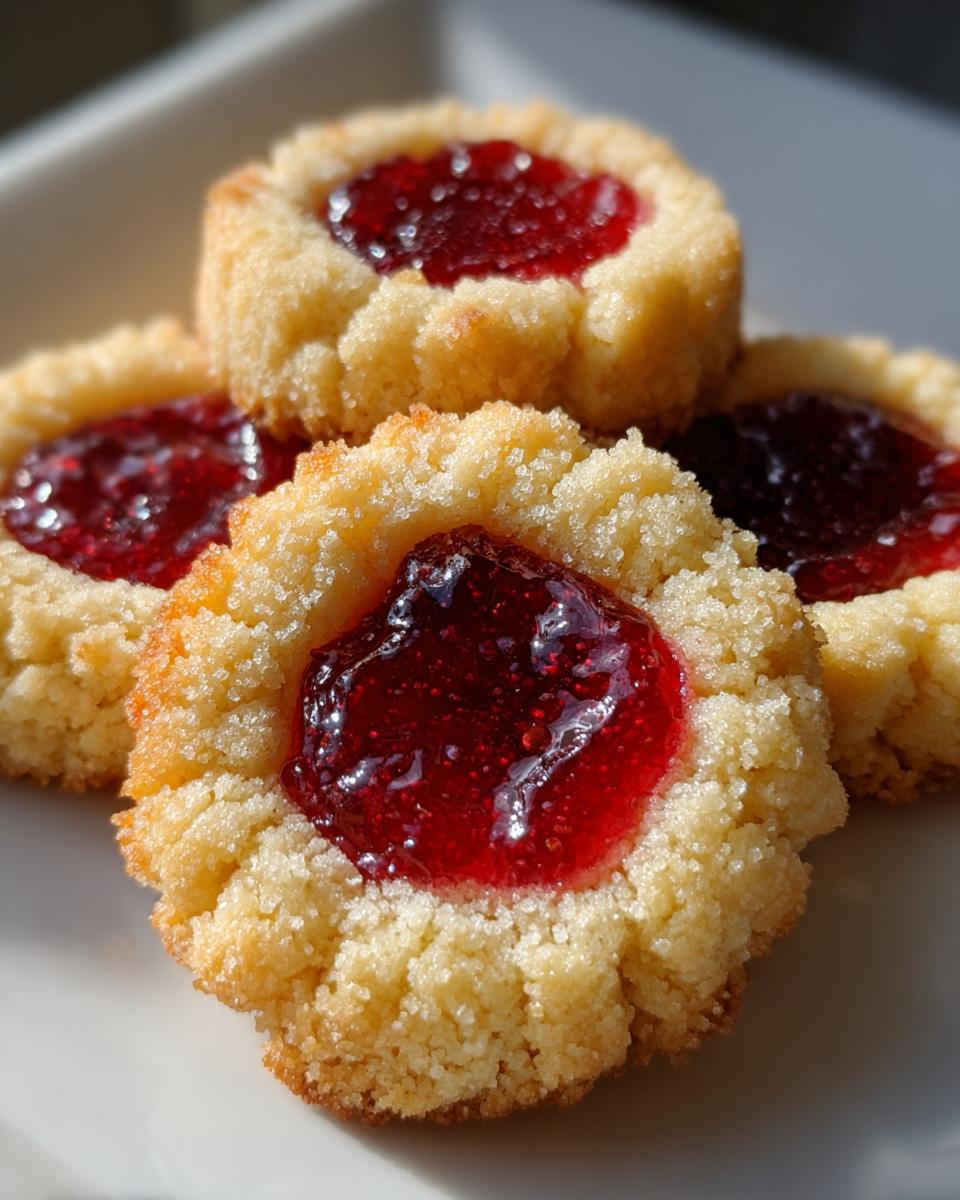
There is just something magical that happens when you take a simple shortbread dough, roll it in sugar, and press your thumb right into the middle waiting for that sweet, gooey center to set—right? These delicious classics remind me of the cookie trays my mother always put out, even when life got hectic. Today, I’m sharing what I perfected over many baking sessions: The Best Classic Buttery Thumbprint Cookies with Raspberry Jam Filling. This recipe nails that tender, shortbread texture, and believe me, mastering these thumbprint cookies is easier than you think!

- Why This is the Best Buttery Thumbprint Cookie Recipe
- Ingredients for Classic Thumbprint Cookies with Raspberry Filling
- How to Make Thumbprint Cookies: Step-by-Step Instructions
- Tips for Success with Your Buttery Thumbprint Cookie Recipe
- Variations on Classic Thumbprint Cookies
- Storage and Make Ahead Holiday Treats with Thumbprint Cookies
- Frequently Asked Questions About Thumbprint Cookies
- Estimated Nutritional Data for Classic Thumbprint Cookies
- Share Your Classic Thumbprint Cookies Creations
Why This is the Best Buttery Thumbprint Cookie Recipe
Look, I’ve tried every basic recipe out there, and this buttery thumbprint cookie recipe stands head and shoulders above the rest. It’s all about that melt-in-your-mouth quality. We aren’t aiming for chewy here; we want that rich, decadent base that just yields perfectly around the bright, tart jam. Trust me when I say that the combination of high-quality butter and minimal handling is what creates truly tender thumbprint cookies. If you enjoy this style of rich baking, you should definitely check out my thoughts on using brown butter in my brown butter chocolate chip cookies.
Achieving the Perfect Shortbread Thumbprint Cookies Texture
The secret sauce for that incredible shortbread texture is simple: fat and restraint! Since this is essentially a shortbread dough, you need a good amount of unsalted butter for that tender crumb. Make sure your butter is truly room temperature—soft enough to dent easily but not oily or melted. When you mix in the flour, only mix until it barely comes together. Overmixing, even slightly, activates too much gluten, and you lose that beautiful, delicate crumble we are striving for. That’s the key to a cookie that doesn’t fall apart!
Ingredients for Classic Thumbprint Cookies with Raspberry Filling
Whenever I share a recipe, I want you to have such clear instructions that you never have to guess. That’s why clarity in ingredients is step one for me! These classic thumbprint cookies rely on simple, quality components, making them perfect for whipping up anytime you have a craving. You’ll notice we have a few optional items, but the main dough ingredients are straight-up shortbread perfection.
Here is exactly what you need for about two dozen cookies:
- 1 cup unsalted butter, softened
- 1/2 cup granulated sugar
- 1 large egg yolk
- 1 teaspoon vanilla extract
- 1/4 teaspoon almond extract
- 2 cups all-purpose flour
- 1/4 teaspoon salt
- 1/2 cup granulated sugar for rolling
- 1/2 cup raspberry jam
And for the finishing touch, if you want that beautiful, snowy look:
- 1/4 cup powdered sugar for dusting (optional)
How to Make Thumbprint Cookies: Step-by-Step Instructions
Okay, now that we’ve got our amazing buttery dough ready, let’s get these beauties baked! Everything hinges on timing here, so listen up. First, make sure your oven is humming along at 350°F (175°C) and your baking sheets are lined—I swear by parchment paper; it just makes cleanup a breeze. If you’ve made your own jam, excellent! If not, you can use your favorite store-bought raspberry jam, or check out my recipe for easy raspberry jam recipe with no pectin.
You need to chill that dough for at least 30 minutes. This is non-negotiable, and it’s step one for successful thumbprint cookies. Once chilled, scoop out tablespoon-sized balls. Roll them until they are smooth, then get them completely coated in that extra granulated sugar. This crust is what gives these easy jam filled cookies that signature sparkle!

- In a large bowl, cream together the softened butter and 1/2 cup of granulated sugar until light and fluffy.
- Beat in the egg yolk, vanilla extract, and almond extract until combined.
- In a separate bowl, whisk together the flour and salt. Gradually add the dry ingredients to the wet ingredients, mixing on low speed until just combined into a soft dough. Do not overmix.
- Place the dough in plastic wrap and flatten slightly into a disk. Chill the dough in the refrigerator for at least 30 minutes.
- Preheat your oven to 350°F (175°C). Line baking sheets with parchment paper.
- Pour the remaining 1/2 cup of granulated sugar onto a shallow plate.
- Scoop the chilled dough into rounded tablespoons. Roll each piece of dough into a smooth ball, then roll the ball thoroughly in the sugar until fully coated.
- Place the sugared balls onto the prepared baking sheets, spacing them about 2 inches apart.
- Use your thumb or the back of a small measuring spoon to press a deep indentation into the center of each cookie ball. This is key to holding the jam.
- Fill each indentation with about 1/2 teaspoon of raspberry jam. Do not overfill, as the jam may bubble over.
- Bake for 12 to 15 minutes, or until the edges are lightly golden brown. The centers should remain pale.
- Remove the cookies from the oven and let them cool on the baking sheet for 5 minutes before transferring them to a wire rack to cool completely.
- If desired, dust the cooled cookies lightly with powdered sugar before serving.
If you are looking for more classic holiday bakes, check out this classic recipe for reference, though I think you’ll find my use of almond extract really elevates these!
Techniques for Perfect Thumbprint Cookies Indentations
This “thumbprint” part is where most people go wrong because the dough starts to warm up fast! Remember that chilling step? It pays off here. If the dough is nice and firm, you can usually press your thumb right into the center deeply enough to hold a good dollop of jam. If you’re worried about getting your thumb messy or if your dough starts getting soft and cracking around the edges, don’t panic!
Grab a small measuring spoon—the back of a 1/2 teaspoon measure works perfectly—and use that instead. Press down slowly and evenly. If you see tiny hairline cracks forming, that means stop pressing! The surface tension broke. Take the whole tray, pop it back in the fridge for five minutes, and then try again. This simple cooling break is the ultimate trick for preventing those sad, cracked-out edges on your beautiful tender thumbprint cookies.
Tips for Success with Your Buttery Thumbprint Cookie Recipe
I want your batch of thumbprint cookies to come out flawlessly, just like mine do every time. Baking is science, but it’s also a little bit of intuition, and I’m going to share the insider knowledge tucked away in my recipe notes. These little pieces of advice are what turn good cookies into the best homemade cookies you’ve ever made!
First things first: resisting the urge to rush chilling time. If you find yourself struggling with those indentations cracking—you know, the tiny fissures happening right when you press down—it’s because the dough got warm too fast. To combat this, make sure that dough is properly chilled after mixing. If the balls feel soft while you’re rolling them in sugar, just pop the tray back into the fridge for ten minutes. It’s a quick reset that saves the structure of your buttery thumbprint cookie recipe.
Also, let’s talk flavor boosters! While the almond extract I call for is divine, if you ever want to pivot slightly from the traditional flavor profile, try swapping it out for lemon zest. I often use the zest from half a lemon, or I will sometimes add 1/2 teaspoon of lemon zest instead of the almond extract. That bright citrus note sings beautifully against the sweet raspberry jam. It’s a simple switch that makes these feel like a very special shortbread treat. For more inspiration on flavor spins, you can always look at tips other bakers have shared, like on this page.
Finally, remember that these are great for making ahead, especially if you’re gearing up for big holiday baking projects or a stressful cookie swap!
Variations on Classic Thumbprint Cookies
The wonderful thing about this core dough—this rich, buttery mix—is how adaptable it is! Once you’ve mastered the technique, you can start playing around. While I absolutely adore the raspberry filling in these classic thumbprint cookies, there’s no reason to stop there. Think about what you have on hand! Apricot jam is fantastic, cherry is a deep, sweet surprise, and you can even dust them with finely chopped nuts after rolling if you aren’t worried about allergies.
But the really fun adaptation comes when you change the dough itself. People often ask me about chocolate versions, and I’m happy to report that you can go there easily! It’s a fantastic way to make a multi-colored tray for a holiday party. If you’re interested in seeing how I play with small-batch chocolate recipes, check out my small-batch chocolate chip cookies for more of my thoughts on balancing cocoa.
Making Chocolate Thumbprint Cookies Recipe
If you want that gorgeous, dark base, you don’t need a whole new recipe. Just lean into the substitution detailed in the notes! For every batch of dough you make, simply pull out 1/4 cup of the all-purpose flour and replace it with unsweetened cocoa powder. That’s it! Whisk the cocoa right in with your dry ingredients. You might notice the dough feels a tiny bit stiffer because cocoa absorbs moisture differently than flour, so if it seems too stiff to press, just let it soften on the counter for 5 minutes before you start scooping.
Fill those chocolate depressions with something bright—like a nice apricot jam, or even salted caramel if you’re feeling fancy! And definitely check out what others are doing with chocolate versions, like this beautiful Chocolate Thumbprint Cookies Recipe for visual inspiration.
Storage and Make Ahead Holiday Treats with Thumbprint Cookies
Let’s face it, around the holidays or when planning for a big cookie swap, you need reliability. You need make ahead holiday treats that taste just as good on Day Five as they did on Day One. Good news: Because these are shortbread-based thumbprint cookies, they are absolute champions for advance baking. They don’t rely on delicate frostings that weep or dry out the way a sugary shortbread might.
The key to keeping these perfectly tender is air control. Once they are completely cooled down on the rack—and I mean cold to the touch—gather them up. Place them in an airtight container layered with parchment paper or wax paper between the layers. This prevents them from sticking together and preserves that gorgeous sugared exterior. You can safely store them at cool room temperature for about a week. Trust me, they rarely last that long anyway, but it’s good to know they can handle a slow pace.
If you need something even *more* hands-off for your holiday spread, I highly recommend checking out my Crockpot Christmas Crack Recipe; that one requires almost zero mental bandwidth once it’s set! But for a classic cookie that anchors any beautiful dessert platter, these raspberry-filled beauties can’t be beaten. Baking them ahead saves so much stress when the actual holiday rush hits. If you’re looking for more classic inspiration, take a peek at this traditional approach too.
Frequently Asked Questions About Thumbprint Cookies
I know you might still have a few little questions buzzing around before you dive into making your first batch. That’s totally normal! When you’re tackling a classic like this, you want it perfect. We’ve covered the main dough structure, but let’s tackle a few common sticking points here so you feel confident walking into the kitchen.
Can I use a different jam in these easy jam filled cookies?
Absolutely! You are not locked into raspberry forever, though I swear by it for the perfect tartness against the sweet shortbread. You can certainly use apricot, strawberry, or even thick citrus marmalade. The main thing to watch out for if you’re using homemade preserves instead of true jam is the consistency. If your filling is too runny, it can seep out and make the shortbread bottom a little soggy during baking. Stick to something that holds its shape reasonably well, and you’ll have no trouble turning these into your favorite flavor profile of easy jam filled cookies.
What is the best way to prevent my thumbprint cookies from cracking?
This is the question I get most often! The culprit is almost always temperature. If your dough is even a little too warm when you try to press that indentation, the fat structure is too soft, and when it releases the built-up pressure, it cracks. You must ensure that dough is thoroughly chilled—at least the 30 minutes we mentioned. If you ball them up, sugar them, and *then* they start to look soft before they hit the oven, put the whole tray back in the fridge for 5 to 10 minutes! Cold dough is sturdy dough, and that’s the number one way to guarantee smooth, round wells for your jam. Remember, sturdy dough equals those gorgeous, whole little cups of shortbread perfection.

Estimated Nutritional Data for Classic Thumbprint Cookies
Now, I always want to be super clear about this part because I am talking family recipes here, not working in a sterile lab! These figures are estimates I’ve put together based on the ingredients and the yield of 24 cookies. They should give you a good baseline understanding of what you are enjoying, but remember, the exact numbers will change based on your specific butter brand or jam sugar content. You know, the joy of home baking!
For one cookie (serving size: 1 cookie), here is the approximate breakdown:
- Calories: 145
- Sugar: 11g
- Sodium: 45mg
- Fat: 8g
- Saturated Fat: 5g
- Unsaturated Fat: 3g
- Trans Fat: 0g
- Carbohydrates: 17g
- Fiber: 0g
- Protein: 2g
- Cholesterol: 30mg
It’s a little treat, right? You get the richness from that beautiful butter, and just a touch of sweetness. Just enough comfort to enjoy with your afternoon coffee without feeling overly guilty about diving into these amazing classic thumbprint cookies!
Share Your Classic Thumbprint Cookies Creations
That’s it! You’ve officially tackled the best buttery shortbread base and filled it with that perfect sweet raspberry center. I truly hope making these classic thumbprint cookies brought you a little bit of that joy and restoration I talk about in my philosophy. Baking should always be fun, and I can’t wait to hear how they turned out for you!
Don’t be shy! This community only gets stronger when we share our successes (and maybe the occasional funny baking mishap!). If you followed the chilling and pressing technique and ended up with the most perfect little indentations, please let me know in the comments below. Did the almond extract give it that little kick you hoped for? Your feedback—especially on the technique for the indentation—helps other bakers feel more confident!
If you snapped a photo of your finished platter, I would absolutely love to see them! Tag me on social media—it seriously makes my day to see my recipes coming to life in your kitchens. If you have any final burning questions that I didn’t cover, you can always reach out directly through my contact page. Happy baking, friends!
PrintThe Best Classic Buttery Thumbprint Cookies with Raspberry Jam Filling
Make these classic, buttery shortbread thumbprint cookies filled with sweet raspberry jam. This easy recipe delivers tender, satisfying homemade cookies perfect for holiday baking or cookie swaps.
- Prep Time: 20 min
- Cook Time: 15 min
- Total Time: 1 hour 35 min
- Yield: 24 cookies 1x
- Category: Dessert
- Method: Baking
- Cuisine: American
- Diet: Vegetarian
Ingredients
- 1 cup unsalted butter, softened
- 1/2 cup granulated sugar
- 1 large egg yolk
- 1 teaspoon vanilla extract
- 1/4 teaspoon almond extract
- 2 cups all-purpose flour
- 1/4 teaspoon salt
- 1/2 cup granulated sugar for rolling
- 1/2 cup raspberry jam
- 1/4 cup powdered sugar for dusting (optional)
Instructions
- In a large bowl, cream together the softened butter and 1/2 cup of granulated sugar until light and fluffy.
- Beat in the egg yolk, vanilla extract, and almond extract until combined.
- In a separate bowl, whisk together the flour and salt. Gradually add the dry ingredients to the wet ingredients, mixing on low speed until just combined into a soft dough. Do not overmix.
- Place the dough in plastic wrap and flatten slightly into a disk. Chill the dough in the refrigerator for at least 30 minutes.
- Preheat your oven to 350°F (175°C). Line baking sheets with parchment paper.
- Pour the remaining 1/2 cup of granulated sugar onto a shallow plate.
- Scoop the chilled dough into rounded tablespoons. Roll each piece of dough into a smooth ball, then roll the ball thoroughly in the sugar until fully coated.
- Place the sugared balls onto the prepared baking sheets, spacing them about 2 inches apart.
- Use your thumb or the back of a small measuring spoon to press a deep indentation into the center of each cookie ball. This is key to holding the jam.
- Fill each indentation with about 1/2 teaspoon of raspberry jam. Do not overfill, as the jam may bubble over.
- Bake for 12 to 15 minutes, or until the edges are lightly golden brown. The centers should remain pale.
- Remove the cookies from the oven and let them cool on the baking sheet for 5 minutes before transferring them to a wire rack to cool completely.
- If desired, dust the cooled cookies lightly with powdered sugar before serving.
Notes
- To prevent the cookies from cracking while pressing the indentation, chill the dough thoroughly. If the dough feels soft while rolling, return it to the refrigerator for 10 minutes.
- For a slightly different flavor, substitute the almond extract with 1/2 teaspoon of lemon zest in the dough.
- If you plan to make these ahead for holiday cookie swaps, store cooled cookies in an airtight container at room temperature for up to one week.
- If you want to try chocolate thumbprint cookies, substitute 1/4 cup of the flour with unsweetened cocoa powder in the dough mixture.
Nutrition
- Serving Size: 1 cookie
- Calories: 145
- Sugar: 11
- Sodium: 45
- Fat: 8
- Saturated Fat: 5
- Unsaturated Fat: 3
- Trans Fat: 0
- Carbohydrates: 17
- Fiber: 0
- Protein: 2
- Cholesterol: 30