

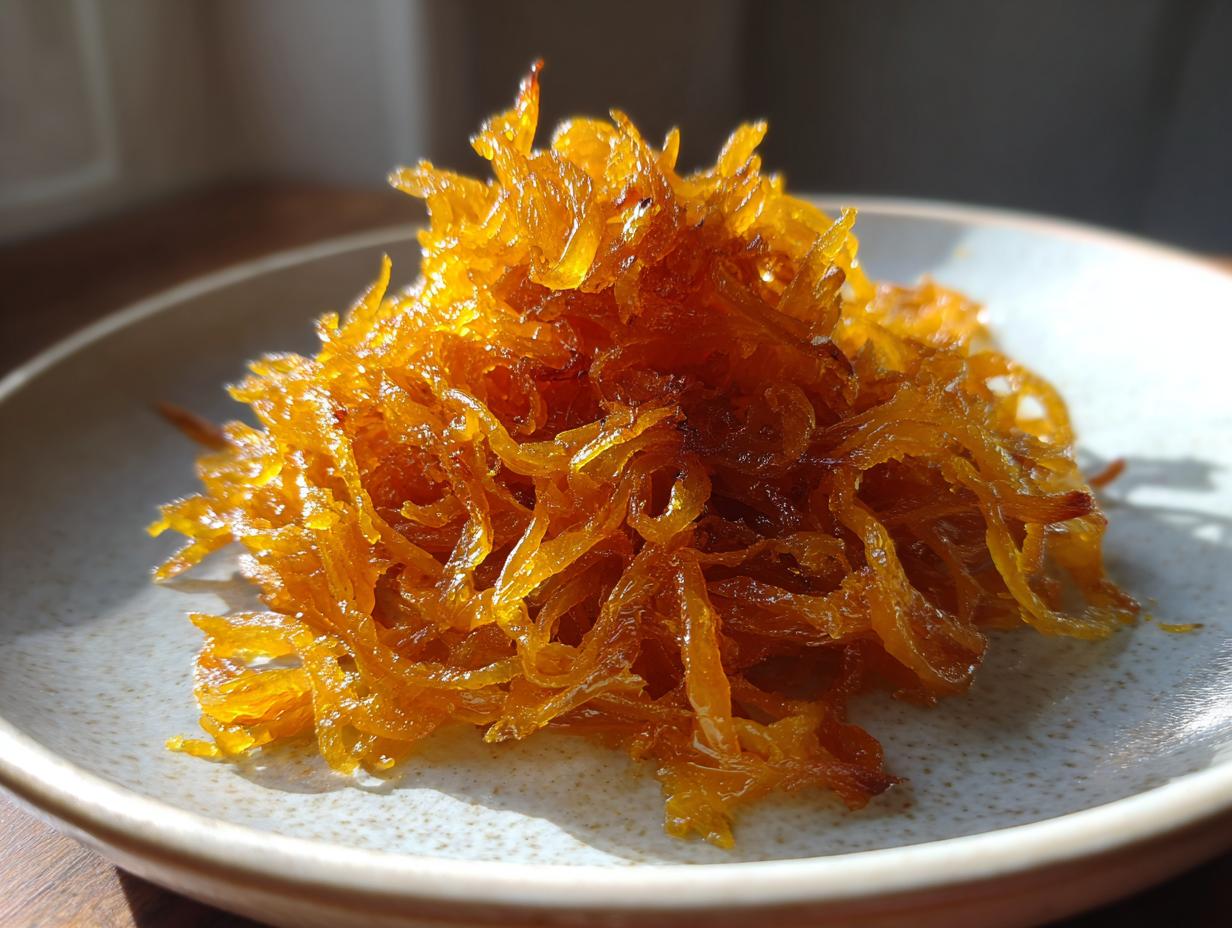
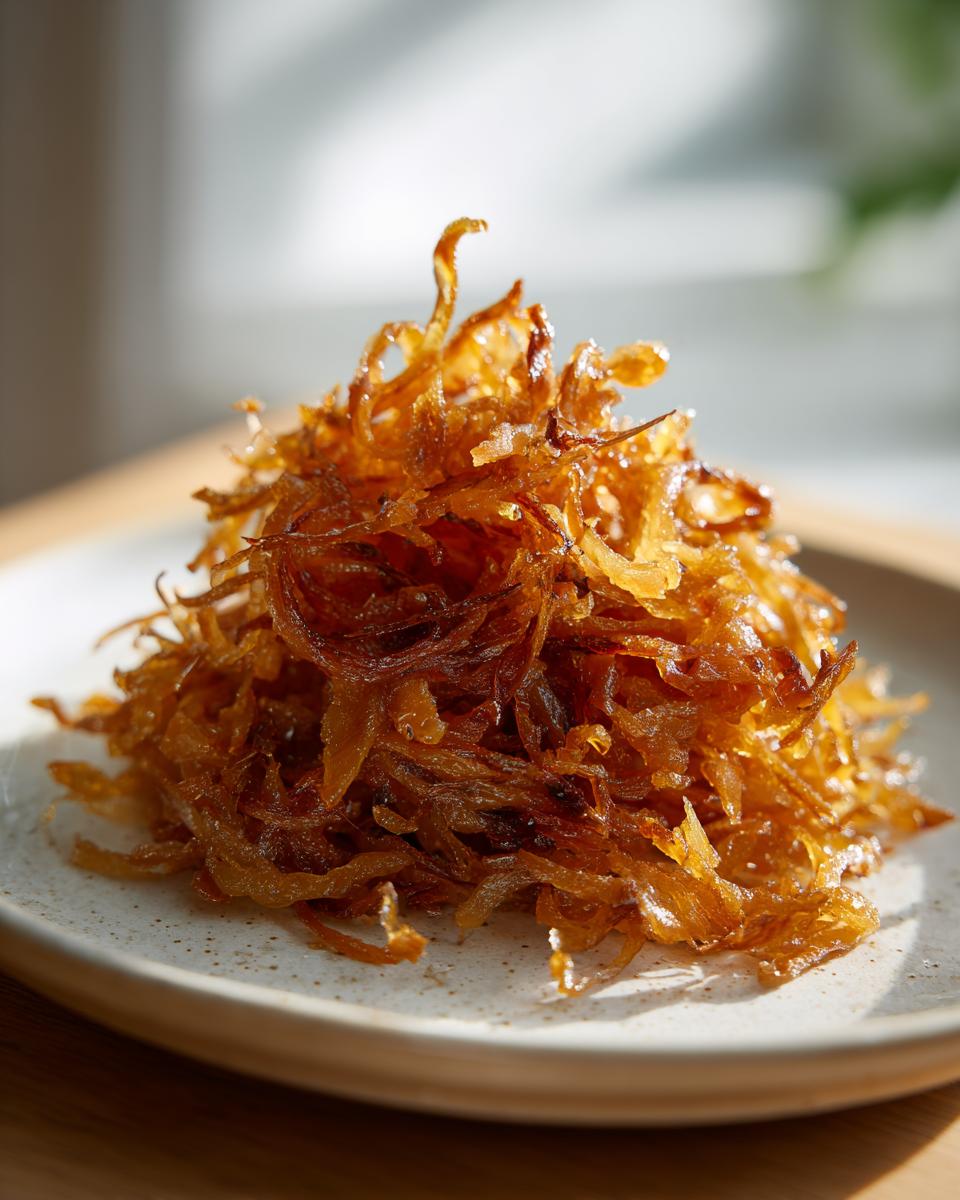
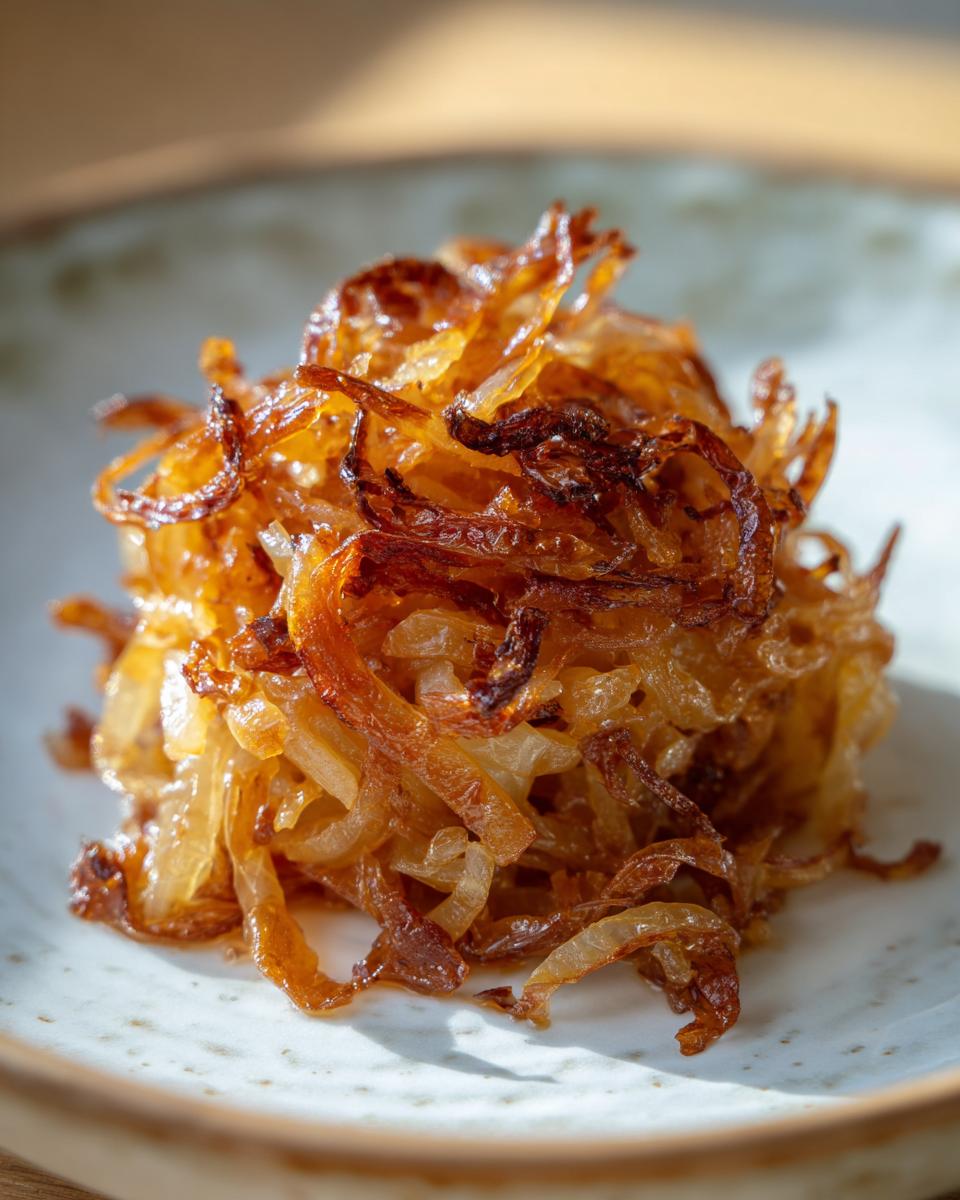
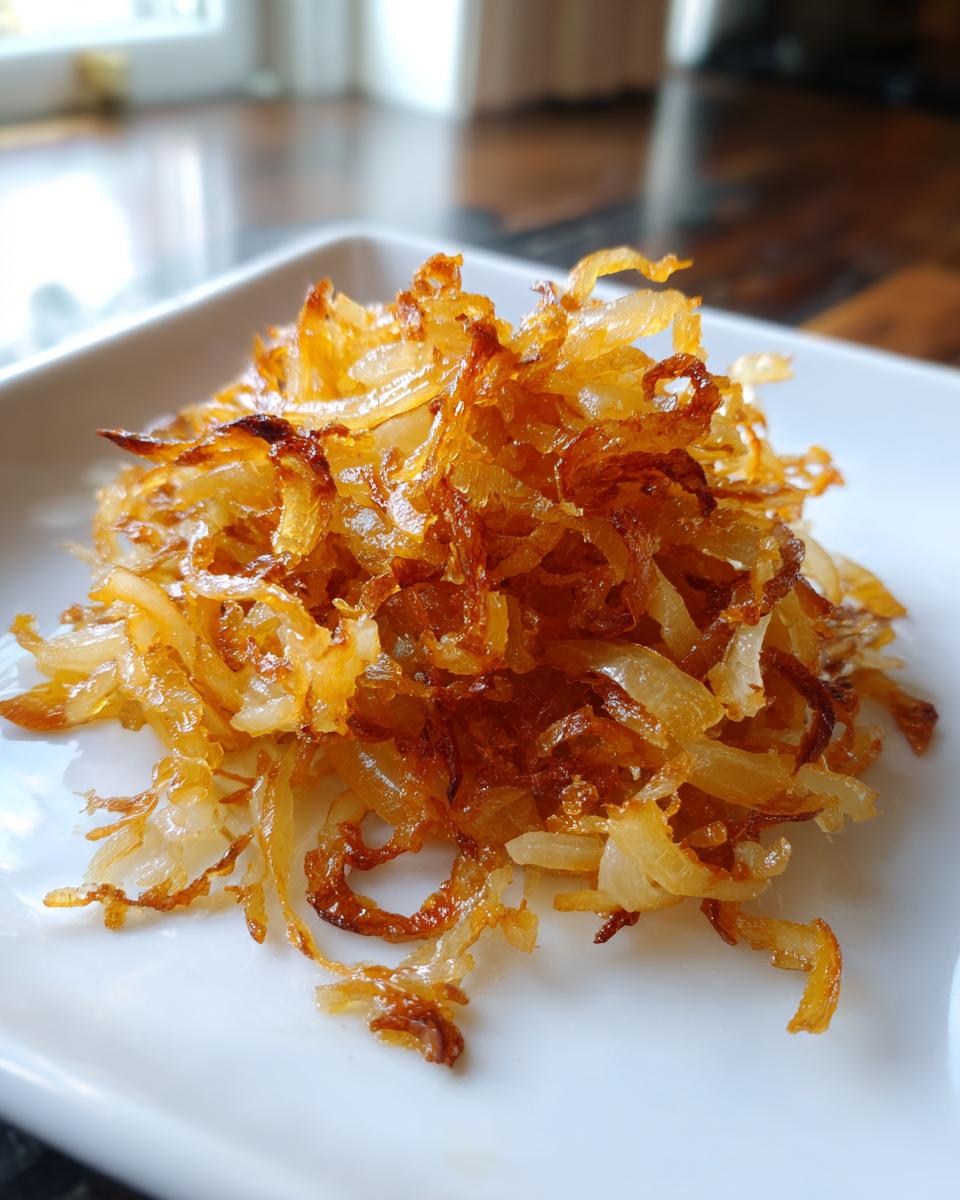
If you think onions are just for chopping into raw slices or crying over while sautéing, I’m here to change your world! There’s a real, almost magical transformation that happens when you commit to cooking onions low and slow. I’m talking about taking something sharp and turning it into this incredibly deep, sweet, golden-brown element that elevates everything it touches. That’s the secret behind perfect caramelized onions.
Here at Cooking by Felix, we understand the clock is always ticking, but flavor shouldn’t have to suffer for convenience. That’s why I perfected this technique. It’s not fast—it takes time—but the method is so simple you can pretty much set it and forget it while you tackle emails or throw in a load of laundry. Trust me, once you taste onions cooked the right way, you’ll never go back. This guide details the ultimate slow-cook method to draw out every last bit of natural sweetness.
- Why You Will Love This Easy Caramelized Onions Recipe
- The Secret to Perfect Caramelized Onions: Technique Matters
- Step-by-Step Instructions for Making Caramelized Onions
- Expert Tips for Success with Caramelized Onions
- Five Ways to Use Your Sweet Onions Topping
- Dietary Adaptations: Vegan Caramelized Onion Recipe
- Storage and Reheating Instructions for Leftover Caramelized Onions
- Frequently Asked Questions About Caramelized Onions
- Serving Suggestions for Your Gourmet Onion Toppings
Why You Will Love This Easy Caramelized Onions Recipe
When I finally figured out how to reliably get these onions on the table without stress, it unlocked so many possibilities in my kitchen. You are going to love this method because it’s really about patience, not complicated skills. Forget the quick-sauté myths; this is where the real flavor lives.
- It delivers the absolute deepest, richest flavor possible—truly gourmet results with basic ingredients.
- The technique is incredibly forgiving because we are cooking low and slow; you have a huge window of time.
- These caramelized onions are the ultimate cheat code for making any meal feel instantly fancier.
- You can easily batch-cook a huge batch and freeze them for future use. Talk about kitchen hacks!
- They work unbelievably well in both hot dishes, like pasta or soup, and cold applications, like dips.
- This method teaches you a fundamental cooking technique that will improve everything else you cook.
The Secret to Perfect Caramelized Onions: Technique Matters
Listen, if you try to rush this process—and trust me, I’ve been there when deadlines are looming—you end up with sautéed onions, not beautiful, sweet, savory caramelized onions. The absolute key here is understanding that we are coaxing the sugars out, not just burning them! This slow, gentle heat triggers the Maillard reaction, creating that deep, complex, rich flavor that makes restaurant food taste so unbelievably good. We want amber, we want tender, and we definitely want that deep, rewarding sweetness that only comes with time.
When I make French Onion Soup, I never cut corners on this step; the whole dish relies on the foundation we build here. You need a wide pan, your patience, and these simple items. Getting the ingredients right is your first crucial step toward success!
Gathering Ingredients for Deep Flavor Onions
You don’t need fancy stuff for this. Just high-quality basics treated right. Here is what you need to pull together for around 1.5 cups of the best onion topping you’ll ever make:
- 4 large yellow onions, thinly sliced
- 2 tablespoons unsalted butter
- 1 tablespoon olive oil
- 1 teaspoon salt
- 1 teaspoon sugar (optional, but helps speed up the browning a little bit)
- 1/4 cup water or low-sodium broth (you’ll need this later for deglazing!)
Step-by-Step Instructions for Making Caramelized Onions
Okay, this is the part where you need to trust the process. Rushing means you get onions that leak water and steam; slow cooking means you get sweet, jammy flavor. You’ll need a big, heavy-bottomed skillet—one that holds heat well is key. We are aiming for a total cook time somewhere between an hour and an hour and fifteen minutes to get those glorious, deep-colored caramelized onions.
- Thinly slice up all your onions. Seriously, make ’em uniform! If one piece is thick and the next is paper-thin, they won’t cook at the same time, and that drives me crazy.
- Get your skillet over medium-low heat and toss in the butter and olive oil to melt. Add all those sliced onions in a big pile, and sprinkle them with the salt right away. Give them a good stir to coat everything in fat.
- For the first 15 minutes, just let them cook down, stirring every 5 to 7 minutes. They’ll start softening up and looking totally wilted. Don’t panic if they look like a messy pile—that’s normal!
- Now, drop that heat down to low. Keep checking every five minutes or so. This is where patience starts bringing out all that natural sugar.
- Once you see some little brown bits sticking to the bottom of the pan—that’s called the ‘fond,’ and it’s flavor gold! Add a tablespoon of your water or broth, scrape that goo up, and stir it back into the onions. We do this deglazing technique a couple of times until they reach that deep, rich brown color you’re dreaming of.
Don’t forget, you can batch cook these up and freeze them! If you’re looking for faster inspiration, check out the technique advice from my friends over at Running to the Kitchen on how to caramelize onions.
Tips for Achieving Golden Brown Onions Quickly
I know, I know—75 minutes sounds like forever when you’re trying to get dinner on the table! While I stand by the low-and-slow method for the absolute best depth, if you are really crunched, here are two things you can try to shave *maybe* ten minutes off. First, that optional teaspoon of sugar you added? That helps things move along since sugar caramelizes faster than starch breaks down. Second, keep the heat just a hair higher than absolute minimum, but you need to babysit these things. Stir constantly, maybe every two minutes, because if they are too hot, they will burn fast instead of sweetly brown!
Expert Tips for Success with Caramelized Onions
The biggest mistake people make with these is assuming a gentle sauté is enough. No way! You absolutely need a heavy-bottomed pan—a stainless steel or cast iron skillet works miracles because it distributes heat so evenly, preventing hot spots where your onions will stubbornly burn instead of turning into sweet caramelized onions.
I remember one Tuesday night, trying to be clever, I cranked the heat up thinking I could knock the 75 minutes down to 30. Oops! Instant smoke alarm and scorched onions. I learned that day that you cannot cheat the sugar breakdown. If you follow the low-heat rule, you can make a huge batch, and they keep beautifully. I often double my recipe just so I can freeze them flat in zip-top bags. They thaw out perfectly ready for topping burgers or stirring into a sauce!
For the best results next time, check out this guide on kitchen hacks for onions, or look at the simple method shared by my friends at Simple Recipes. But remember, stick to the low and slow heat for that deep, rewarding flavor!
Five Ways to Use Your Sweet Onions Topping
So you’ve got your beautiful, deeply flavored, sweet caramelized onions cooling on the counter. Now what? Don’t let them sit around forever! While I love popping them into my mouth straight from the bowl, you need ways to really show them off. These onions are versatile enough to take center stage or play the best supporting character in any meal.
Here are my top five ways to turn dinner from good to absolutely unforgettable using this sweet onions topping:
- Smother them on a hearty burger. Forget plain pickles; these onions add moisture and a huge punch of savory sweetness. They are genuinely the best onion topping for a backyard grill-out.
- Mix them right into scrambled eggs or an omelet in the morning. It’s seriously decadent for brunch!
- Layer them onto grilled cheese sandwiches—especially ones made with sharp cheddar or Gruyere.
- Fold them into my creamy pasta sauces. It adds an instant background complexity.
- Use them to level up appetizers!

Making Creamy Caramelized Onion Dip
This is where the magic really pays off, especially when you need quick appetizer dips. You take a base of softened cream cheese, maybe mix in some sour cream or even some melted Brie if I’m feeling fancy—and then you fold in a big scoop of those sweet, richly flavored caramelized onions. Seriously, it takes almost zero effort, and you get that gourmet result. If you’re looking for a crowd-pleaser dip, check out how simple it is to build one over at Family Table Vibes.
Adding Flavor to Caramelized Onion Pasta
Pasta doesn’t always need a heavy sauce to shine. For a fantastic, comforting meal, I toss al dente noodles with a little pasta water, Parmesan, and a couple of spoonfuls of these onions. The residual heat melts the cheese and creates a quick, rich coating that tastes like it cooked for hours. It transforms a simple noodle dish into something truly special, much like the deep flavor you find in my slider recipes, but in pasta form!
Dietary Adaptations: Vegan Caramelized Onion Recipe
I get tons of questions about making these caramelized onions work for everyone, and honestly, it’s one of the easiest switches you can make in the kitchen. This recipe naturally becomes a fantastic vegan caramelized onion recipe just by tweaking the fat!
Forget the butter; just use a combination of good quality olive oil or substitute it with a nice, neutral-flavored vegan butter substitute. That’s it! The process for drawing out those deeply sweet sugars is totally based on slow heat and time, not the dairy itself. You’ll still get that incredible flavor payoff. If you’re planning on using these in a creamy sauce, check out how my friends managed a fantastic Vegan Caramelized Onion Pasta. It proves you don’t need dairy for ultimate comfort food!
For more plant-based inspiration on the blog, you might want to look at my recipe for moist vegan banana bread!
Storage and Reheating Instructions for Leftover Caramelized Onions
If you successfully manage to have any leftovers—which is a feat of willpower right there—you absolutely want to store them properly so you can enjoy that delicious flavor later on. These are fantastic for batch cooking, which is how I always make sure I have some in the house!
For the fridge, just pop the cooled onions into an airtight container. They will stay tasting wonderfully sweet and tender for about a week, though honestly, they rarely last past five days in my house. They stay soft and ready to eat right out of the container.
Now, for freezing—this is where you really win! Spread your cooled cooked onions out in a single layer on a parchment-lined baking sheet. Pop that sheet into the freezer until they are completely solid. Once frozen solid, you can transfer those little onion discs into a heavy-duty freezer bag, squeezing out all the air. They freeze perfectly flat and take up hardly any room in the deep freeze! You can keep them frozen for up to three months like this, ready to toss into any quick meal.
Reheating is simple too. If you’re adding them to a soup or a sauce, just drop them right in while they are thawing out on low heat; the extra moisture will blend right in. If you want them for a topping, gently warm them up in a small pan over very low heat, maybe adding just a couple of drops of water if they seem stiff.
Frequently Asked Questions About Caramelized Onions
I always get questions when folks first try making big batches of these onions! It’s normal to have a few hiccups when you are learning a new technique. Don’t worry if your first batch isn’t perfectly deep brown; that’s where practice comes in. We are talking about deep flavor here, which takes time!
Why are my caramelized onions taking too long?
The most common reason your caramelized onions recipe is stalling is that your heat is too low or you haven’t added enough fat to start. But sometimes, if you’re using really fresh, watery onions, they spend the first twenty minutes just steaming themselves into submission before they can actually start browning. If they are refusing to brown, try adding that tiny bit of sugar or raising the heat just slightly, but stir constantly! Remember, the goal is slow cooked onions, but they still need encouragement.
Can I use shallots instead of onions for this recipe?
Oh, absolutely! Using shallots will give you a slightly different, sometimes even fruitier flavor profile—they caramelize beautifully, too. The main difference is that shallots are smaller and cook down much faster than those big yellow onions. If you swap them in, start checking for doneness around the 45-minute mark instead of waiting the full hour. They make a wonderful gourmet onion topping for fish or roasted chicken!
If you’re looking for more quick kitchen tips for making breakfast or other speedy meals, check out my thoughts on quick and easy breakfast ideas—though those are definitely faster than this process!
Serving Suggestions for Your Gourmet Onion Toppings
Once you have those luscious, slow-cooked onions ready, you have to use them everywhere! Go beyond pasta and dips. These are fantastic piled high on a perfectly seared steak—honestly, way better than any sauce. Try stirring them into your scrambled eggs next time, or melting them under cheese on a gourmet grilled cheese. They make the best onion topping for almost any savory comfort food recipe, like my steak fajitas! For even more quick ideas on upgrading your dishes, check out these quick recipe tips.
PrintThe Ultimate Guide: How to Perfectly Caramelize Onions (Plus 5 Ways to Use Them)

Learn the slow cooking technique to transform raw onions into sweet, golden brown caramelized onions. This guide provides the best onion topping method and shows you how to use them in pasta and dips.
- Prep Time: 10 min
- Cook Time: 75 min
- Total Time: 85 min
- Yield: About 1.5 cups 1x
- Category: Condiment/Topping
- Method: Slow Cooking
- Cuisine: American
- Diet: Vegetarian
Ingredients
- 4 large yellow onions, thinly sliced
- 2 tablespoons unsalted butter
- 1 tablespoon olive oil
- 1 teaspoon salt
- 1 teaspoon sugar (optional, for faster browning)
- 1/4 cup water or low-sodium broth (for deglazing)
Instructions
- Slice the onions thinly and uniformly. Uniformity helps them cook evenly.
- Place a large, heavy-bottomed skillet over medium-low heat. Add the butter and olive oil.
- Add all the sliced onions to the skillet. Stir to coat them evenly with the fat. Add the salt.
- Cook the onions slowly, stirring every 5 to 7 minutes. For the first 15 minutes, the onions will soften and release moisture.
- Reduce the heat to low after 15 minutes. Continue cooking, stirring every 5 minutes. This slow process draws out the natural sugars.
- After about 30 to 40 minutes, the onions will start to turn pale gold. If the bottom of the pan develops brown bits (fond), add 1 tablespoon of water or broth and scrape the bottom of the pan to lift the flavor. This is deglazing.
- Continue cooking for another 20 to 30 minutes until the onions reach a deep, rich brown color and are very tender. Total cooking time is usually 60 to 75 minutes for deep flavor.
- If using, stir in the optional sugar during the last 10 minutes of cooking to aid caramelization.
- Remove from heat. These caramelized onions are now ready to use as a gourmet onion topping or ingredient.
Notes
- For the deepest flavor, do not rush this process; low and slow cooking is key to developing sweetness.
- If you need a faster method, use a higher heat initially, but watch carefully to prevent burning. Add a splash of balsamic vinegar near the end for a tangier flavor.
- You can easily double or triple this recipe. Caramelized onions freeze well for later use in dishes like caramelized onion dip.
- These are perfect as a burger topping or an addition to savory jams.
Nutrition
- Serving Size: 1/4 cup
- Calories: 75
- Sugar: 7
- Sodium: 280
- Fat: 4
- Saturated Fat: 2
- Unsaturated Fat: 2
- Trans Fat: 0
- Carbohydrates: 9
- Fiber: 1
- Protein: 1
- Cholesterol: 5