

I know what you’re thinking: chocolate babka. It looks like something that belongs behind a glass case at a fancy city bakery, right? Something that requires an entire weekend and maybe a culinary degree to pull off. Well, I’m Felix Hayes, and my whole philosophy is built on proving that wrong! After long days in marketing, I needed pastries that tasted decadent but didn’t demand my entire Saturday.
That’s why I spent ages perfecting this recipe. Trust me, aiming for bakery quality doesn’t mean mastering every intimidating technique. We nail that stunning result with the amazing, soft, tender brioche dough and those rich, dramatic chocolate swirls you dream about. This Best Homemade chocolate babka Recipe is my answer to enjoying luxurious weekend baking projects without sacrificing the whole day. I even have an amazing little guide on making that wonderful easy brioche bread recipe if you want a head start on dough mastery! We break down the steps—even the famous braid—so you can pull this showstopper out of your oven with total confidence. You’re going to love how achievable this truly is.
- Why This Homemade Chocolate Babka Recipe Works
- Ingredients for the Best chocolate babka
- How to Prepare the Rich brioche babka dough
- Assembling Your chocolate babka: Filling, Rolling, and Chilling
- The Babka Recipe Step by Step: Braiding and Baking
- Finishing Your chocolate babka with a Shiny Glaze
- Tips for Success with Your chocolate babka
- Storage and Reheating for Your chocolate babka Loaf
- Frequently Asked Questions About chocolate babka
Why This Homemade Chocolate Babka Recipe Works
So many recipes promise a chocolate babka but deliver something dry or dense. Not this one! We unlock the secret to that truly moist chocolate babka loaf you see in bakeries without adding a ton of effort. Because we use a proper brioche base, the texture is unbeatable.
This recipe focuses on what matters: a filling that oozes richness and layers that make it a magnificent swirled chocolate sweet bread. I’ve streamlined the time commitment where I can, so you get maximum flavor payoff for your effort.
Tender Brioche Dough Secrets for Your chocolate babka
Brioche dough is simply richer than standard bread dough, thanks to all that butter and those eggs! That’s why it feels so soft when you bite into it. The key I learned from my family is timing: make sure your eggs are at room temperature so they incorporate smoothly. Also, please use softened butter—and take your time adding it to the mixer. That slow process is what builds the structure for that dreamy softness.
Achieving Perfect chocolate babka Swirls
The braid looks intimidating, I know! But here’s where a little patience pays off big time. Once you’ve rolled out that chocolate-slathered dough, stick the whole log in the fridge for 30 minutes. Seriously, don’t skip it! Chilling firms up the chocolate filling quickly, allowing you to slice the log cleanly. That clean cut is exactly what gives you those gorgeous, defined layers when you twist it together. It makes the braiding part feel ten times easier, I promise!
If you want more simple ways to make gorgeous things at home, check out my guide to simple delicious desserts. Happy baking!
Ingredients for the Best chocolate babka
Alright, let’s get to the heart of the matter: what you actually need for this showstopper. I’ve broken the list down so you can organize your grocery run—or better yet, your pantry raid! Remember, precision matters in baking, especially with yeast dough, so measure everything out before you start.
Getting the distinction right between the *softened* butter for the dough and the *melted* butter for the filling is key. Don’t mix those up! The dough needs structure, and the filling needs that rich, buttery liquid to spread perfectly across the surface.
For the Rich chocolate babka Filling
- 1 cup unsalted butter, melted, for filling
- 1 cup granulated sugar for filling
- 3/4 cup unsweetened cocoa powder
- 1 teaspoon instant espresso powder
See that tiny bit of instant espresso powder in the filling? That’s my little trick! It doesn’t make the babka taste like coffee at all; it just deepens that rich chocolate flavor so it tastes extra luxurious. It’s a small detail, but it makes a huge difference in making this a truly decadent yeast bread dessert!
Here’s the rest of what you’ll need to assemble this masterpiece:
- 1 cup whole milk, warm
- 2 1/4 teaspoons active dry yeast
- 1/2 cup granulated sugar, plus 1 tablespoon for yeast
- 4 large eggs, room temperature
- 1 teaspoon vanilla extract
- 1 teaspoon salt
- 4 1/2 cups all-purpose flour, plus more for dusting
- 1 cup (2 sticks) unsalted butter, softened and cut into pieces (for dough)
- 1/2 cup water for syrup
- 1/2 cup granulated sugar for syrup
- 1 cup powdered sugar for glaze
- 3 tablespoons milk for glaze
How to Prepare the Rich brioche babka dough
Okay, now that we have all our components ready, let’s jump into the real work: building that gorgeous, soft dough. This is where we create the foundation for our amazing rich brioche babka dough. Seriously, don’t rush this part; it’s worth every minute! I used to see dough recipes and feel intimidated, but mixing in a stand mixer makes it so much more hands-off than kneading by hand, which is perfect for my busy days.
First things first: we wake up the yeast (Step 1). It needs a warm bath with just a little bit of that granulated sugar to get it going. You want it foamy—that means it’s happy and ready to make magic happen. If it doesn’t foam up after about ten minutes, your milk might have been too hot, or the yeast is old, so you might need to start that small batch over. Don’t worry; it happens to everyone!
Now for the big mix (Step 2 through 4). Get your stand mixer out. Combine the flour, the rest of your sugar, salt, eggs, and vanilla. Get that mixer running low just to get things incorporated, but nothing too violent yet. Then, slowly, and I mean *slowly*, start adding in your softened butter pieces one by one. This slow addition is crucial. If you dump it all in at once, you shock the dough, and it won’t develop that perfect, elastic texture.
This process of slowly adding fat while mixing for about 8 to 10 minutes (Step 4) is what gives you that bakery-quality result. Keep scraping down the sides! You are looking for a dough that pulls cleanly away from the bowl sides and cleans the bottom of the bowl before you’re done. It needs to look smooth and stretchy, almost like silk. If you want to get deep into the science of this soft dough, check out my expanded guide on easy brioche bread recipe where I nerd out a bit more on gluten development.
Once the dough looks springy and smooth, transfer it to a lightly oiled bowl, cover it with plastic wrap or a clean kitchen towel, and find it a nice warm spot in your kitchen (Step 5). Let it chill out and double in size. This usually takes an hour and a half to two hours, depending on how warm your kitchen is. Patience during this rise means a lighter, fluffier final babka!
Assembling Your chocolate babka: Filling, Rolling, and Chilling
While the dough is busy getting happily puffy (that first rise, Step 5), it’s time to whip up the glorious chocolate filling! This is my favorite part, honestly. It smells like the best indoor experience ever. Just whisk together your melted butter, that one cup of sugar, the cocoa powder, and the espresso powder we talked about until it looks smooth and spreadable. That’s Step 6 done!
Now, gently punch down that beautiful risen dough. Turn it out onto a counter dusted with just a whisper of flour. We need to roll this out into a big, thin rectangle—aim for about 12 by 18 inches (Step 7). Think of it as your chocolate canvas!
This next step is pure decadent layering. Take that smooth chocolate mixture and spread it edge-to-edge across the dough. But, and this is important for sealing later, leave about an inch bare on one of the long edges (Step 8). Think of that bare edge as the seal that locks all the goodness inside!
Starting from the opposite long side, you need to roll this up tight, like you’re rolling a sleeping bag. Keep the tension consistent so you don’t end up with loose pockets inside. Once you hit that bare edge, pinch that seam closed really well! That’s Step 9.
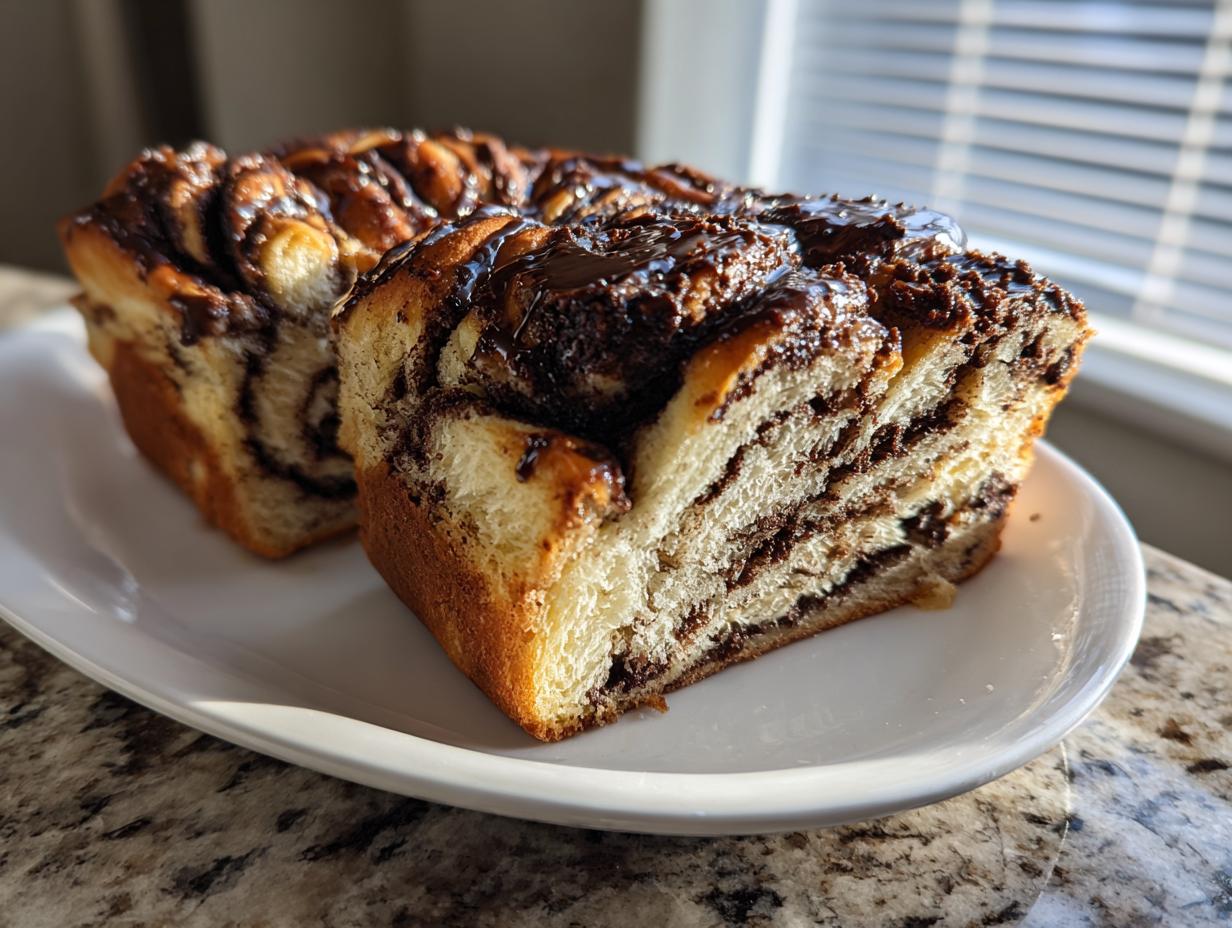
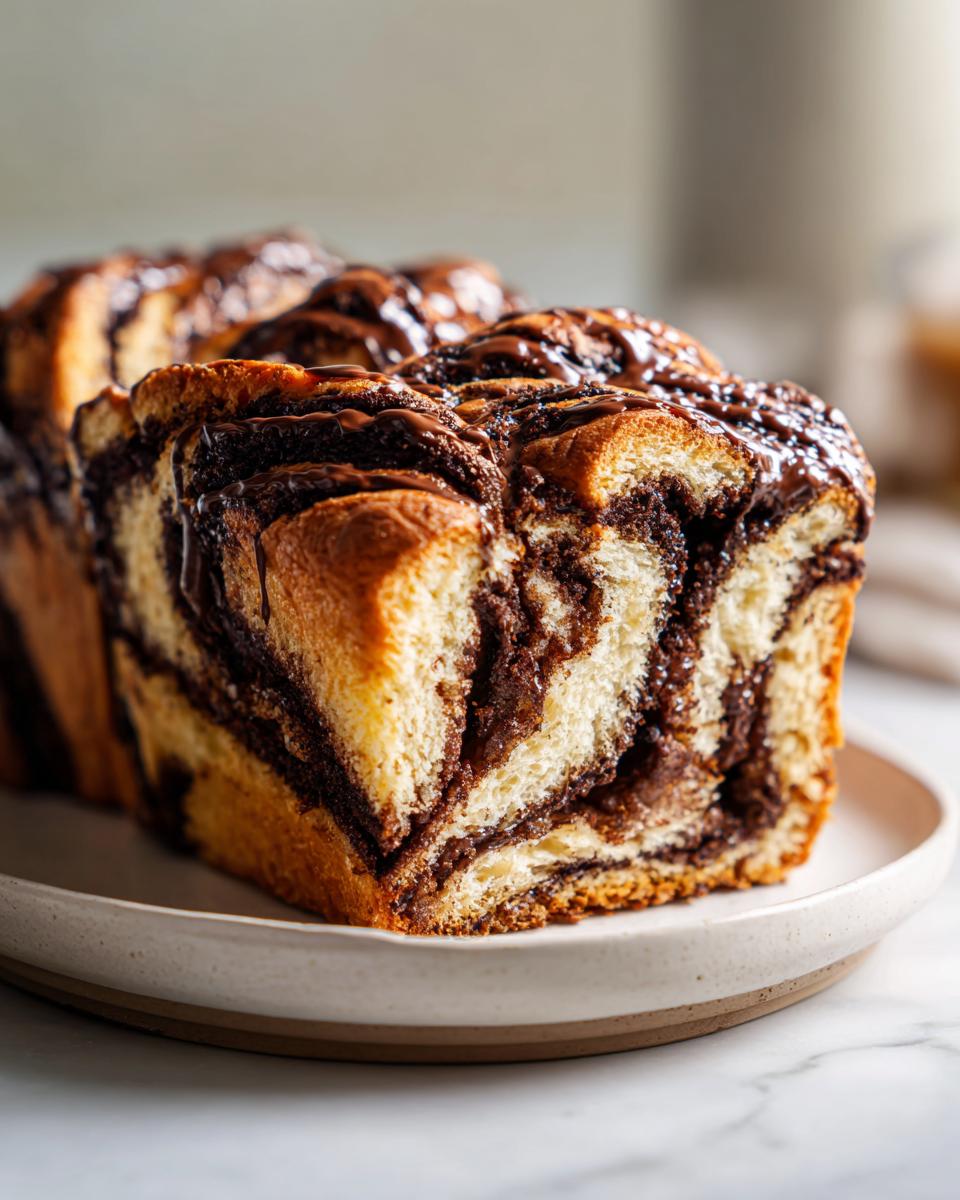
Here is the secret weapon for great braiding: chilling! (Step 10). Wrap that log tightly in plastic wrap and pop it into the fridge for a good 30 minutes. You aren’t trying to freeze it; you just want that rich chocolate filling to firm up a bit. Why? Because when you try to slice and twist later, if the filling is soft and gooey, it will smear everywhere, and you’ll lose those stunning patterns. Chilling ensures you get those clean, defined layers, making your chocolate swirl pastry look professional. Trust me on this pause; it’s what prevents those messy blobs and highlights those beautiful swirls! You can see some fantastic examples of how this clean cut impacts the final look when you check out the talented bakers over at Topp Kitchen.
The Babka Recipe Step by Step: Braiding and Baking
We’ve got our chocolate-filled log chilled, so now comes the part that looks like it should be on TV—the braiding for our babka recipe step by step! Don’t panic, though; we’ve made it so easy for you. Before we start twisting, let’s get our sugar syrup ready (Step 11). This is super simple: just boil the water and sugar until the sugar dissolves, and then pull it off the heat. I keep this sitting right next to my stove because we’re going to use it while the babka is piping hot!
Next, you need to prep your loaf pan with parchment paper. Make sure you leave some overhang on the sides—that’s your built-in handle for lifting the finished loaf out later. Now we move to the real showstopper move: cutting the log open (Step 12). Take your chilled log and, using a sharp knife, slice it right down the middle lengthwise. You are exposing those beautiful, distinct layers of dough and filling. Wow! You should see those swirls already peeking out!
Gently lay the two halves side-by-side on your workstation. Here’s the trick that makes *your* chocolate babka look professional: you want to twist them together, but keep those cut, swirl-side-up as much as humanly possible! You are essentially making a two-strand braid where the filling is always facing the ceiling. It sounds finicky, but just work slowly and deliberately. As you twist, you’ll see the chocolate ribbons forming that classic pattern.
Once it’s all twisted up, treat it gently like a baby bird and carefully transfer that twisted dough into your prepared loaf pan (Step 12). It looks like it won’t fit, but it will settle down as it rises again.
Now, that second rise is important for a light crumb (Step 13). Cover the pan loosely—I use plastic wrap lightly tented over the top—and let it rest somewhere warm for about 45 minutes to an hour. It should puff up nicely, but don’t let it double again; we don’t want it to over-proof before it hits the heat.
Preheat your oven to 350°F (175°C) while it’s doing its final rise. Once it’s ready, bake it for 35 to 45 minutes until deeply golden brown. When you gently insert a skewer near the center, it should come out clean or with just a few moist crumbs attached. Don’t overbake this, because we want that soft texture we worked so hard for!
The *absolute* final step for perfection is the syrup (Step 15). As soon as that babka comes out of the oven, grab that sugar syrup you made way back when and brush it all over the top and sides while it’s still sizzling hot. This step is non-negotiable! It soaks right into the crust, locks in moisture, and gives it that incredible shine—the hallmark of amazing baked goods. It’s an essential part of making this a show-stopping dessert. If you’re looking for other ways to jazz up your baking repertoire, check out my roundup of simple delicious desserts!
Finishing Your chocolate babka with a Shiny Glaze
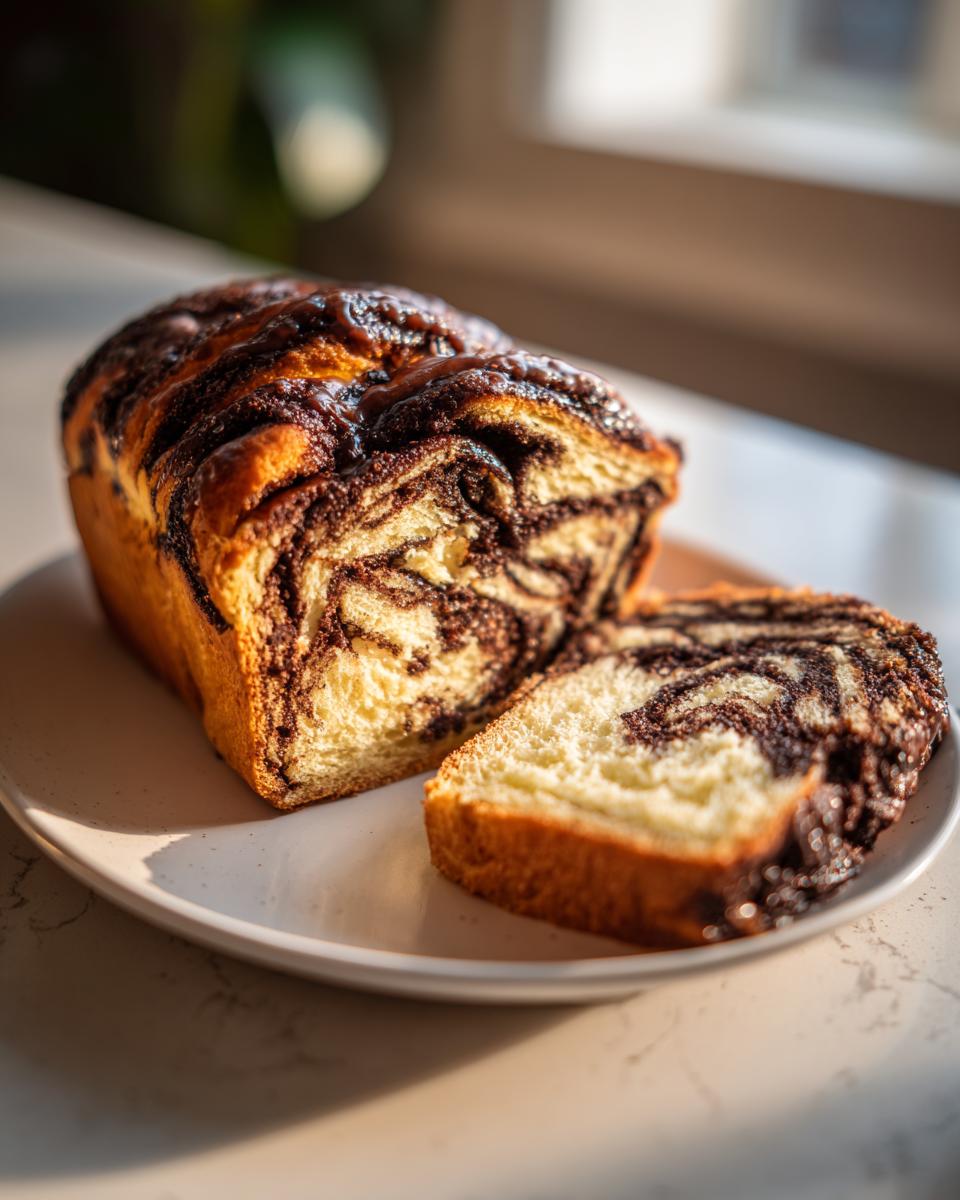
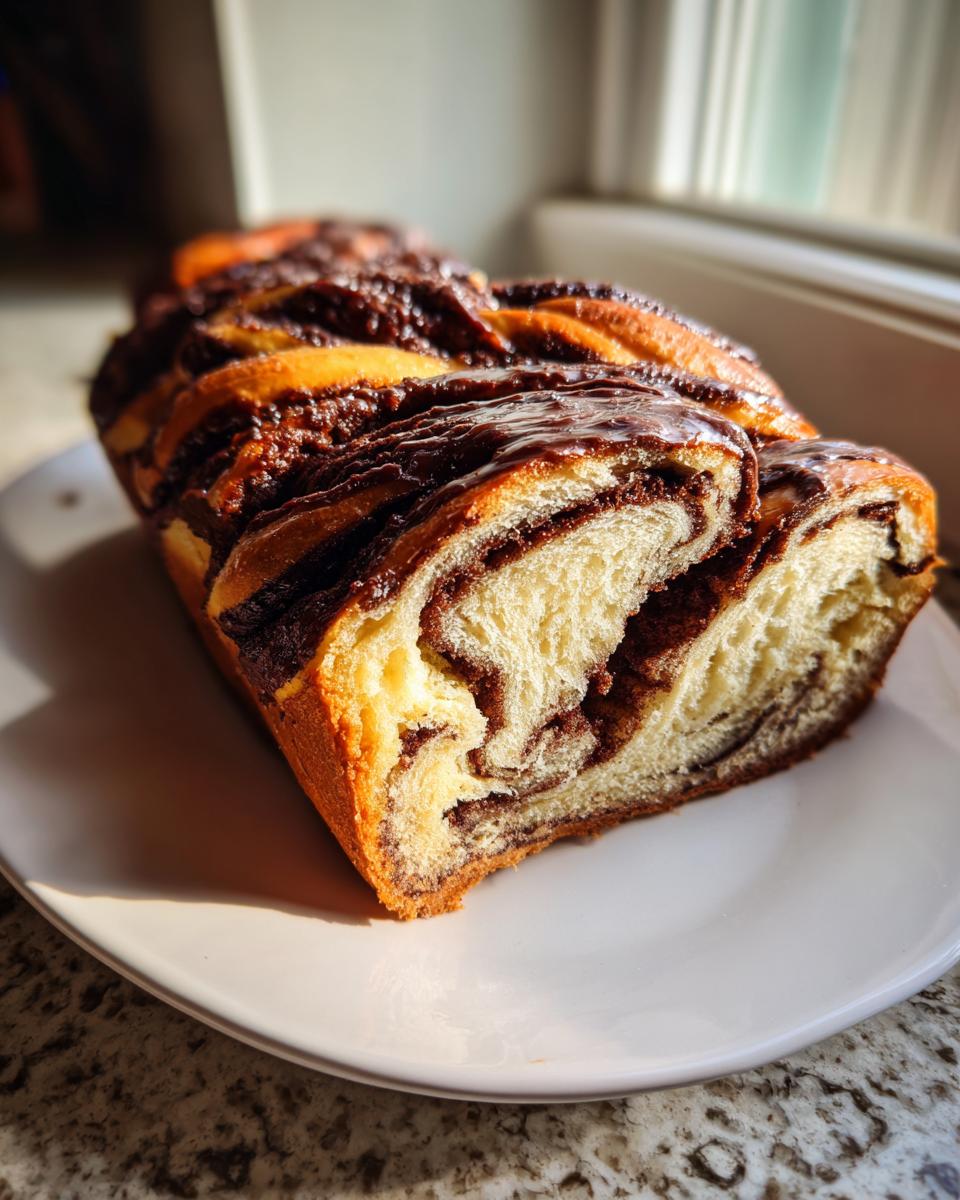
Okay, we are finally at the moment of truth! Remember that simple sugar syrup we mixed up way back when? Now is when it earns its stripes. As soon as that beautiful, golden-brown loaf of chocolate babka with syrup glaze comes out of the oven, grab a pastry brush and generously coat the entire top surface (Step 15). Don’t be shy! The hot bread acts like a sponge, soaking up that liquid immediately. This step is non-negotiable for a truly fantastic result. It not only brings incredible shine—that perfect bakery look—but it also traps moisture inside so your loaf stays soft for days.
After you’ve brushed on all that wonderful syrup, let the babka cool in the pan for just 15 minutes. This little break lets the structure set up before we move it onto a wire rack to finish cooling completely. Honestly, this syrup is what separates a good homemade loaf from the bakery masterpieces!
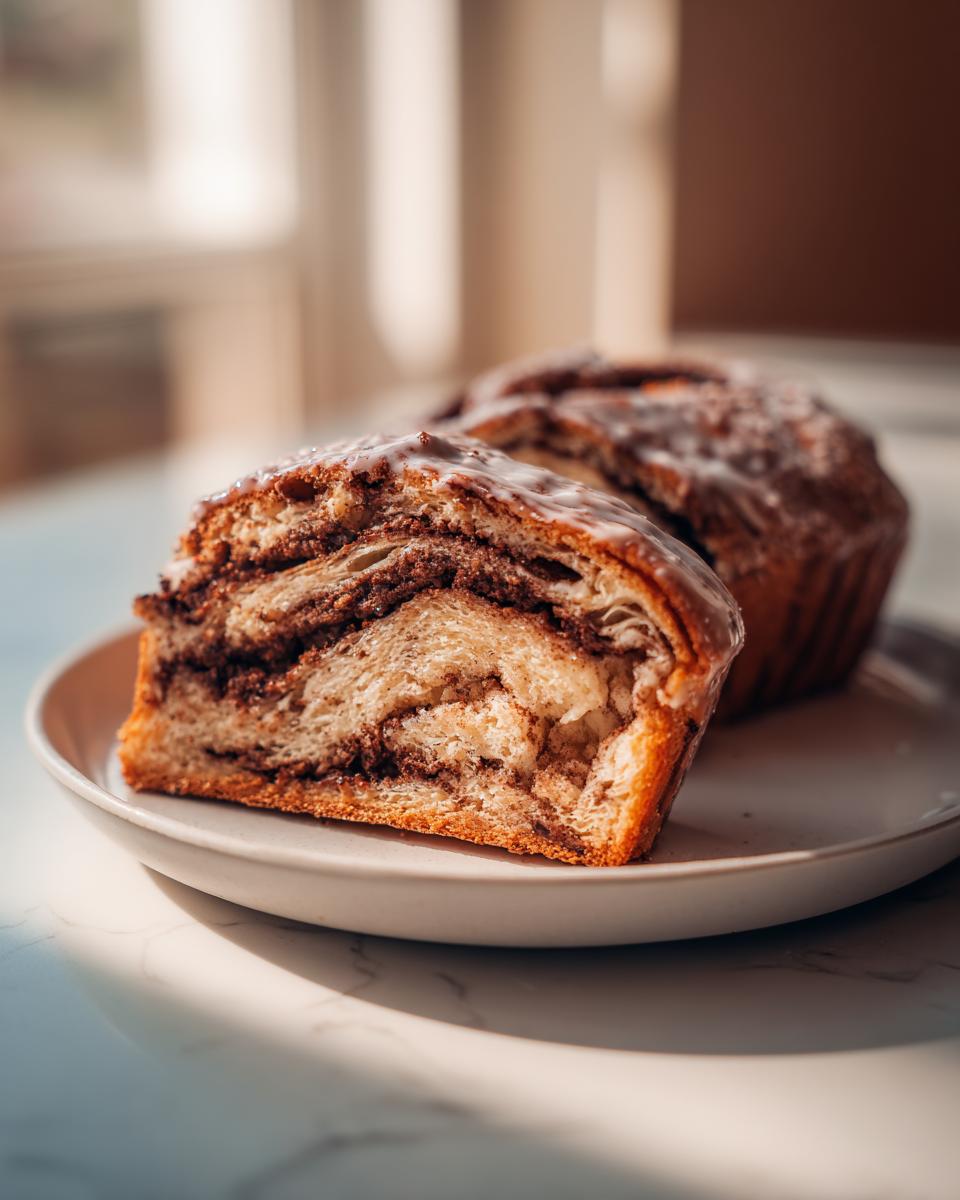
Now, you have a choice for the final flourish (Step 17). If you want that classic, slightly rustic, shiny top, you can stop right there. It’s perfect! But if you want that extra sweet touch that screams dessert, we can whip up a quick glaze. It’s just powdered sugar whisked with a touch of milk until it’s smooth enough to drizzle easily. You can find tips on other simple drizzling recipes over in my post about easy white chocolate fudge recipe, because the technique is the same!
Once the babka has cooled completely—and I mean fully cooled, otherwise the glaze will just melt off—take a spoon and drizzle that simple glaze back and forth over the top, letting it drip down the sides. It sets up beautifully and adds a lovely little snap of sweetness on top of that soft, rich crumb. Either way—syrup only or syrup plus glaze—you just made the best chocolate babka I’ve ever tasted outside of a professional kitchen!
Tips for Success with Your chocolate babka
Even with a great recipe, sometimes that last little nudge is what turns a good bake into an unbelievable one. We’re aiming for that truly decadent yeast bread dessert experience here, not just something that looks pretty. That means pushing quality on the ingredients front and giving the dough the time it sometimes needs.
I highly recommend using the best cocoa powder you can find. Since the filling is essentially chocolate butter, the quality really sings through! Don’t skimp here if you want that deep, slightly bitter complexity to cut through the sweetness of the brioche dough. If you love exploring simple yet impressive sweets, I have a few other easy wins linked in my thoughts on simple delicious desserts.
Now, about time. If you have a weekend project in mind, this babka thrives on a slow, cold rise. This is my ultimate E-E-A-T move. After you finish the initial mixing and kneading (Steps 2-4), instead of letting it rise on the counter for two hours, just pop that oiled bowl right into the fridge overnight—say, 10 to 14 hours. Cold-proofing allows the yeast to work slowly, developing incredible depth of flavor. When you pull it out the next day, it will take a little longer to warm up enough to roll, but the resulting chocolate babka taste is just unparalleled!
Final tip while you’re waiting for the braiding magic (Step 12): If your bread seems to stall during the second rise, don’t panic. If your kitchen is cold, the dough won’t want to puff up much before baking, and that’s fine! A slightly smaller second rise under a warm, loosely tented towel where you might put a pan of warm water nearby works wonders as a makeshift proofer. I’ve seen others who get phenomenal results by letting their dough rise slowly in a turned-off oven with just the light on.
If you’re curious about other fantastic chocolate bakes that match this level of decadence, you should definitely take a look at the beautiful loaf shared by the crew at Cook Tune. Sometimes just seeing another baker’s finished product can give you the confidence boost you need for your own batch!
Storage and Reheating for Your chocolate babka Loaf
You’ve baked the perfect loaf of chocolate babka, and now you have to face the reality: you might not eat it all in one sitting! Good news! This bread is much better at staying fresh than most other yeast creations, mostly thanks to that glorious sugar syrup we brushed on right out of the oven.
The syrup not only makes it shiny but also acts as a seal to lock in all that soft, moist crumb. Because of that, you should absolutely store leftovers at room temperature. Don’t put it in the fridge! The fridge is the enemy of soft bread; it dries it out in record time. Just wrap that loaf up tightly in plastic wrap, and then maybe wrap it again in foil or put it in an airtight container (Step 18, essentially). Stored this way, it stays fantastic for three or four days.
If you want it to last even longer—maybe you baked it for a holiday gathering and need to save some for later—freezing is your best bet. You can wrap individual slices tightly in plastic wrap and freeze them for up to three months. It reheats beautifully from frozen!
When you are ready for a slice, reheating is super fast and brings back that fresh-from-the-oven magic. For a quick fix, pop a slice in the microwave for just 10 to 15 seconds. It warms up the butter and softens the crumb instantly. If you have a little more time and want that crust to crisp up just a touch, wrap the slice lightly in foil and heat it in a toaster oven or regular oven at about 300°F for about 7 to 10 minutes. It’s heavenly when warm!
Making sure your bread lasts is part of making a great weekend baking project sustainable, which is why I always have tips for keeping my bakes fresh, like in my guide to moist apple bread. Enjoy every single slice of your hard work!
Frequently Asked Questions About chocolate babka
It’s totally normal to have questions when tackling a stunning bake like this! Even when following a detailed babka recipe step by step, little snags pop up. I’ve gathered the questions I usually get from friends when they try to recreate this beauty at home. Hopefully, these quick answers make your next chocolate babka attempt totally foolproof!
Can I make this dough without a stand mixer?
Yes, absolutely! My career background means I love my mixer because it saves time, but my mom always made her brioche by hand, and it turned out beautifully. The challenge is incorporating that large amount of butter (Step 4). You’ll need serious arm power! You must mix the butter in very slowly, about one chunk at a time, after the initial dough comes together. It will take much longer—expect 15 to 20 minutes of steady kneading/mixing by hand to get that elastic texture. Just keep going until it passes the windowpane test, and you’ve got a fantastic homemade chocolate babka recipe result!
What if I don’t have a 9×5 inch loaf pan for my babka?
No loaf pan? No problem! The dough volume is perfect for creating a beautiful presentation in a few different ways. If you skip the loaf pan, you have a couple of options. First, you can use a 9-inch round cake pan, though the rise will be taller and might need a slightly longer bake time, so watch it closely! Second, and this is a really fun way to present it, you can bake the twisted dough in an 8- or 9-inch springform pan. This is great if you want to skip the syrup soak slightly, as it frees the sides for easier slicing, showcasing that gorgeous braid topping. For more fail-proof baking ideas, check out my tricks for an easy chocolate cake recipe.
Can I use Nutella instead of making the homemade filling?
Oh, you totally *can* use store-bought Nutella if you’re really pressed for time for a great weekend baking project! It saves you maybe 10 minutes of prep time for the filling. However, I highly recommend sticking to the cocoa and butter filling for two main reasons. One: Nutella is softer and tends to run out completely when you try to braid, making it harder to get clean swirls. Two: Our homemade filling has that espresso powder, which really deepens the chocolate flavor, making it a far superior decadent yeast bread dessert experience. If you use Nutella, make sure you chill the log extra long—at least 45 minutes—to firm it up before slicing!
Why is my dough rising so slowly?
If your dough isn’t doubling after an hour and a half, the first thing to check is the temperature of your environment. Yeast doesn’t like the cold! If your kitchen is chilly, the yeast becomes sluggish. Try putting your covered bowl into the oven with *only* the light turned on. That tiny bit of ambient heat is usually just enough to encourage the yeast to get moving without actually cooking the dough. This is a necessary trick for achieving that impossibly soft, rich brioche babka dough flavor, especially in the winter months!
PrintThe Best Homemade Chocolate Babka Recipe: Tender Brioche Dough with Rich Chocolate Swirls and Shiny Glaze
Bake a decadent chocolate babka that surpasses store-bought quality. This recipe uses a tender brioche dough, a rich chocolate filling, and simple steps to achieve perfect swirls and a glossy finish.
- Prep Time: 45 min
- Cook Time: 45 min
- Total Time: 3 hours 45 min
- Yield: 1 loaf 1x
- Category: Dessert
- Method: Baking
- Cuisine: Jewish/American
- Diet: Vegetarian
Ingredients
- 1 cup whole milk, warm
- 2 1/4 teaspoons active dry yeast
- 1/2 cup granulated sugar, plus 1 tablespoon for yeast
- 4 large eggs, room temperature
- 1 teaspoon vanilla extract
- 1 teaspoon salt
- 4 1/2 cups all-purpose flour, plus more for dusting
- 1 cup (2 sticks) unsalted butter, softened and cut into pieces
- 1 cup powdered sugar for glaze
- 3 tablespoons milk for glaze
- 1/2 cup water for syrup
- 1/2 cup granulated sugar for syrup
- 1 cup unsalted butter, melted, for filling
- 1 cup granulated sugar for filling
- 3/4 cup unsweetened cocoa powder
- 1 teaspoon instant espresso powder
Instructions
- Activate the yeast: In a small bowl, combine the warm milk, 1 tablespoon of sugar, and the yeast. Let stand for 5 to 10 minutes until foamy.
- Make the dough: In the bowl of a stand mixer fitted with the dough hook, combine the remaining sugar, eggs, vanilla, salt, and flour. Mix on low speed until just combined.
- Add the yeast mixture to the flour mixture. Mix on low speed for 2 minutes.
- Increase the speed to medium-low and gradually add the softened butter, one piece at a time, mixing well after each addition. Continue mixing for 8 to 10 minutes until the dough is smooth and elastic.
- Place the dough in a lightly oiled bowl, cover, and let it rise in a warm place for 1.5 to 2 hours, or until doubled in size.
- Prepare the chocolate filling: In a medium bowl, whisk together the melted butter, 1 cup sugar, cocoa powder, espresso powder, and a pinch of salt until smooth.
- Punch down the risen dough. Turn it out onto a lightly floured surface and roll it into a large rectangle, about 12×18 inches.
- Spread the chocolate filling evenly over the entire surface of the dough, leaving a small border on one long edge.
- Starting from the long edge opposite the border, tightly roll the dough into a log. Pinch the seam closed.
- Chill the log for 30 minutes to firm up the filling, which makes braiding easier.
- Prepare the syrup: While the dough chills, combine 1/2 cup water and 1/2 cup sugar in a small saucepan. Bring to a boil, stirring until sugar dissolves. Remove from heat and set aside.
- Prepare the braid: Line a 9×5 inch loaf pan with parchment paper. Cut the chilled dough log in half lengthwise, exposing the layers of filling.
- Place the two halves side-by-side, cut sides up. Twist the two strands together, keeping the cut sides facing up as much as possible to show the swirls.
- Carefully transfer the twisted dough into the prepared loaf pan. Cover loosely and let it rise for 45 to 60 minutes.
- Preheat your oven to 350°F (175°C). Bake for 35 to 45 minutes, or until golden brown and cooked through.
- While the babka is still hot from the oven, brush the entire top generously with the prepared sugar syrup. This creates the shiny glaze.
- Let the babka cool in the pan for 15 minutes before transferring it to a wire rack to cool completely.
- Make the glaze: Whisk together powdered sugar and 3 tablespoons of milk until smooth. Drizzle over the cooled babka, or serve alongside.
Notes
- For the best texture, ensure your butter for the dough is truly softened, not melted.
- If you want a deeper chocolate flavor, use bittersweet chocolate chips mixed into the filling.
- You can make the dough a day ahead and let it cold-proof in the refrigerator overnight for deeper flavor development.
Nutrition
- Serving Size: 1 slice
- Calories: 450
- Sugar: 35g
- Sodium: 250mg
- Fat: 25g
- Saturated Fat: 15g
- Unsaturated Fat: 10g
- Trans Fat: 0.5g
- Carbohydrates: 50g
- Fiber: 3g
- Protein: 8g
- Cholesterol: 75mg