

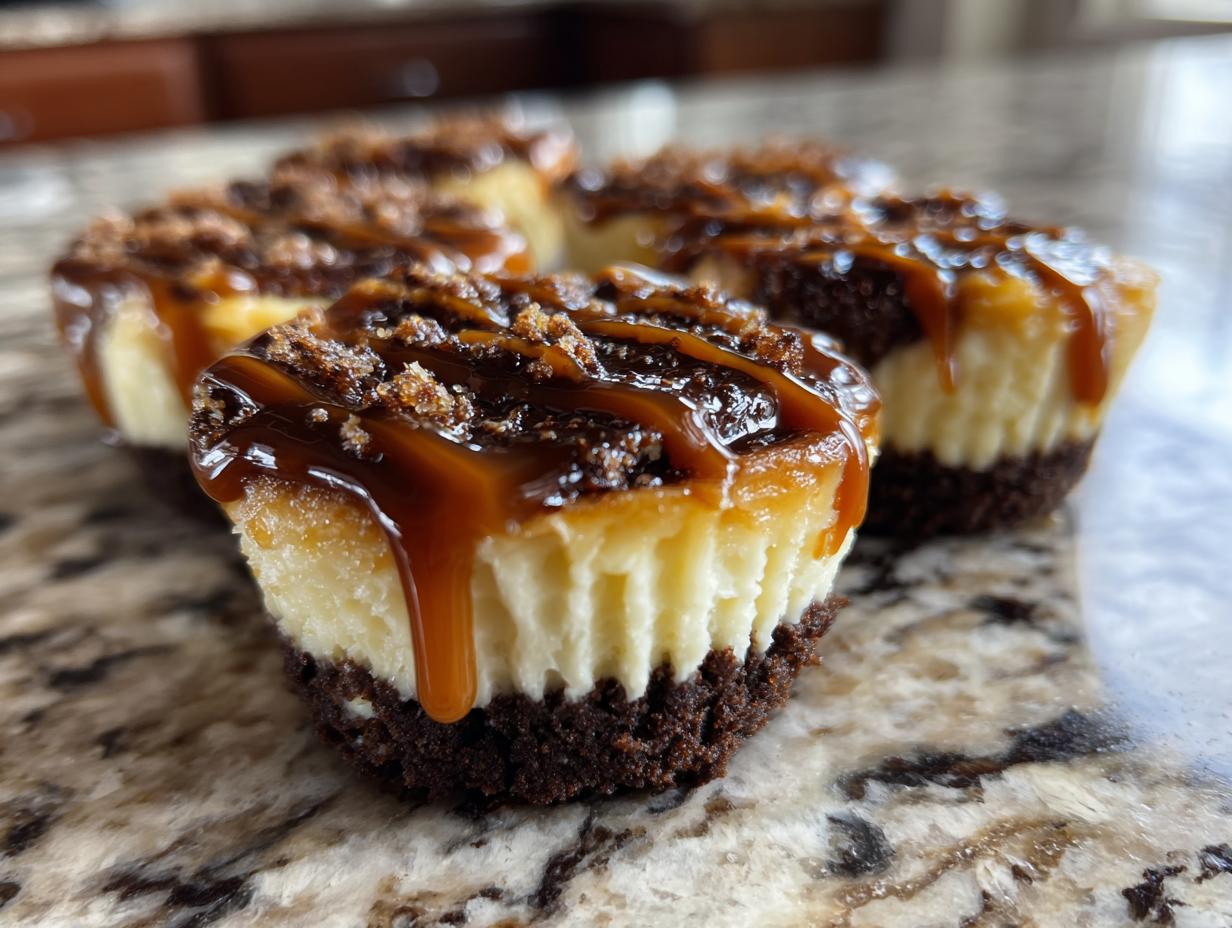
I don’t know about you, but some days I need something incredible—totally decadent, rich, and satisfying—but hitting the oven button feels like too much commitment. That’s exactly why I’m sharing my absolute favorite shortcut for those moments: the Easy No-Bake cookie butter cheesecake cups. These individual servings are creamy, dreamy, and they let you skip the oven entirely! It’s all about delivering that showstopper dessert flavor without adding stress, which is exactly what Felix built this whole site around. If you loved my no-bake peanut butter pie, these are going to be your new obsession. These little cups pack that spiced cookie butter punch into a perfect, portion-controlled treat for busy weeknights or sudden party needs.
- Why You Will Make These Easy No-Bake Cookie Butter Cheesecake Cups
- Gathering Ingredients for Your Cookie Butter Cheesecake Cups
- Step-by-Step Instructions for Perfect No Bake Cookie Butter Cheesecake Cups
- Tips for Success with Your Cookie Butter Cheesecake Cups
- Ingredient Notes and Substitutions for These Dessert Cups Recipe
- Storage and Make-Ahead Instructions for Cookie Butter Treats
- Serving Suggestions for Decadent Dessert Cups
- Frequently Asked Questions About No Bake Cheesecake Cups
- Estimated Nutritional Breakdown for Cookie Butter Cheesecake Cups
- Estimated Nutritional Breakdown for Cookie Butter Cheesecake Cups
Why You Will Make These Easy No-Bake Cookie Butter Cheesecake Cups
Seriously, why wouldn’t you make these? They check every single box for a quick, impressive dessert. These are perfect for when you need a sweet fix fast. You get the big flavor payoff with minimal effort, which I totally love.
- Zero Oven Time: That’s right, these are completely no-bake! Perfect for summer or when you just aren’t feeling the heat.
- Perfect Portions: These cookie butter cheesecake cups are already divided, so there’s no cutting messy slices. They are made for easy serving at any kind of bash.
- Incredible Flavor: That spicy, caramelized taste of cookie butter against the tangy, creamy filling is just pure magic.
- Fast Assembly: You’ll have the crusts in the freezer before you know it. Grab the ingredients, and you’re already halfway there! Check out my guide to other no-bake cheesecake bites while you’re here.
Gathering Ingredients for Your Cookie Butter Cheesecake Cups
Okay, the beauty of these individual dessert portions is that the ingredient list is short and everything is super accessible. We are aiming for 12 perfect, creamy little desserts, remember! Keep your cream cheese out on the counter for a bit before you start; that warmth makes sure you get zero lumps in your filling. I always organize my ingredients like this so I don’t miss a step.
For the crust, you just need:
- Crushed Biscoff or Speculoos Cookies: You need 1 1/2 cups of these crumbs. That’s the foundation!
- Unsalted Butter: Melted down, 6 tablespoons worth.
Now for the star of the show, the rich cheesecake filling itself. Make sure you have these ready to go:
- Cream Cheese: The full 16 ounces, make sure it’s softened up!
- Powdered Sugar: We’re using 1 cup of this pure sweetness.
- Vanilla Extract: Just 1 teaspoon for that lovely background note.
- Cookie Butter (The Main Event): This is key! You need 1/2 cup mixed right into the filling, PLUS you need extra set aside for drizzling later on top.
- Heavy Whipping Cream: We’ll only whip up 1/4 cup, but it really lightens up the texture.
And finally, we need those little paper or foil liners—you’ll need 12 of them to line your standard muffin tin. If you were hoping to skip the butter in the crust like in some of my other recipes, check out how I make peanut butter bars, but for these, the butter helps that crust set up firm!
Step-by-Step Instructions for Perfect No Bake Cookie Butter Cheesecake Cups
Alright, let’s get serious about assembly! Because this is a no-bake situation, timing is everything. We want our base firm and our filling light and fluffy. Follow these steps exactly for the best cookie butter cheesecake cups you’ve ever made. And please, make sure your cream cheese is truly soft—that’s where the magic starts for a super smooth texture! Speaking of easy recipes that save time, you should check out my slow cooker pozole recipe if you ever need a hands-off dinner!
Creating the Cookie Butter Crust Base
First things first, we build the foundation. Grab a medium bowl and toss in your crushed cookies—the 1 1/2 cups—along with the 6 tablespoons of melted butter. You really need to mix this well until every crumb looks damp, like wet sand you’re ready to build a castle with.
Next, line up your muffin tin with those 12 paper liners. Scoop about 2 tablespoons of that buttery crumb mixture into the bottom of each liner. You need to press this down really firmly—use the back of a spoon or even the bottom of a small glass. Once pressed, shove that whole tin into the freezer immediately while you tackle the filling. This freezing time is non-negotiable!
Mixing the Creamy Cookie Butter Dessert Filling
Now for the creamy part! Get your mixer out. Add only your softened cream cheese to the bowl. Beat it solo until it looks completely uniform—you don’t want any little white lumps lurking in there. Trust me, that first solo beat makes all the difference for a truly creamy no bake cheesecake.
Once smooth, add in your powdered sugar and vanilla. Mix just until that’s incorporated. Now, gently mix in that 1/2 cup of cookie butter. You want the color and flavor distributed evenly without beating air out of the mixture. Speaking of air, in a separate small bowl, whip that 1/4 cup of heavy cream until you get nice soft peaks. Then, and I mean *gently*—fold that whipped cream into the cream cheese mix. Folding keeps it light and airy, which is what makes these superior to some denser versions.
Assembling and Chilling Your Cookie Butter Cheesecake Cups
Time to bring everything together! Take your crusts out of the freezer—they should be nice and solid now. Spoon the filling evenly over the chilled crusts. If you want that professional, bakery-perfect look, here’s a little tip from Felix: use a big piping bag with a round tip! It makes filling these individual dessert portions so much cleaner than a spoon. You can check out how they style things over at this irresistible dessert guide for presentation inspiration.
Once they are all filled, they need a good, long nap in the fridge. We need these cookie butter cheesecake cups to firm up nicely, so don’t rush this part! You must chill them for a minimum of 4 hours. Seriously, you need that full time for them to set up so they hold their shape when you pull them out of the liners.
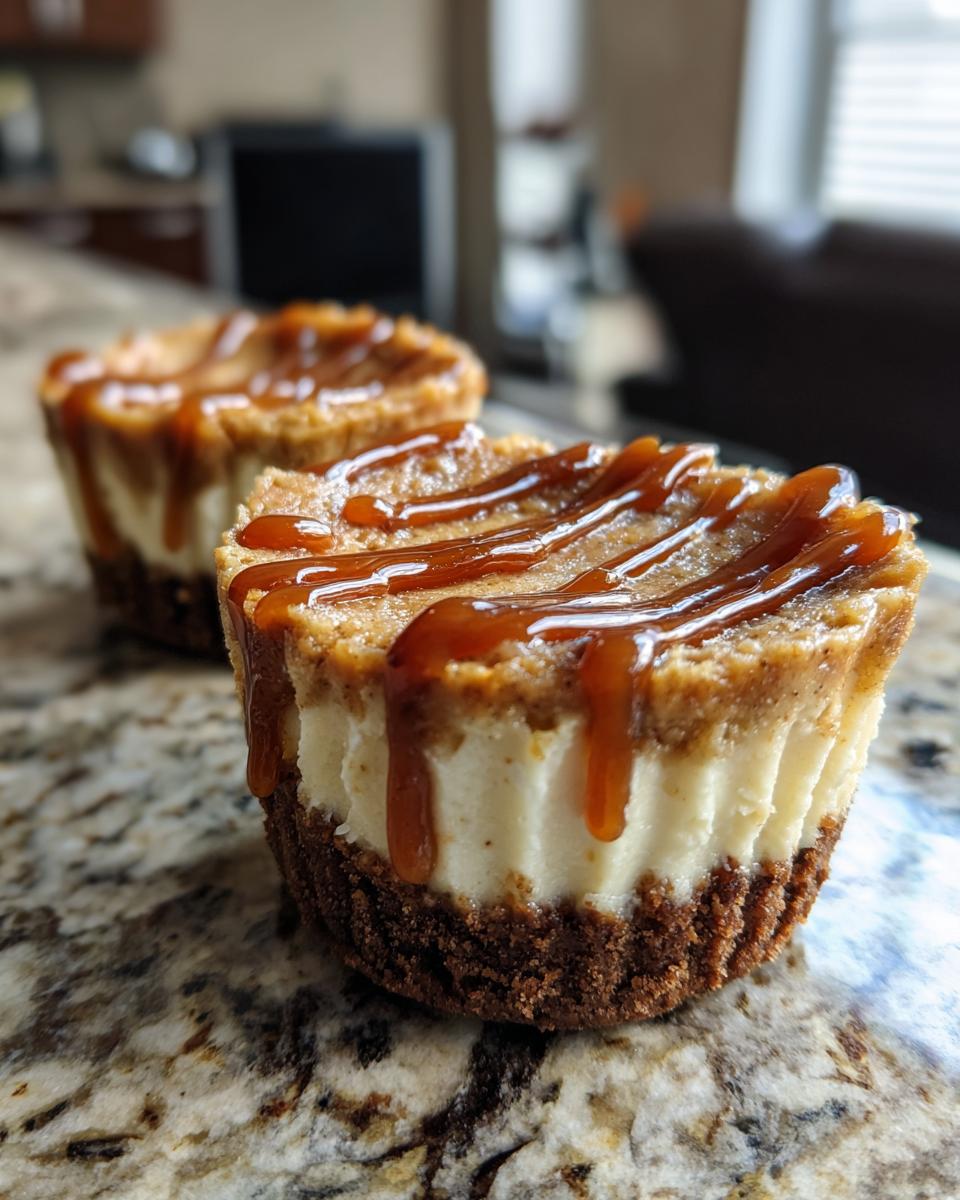
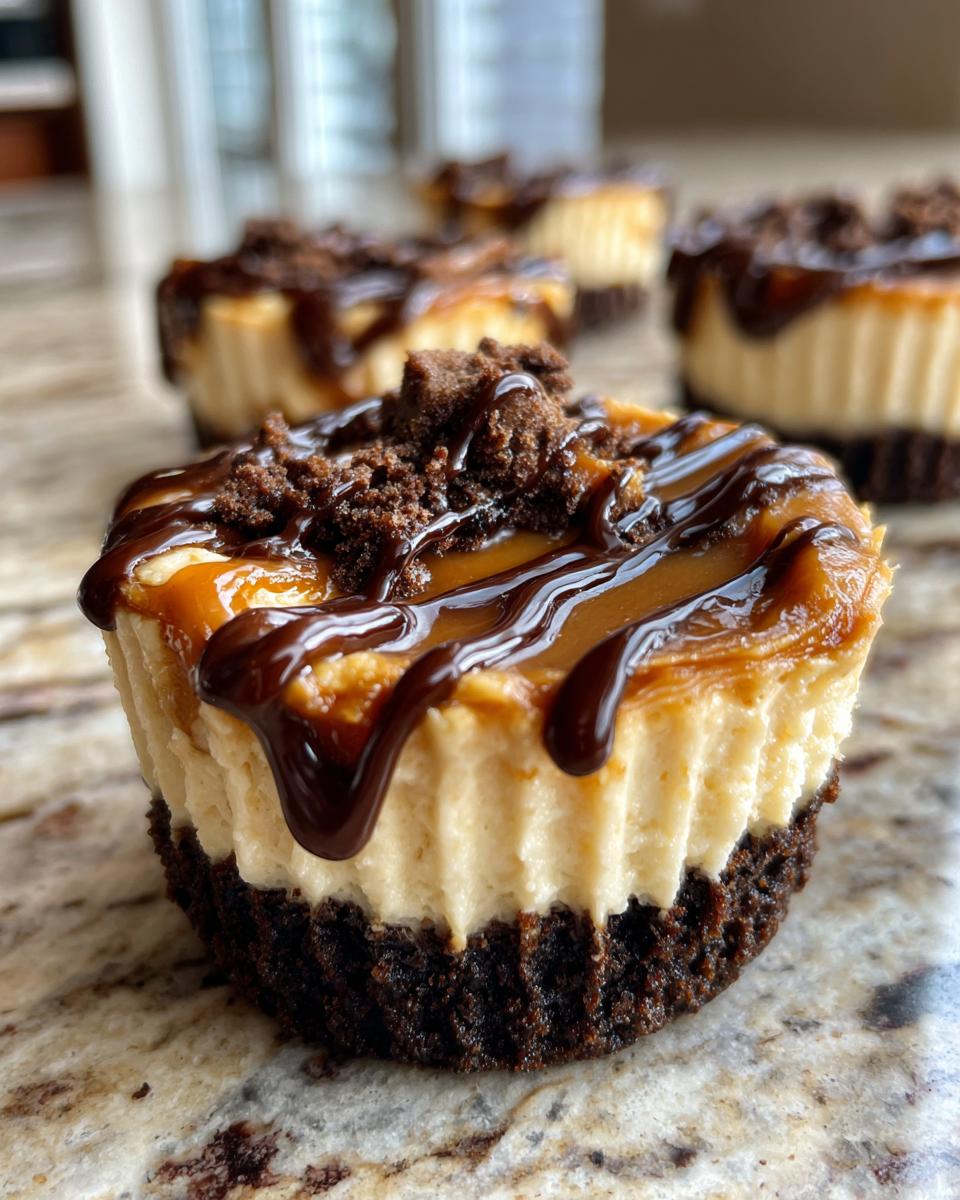
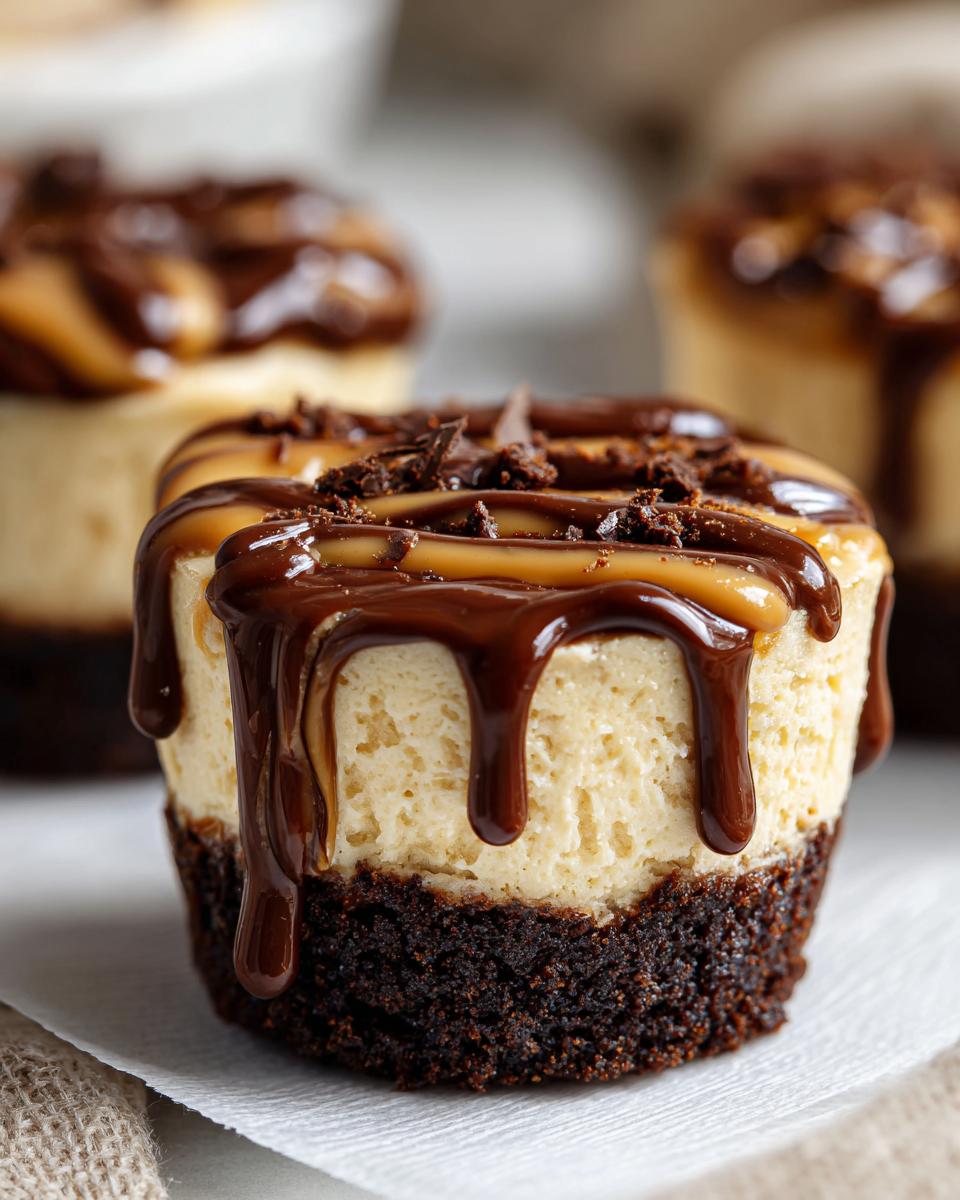
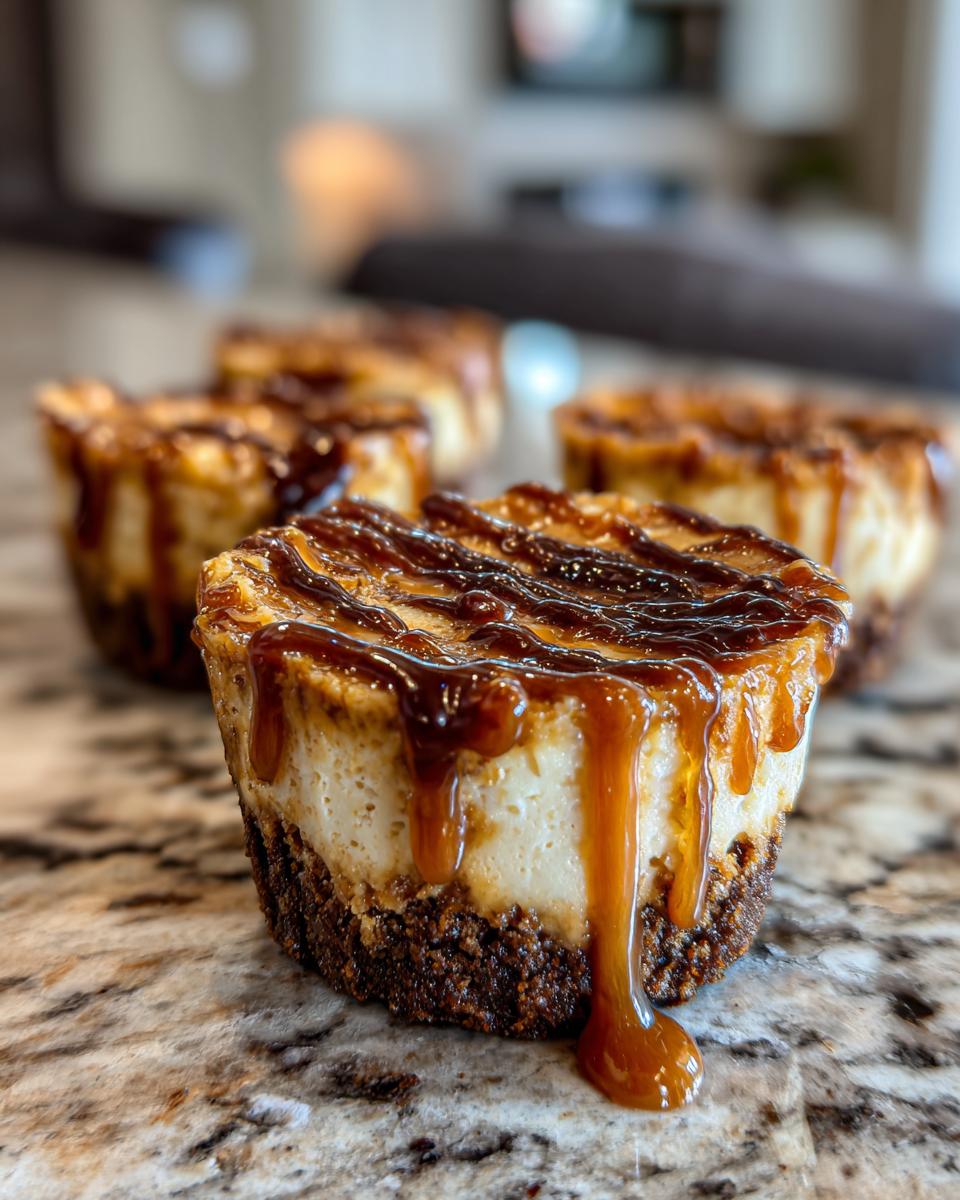
When they are totally chilled and firm, it’s time for the final flourish! Lightly warm up a couple of tablespoons of that extra cookie butter until it’s a nice, thin drizzle consistency. Then, drizzle it right over the top of each perfect cup. I like to make little swirls!
Tips for Success with Your Cookie Butter Cheesecake Cups
Look, I want every single batch of these cookie butter cheesecake cups to turn out like a dream for you. They are simple, but paying attention to a few details really elevates them from ‘good’ to ‘OMG, what is this glorious thing?’ Felix always says the best no-bake treats rely on temperature and texture, and she’s right!
First off, let’s talk about the base. My original notes mentioned sometimes swapping out the cookie crumbs for graham crackers if you want a change, which is totally fine! But if you go that route, try adding just a tiny pinch of cinnamon to the graham cracker portion. It gives it that warm base note that complements the cookie butter perfectly. I usually pair these kinds of simple fixes with other quick, satisfying meals, like my recipe for creamy beef pasta, when I need dinner on the table fast.
Here’s a crucial tip for that drizzle near the end to make sure you get those gorgeous lines showing off the flavor:
- Warm the Drizzle Gently: If your extra cookie butter is cold, it will be too stiff to drizzle nicely. Pop those two tablespoons (or more if you’re feeling generous!) into a microwave-safe bowl and heat it for just 10 seconds at a time. You want it runny, but not hot, so it doesn’t melt the beautiful cheesecake layer underneath.
- Room Temp Setting: Avoid assembling these cups on a really hot day or near a sunny window. Since there’s no baking, the butter and the cream cheese filling rely on the cold kitchen environment to help them stay stable before they hit the fridge.
- Don’t Skimp on the Chill: I know you’re eager, but that 4-hour minimum chill time really helps the whipped cream stabilize within the filling, giving you that perfect, scoopable, yet firm texture. Trust me on this one; a short chill means a sloppy dessert cup!
If you want to see some really stunning examples of how beautiful these individual dessert portions can look, you absolutely have to check out the presentation ideas over at Melissa’s site. It just goes to show how impressive simple, no-oven desserts can be!
Ingredient Notes and Substitutions for These Dessert Cups Recipe
Now, I know sometimes you’re mid-recipe and realize you’re out of one specific thing. Don’t panic! Part of Felix’s philosophy is making real food achievable even when life throws you a curveball. These dessert cups recipe components are pretty flexible, especially for the crust.
If you look back at my ingredient list, you’ll see I called for crushed Biscoff or Speculoos cookies. If you can find Speculoos, please use it—the flavor is slightly deeper, but honestly, Biscoff is widely available and just as delicious. They are essentially the same thing, so grab whichever one you find first! When it comes to the cookie butter itself, that rich swirl in the middle, use your favorite brand. It all melts down beautifully.
For the base, if you really can’t find any speculoos cookies, you can absolutely use graham crackers instead. I mentioned it briefly before, but here’s the adjustment: If you use graham crackers for the crust, that flavor is much milder than the spiced cookies, so you might want to mix in just a tiny pinch of cinnamon or nutmeg with the melted butter. That will help bring back some of that cozy flavor profile we love in these cookie butter dessert cups. It’s simple tweaks like this that keep cooking stress-free!
As far as the dairy goes, stick to full-fat cream cheese and heavy cream if you can. These are no-bake treats, and we need that fat content to help everything set up firmly in the fridge. Using light cream cheese often results in a filling that stays too soft, which defeats the purpose of perfect individual cheesecake servings. If you’re looking for other simple, satisfying recipes where the ingredients really matter, you should take a peek at my creamy broccoli salad. It’s amazing how good simple flavors can be!
Storage and Make-Ahead Instructions for Cookie Butter Treats
This is the part I love most about cookie butter cheesecake cups—they are basically built for making ahead! If you’re trying to stay ahead of the game for a party or just want to satisfy those weeknight sweet cravings without starting from scratch every day, listen up. These individual servings are creamy, dreamy, and they let you skip the oven entirely! It’s all about delivering that showstopper dessert flavor without adding stress, which is exactly what Felix built this whole site around.
The short answer is yes, you can absolutely prep these early! Felix always preps desserts the day before a big event. It takes the pressure off the actual day, leaving you time to focus on the main meal or decorating. You can make them completely, crust and all, and pop them straight into the fridge.
In the refrigerator, these individual cheesecake servings stay wonderfully fresh and delicious for up to three whole days. I’ve tested this thoroughly, I promise! The crust stays crisp enough, and the filling holds its creamy, dreamy texture perfectly thanks to the stabilizers in the cream cheese and the fact that they are individual dessert portions.
Here’s the one little snag, though, and it’s about that glorious drizzle. You know I told you to warm up that extra cookie butter to drizzle over the top? Don’t do that step ahead of time!
- Crust & Filling: Assemble the entire cup—crust through the filling—and chill until firm. Keep them covered tightly in the muffin tin or transferred carefully to an airtight container.
- The Drizzle Debate: Wait until serving time to drizzle that warm cookie butter topping over your quick make ahead dessert. If you drizzle it on when they are cold and then store them overnight, the drizzle will harden up way too much and lose that wonderful, gooey texture we are aiming for.
If you are prepping a huge batch, you can even freeze the *un-topped* cheesecake cups! Just make sure they are fully set, place them in a freezer-safe container with a layer of parchment paper between any layers to prevent sticking, and freeze. Thaw them in the fridge for about 4 to 6 hours before serving, and then add that glorious drizzle right before you present them. It’s such an easy secret weapon for dessert planning! When the holidays roll around and I need a stable make-ahead treat, I often turn to my recipe for gingerbread brownies, which is perfect for setting aside in advance, too.
If you want to see how other people style up their make-ahead desserts, you should check out the cookie butter ideas floating around over at Cooking Layer. It gives you creative energy for your next batch!
Serving Suggestions for Decadent Dessert Cups
Okay, you’ve made these absolutely gorgeous, rich decadent dessert cups, and now it’s time to make them look as good as they taste! Presentation is half the fun, especially when you’re serving these at a party or potluck. Since they are already in their own little liner, they are super portable, but we can always dial up the fancy factor just a little bit more.
My philosophy for desserts like this is to keep the garnish simple because the actual filling flavor is the star. But here are a few ways I like to dress them up for company. If you need other easy appetizers to serve alongside these sweet treats, my guide to lemon scones shows you how to make a simple glaze that works fast, too!
- The Cookie Crown: The easiest presentation boost is adding a tiny topping right before you serve them. Take one whole Biscoff cookie (or half of one if they are small) and gently place it right on top of the warm cookie butter drizzle. It adds height and flavor recognition instantly.
- A Dusting of Spice: If you decide to skip the final drizzle (maybe you just want the simpler, cleaner look of the cheesecake filling), dust the tops lightly with just a touch of ground cinnamon or even a tiny sprinkle of nutmeg after they’ve chilled. This enhances that spiced flavor profile beautifully.
- Toasted Nuts for Crunch: For those who love texture, a few finely chopped pecans or walnuts, lightly toasted in a dry pan, make a fantastic crunchy contrast to the creaminess. Sprinkle them on right before you put them on the serving tray.
- Elevate with Citrus Zest: This is a little secret I picked up. The warm spice of cookie butter sings when you add a tiny bit of zest. Before the final drizzle, grate just a whisper of fresh orange zest over the tops. It brightens up the richness without tasting too citrusy.
Honestly, these are meant to be individual dessert portions, so setting them out on a pretty tray with little serving spoons is all you really need to do. They look fantastic lined up ready to go—your guests will be grabbing these first, I guarantee it!
Frequently Asked Questions About No Bake Cheesecake Cups
I always get questions about streamlining things in the kitchen, especially when it comes to recipes designed to be quick and easy like these! Since we are skipping the oven, folks sometimes wonder about structure or substitutions. Here are the things I hear most often about making these popular no bake cheesecake cups.
Can I use a different cookie for the crust?
Yes, absolutely! While the spiced flavor of crushed Biscoff is what makes these so special, you can certainly swap out the base. If you don’t have cookie butter cookies on hand, graham crackers are a tried-and-true classic base for any creamy no bake cheesecake. Just treat them the same way: crush them up and mix them with melted butter until they look like moist sand. If you use graham crackers, you might want to add a little extra vanilla or a tiny pinch of ground cloves to your crumb mixture to give it a bit more spice, just to match the original flavor profile!
Can I make these without a muffin tin (e.g., in small glasses)?
That’s a fantastic idea for presentation! If you want to turn these into more elegant dessert cups recipe items instead of individual portions in liners, you can definitely use small clear glasses, ramekins, or even small mason jars. You just need to layer them! Press the crust mixture into the bottom of your chosen vessel first. Then, spoon or pipe the filling right on top of the crust. The only thing you have to adjust is the chilling time; you might need them to chill just a little longer—maybe six hours or even overnight—to ensure the filling is perfectly set in the wider, shallower base of a glass.
How do I get the cookie butter perfectly smooth for mixing?
This is a great question because nobody wants chunks of cold, stiff cookie butter messing up their smooth texture! If your jar of cookie butter feels stiff right out of the pantry, it needs a little warming up before you mix it into the cream cheese. I usually scoop out the portion I need (that half cup for the filling) and microwave it for only about 5 to 10 seconds. You just want it warm enough to be easily stirrable, almost like a thick paste, so it blends seamlessly into the cream cheese mixture without heating up or melting the other ingredients too much. This little trick ensures you get that gorgeous, uniform color throughout your sweet cravings dessert filling.
Is this recipe truly no-bake?
It totally is, promise! This recipe thrives on the cold, not the heat. We use the freezer only to firm up the crust quickly, and the refrigerator to set the magnificent creamy filling. There’s zero oven time involved, which makes this one of my go-to no oven dessert recipes when the weather is hot or when I need something fast and easy to pull together. It’s dessert magic made without ever preheating the oven!
If you’re looking for other ways to utilize simple, savory flavors in a quick format, my sticky orange chicken is another ridiculously simple recipe that feels like takeout but takes way less fuss!
Estimated Nutritional Breakdown for Cookie Butter Cheesecake Cups
Now, I always say that when you’re eating something this delicious, you shouldn’t obsess over the numbers, but I know some of you like to have a general idea. Because this recipe uses heavy cream and butter, these are certainly decadent! These estimates are based on the full recipe yielding 12 servings, so remember that if you make fewer mini cheesecake cups, the numbers per serving will change.
Here is a rough idea of what you are looking at per serving:
- Calories: Around 350
- Fat: About 22 grams (this includes that rich butter and cream!)
- Carbohydrates: Roughly 33 grams
- Sugar: Approximately 28 grams (Cookie butter is sweet, after all!)
- Protein: About 5 grams
This is just an estimate, of course! If you swap in graham crackers or use light cream cheese, the numbers change. When I’m not making something super sweet like this, I often default to my favorite pecan pie cookies, which have a slightly different nutritional profile, but are equally satisfying.
Estimated Nutritional Breakdown for Cookie Butter Cheesecake Cups
Now, I always say that when you’re eating something this delicious, you shouldn’t obsess over the numbers, but I know some of you like to have a general idea. Because this recipe uses heavy cream and butter, these cookie butter cheesecake cups are certainly decadent! These estimates are based on the full recipe yielding 12 servings, so remember that if you make fewer mini cheesecake cups, the numbers per serving will change.
Here is a rough idea of what you are looking at per serving—and remember this is just a guideline!
- Calories: Around 350
- Fat: About 22 grams (this includes that rich butter and cream!)
- Carbohydrates: Roughly 33 grams
- Sugar: Approximately 28 grams (Cookie butter is sweet, after all!)
- Protein: About 5 grams
This is just an estimate, of course! If you swap in graham crackers or use light cream cheese, the numbers change. When I’m not making something super sweet like this, I often default to my favorite pecan pie cookies, which have a slightly different nutritional profile, but are equally satisfying.
PrintEasy No-Bake Cookie Butter Cheesecake Cups
Make these individual cheesecake cups without turning on your oven. They feature a simple crust, a creamy filling, and the rich flavor of cookie butter for a quick, satisfying dessert.
- Prep Time: 20 min
- Cook Time: 0 min
- Total Time: 4 hr 20 min
- Yield: 12 servings 1x
- Category: Dessert
- Method: No-Bake
- Cuisine: American
- Diet: Vegetarian
Ingredients
- 1 1/2 cups crushed Biscoff or speculoos cookies
- 6 tablespoons unsalted butter, melted
- 16 ounces cream cheese, softened
- 1 cup powdered sugar
- 1 teaspoon vanilla extract
- 1/2 cup cookie butter (like Biscoff spread), plus extra for topping
- 1/4 cup heavy whipping cream
- 12 paper or foil liners for a standard muffin tin
Instructions
- Prepare the crust: Combine the crushed cookies and melted butter in a bowl. Mix until the crumbs are evenly moistened.
- Line a standard muffin tin with 12 paper or foil liners. Press about 2 tablespoons of the cookie mixture firmly into the bottom of each liner to form the crust. Place the tin in the freezer while you prepare the filling.
- Make the cheesecake filling: In a large bowl, beat the softened cream cheese with an electric mixer until smooth.
- Add the powdered sugar and vanilla extract to the cream cheese. Beat until fully combined and creamy.
- Gently mix in the 1/2 cup of cookie butter until the mixture is uniform in color and smooth. Do not overmix.
- In a separate small bowl, whip the heavy cream until soft peaks form. Gently fold the whipped cream into the cream cheese mixture until just combined.
- Spoon or pipe the cheesecake filling evenly over the chilled crusts in the muffin cups.
- Refrigerate the cups for at least 4 hours, or until the filling is firm.
- Before serving, warm 2 tablespoons of extra cookie butter slightly so it is pourable. Drizzle the melted cookie butter over the top of each cheesecake cup.
Notes
- You can use graham crackers instead of cookie crumbs for the crust if you prefer a different base flavor.
- For a cleaner look when filling, use a piping bag fitted with a large round tip to pipe the cheesecake mixture onto the crusts.
- These individual dessert portions hold up well in the refrigerator for up to 3 days.
Nutrition
- Serving Size: 1 cup
- Calories: 350
- Sugar: 28g
- Sodium: 210mg
- Fat: 22g
- Saturated Fat: 13g
- Unsaturated Fat: 9g
- Trans Fat: 0g
- Carbohydrates: 33g
- Fiber: 1g
- Protein: 5g
- Cholesterol: 55mg