

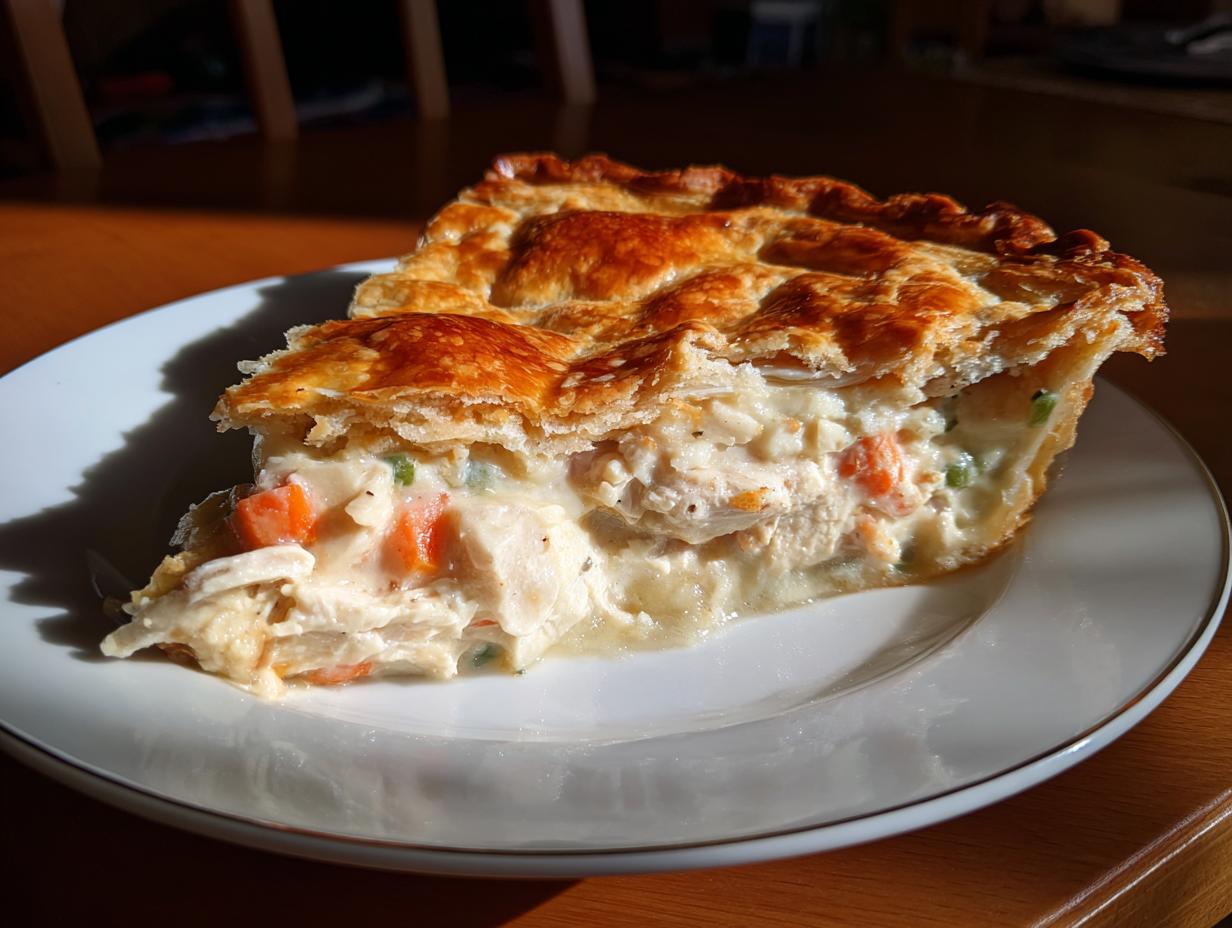
Some days, you just need that big, warm hug only food can deliver, right? I know that feeling well. When the world feels too fast, nothing beats the comforting scent of a truly homemade meal filling your kitchen. That’s why I’m sharing my absolute favorite pot pie recipe: the Classic Homemade Chicken Pot Pie with Flaky Double Crust. If you thought making a perfect, rich, creamy filling topped with shatteringly crisp crusts took all weekend, prepare to be surprised!
My background, jumping from a demanding marketing career to finding joy back in the kitchen—taking cues from my mom’s soulful cooking—taught me that compromise isn’t necessary when it comes to dinner. You deserve real flavor! This recipe proves that you can achieve that hearty, soul-satisfying result associated with classic comfort food recipes without sacrificing your entire evening. We handle the time-consuming bits smartly so you get all the homemade glory. Trust me, this savory pie changes everything about how you view weeknight dinners. If you want to skip the step of making homemade broth and need a shortcut for that rich base later, definitely peek at my guide on homemade cream of chicken soup from scratch.
If you want to dive deep and make your own roux base that rivals anything you’ve ever had from a can, or you’re interested in skipping the pie crust for my famous biscuit topping alternative, stick with me! We’re going straight to the heart of what makes a chicken dinner a true family event.
- Why This Homemade Chicken Pot Pie Recipe Works
- Ingredients for Your Classic Pot Pie Recipe
- How to Make Pot Pie Recipe: Step-by-Step Instructions
- Tips for Success with Your pot pie recipe
- Storage and Reheating Instructions for Leftover pot pie recipe
- Serving Suggestions for This Savory Pie Recipe
- Frequently Asked Questions About This pot pie recipe
- Estimated Nutritional Data for This pot pie recipe
- Share Your Homemade Chicken Pie Experience
Why This Homemade Chicken Pot Pie Recipe Works
Look, I get it. You want something that tastes like it simmered all day, but you only have an hour before everyone starts asking “What’s for dinner?”. That’s the magic here! This isn’t just another casserole setup; this is pure, unadulterated comfort food recipes, structured for the modern kitchen. This double-crust version delivers those deep, satisfying flavors that make it a true hearty family meal without the all-day commitment.
Achieving the Best Flaky Crust Recipes
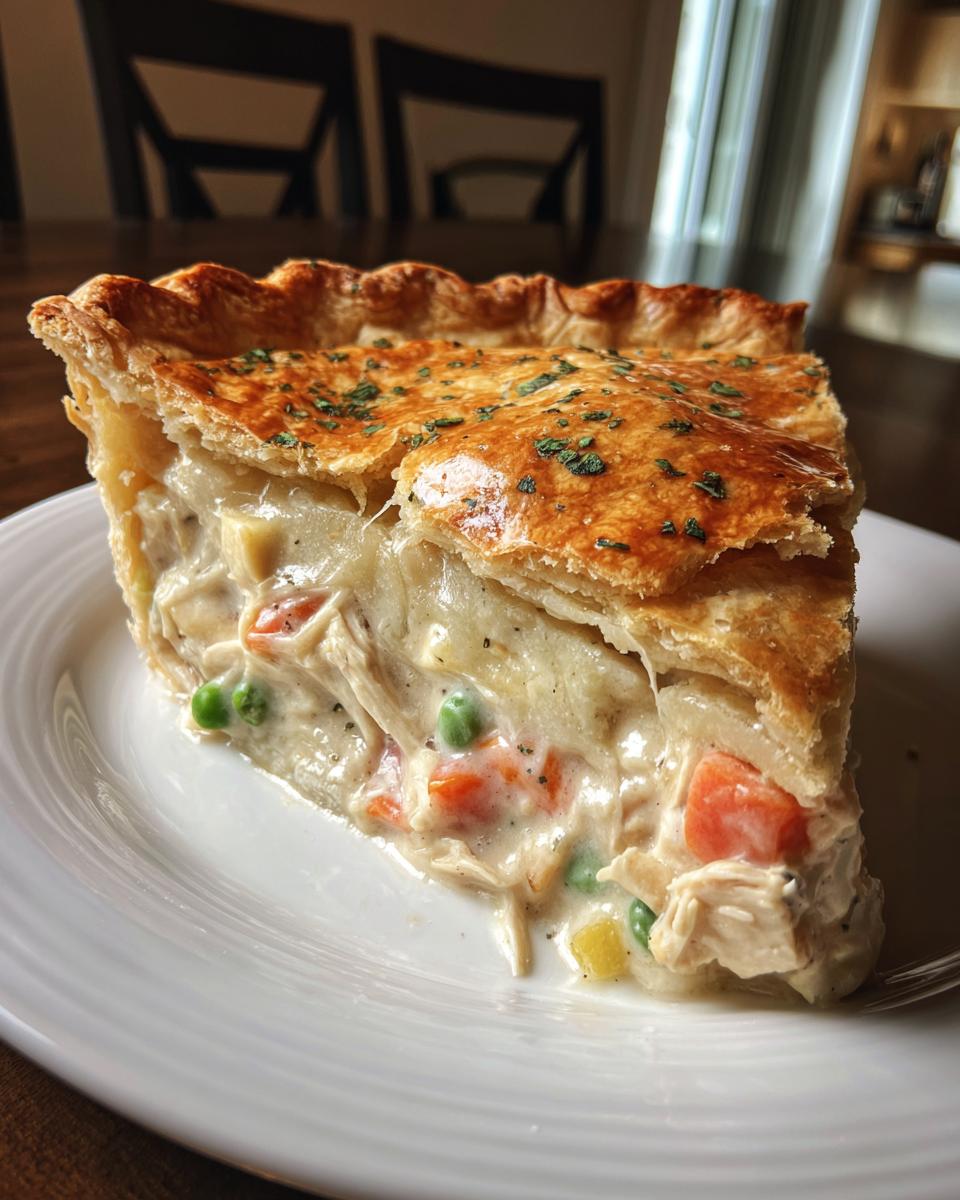
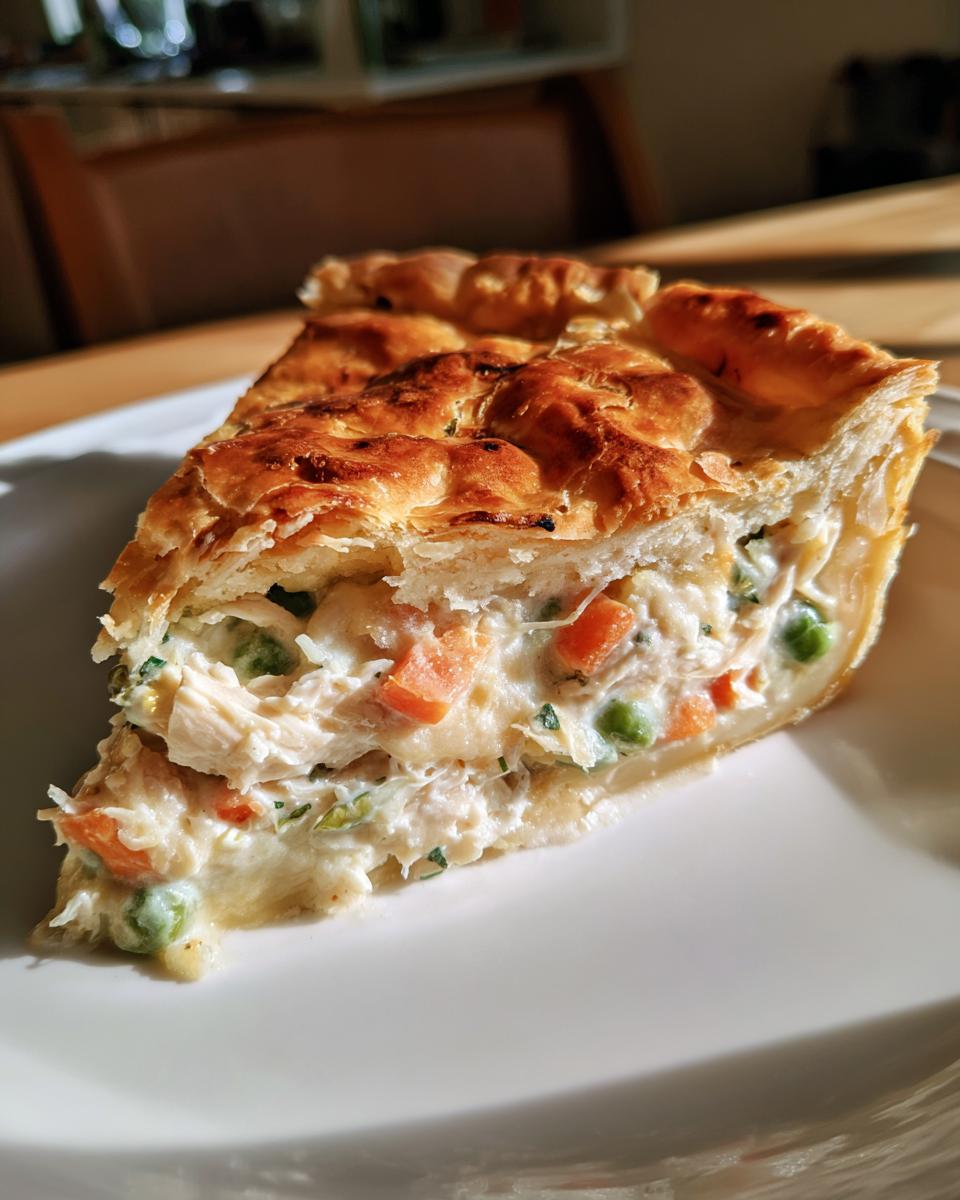
If you’re making the crust from scratch—and honestly, you should try it once!—the magic is keeping everything frigidly cold. Less handling, lots of tiny butter pieces, and you get those gorgeous, flaky layers that shatter perfectly when you cut into them. If you’re leaning on store-bought discs (no judgment, we all have those days!), just make sure they’ve softened just enough to unroll without cracking. We want maximum flakiness! It’s truly one of the best flaky crust recipes you’ll ever try, guaranteed.
The Secret to a Creamy Chicken Filling
The filling is where we separate the okay pot pies from the legendary ones. The absolute key is building a thick, gorgeous roux first—that’s just butter and flour cooked for a minute. That roux thickens our broth perfectly, leading to that rich, velvety texture in this great pot pie recipe. We use heavy cream or whole milk right at the end, off the heat, to ensure it stays lusciously smooth, never grainy. If you’re looking for a good base for that texture, you might find my guide on making homemade gravy helpful in understanding roux structure!
Ingredients for Your Classic Pot Pie Recipe
Okay, let’s get down to business. The beauty of this pot pie recipe is how accessible the ingredients are. You don’t need a fancy specialty store run; you just need good basics treated well. Everything listed here builds that perfect flavor profile, from the thickener to the vegetables. Remember, precision in measurement here makes the filling just right!
- 2 pie crusts (one for bottom, one for top, homemade or store-bought—your call!)
- 2 tablespoons unsalted butter
- 1 medium yellow onion, chopped
- 2 carrots, diced
- 2 celery stalks, diced
- 1/2 cup all-purpose flour
- 1 teaspoon salt
- 1/2 teaspoon black pepper
- 1/4 teaspoon dried thyme
- 2 cups excellent quality chicken broth
- 1 cup heavy cream or whole milk
- 2 cups cooked, shredded chicken (I often cheat here!)
- 1 cup frozen peas
- 1 cup frozen corn
- 1 large egg, beaten (this is just for that gorgeous shiny top crust)
Ingredient Notes and Substitutions for this pot pie recipe
Since this is designed to be a hearty family meal that can sneak into your schedule, smart substitutions are totally encouraged. The goal is flavor combined with ease!
First, the chicken: If you can’t roast a whole bird, don’t sweat it! Using shredded rotisserie chicken is my secret weapon when aiming for easy weeknight dinners. It saves nearly 30 minutes right there. Toss that right into the filling.
Second, the topping is flexible. If you love the idea of a flaky top crust but you’re running extremely tight, swap out that top pie crust for a batch of drop biscuits right on top. It gives you that wonderful Southern vibe—definitely check out instructions for a perfect pot pie with biscuit topping if you go that route. Biscuits bake up lighter and fluffier than the pastry, which is a totally different but equally comforting experience.
Finally, if you want the deepest savory flavor in your filling, you can supplement some broth with homemade chicken stock, or if you want to lean into that flavor profile, my guide on making the best homemade brown gravy uses a similar roux structure, just with richer browning!
How to Make Pot Pie Recipe: Step-by-Step Instructions
Ready for the journey? This is where the magic happens, transforming chopped veggies and chicken into the ultimate pot pie recipe. It seems straightforward, but the order of operations really matters here to keep that filling perfectly thick. Don’t jump ahead!
First things first, get the house smelling good already: Preheat your oven to 400 degrees F (200 degrees C). And here is a pro hint for you—place a sturdy baking sheet on the lower rack *now*. That sheet catches any drips and, more importantly, keeps the bottom crust insulated so you avoid that dreaded soggy bottom!
Next, take one of your pie crusts and gently fit it right into your 9-inch pie dish. Trim the edges neatly, but don’t fuss too much yet; you’ll seal it up later. Set that aside while we tackle the guts of this pie.
Preparing the Filling and Assembling the pot pie recipe
Grab a large saucepan, because we start building that creamy base. Melt your 2 tablespoons of butter over medium heat. Once it looks shimmering, toss in your chopped onion, carrots, and celery. Let them sauté until they start feeling soft—about 5 to 7 minutes is usually perfect for that tender-but-not-mushy texture.
Now, here comes the roux! Sprinkle in your flour, salt, pepper, and thyme right over those veggies. Stir this combination constantly for about a full minute. You’re cooking out that raw flour taste, which is essential for a good start on any easy weeknight dinners recipe relying on a thick sauce.
Time to thin it out! Whisk in the chicken broth gradually. You want to pour slowly while whisking like crazy so you don’t get any lumps. Keep stirring until the mixture starts bubbling gently and thickens up nicely—it should coat the back of a spoon. This is your thickening stage!
Expert Tip Alert: This is critical! Take the whole saucepan *off* the heat before adding your liquids and solids. Pour in the heavy cream (or milk) first, stir until combined. Then, gently fold in your cooked chicken, frozen peas, and frozen corn. Adding the dairy when the base is too hot can sometimes cause the sauce to thin out or curdle slightly. We are aiming for velvety smooth!
Once it’s cool enough to touch (but still warm), funnel that amazing, creamy mixture right into your prepared bottom crust.
Baking Your Homemade Chicken Pie for Golden Perfection
Lay that second crust right over the filling. Now, crimp those top and bottom edges together firmly—you want a good seal so those gorgeous juices stay inside. Don’t forget the most important part for steam release: use a sharp knife and cut several slits right in the top. This allows the steam to escape so your crust doesn’t explode everywhere!
For that picture-perfect finish that screams homemade chicken pie, lightly brush the entire top surface with your beaten egg wash. This gives you that beautiful, deep golden sheen.

Slide the pie onto that preheated baking sheet on the lower rack. Bake it for 35 to 45 minutes. You’re looking for a crust that is deeply golden brown everywhere and the filling should be visibly bubbling up through those vent slits. If you need a time check reference, I always find this guide on how long to cook chicken pot pie recipe helpful when I’m experimenting with different oven temperatures!
Okay, this is the hardest step. When it comes out, you absolutely MUST let the pot pie recipe cool for at least 15 minutes before slicing. If you cut too soon, all that beautiful, thick filling will run right out onto your plate. Patience gives you that perfect, sliceable center!
Tips for Success with Your pot pie recipe
You’ve got the filling mixed and the crust sealed—that’s huge! But to truly elevate this from a good weeknight meal to an unforgettable pot pie recipe, we need to talk about preventing those little hiccups that can happen when baking a double-crust pie. These are the little secrets I picked up that really make the difference in texture and taste.
First off, let’s talk about that bottom crust again. I already mentioned putting a baking sheet below it, and I mean it! If you skip that, you risk a sad, wet bottom layer, and nobody wants that. That hot sheet acts like a shield against the ambient heat of the oven floor, shocking the bottom dough into setting quickly and becoming sturdy enough to hold that heavy, creamy filling. It’s a super easy hack.
When assembling, make sure your filling isn’t scorching hot when it goes into the unbaked bottom crust. If it’s lava-temperature, it melts the butter in the raw dough before it even gets into the oven, which ruins the flakiness before baking even starts. Let it cool on the counter for about 10 minutes after you fold in the cream and veggies.
Regarding the top crust vents—don’t be stingy with them! Steam has to escape, or your crust will balloon up unevenly or basically explode the filling out the sides. I usually cut a simple cross shape right in the center, but if you want pretty patterns, go for it, just make sure they are generous slits. If you want to see how a master like Natasha handles her crusts, check out this great example of classic pastry work over at chicken pot pie recipe.
One final, slightly niche tip, especially if you’re using a very wet filling, is to lightly brush a thin layer of whisked egg white (just the white!) right onto the raw dough of the *bottom* crust before you add the filling. It creates a thin, invisible seal that acts as a barrier against moisture seepage. You won’t even taste it, but it keeps that base rock-solid! If you’re ever debating different pantry seals, you might be interested in learning how to make my icing recipe that hardens smoothly—it’s the same concept of creating a waterproof layer!
Storage and Reheating Instructions for Leftover pot pie recipe
Oh, leftovers! They are sometimes even better the next day, provided you handle the transition right. If you managed to have any of this incredible pot pie recipe left over (which is rare in my house!), how you store and reheat it is everything, especially if you want that crust to snap back to life.
The cooling period I mentioned earlier—the 15 minutes before slicing—is only step one. Once you’ve served it, you need to cool the *rest* of the pie completely on the counter for about an hour. Don’t put a hot pie directly into the fridge; that condensation steams up the crust and turns it soggy overnight!
Once cool, cover the whole pie plate tightly with plastic wrap or foil. It will keep beautifully in the refrigerator for about three days. If you cut slices out, just cover the exposed filling area with a small piece of plastic wrap so the filling doesn’t get that weird skin on it.
Reheating Safely and Keeping the Crust Crisp
Here’s where we fight the microwave monster. Microwave reheating is lightning fast, yes, but it turns that beautiful flaky crust into sad, chewy rubber. We just don’t do that to a perfect pot pie recipe!
The oven is your only true friend here for great texture. Take the leftover pie out of the fridge about 30 minutes before you plan to reheat it—this helps take the chill off so it cooks more evenly. Place it back onto that same baking sheet (if you still have it handy) to protect the bottom.
Bake it uncovered at a lower temperature, around 350°F. You’re not cooking it new; you’re just warming it through. Give it maybe 20 to 25 minutes. Check the center; when it feels hot all the way through, you’re done. That gentle warming heat brings the crust back to life without scorching it.

Now, if you *absolutely* need a single slice ready in five minutes, the air fryer is your secret weapon. Pop a slice in at 325°F for about 8 minutes. The circulating air is much better than the microwave dome for crisping the pastry back up. It’s not quite the oven finish, but it’s darn close!
If you are planning a big batch and know you’ll have leftovers, you can freeze it! Assemble the entire pie (top and bottom crusts uncooked) and wrap it tightly in several layers of plastic wrap and then foil. Freeze for up to three months. When ready to bake from frozen, you need to add about 20 minutes to the original baking time, but skip the 15-minute cool-down at the end. For more freezer-friendly comfort meals, you might want to check out my chicken cauliflower rice casserole recipe, which freezes like a dream!
Serving Suggestions for This Savory Pie Recipe
This Classic Homemade Chicken Pot Pie is seriously rich. It’s already got your protein, your starch from the crust, and your vegetables all wrapped up in one stunning, golden package. Because it’s such a complete, hearty family meal on its own, you don’t need to go overboard with sides!
When I’m serving this for a proper winter night dinner, I like to keep the sides light and bright to cut through that creamy richness and keep the whole meal feeling fresh rather than too heavy. We are going for that cozy, yet balanced, approach to savory pie recipes.
My number one rule? Add something green and crunchy to counteract that soft, velvety filling. It’s all about textural contrast!
Simple Green Salads for Balance
You need acid and crispness to make the pie shine even brighter. Don’t serve this with another heavy starch; save that energy for a great wine pairing instead!
A simple mixed greens salad tossed with a bright, thinly sliced shallot vinaigrette is perfect. The acidity of the vinegar just cleanses the palate after a bite of that thick gravy. I often make a fast cucumber tomato salad when cucumbers are in season because the watery crunch is fantastic contrast.
If you prefer something more structured than just lettuce, consider lightly steamed green beans tossed with a squeeze of fresh lemon juice and a whisper of salt. Don’t overcook them! They should still have a little snap to them. Remember, we are aiming for cozy winter meals that don’t put you in a food coma!
Roasted Vegetables for Easy Prep
If salads feel too cold for a truly chilly evening, roasted vegetables are the way to go, and they bake up nicely while your pie is resting! The key here is roasting at a high temperature so they get a slightly charred, sweet edge.
Broccoli florets tossed simply with olive oil, salt, and pepper become sweet and nutty right next to the savory pie. Another favorite is roasted asparagus. It cooks fast and tastes elegant, making your family feel like they are eating at a fancy restaurant, even though it’s just an easy pot pie recipe!
Avoid anything too watery or mushy, like overly soft zucchini. We need texture! Keep those sides easy to prepare so you can focus on properly sealing that crust!
Frequently Asked Questions About This pot pie recipe
I totally get it—when you find a great pot pie recipe, you want to know how much you can tweak it or prep it in advance. It’s a big meal, so planning ahead is usually half the battle for us busy cooks!
Can I make this pot pie recipe ahead of time?
Yes, you absolutely can! I always encourage making the filling ahead of time, especially if you’re planning this for a weekend gathering. You can cook the creamy chicken filling, let it cool completely, and store it airtight in the fridge for up to two days. When you’re ready to bake, roll out your crusts, pour in the chilled filling, top it, seal it, and bake as directed. You might need to add 5 to 10 minutes to your baking time since the filling is cold.
If you want to assemble the *entire thing*—bottom crust, filling, and top crust—you can chill it for up to 24 hours. Just remember to let it sit on the counter for about 30 minutes before baking so the dough loses that fridge chill slightly. This is a fantastic tactic for staying ahead of the game!
What is the best way to make this a quick pot pie dinner?
If you’re aiming for the fastest possible result—a true quick pot pie dinner—you have a couple of easy shortcuts that don’t sacrifice too much flavor. The biggest time saver is using pre-cooked chicken. Grab a quality rotisserie chicken! Shredding that takes minutes.
Secondly, ditch the homemade dough and use good quality store-bought pie crusts. If you’re feeling extra time-crunched, go for the biscuit route instead of the top crust entirely. You can use refrigerated biscuit dough or whip up a fast batch of homemade biscuits (check out my easy biscuit topping ideas!) and just drop those right over the filling. Pop it in the oven, and you shave off at least 20 minutes of prep time!
Also, using frozen peas and corn straight from the bag means no chopping outside of the onions, carrots, and celery. Every minute counts when you’re chasing down that comfort food recipes feeling on a Tuesday night! If you ever need a dessert that whips up fast after a big savory meal like this, my guide on easy 5-minute chocolate frosting recipe will save your life.
Estimated Nutritional Data for This pot pie recipe
Now, look, I always bake with real ingredients—butter, cream, and the full works—so this is truly homemade, which means the numbers reflect that richness. When you swap in leaner chicken breast or use a lighter milk instead of heavy cream for your amazing pot pie recipe, these figures will shift, of course. But for the creamy, flaky standard recipe you see here, these rough estimates give you a good idea of what you’re enjoying.
Please remember, these numbers are calculated based on the ingredients listed, assuming 8 even slices. Because where I shop might differ from where you shop for things like broth or specific cuts of chicken, use this as a trustworthy starting point, not a guarantee down to the last decimal. That’s what transparency is all about here at Cooking by Felix!
- Serving Size: 1 slice
- Calories: 450
- Fat: 25g
- Saturated Fat: 10g
- Carbohydrates: 35g
- Protein: 25g
- Sodium: 550mg
- Sugar: 4g
- Fiber: 3g
- Cholesterol: 90mg
As you can see, that 25g of fat comes mostly from that glorious, flaky crust and the rich, creamy sauce we worked so hard to make lump-free! It’s what makes it a true comfort food recipe. This is why I always suggest pairing it with something light and acidic, like a crisp salad, to keep the entire plate balanced. It’s a hearty, satisfying single dish!
Share Your Homemade Chicken Pie Experience
Now it’s your turn to enjoy the fruits of our labor! Seriously, if you tackle this pot pie recipe, I want to hear every single detail about it.
This recipe, built on tradition and optimized for your busy schedule, is meant to be shared. When you pull that golden beauty out of the oven and see the filling bubbling through those perfectly cut steam vents, that’s a win we all deserve to celebrate!
Did you stick with the double flaky crust, or did you opt for the speedy biscuit topping? Did you use leftover turkey instead of chicken? Did you sneak in some parsnips? Drop a star rating just below based on your experience—it helps other home cooks trust this recipe when they’re staring down a chilly night and needing that perfect, warm hug on a plate.
Please, leave a comment below and tell me how it went! I read all of them, and I love seeing how you make this simple, classic approach work in your own home. If you ended up with an amazing creamy sauce that you loved, or if you paired it with something unexpectedly delicious (I’m always looking for new side dish inspiration!), let us know. Maybe you want to try making it into a layered casserole next time? Don’t forget to check out my recipe for best classic creamy egg salad recipe if you need a lighter, savory dish for brunch later in the week!
PrintClassic Homemade Chicken Pot Pie with Flaky Double Crust

Make this classic chicken pot pie from scratch for a hearty family meal. This recipe delivers a creamy chicken filling and a perfectly flaky double crust, proving comfort food is achievable even on busy nights.
- Prep Time: 20 min
- Cook Time: 45 min
- Total Time: 65 min
- Yield: 8 servings 1x
- Category: Dinner
- Method: Baking
- Cuisine: American
- Diet: Vegetarian
Ingredients
- 2 pie crusts (one for bottom, one for top, homemade or store-bought)
- 2 tablespoons unsalted butter
- 1 medium yellow onion, chopped
- 2 carrots, diced
- 2 celery stalks, diced
- 1/2 cup all-purpose flour
- 1 teaspoon salt
- 1/2 teaspoon black pepper
- 1/4 teaspoon dried thyme
- 2 cups chicken broth
- 1 cup heavy cream or whole milk
- 2 cups cooked, shredded chicken (rotisserie chicken works well)
- 1 cup frozen peas
- 1 cup frozen corn
- 1 large egg, beaten (for egg wash)
Instructions
- Preheat your oven to 400 degrees F (200 degrees C). Place one pie crust into a 9-inch pie dish. Trim the edges and set aside.
- In a large saucepan, melt the butter over medium heat. Add the chopped onion, carrots, and celery. Cook until the vegetables soften, about 5 to 7 minutes.
- Stir in the flour, salt, pepper, and thyme. Cook for 1 minute, stirring constantly.
- Gradually whisk in the chicken broth until the mixture is smooth. Bring the mixture to a simmer, stirring until the sauce thickens.
- Stir in the heavy cream (or milk), cooked chicken, frozen peas, and frozen corn. Remove the filling from the heat.
- Pour the creamy chicken filling into the crust-lined pie dish.
- Place the second pie crust over the filling. Trim the top crust edges and crimp the top and bottom crusts together to seal. Cut several slits in the top crust to allow steam to escape.
- Brush the top crust lightly with the beaten egg wash.
- Bake for 35 to 45 minutes, or until the crust is golden brown and the filling is bubbling.
- Let the pot pie cool for at least 15 minutes before slicing and serving. This cooling time helps the filling set.
Notes
- For a quicker option, substitute the double crust with simple biscuit topping placed on top of the filling.
- If you use store-bought rotisserie chicken, this becomes an easy weeknight dinner.
- To prevent a soggy bottom crust, place a baking sheet on the lower rack while baking to help insulate the bottom crust.
Nutrition
- Serving Size: 1 slice
- Calories: 450
- Sugar: 4
- Sodium: 550
- Fat: 25
- Saturated Fat: 10
- Unsaturated Fat: 15
- Trans Fat: 0.5
- Carbohydrates: 35
- Fiber: 3
- Protein: 25
- Cholesterol: 90