

We’ve all been there, right? You want that showstopper dessert—something impressive, rich, and deeply satisfying—but you feel like you need an entire weekend free just to tackle the fear of weeping meringue or a sloppy filling. I get it; my life running around balancing everything means I need reliability from my **chocolate meringue pie** recipe.
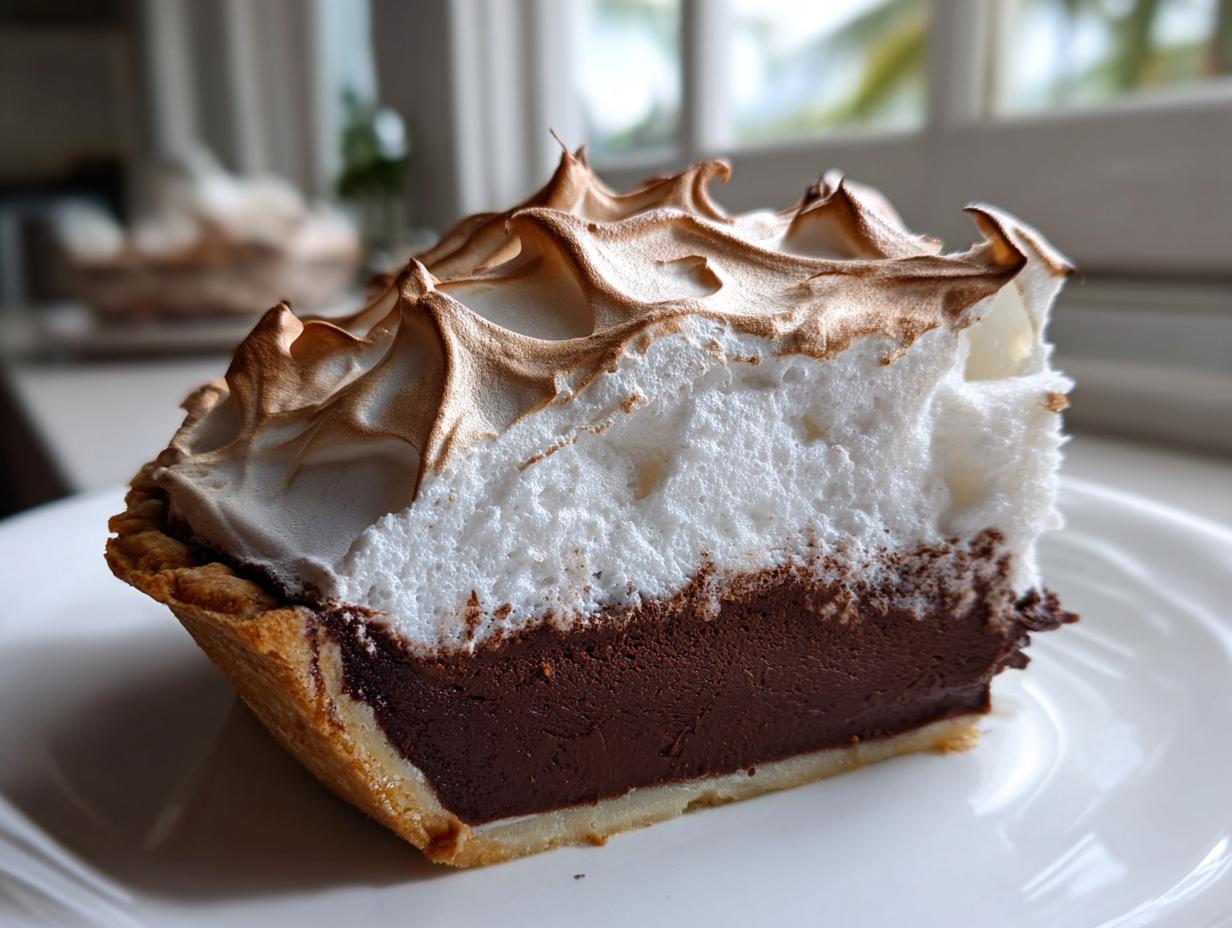
That’s why I spent ages perfecting this formula. This isn’t just any recipe; it’s my ultimate, flawless version of the classic. I built this recipe based on the same principle that guides everything here at Cooking by Felix: we honor amazing flavor without demanding all your time. Get ready for a deeply rich, velvety chocolate custard base that sets up perfectly every time, topped with a towering, stable, and gorgeously golden meringue. If you love that intense chocolate flavor, you might also love my recipe for easy, silky chocolate mousse! It’s a truly **decadent dessert** that finally lives up to the hype.
- Why This Is the Best Chocolate Meringue Pie Recipe You Will Ever Make
- Ingredients for Your Flawless Chocolate Meringue Pie Recipe
- How to Prepare the Ultimate Chocolate Meringue Pie
- Pro Tips for the Best Chocolate Meringue Pie
- Variations on This Classic Pie Recipes
- Serving Suggestions for Your Decadent Dessert
- Storage and Reheating Instructions for Chocolate Meringue Pie
- Frequently Asked Questions About Making Chocolate Meringue Pie
- Find More Classic Baking Recipes
Why This Is the Best Chocolate Meringue Pie Recipe You Will Ever Make
I know there are a million recipes out there, but this specific **chocolate meringue pie** formula works like a charm. It’s designed to take you from ‘baking-stressed’ to ‘showstopper dessert presenter’ without any drama.
Here’s why I put my name on this recipe and included it in my collection of essential classics. You can even see similar praise for this type of dessert structure over at Cook Artisan:
- It delivers that truly decadent feeling you crave in a classic pie.
- It uses simple techniques that guarantee success, even if you’re nervous about meringue.
- The filling is perfectly set—silky, never grainy!
Achieving a Truly Rich Chocolate Custard Filling
The goal here is velvety, not grainy. We use a bit of flour along with the cornstarch to help structure the custard, but the real trick is tempering. When you slowly introduce the hot liquid to those egg yolks, you’re gently warming them up instead of scrambling them. That is *why* this base becomes that smooth, amazing **rich chocolate custard pie** texture. No lumps, just pure chocolate velvet!
Secrets to a Fluffy Meringue Topping That Never Weeps
This is where most people throw their hands up, but don’t you dare run away!
We start with room-temperature egg whites and use cream of tartar—it’s a stabilizer that makes the structure strong. It locks in air, giving you that glorious **fluffy meringue topping**. My must-do move is spreading that beautiful cloud right onto the *hot* filling immediately. This seals the bottom layer where weeping usually starts. It makes for the most stunning **chocolate meringue pie** you could imagine.
Ingredients for Your Flawless Chocolate Meringue Pie Recipe
Okay, here are the clean, exact measurements I use every time. Trust me on the precision here; it matters for that perfect set!
Before you start, make sure you have all your components ready to go. I like to have everything measured out, especially the egg whites for the meringue, because speed is key once that filling is done.
- 1 unbaked 9-inch pie crust (make sure this is fully cooled before we start filling!)
- 1 1/2 cups granulated sugar, divided
- 1/3 cup cornstarch
- 1/4 cup all-purpose flour
- 1/4 teaspoon salt
- 1 1/2 cups cold water
- 4 large egg yolks, lightly beaten
- 2 tablespoons unsalted butter
- 1 teaspoon vanilla extract
- 4 large egg whites, at room temperature
- 1/4 teaspoon cream of tartar
If you need a quick frosting recipe for another project, check out my easy 5-minute chocolate frosting. But trust me, this pie needs the meringue!
How to Prepare the Ultimate Chocolate Meringue Pie
Alright, this is where we put it all together! Making this **chocolate meringue pie** isn’t hard, but timing is everything. We’re moving through stages, so keep your eye on the clock, especially when we finish that custard. I love that we can make this incredible dessert using simple homemade pudding techniques!
Preparing the Pie Crust and Rich Chocolate Custard Filling
First things first, get your crust ready. Preheat your oven to 350 degrees F and bake that empty pie shell until it’s just lightly golden. Don’t skip baking it first! Once it’s done, you *must* let it cool down completely on a wire rack. A hot crust meets a hot filling and you’ll have a mess.
Now for the star: the filling. In a saucepan—don’t turn the heat on yet—whisk together 1 cup of the sugar, cornstarch, flour, and salt. Slowly whisk in your 1 1/2 cups of cold water until it looks smooth and sleepy. Now, turn the heat to medium and stir constantly until it gets thick and starts to bubble. Let it boil for exactly one minute, still stirring so it doesn’t scorch.
This next step is a crucial **baking technique**: tempering. Take your lightly beaten egg yolks in a separate bowl. You have to slowly whisk about 1 cup of the hot chocolate mixture into those yolks. If you dump it all in at once, you’ll end up with sweet scrambled eggs! Once they are warmed up (tempered), pour that yolk mixture back into the saucepan with the rest of the chocolate base. Return it to medium heat and stir until it thickens again and just starts to bubble gently. Pull it off the heat immediately. Stir in that butter and vanilla until everything melts into a gorgeous, **creamy chocolate filling**. Pour that hot filling right into your cooled crust!
Creating the Stable, Fluffy Meringue Topping
Time for the clouds! Use a mixer and make absolutely certain your bowl and beaters are spotless—no grease allowed, seriously. Beat those room-temperature egg whites until they form soft peaks. Now, drizzle in the remaining 1/2 cup of sugar, along with your tiny pinch of cream of tartar. Keep beating until you have stiff, glossy peaks. This is what gives you that amazing **fluffy meringue topping**.

You need to seal the deal right now to prevent weeping. Spread that meringue right over the *hot* chocolate filling. Make sure the meringue brushes up against the edges of the crust all the way around. This seals it tight! Use the back of your spoon to make some lovely swirls and peaks for that classic look.
Baking and Cooling Your Perfect Chocolate Meringue Pie
Gently slide that pie into the 350-degree oven for 12 to 15 minutes. You are just looking for light golden tips. You *must* watch it like a hawk here, because meringue burns faster than you can say “Meringue Pie!”
Once it’s golden, pull it out. The final secret to this **chocolate meringue pie** is patience during cooling. Let it cool down slowly on a wire rack at room temperature for a minimum of 4 hours. Why? Because shocking the meringue by shoving it into the fridge right away causes it to sweat and weep. Slow, steady cooling ensures that beautiful texture is locked in. If you’re interested in other reliable recipes from my kitchen, check out this external recipe source I often reference!
Pro Tips for the Best Chocolate Meringue Pie
Even with a foolproof recipe, sometimes little things can happen. That’s why having these pro tips ready for your **chocolate meringue pie** makes all the difference in going from good to absolutely unbelievable. We want a **showstopper dessert**!
Troubleshooting Common Chocolate Meringue Pie Issues
Let’s talk about the dreaded meringue drama. If your meringue starts weeping—that little shower of sticky liquid on top—it usually means moisture got trapped. To fight this, make sure your mixing bowl for the whites is totally grease-free. I mean sparkling clean! Any fat residue stops those stiff peaks from forming correctly.
For preventing cracks, my number one rule (which I mentioned above, but it bears repeating!) is sealing it with heat. Spread that meringue right away over that hot filling. The heat helps bind the bottom layer, preventing shrinkage and those ugly fissures when it cools. If you’re looking for more foundational advice on mastering these centerpiece bakes, I cover a lot of good stuff in my post on baking classics. And if you want another perspective on perfect meringue, I always recommend the tips found over at Countryside Cravings too!
Variations on This Classic Pie Recipes
While I love this **classic pie recipe** exactly as written, sometimes you just need a little nudge in a different direction, right? Don’t worry, this **rich chocolate custard pie** base is totally adaptable.
If you want to deepen the chocolate flavor profile—and who wouldn’t?—try swapping out 1/4 cup of the sugar for high-quality cocoa powder when combining the dry ingredients. Or, my personal favorite cozy swap: stir in one teaspoon of instant espresso powder with the dry ingredients. It doesn’t make the pie taste like coffee, but it makes the chocolate taste like, well, the *best* chocolate you’ve ever had!
If you’re feeling bold and want to lean into a boozier flavor, you can even use a splash of Kahlúa instead of the vanilla extract. For more exciting holiday bakes like this, check out my chocolate bourbon pecan pie!
Serving Suggestions for Your Decadent Dessert
Now that you’ve mastered the **rich chocolate custard pie** and topped it with that perfect cloud, you deserve to serve it beautifully! This **decadent dessert** really shines on its own, but I have a couple of tricks for making it a true **dessert for holidays** centerpiece.
Keep it simple on the plate. A tiny dusting of unsweetened cocoa powder right before serving adds a lovely visual contrast to that golden meringue. If you serve it with fresh raspberries or a side of lightly sweetened whipped cream (not too much, we don’t want to overpower that chocolate!), it adds a wonderful fresh note.
If the pie is for a less formal gathering, feel free to serve leftovers with a side of my easy white chocolate fudge—just a small bite is enough!
Storage and Reheating Instructions for Chocolate Meringue Pie
Okay, this is the crucial part for keeping your **chocolate meringue pie** looking perfect the next day! Remember how I stressed cooling it slowly at room temperature for those 4 hours? That’s step one for successful storage.
Once the pie is fully cooled and set, you can cover it loosely with plastic wrap—but be careful not to press it onto the meringue! If you need to store it longer, cover it tightly and move it to the fridge. It’s best eaten within two days. Warming it up? Don’t! This pie is meant to be enjoyed chilled or at cool room temperature. If you’re looking for other things that store well, like my fluffy homemade marshmallows, that’s different! For this pie, chilling is key after the initial set.
Frequently Asked Questions About Making Chocolate Meringue Pie
I love getting questions because it means you’re out there making this **chocolate meringue pie**! Dealing with custard and meringue can cause some hesitation, but once you know the tricks, these **classic pie recipes** are totally approachable. Here are the things folks ask me most often.
Can I use a pre-made pie crust for this chocolate meringue pie recipe?
Absolutely, you can! I know we like everything from scratch, but sometimes you just need a shortcut. If you use a store-bought crust, just make sure you blind bake it according to the package directions. And here’s the critical part: let that crust cool down completely before you pour your hot, **velvety pie filling** into it. If the crust is warm, it starts to steam the filling, and that’s trouble!
What is the best way to get a golden brown, toasted meringue topping?
I stick to the oven method every time for that beautiful, consistent look. Pop the pie in after the filling is added and bake it for just 12 to 15 minutes at 350°F. The goal is golden, not burnt! If you want more control, you can let the pie cool a little bit after baking, and then use a kitchen torch to gently toast the peaks until they look exactly how you want them. That way, you don’t risk over-baking the custard base.
Can I make the creamy chocolate filling ahead of time?
This is tricky. You *can* make the **creamy chocolate filling** maybe 4 or 5 hours ahead of time and store it covered in plastic wrap right on the counter, but I really don’t recommend making it completely solid ahead of time. Why? Because when the filling gets too cold and stiff, it pulls away from the pie crust, and that gap lets moisture sneak in, causing the meringue to shrink or weep.
My advice for the absolute **best chocolate meringue pie** is to have the crust baked, and then make the filling and top it with the meringue all in one go so you can get that hot filling sealing the meringue. You can learn even more about egg whites in my guide on how to make perfect meringue!
Find More Classic Baking Recipes
You’ve successfully tackled one of the great American **baking classics**! If you enjoyed achieving that perfect **velvety pie filling** and mastering the meringue layer, you are clearly ready for more satisfying **sweet endings**.
We’ve unlocked the secrets to making this **chocolate meringue pie** a repeatable success, and I have so many other recipes that follow the same philosophy: maximum flavor, minimum fuss. If you’re craving something rich and chocolatey but maybe less structured, you have to try my moist, easy one-bowl chocolate cake. It’s pure indulgence!
If you’re looking for more layered perfection, you absolutely need to check out the layered goodness of my magic cookie bars—talk about a guaranteed crowd-pleaser. And for when you just want a tiny hit of fudgy goodness, my chocolate crinkle cookies are the best little bite! Let’s keep reclaiming the joy in the kitchen together!
PrintThe Ultimate Flawless Chocolate Meringue Pie: Rich Custard & Perfect Meringue Secrets
Make this classic chocolate meringue pie with a rich, velvety chocolate custard filling and a towering, stable, golden meringue topping. This recipe provides simple steps for a showstopper dessert.
- Prep Time: 25 min
- Cook Time: 30 min
- Total Time: 4 hours 55 min
- Yield: 8 servings 1x
- Category: Dessert
- Method: Baking
- Cuisine: American
- Diet: Vegetarian
Ingredients
- 1 unbaked 9-inch pie crust
- 1 1/2 cups granulated sugar, divided
- 1/3 cup cornstarch
- 1/4 cup all-purpose flour
- 1/4 teaspoon salt
- 1 1/2 cups cold water
- 4 large egg yolks, lightly beaten
- 2 tablespoons unsalted butter
- 1 teaspoon vanilla extract
- 4 large egg whites, at room temperature
- 1/4 teaspoon cream of tartar
Instructions
- Preheat your oven to 350 degrees F. Bake the pie crust according to package directions until lightly golden. Let it cool completely on a wire rack.
- For the chocolate custard filling, whisk together 1 cup of the sugar, cornstarch, flour, and salt in a medium saucepan. Gradually whisk in the cold water until smooth.
- Cook the mixture over medium heat, stirring constantly, until it thickens significantly and comes to a boil. Boil for 1 minute, stirring constantly. Remove from heat.
- In a separate bowl, whisk the egg yolks. Slowly temper the yolks by whisking about 1 cup of the hot chocolate mixture into the yolks. Then, pour the tempered yolk mixture back into the saucepan with the remaining chocolate mixture.
- Return the saucepan to medium heat. Cook, stirring constantly, until the filling thickens again and bubbles gently. Do not allow it to boil rapidly. Remove from heat immediately.
- Stir in the butter and vanilla extract until the butter is melted and incorporated. Pour the hot filling into the cooled, baked pie crust.
- For the fluffy meringue topping, beat the egg whites in a clean, grease-free bowl with an electric mixer until soft peaks form. Gradually add the remaining 1/2 cup of sugar and the cream of tartar. Continue beating until stiff, glossy peaks form.
- Spread the meringue evenly over the hot chocolate filling, making sure the meringue touches the inside edge of the crust all around to prevent shrinking. Create decorative swirls with the back of a spoon.
- Bake for 12 to 15 minutes, or until the meringue is lightly golden brown. Watch carefully to prevent burning.
- Cool the pie completely on a wire rack at room temperature for at least 4 hours before slicing. Do not refrigerate immediately, as this can cause weeping.
Notes
- To prevent weeping in the meringue, make sure your mixing bowl and beaters are completely free of any grease or fat.
- For a crack-free meringue, spread it over the hot filling immediately after making the custard. The heat helps seal the bottom layer.
- If you prefer a toasted look without baking, use a kitchen torch to brown the peaks of the meringue after it has cooled slightly.
- This creamy chocolate filling sets best when allowed to cool slowly at room temperature before chilling.
Nutrition
- Serving Size: 1 slice
- Calories: 380
- Sugar: 45g
- Sodium: 180mg
- Fat: 16g
- Saturated Fat: 8g
- Unsaturated Fat: 8g
- Trans Fat: 0g
- Carbohydrates: 58g
- Fiber: 1g
- Protein: 6g
- Cholesterol: 110mg