

Honestly, is there anything better than that first tear of warm, gooey cheese bread? That savory, buttery scent that just fills the whole house? I hear you if your calendar is packed, because I’ve been there! That’s why, here at Cooking by Felix, I dedicate myself to taking those iconic comfort foods—the ones everyone craves—and turning them into something you can genuinely pull off on a weeknight or showcase at a party without stressing out. This recipe, the Ultimate Cheesy Garlic Pull-Apart Bread, is absolute proof of that. It looks impressive, tastes like it came from the best bakery, but it’s honestly one of the simplest appetizer setups you’ll ever make. If you need a winner for game day, check out my recipe for no-cook pizza sauce to go alongside it!
Forget complicated doughs or long resting times. This is about instant reward. We’re taking a simple loaf, slathering it in garlic butter, stuffing it with glorious amounts of melted cheese, and wrapping it up like a present. It’s the perfect savory baked bread solution for feeding a crowd, and honestly, it rarely makes it to leftovers round! It’s the easiest way to make your kitchen smell amazing fast.
- Why This Ultimate Cheesy Garlic Pull-Apart Bread Is Your New Favorite Cheese Bread
- Ingredients for the Best Cheese Bread
- How to Make Ultimate Cheesy Garlic Pull-Apart Cheese Bread
- Tips for Perfect Homemade Cheese Bread
- Variations on Classic Cheese Bread
- Storage and Reheating Instructions for Leftover Cheese Bread
- Frequently Asked Questions About This Garlic Cheese Bread Recipe
- Nutritional Estimate for This Savory Baked Bread
- Share Your Experience Making This Cheese Bread
Why This Ultimate Cheesy Garlic Pull-Apart Bread Is Your New Favorite Cheese Bread
When I was balancing my marketing career and trying to keep up those rich family food traditions, convenience was everything. That’s why this specific cheese bread setup is gold—it delivers maximum flavor with minimal fuss. It’s the ultimate comfort food bread that doesn’t demand all day in the kitchen. I promise you, once you pull this bubbling, golden loaf out of the oven, you’ll wonder how you ever survived a party without it. If you’re looking for another easy win for gatherings, check out my cranberry brie bites!
It simply ticks every box for the modern cook:
- It’s perfect for dipping into things like my creamy baked garlic bread dip.
- It travels well for potlucks when wrapped tight.
- It turns an ordinary dinner into a celebration.
Quick Prep for Easy Cheese Bread
Seriously, ten minutes. That’s all it takes to prep this entire thing! When I say easy cheese bread, I mean it. You aren’t mixing dry ingredients, you aren’t developing gluten; you are just slicing, stuffing, and slathering. This speed means you can whip it up while the main course is finishing its last few minutes, or even when unexpected guests show up. It truly is the definition of a stress-free appetizer.
The Perfect Melty Cheese Bread Texture
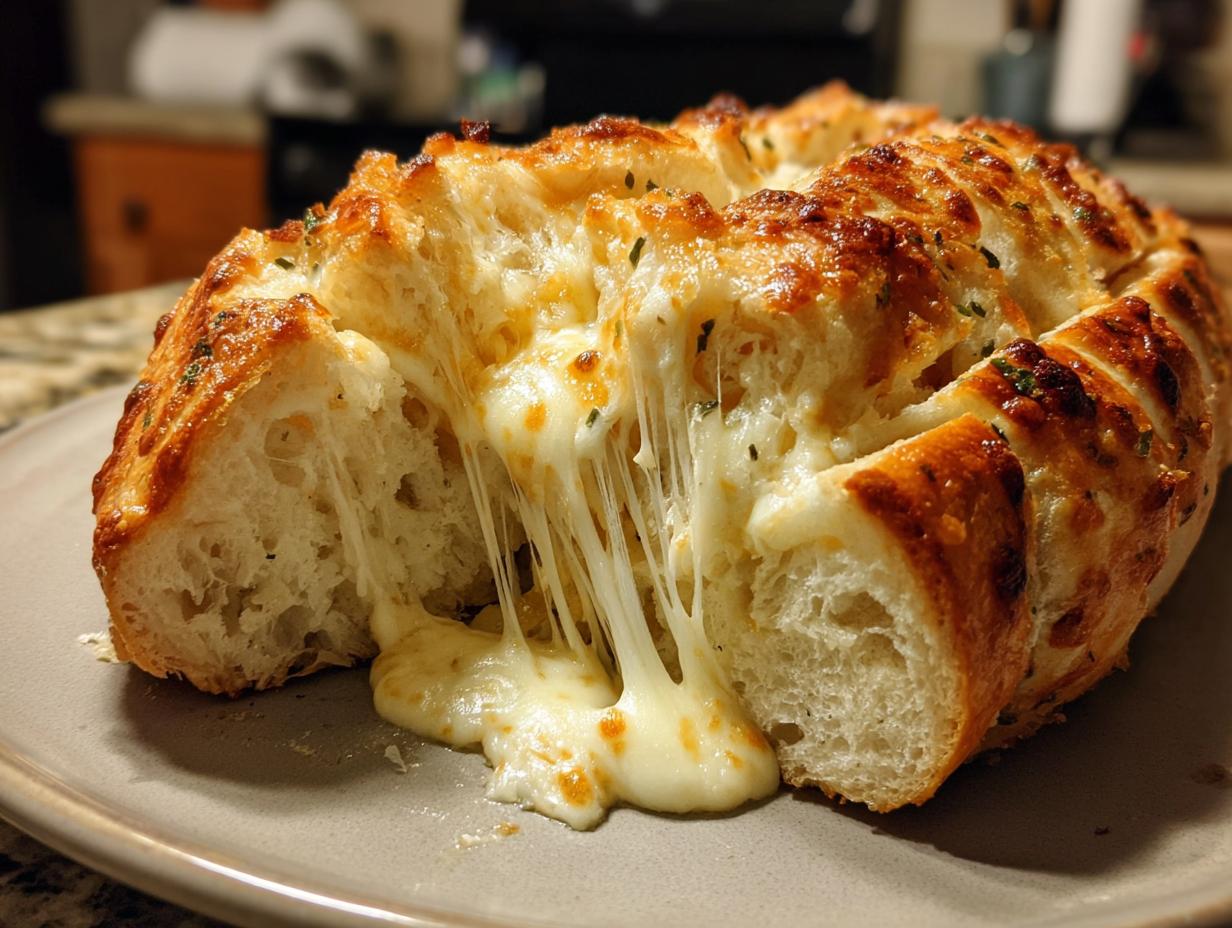
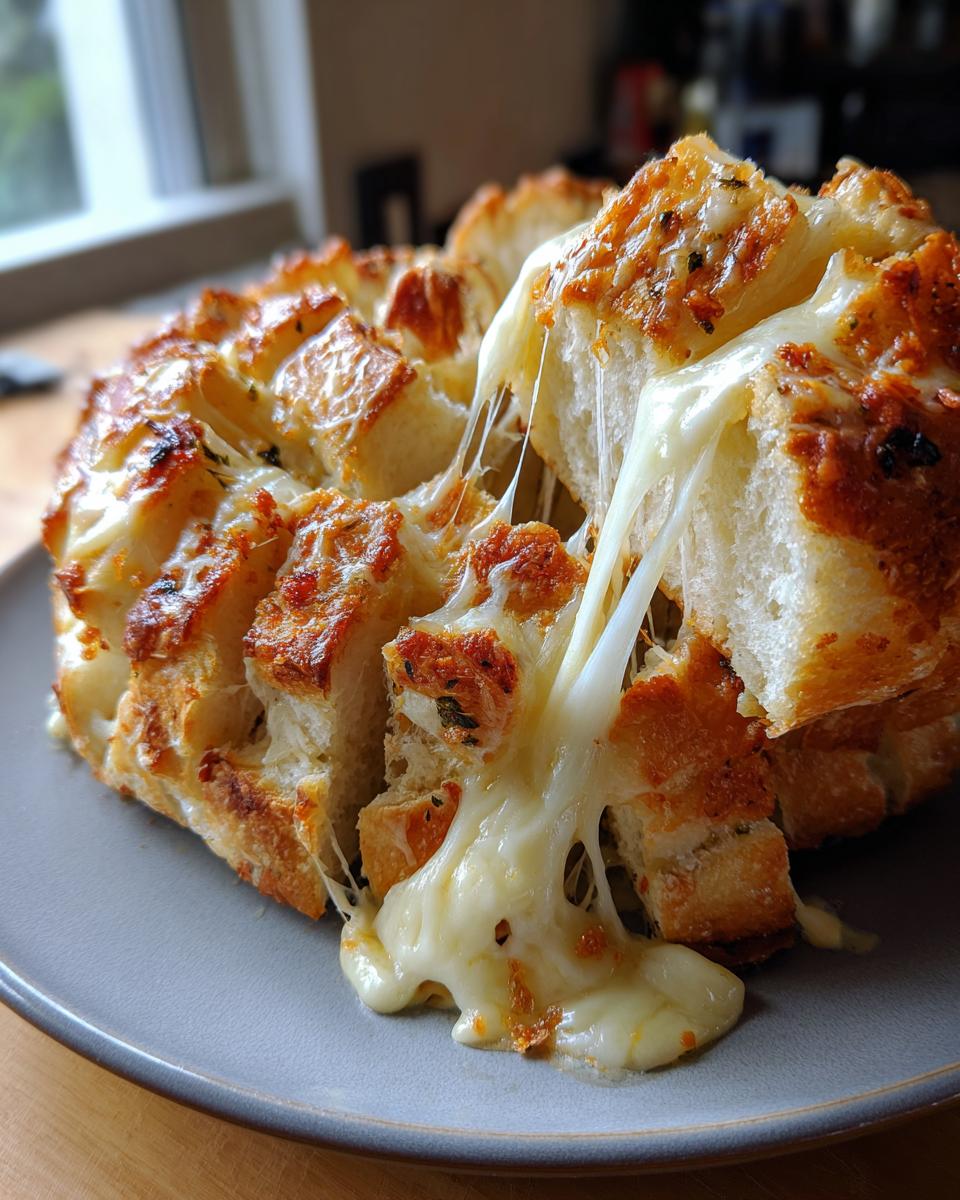
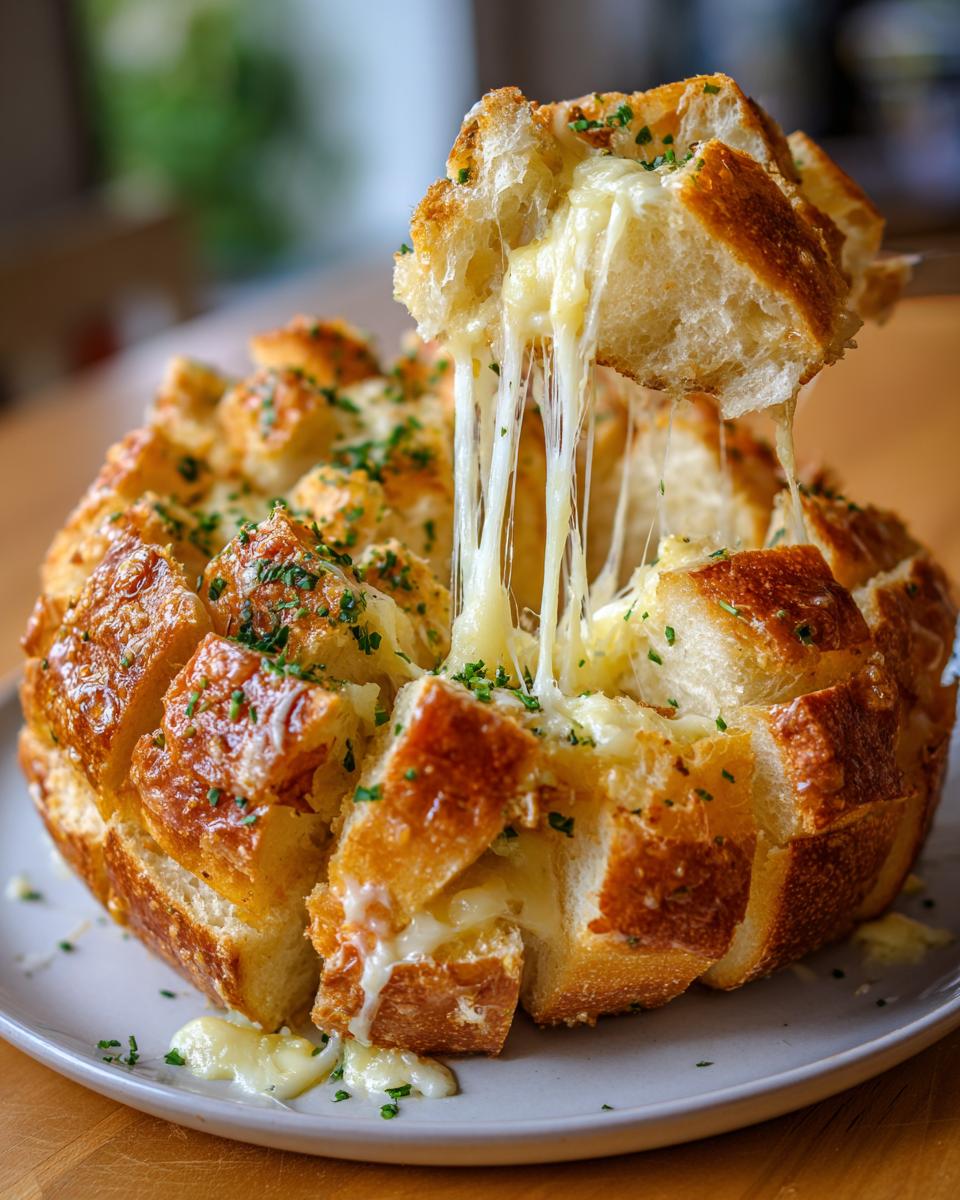
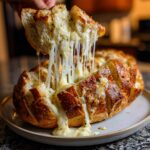
The secret weapon here is the foil wrap. Trust me on this—don’t skip it! Wrapping the loaf tightly allows the butter and steam to permeate the entire bread structure, guaranteeing that incredibly soft, unbelievably gooey center. You get that stunning, melty cheese bread pull that everyone obsesses over, but without any part of the bread drying out. It’s messy, it’s rich, and it’s absolutely beautiful when you finally unwrap it!

Ingredients for the Best Cheese Bread
When I put together a recipe, especially one focused on classic comfort like this, I want everything to be crystal clear. You don’t need fancy tools, but you do need to know exactly what you’re working with! For this Ultimate Cheesy Garlic Pull-Apart Bread, we keep the ingredient list short because the quality of those few items really shines through. You will need a good, sturdy loaf, and of course, mountains of cheese. If you are looking for tips on making that essential garlic butter from scratch (which is amazing, by the way!), check out my guide on homemade garlic butter.
Here is exactly what you need for this amazing starter:
- 1 loaf crusty bread (I love using sourdough or a good Italian style loaf for structure).
- 1/2 cup unsalted butter, melted (No substitutes here; butter is flavor!).
- 4 cloves garlic, minced (Use fresh! The jarred stuff just doesn’t have the same punch).
- 1 teaspoon dried Italian herbs (This brings the restaurant flavor).
- 1/2 teaspoon salt
- 1/4 teaspoon black pepper
- 1 1/2 cups shredded mozzarella cheese (For that signature, amazing stretch).
- 1 cup shredded sharp cheddar cheese (This gives us the tang and color).
How to Make Ultimate Cheesy Garlic Pull-Apart Cheese Bread
Okay, this is where the magic comes together! The whole process is incredibly straightforward, but the way you cut the bread and the two-stage baking are what separates a good imitation from the *best* version of this wonderful comfort food. Since this is essentially a deconstructed sandwich, attention to detail in the prep makes all the difference. If you love making things from scratch, you should definitely check out my recipe for copycat homemade breadsticks too, but this pull-apart version is even faster!
Preparing the Loaf and Garlic Butter
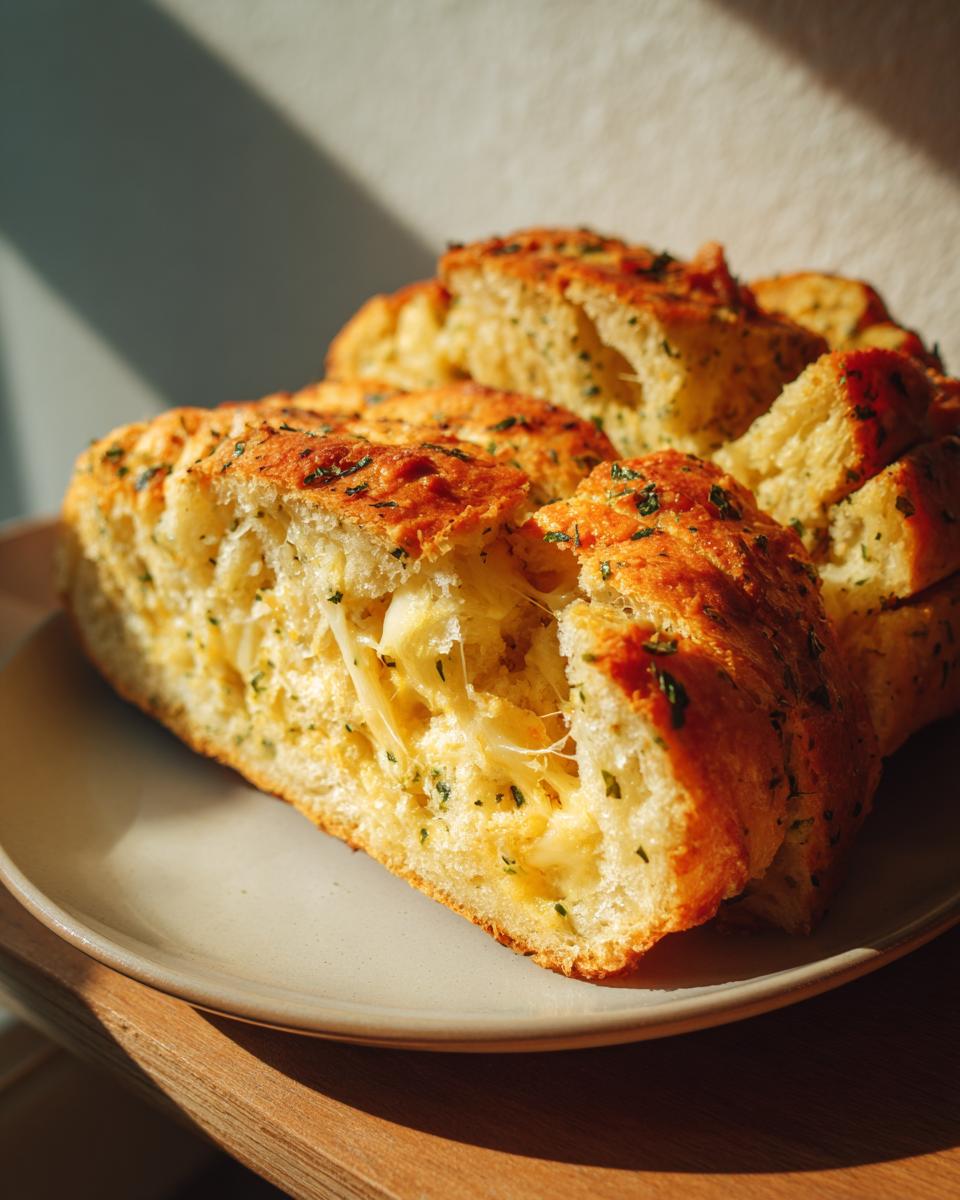
First things first, get that oven hovering at 350 degrees Fahrenheit and line a baking sheet. Now, grab your loaf. This is the trickiest part. You need to slice it into 1-inch thick pieces, like cutting a deck of cards, but you absolutely MUST stop just before you cut all the way through the bottom crust. We need that base to hold everything together! Once it’s cut, it’s time for the flavor bomb. Mix up that melted butter, minced garlic, herbs, salt, and pepper in a small bowl. I like to use a pastry brush and really work that mixture in, making sure I drizzle enough butter down into every single cut you just made. Don’t be shy! That’s the payoff for that rich, buttery flavor.
Stuffing and Baking Your Cheese Bread
Once the butter is soaked in, start aggressively stuffing! Take handfuls of that mozzarella and sharper cheddar combo and push it down into every little crack and crevice. Don’t worry if some spills out; that’s just going to get delicious and crispy on the pan later. When you’re completely stuffed, wrap the entire loaf very tightly in aluminum foil. This foil bath is non-negotiable! It traps the steam, ensuring the cheese melts perfectly and the inside of the bread gets soft and steamy. Bake it wrapped for 15 minutes. Then? Peal that foil off carefully—watch out for the steam!—and pop it back in for another 5 to 10 minutes until the top is gloriously bubbly and golden brown. Serving this amazing cheese bread immediately while it oozes is how you win appetizers.
Tips for Perfect Homemade Cheese Bread
Making this pull-apart bread at home is so satisfying, and getting that perfect texture consistently is all about a few little tricks I picked up over the years. We want that gooey, cheesy explosion in every single cross-section, right? That takes a little more finesse than just throwing cheese and butter on a loaf! I love helping you achieve bakery results in your own oven, which is why I always share the insider knowledge that makes the difference. If you’re trying another bread recipe soon, my guide for an easy brioche bread is superb!
Cheese Selection for the Best Pull Apart Cheese Bread
You saw in the ingredient list that I use a blend of mozzarella and sharp cheddar. That’s intentional! Mozzarella gives you that incredible, stringy stretch—you know, the one that makes a great photo—while the cheddar brings the sharp, deep flavor. If you want to get really fancy, swap out the cheddar for something with a bit more personality, like Gruyère if you have it on hand. Gruyère melts beautifully and adds a really sophisticated, nutty baseline. Oh, and don’t forget my little pro-tip from the notes: a light dusting of grated Parmesan right before that final un-foiled bake provides the most gorgeous, savory crust topper.
Serving Suggestions for Warm Cheesy Bread
Look, I’m not going to lie—this bread is best enjoyed within five minutes of leaving the oven. As it sits, the cheese starts to firm up slightly, and while it’s still delicious, you miss that incredible, molten lava effect. We want that pull! Think of this as the VIP appetizer that needs your immediate attention. It pairs perfectly as a side dish for basically anything hearty. It’s incredible dipped into a big bowl of tomato soup, alongside a lasagna, or honestly, just eaten straight off the baking sheet standing over the sink, which I have definitely done.
Variations on Classic Cheese Bread
Part of the fun of cooking for me is playing around once you have the core technique locked down. This pull-apart concept is so sturdy and reliable because we use that two-stage bake method, but you can really take those flavors in fun different directions! You absolutely don’t have to stick to just Italian herbs, though they are a fantastic baseline for a hearty savory baked bread. If you’re feeling bold, you could even ditch the garlic butter for a creamy spread, kind of like I do in my creamy ricotta white pizza base—imagine that inside your loaf!
Making Italian Herb Cheese Bread
If you want to punch up the herbaceous flavor, think about what you love in your favorite pasta dishes. The recipe already has dried Italian seasoning, but why stop there? I always keep fresh herbs on hand, and they make such a difference here, especially when baked inside all that warm butter! Try adding about a tablespoon of finely chopped fresh parsley when you mix your garlic butter. If you want something slightly earthier, a tiny bit of fresh oregano or even some finely chopped fresh rosemary works wonders, especially if you are using a more robust cheese like Asiago instead of mozzarella. Always add fresh herbs right before you stuff the cheese in, so the heat activates their oils right there in the bread!
Creating Cheesy Breadsticks from this Recipe
Okay, so imagine this: instead of grabbing a whole loaf, you want something finger-food friendly for a crowd. You can totally use this same flavor profile to make decadent cheesy breadsticks! Instead of slicing a pre-baked loaf, you would start with a simple no-rise pizza dough or even store-bought puff pastry for super speed. Roll the dough out flat, brush it heavily with your garlic butter mixture, sprinkle generously with both cheeses, and then slice it into strips. Give those strips a gentle twist—like a little savory bread pretzel—and then you bake them uncovered at 400 degrees until they are golden and bubbling. They cook much faster, usually needing about 12 to 15 minutes total. They won’t have that super soft, whole-loaf texture, but they are amazing if you want dippable breadsticks. It’s a great way to use up any leftover garlic butter, too!
Storage and Reheating Instructions for Leftover Cheese Bread
Now, let’s talk about the harsh reality: sometimes, miraculously, you have leftovers of this incredible, warm cheesy bread. It happens! But we can’t just let that precious gooey texture dry out overnight. Like any good comfort food, this pull-apart bread needs a little TLC to bring it back to life. Handling leftovers properly is key to maintaining that amazing homemade quality we worked so hard for.
First, you need to store it correctly. Once it’s cooled down to room temperature (don’t wrap it hot, or you’ll get steam buildup and sogginess!), place the whole loaf—or whatever pieces you have left—into an airtight container. If you don’t have a container big enough, tightly wrapping the remaining pieces in plastic wrap followed by a layer of foil works almost as well. This keeps the air out and locks in any remaining moisture. It’s perfectly fine in the fridge for about two days.
Reheating is where the trust factor comes in, and I promise my method works better than microwaving it until it’s rubbery. We need to recreate that initial bath of steam. Wrap the cooled loaf back up securely in aluminum foil. Pop it into a preheated 350-degree oven. Let it sit wrapped for about 10 to 12 minutes. This gently warms the bread and melts the cheese back into that luscious state. If you want a little bit of crispness on top, unwrap it for the last two minutes of heating, but honestly, the foil warming is what brings back that perfect, soft pull. If you’ve made something sweet recently, like my easy white chocolate fudge, you might find yourself craving something savory like this bread the next day!
Frequently Asked Questions About This Garlic Cheese Bread Recipe
I know you’re going to love making this, but sometimes little questions pop up when you’re standing in the kitchen with your ingredients out. That’s totally normal! I’ve gathered the most common things folks ask me about this incredibly delicious, quick application of cheesy flavor. We want to make sure your experience making this garlic cheese bread recipe is as seamless as possible. If you want to see another quick-bake recipe I swear by, my recipe for cassava cake is next level!
Can I use different types of bread for this cheese bread?
That’s a great question about the foundation of this cheese bread! The most important thing you’re looking for is a sturdy loaf. You need that bread to have enough structure so that when you slice it and stuff it full of cheese, it doesn’t completely collapse on itself during baking. Sourdough or a good, dense Italian loaf are my absolute favorites because they hold up beautifully to all that melted butter and cheese. I wouldn’t recommend super soft sandwich bread, because the structure isn’t there, and you won’t get that satisfying ‘pull apart’ when you serve it. Sturdier bread equals better structure for this homemade cheese bread!
How long does it take to make this appetizer bread recipe?
This is why I call this my go-to party savior! For the preparation part—slicing, buttering, and stuffing—you’re looking at maybe 10 minutes, tops. Then the cooking time is only about 25 minutes total (15 wrapped, 5–10 unwrapped). So, in under 35 minutes total time, you have this spectacular, piping hot, melty cheese bread ready to go. It makes it one of the very best appetizer bread recipes you can keep in your back pocket for when you need something outstanding fast!
Nutritional Estimate for This Savory Baked Bread
Now, I always feel it’s important to be transparent about what we’re putting into our bodies, even when we’re indulging in pure comfort like this glorious cheese bread. Remember, these numbers are just estimates based on the portion sizes and ingredients listed in the recipe, okay? Since we’re using a whole loaf and dividing it into eight generous slices, these figures reflect one serving. If you sneak a couple of extra pieces (I don’t blame you!), those numbers will obviously climb!
This dish is definitely on the richer side because of all that glorious butter and cheese we pile in—that’s where the flavor factor goes through the roof! If you’re keen on pairing this with something else fantastic, perhaps a homemade sauce, you might want to check out my recipe for quick and easy homemade BBQ sauce—though honestly, this bread doesn’t need telling! Think of this as your decadent side dish for the week.
Here is the breakdown for one slice of the Ultimate Cheesy Garlic Pull-Apart Bread:
- Serving Size: 1 slice
- Calories: 280
- Fat: 18g (that’s where the goodness is!)
- Saturated Fat: 10g
- Carbohydrates: 18g
- Protein: 12g
- Sugar: 1g (Whew, barely any!)
- Sodium: 450mg
See? Not bad for a full loaf drowning in cheese and garlic butter! It hits the savory notes perfectly and gives you a solid hit of protein. Enjoy it guilt-free, knowing you made something incredible from scratch!
Share Your Experience Making This Cheese Bread
Now that you’ve carved, stuffed, and indulged in the pure comfort of this Ultimate Cheesy Pull-Apart Bread, I really, truly want to hear what you thought! This recipe is about bridging the gap between busy life and delicious food, and your success stories—and any little tweaks you made—inspire me so much. When you make this cheese bread, please take a snapshot of that glorious cheesy pull and tag me on social media. I love seeing your kitchens!
Did you use a different cheese blend? Maybe you served it alongside my white chocolate fudge for the ultimate sweet-and-savory contrast? Let me know in the comments below! Giving the recipe a star rating helps other busy cooks decide to dive in, and your feedback helps me keep making sure these recipes deliver exactly what you need: delicious food, easily made.
Don’t just leave the satisfaction locked in your own kitchen—share the buttery, garlicky joy! I’m right here reading every comment. Go on, tell me all about how quickly this vanished at your dinner table!
PrintUltimate Cheesy Garlic Pull-Apart Bread
Make this ultimate pull-apart cheese bread for your next gathering. It is warm, buttery, and stuffed with melty cheese in every bite, making it an addictive appetizer or side dish.
- Prep Time: 10 min
- Cook Time: 25 min
- Total Time: 35 min
- Yield: 8 servings 1x
- Category: Appetizer
- Method: Baking
- Cuisine: American
- Diet: Vegetarian
Ingredients
- 1 loaf crusty bread (sourdough or Italian style)
- 1/2 cup unsalted butter, melted
- 4 cloves garlic, minced
- 1 teaspoon dried Italian herbs
- 1/2 teaspoon salt
- 1/4 teaspoon black pepper
- 1 1/2 cups shredded mozzarella cheese
- 1 cup shredded sharp cheddar cheese
Instructions
- Preheat your oven to 350 degrees Fahrenheit. Prepare a baking sheet with parchment paper.
- Cut the loaf of bread into 1-inch thick slices, cutting almost all the way through but leaving the bottom crust intact so the slices hold together.
- In a small bowl, combine the melted butter, minced garlic, Italian herbs, salt, and pepper. Mix well to create the garlic butter.
- Carefully brush the garlic butter mixture over the entire loaf, making sure to drizzle some down into the cuts between the slices.
- Generously stuff the shredded mozzarella and cheddar cheese into the cuts of the bread. Press the cheese down gently.
- Wrap the entire loaf tightly in aluminum foil.
- Bake for 15 minutes while wrapped.
- Remove the foil and bake for an additional 5 to 10 minutes, or until the cheese is fully melted and bubbly.
- Let the cheese bread cool for 5 minutes before serving warm as a pull-apart appetizer.
Notes
- For extra flavor, sprinkle a little grated Parmesan cheese over the top before the final unwrapped bake.
- You can substitute the cheese blend with Gruyère or Monterey Jack for a different melt.
- This bread is best served immediately while the cheese is gooey.
Nutrition
- Serving Size: 1 slice
- Calories: 280
- Sugar: 1
- Sodium: 450
- Fat: 18
- Saturated Fat: 10
- Unsaturated Fat: 8
- Trans Fat: 0
- Carbohydrates: 18
- Fiber: 1
- Protein: 12
- Cholesterol: 45