

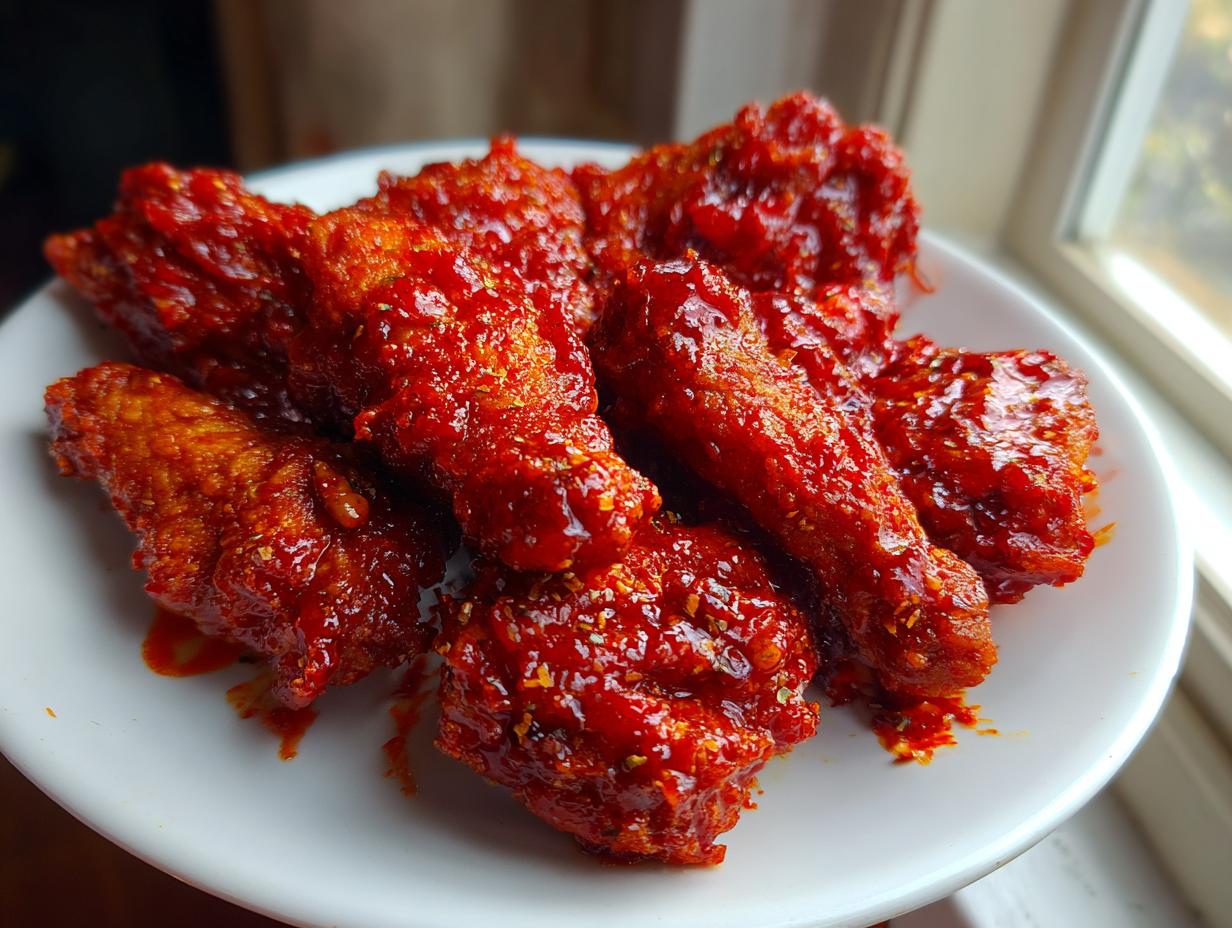
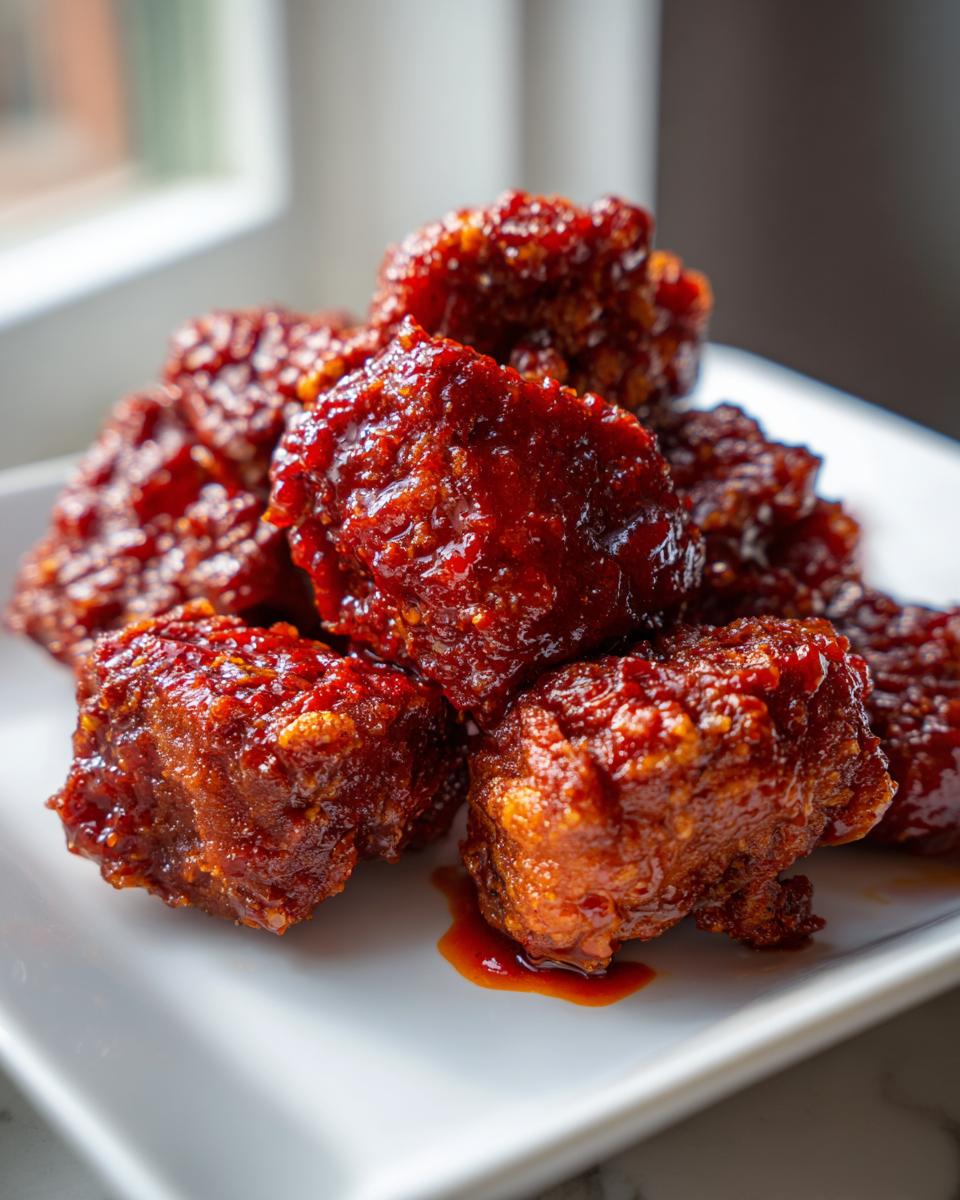
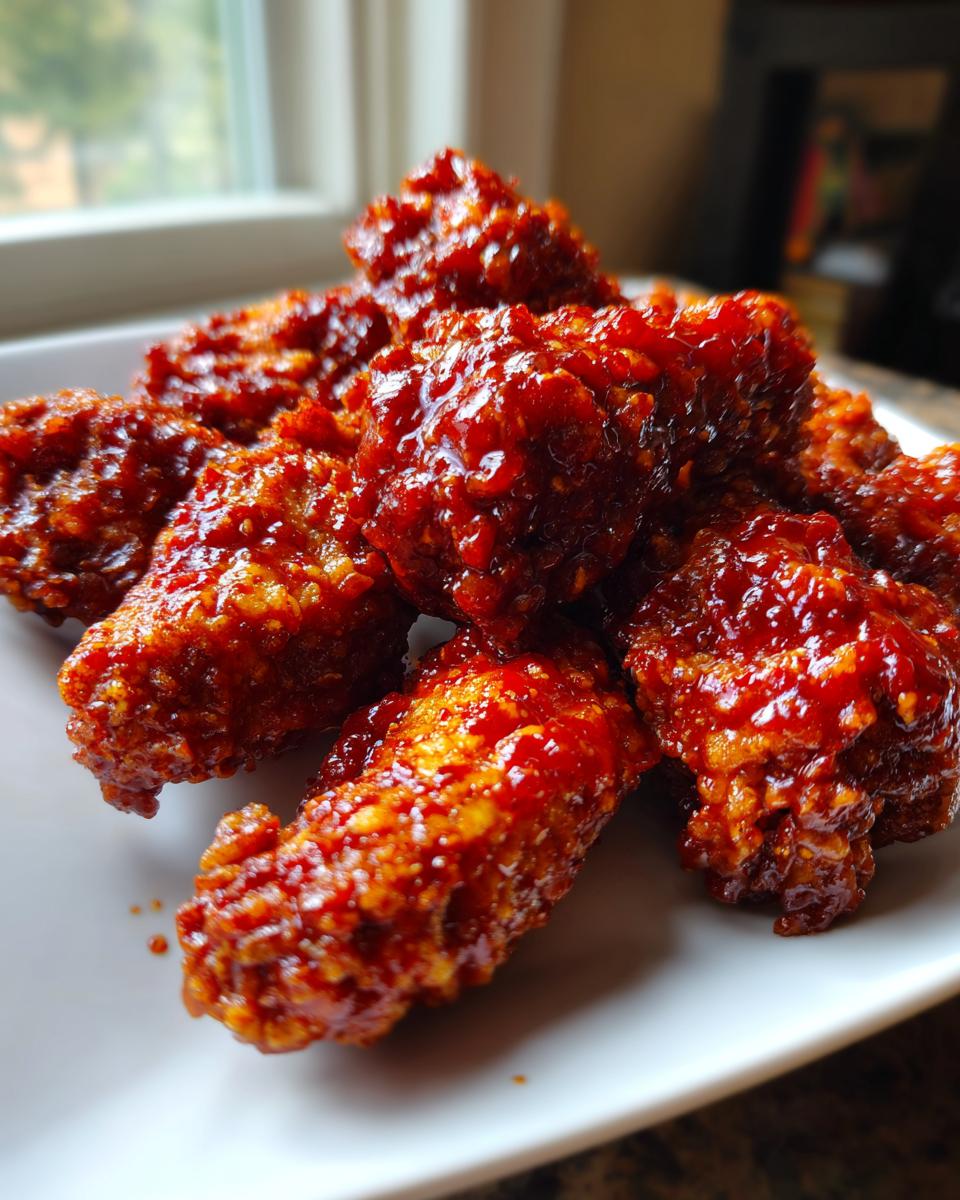
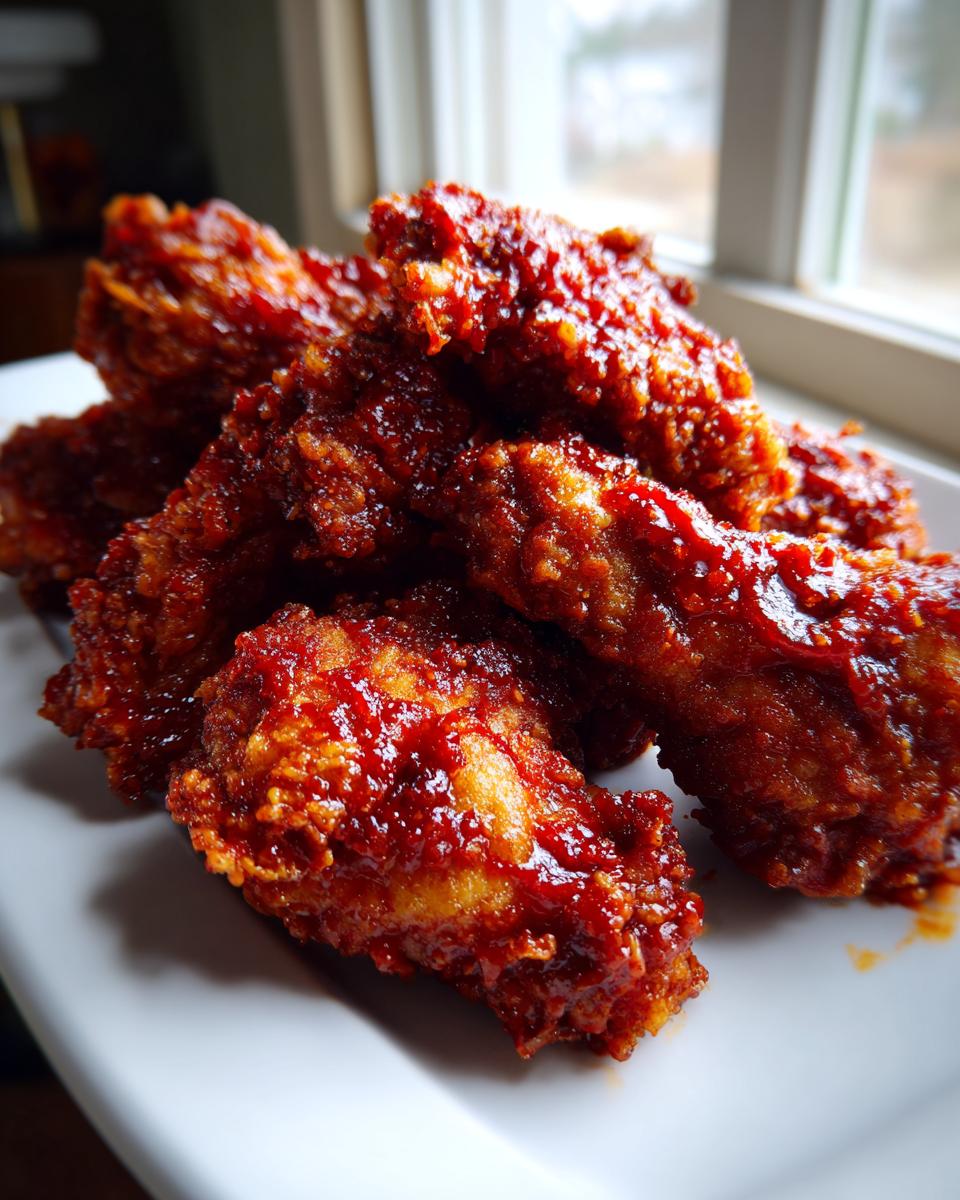
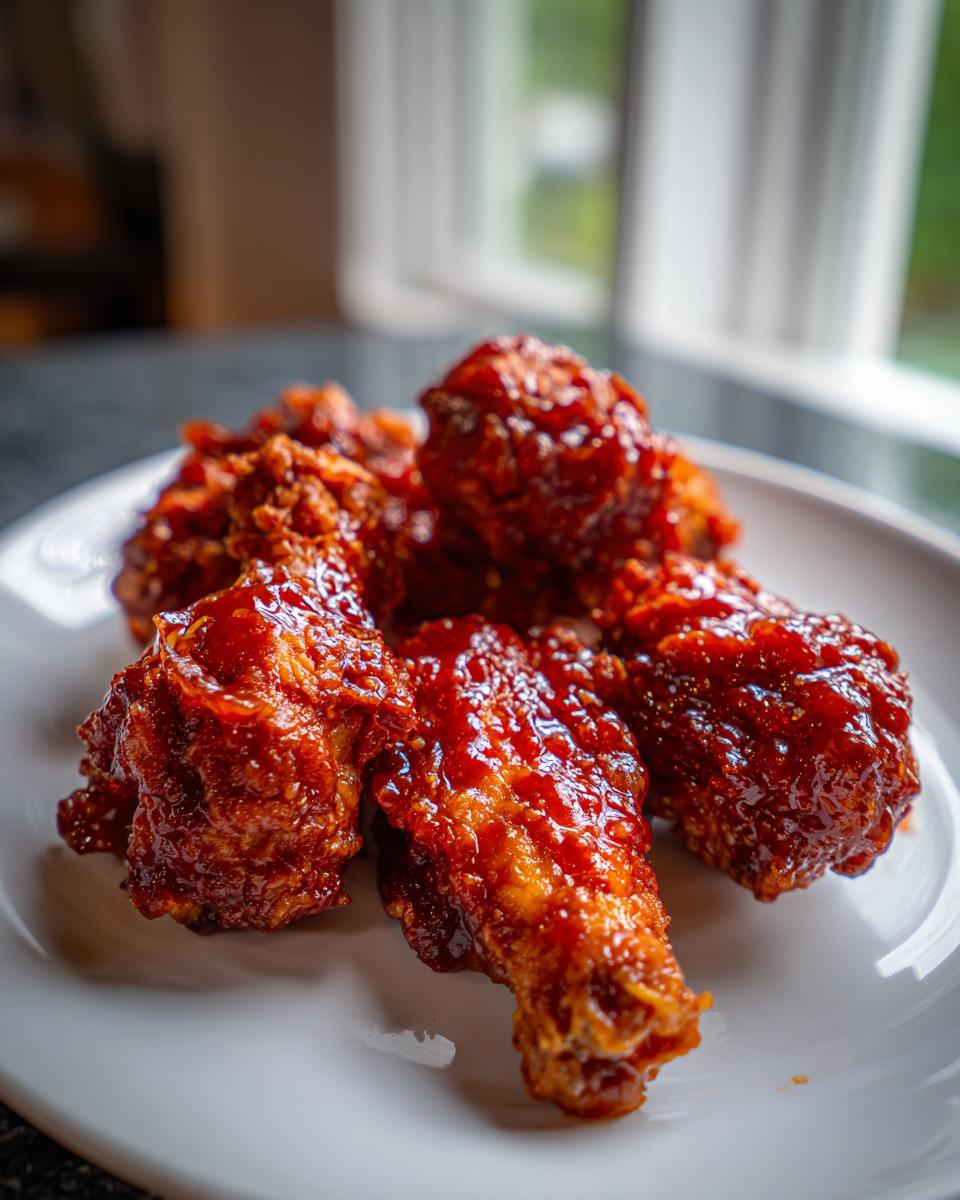
You know that moment when you are absolutely craving crispy, sticky, takeout-quality fried chicken, but you know the delivery wait is going to be forever? I get it! That craving for truly fantastic Korean fried chicken led me down a path to develop what I firmly believe is the single korean fried chicken recipe you need to master. Forget soggy crusts—our ticket to success is the famous double-fry method, which locks in moisture while delivering that unbelievable, shatteringly crisp exterior. Based on the Cooking by Felix philosophy, I’ve boiled down the technique here into simple, clear steps. If you’re busy but refuse to compromise on incredible flavor, trust me, this is the method that gives you restaurant-style results right in your own kitchen! For other quick, flavorful meals, you should check out my spicy chicken lettuce wraps recipe, too.
- Why This korean fried chicken recipe Delivers Restaurant Style Crispy Chicken
- Ingredients for Your korean fried chicken recipe
- Step-by-Step Instructions for the Best KFC Recipe at Home
- Ingredient Notes and Substitutions for Your korean fried chicken recipe
- Tips for Success with Your Crispy Fried Chicken Recipe
- Serving Suggestions for Homemade Korean Chikin
- Storage and Reheating Instructions
- Frequently Asked Questions About This korean fried chicken recipe
- Estimated Nutritional Information
- Share Your Homemade Korean Chikin Experience
Why This korean fried chicken recipe Delivers Restaurant Style Crispy Chicken
Look, there are a ton of fried chicken recipes out there, but what makes this one special is that it truly mimics what you get at those top Korean spots. We aren’t just dredging and frying once; we are using science, folks! The magic really comes down to two non-negotiables: the exact balance of starch in the coating and, of course, that critical double-fry. Do these two things right, and I promise you’ll get that incredible Juicy Inside Crispy Outside Chicken everyone raves about.
If you want to try a totally different but equally comforting meal later, I have a fantastic creamy chicken alfredo lasagna recipe you might love. And if you want to see how others are obsessing over the crunch, check out what they are saying over here!
The Secret to the Ultra-Crispy Coating
Ditch the plain flour! The key to that paper-thin, shatteringly crisp crust that defines Authentic Korean Fried Chicken is the starch. We use a mix of regular flour and potato starch—or cornstarch if that’s what you have handy. The starch is what keeps the crust light and airy, refusing to soak up the oil or get heavy. It’s what makes every bite crackle, not crunch heavily.
Mastering the Double Fried Chicken Technique
This is where we build texture. The first fry is slow and low, around 325°F, just to cook the chicken all the way through and gently dry out the coating. Then, you have to let it rest—this is crucial! After resting, we blast it at a much higher temp, 375°F. That second, quick fry doesn’t cook the chicken more; it just puffs up that dry surface barrier until it’s perfectly golden and impossibly crisp. Don’t skip the rest, or you lose the texture!
Ingredients for Your korean fried chicken recipe
Getting the ingredients organized is half the battle, especially when you are working with two different sauce options! I always lay everything out before I start mixing anything, just like in my one-pot beans and rice recipe. It keeps things moving smoothly when the oil starts heating up. Remember, the quality of your components really shows through here, especially with these bold Asian flavors.
For the Chicken and Batter
- 2 lbs boneless, skinless chicken thighs OR wings, cut into bite-sized pieces
- 1 cup all-purpose flour
- 1/2 cup potato starch or cornstarch (this is your crunch secret!)
- 1 teaspoon salt
- 1/2 teaspoon black pepper
- 1/2 teaspoon garlic powder
- 1/4 teaspoon baking powder
- 1 large egg, beaten
- 1/2 cup cold water
- Vegetable oil, for frying (you’ll need a good amount for deep frying!)
For the Gochujang Sweet & Spicy Glaze (Yangnyeom)
This is the classic sticky, spicy coating. If you skip this, you miss out on the true Sweet and Spicy Glazed Chicken experience!
- 1/4 cup Gochujang (Korean chili paste—don’t skimp here!)
- 3 tablespoons honey
- 2 tablespoons soy sauce
- 1 tablespoon rice vinegar
- 1 tablespoon brown sugar
- 1 teaspoon minced garlic
- 1 teaspoon sesame oil
For the Savory Soy Garlic Glaze
If you prefer something less spicy, this savory option is absolutely mind-blowing. It takes just minutes to simmer down into that perfect savory coating for your Soy Garlic Korean Chicken.
- 1/4 cup soy sauce
- 3 tablespoons honey OR corn syrup (corn syrup makes it glossier)
- 2 tablespoons water
- 1 tablespoon minced garlic
- 1 teaspoon grated ginger
- 1 teaspoon sesame oil
Step-by-Step Instructions for the Best KFC Recipe at Home
Okay, this is where all our careful prep work pays off! Making the best KFC recipe at home means sticking closely to the timing for the double fry, but don’t worry, it’s not complicated—it just requires patience during the resting phase. Get your oil heating up while you prep the coating mixture. If you’re serving this with something rich like creamy garlic mashed potatoes, you’ll want the chicken ready at the same time!
Preparing the Chicken and Batter Coating
First things first: your chicken has to be bone dry. Pat it down really well with paper towels. In one bowl, whisk up all your dry stuff—flour, starches, seasonings. In another bowl, mix that beaten egg and the ice-cold water. Now, pour the wet into the dry, and mix it just until you don’t see white flour streaks anymore. I mean it—a few lumps are totally fine. Overmixing that batter locks in gluten, and we want a light coating, not a heavy breading!
Toss the chicken into that batter and let it chill out for 10 full minutes. This rest is important; it helps the coating adhere properly before it hits the hot oil.
The Crucial First Fry and Rest
Heat your oil up to 325°F (160°C). Never guess this temperature; use a thermometer! Fry the chicken in small batches for about 6 to 7 minutes. You aren’t aiming for big color here—just pale golden, cooked through. Once they look done, pull them out right onto a wire rack set over a sheet pan. Now for the hardest part of this korean fried chicken recipe: you must let them rest for at least 15 minutes. This resting period is non-negotiable! It lets steam escape, setting the crust so it can truly crisp up later.
Making the Glazes and the Final Crisp
While that chicken rests, juggle your sauces. Either simmer the Spicy Glaze ingredients until thickened, or gently simmer the Soy Garlic ones until they reduce slightly. Once your sauces are ready, turn up the oil heat to 375°F (190°C). Toss the rested chicken back into that super hot oil in quick batches. You only need 2 to 3 minutes this time! We are just pushing that exterior to that deep, perfect golden brown where it shatters when you bite it. Check out some great frying tips over at this site while you wait for the oil to heat up!
Glazing and Serving Immediately
As soon as that second fry is done, get the chicken into a big bowl. Quickly drizzle your chosen sauce over the pieces and toss them fast to coat everything evenly. Seriously, you have to serve this right away. The glaze is amazing, but this chicken is only truly legendary when covered in sauce and still piping hot and crunchy. If you want to jazz it up, a sprinkle of sesame seeds or some chopped green onions looks fantastic!
Ingredient Notes and Substitutions for Your korean fried chicken recipe
I know ingredient hunting can sometimes be the trickiest part of making any ethnic dish at home, especially when you need something specific like Gochujang. But don’t let that stress you out! When I create a korean fried chicken recipe, I always test variations to make sure even if you have to swap one thing, the final product still feels authentic and amazing. We want that great crunch and bold flavor without needing a specialty shopping trip.
If you want to try a sweet little side treat while you are cooking, my recipe for candied pecans is super easy and uses similar warm spice notes!
Chicken Cut Selection
You’ll see I listed both thighs/boneless pieces *and* wings in the ingredients. Wings are fantastic because the bone helps insulate the meat, making it tender while the skin crisps up perfectly. However, if you use boneless thighs, you need to watch your first frying time closely. Since they are generally thicker pieces, ensure they reach 165°F internally during that first 325°F fry. If you use wings, you might shave off a minute from that initial fry time. No matter which you pick, cut them into manageable, similar-sized pieces so they cook evenly!
For different flavor profiles, check out how others are approaching Asian chicken flavors over at this site.
Glaze Sweetener Swaps
Both sauces rely on a sweetener to balance the saltiness of the soy sauce or the heat of the Gochujang. In the Spicy Glaze, I love using honey because it thickens nicely, but if you only have brown sugar, go for it! The brown sugar will give the glaze a deeper, almost molasses-like color. For the Soy Garlic variety, corn syrup is often the gold standard because it ensures maximum gloss and really resists crystallizing. Honey works fine there too, but it might not get quite as sticky-looking as traditional syrup. Don’t stress too much; the flavor will still be wonderful!
Tips for Success with Your Crispy Fried Chicken Recipe
I want this korean fried chicken recipe to work perfectly for you on your first try because disappointing fried chicken is just criminal! Getting that crunch isn’t just about the batter; it’s about managing the environment around the chicken while it cooks. If you follow these two little rules, you’ll avoid that dreaded soggy coating and guarantee that perfect crackle every single time. If you need a quick, sweet break after all that frying, my 5-minute Oreo fudge is the fastest little dessert ever.
Oil Temperature Control is Key
Seriously, grab a thermometer! If your oil is too cool during that first 325°F fry, the coating soaks up fat like a sponge and gets greasy. If it’s too hot during the second 375°F blast, the outside burns before the residual heat fully crisps the inside. You must keep those temperatures locked in. That pause between fries is what lets the chicken stabilize before the final crunch push.
Preventing Soggy Coating
Once that chicken comes out of the second fry, resist the urge to dump it onto a stack of paper towels! Paper towels trap steam right underneath the chicken, and steam is the enemy of crispiness. Always, always drain your finished pieces on a wire rack set over a sheet pan. This allows air to circulate all the way around every piece so the crust stays instantly crisp—that’s how you finish this Crispy Fried Chicken Recipe right!
Serving Suggestions for Homemade Korean Chikin
Making amazing Homemade Korean Chikin is only half the fun, right? Now you have this huge bowl of perfectly crispy, saucy goodness, and you need the perfect crew to go with it! This is the ultimate Game Day Chicken Appetizer, but it also makes for the most satisfying Saturday night dinner. The key when serving something so rich and flavorful is to bring in some bright, acidic, or fresh balance.
If you want something refreshing that cuts right through that sweet heat from the glaze, you cannot go wrong with my simple raw carrot salad recipe. It’s crunchy, tangy, and just the perfect palate cleanser.
For the most authentic experience, you absolutely need some quick pickles on the side. The tiny cubes of white pickled radish, often called mu-ssam, are sold everywhere, but they are surprisingly easy to make yourself if you have the time. That sharp, vinegary zing makes the fried chicken taste even better the next bite!
Here are a few ways I like to plate this up for maximum enjoyment:
- The Classic Bowl: Serve it over steamed white rice with a generous side of kimchi and a sprinkle of sesame seeds. Filling and deeply comforting.
- Takeout Style: Put the chicken into a big basket lined with paper, and serve it with a side of coleslaw (I like mine creamy, not vinegar-based, for this).
- Wing Platter Upgrade: If you made wings, just set out simple dipping bowls of extra sauce, some sliced scallions, and maybe even some crunchy fried onions for texture. Guests can mix and match their favorites. For more inspiration on amazing crispy textures, check out this tasty recipe!
Storage and Reheating Instructions
Oh, the leftovers struggle! Any fried food enthusiast knows that day-old fried chicken—even this amazing korean fried chicken recipe—can lose its magic quickly. The absolute enemy here is the microwave, folks. Microwaving fried chicken is a fast track to sadness; you’ll end up with steamed, chewy chicken, and we absolutely cannot allow that to happen after all that hard work with the double fry!
If you find yourself with extra pieces, the goal is to bring back that shatteringly crisp crust without re-frying the whole batch. We are aiming for efficiency here, just like how I approach my sweet potato casserole topping!
The Best Way to Store Leftover Chicken
First, if you glazed the chicken right away before storing, the crust will soften over time because of the sauce. That’s just the physics of glaze! If you want to save some for later, try to save a few pieces glazed, and a few just plain (crispy without sauce). Store any leftovers in a single layer in an airtight container in the fridge. Stacking them tends to trap moisture between pieces, which leads to sogginess.
Do not keep already glazed chicken for more than two days; the texture really starts to degrade after that initial refrigeration.
Reheating for Ultimate Crispness
You have two excellent, texture-saving options for reheating. Forget the nuker!
- The Air Fryer is Your Best Friend: If you have one, use it! Set it to about 350°F (175°C) and spread the chicken in a single layer. Air fry for about 5 to 7 minutes. It pulls the crisp right back out of that crust beautifully.
- The Oven Method: This works great if you have a big batch. Preheat your oven to 375°F (190°C). Place the chicken pieces directly on a wire rack set over a baking sheet. Bake for about 10 to 12 minutes. The rack allows air flow underneath so the bottom doesn’t steam against the pan.
If you are reheating pieces that are already sauced, the crisp might not return 100%, but the oven or air fryer will still warm them up much better than the microwave. They’ll still be delicious!
Frequently Asked Questions About This korean fried chicken recipe
I always get questions when people first try making this at home, and honestly, that’s the best part—seeing people conquer techniques they thought were too hard! This korean fried chicken recipe is designed to be adaptable, but here are the main things folks ask me about to ensure they get that perfect crunch every time.
If you’re looking for something cheesy and amazing to serve alongside the chicken (or use as a party dip before the main event!), you absolutely have to try my easy Reuben dip recipe!
Can I make this a Shallow Fry Chicken Korean Style recipe?
You totally can if you don’t want to use gallons of oil! While the double-fry method works best when the chicken is fully submerged (deep frying), you can absolutely manage with shallow frying. You’ll need a heavy skillet with at least 1.5 inches of oil. The tricky part is ensuring the pieces are fully covered so they cook evenly on all sides during that first fry. You might need to flip them more often, but if you stick to that two-stage cooking temperature—low first, then high—you’ll still get a good result for your Shallow Fry Chicken Korean Style attempt!
How far ahead can I prepare the chicken for this Crispy Fried Chicken Recipe?
This is where the Make Ahead Fried Chicken strategy comes into play. You can absolutely do Steps 1 through 4 of the recipe ahead of time! After the first fry, let the chicken drain and rest completely. You can store these partially cooked pieces in the fridge for up to a day. When you are ready to eat, crank that oil up to 375°F and hit them with the second fry for those last 2 to 3 minutes. That second high-heat blast brings back the crunch perfectly. Don’t try to glaze them until after the final fry, though!
What is the best way to adjust the spice level in the Gochujang Fried Chicken Sauce?
The heat comes almost entirely from the Gochujang itself. If you want a milder flavor for your Gochujang Fried Chicken Sauce, the easiest fix is simple math: use less Gochujang! For example, try cutting the recommended amount by a quarter and replacing that volume loss with a little more honey or a splash of water. If you only have very spicy Gochujang on hand, adding a touch more brown sugar to that simmering sauce really helps balance the fire and makes it sweet instead of just spicy. You want bold flavor, not painful heat, right?
Estimated Nutritional Information
Okay, let’s talk nutrition, because while this korean fried chicken recipe is pure joy and comfort food, it does come with some real numbers attached! I always look at this information with the understanding in mind that these are estimates based on the recipe as written, using boneless thighs, and generously tossing in the sauce. If you decide to skip the sauce or use mostly the Soy Garlic version, your numbers might look a little nicer regarding sugar!
These values are based on one serving, calculated from the whole recipe breakdown. They are great for keeping track, but remember, homemade is always better because you control the ingredients. When you are done making this amazing chicken, maybe cool down your palate with my brown butter chocolate chip cookies for dessert!
Please remember these figures can vary based on the exact cut of chicken (thigh vs. wing) and the amount of glaze you lovingly toss onto your pieces.
- Serving Size: 1 serving (approx. 6 pieces)
- Calories: 650
- Fat: 35g (with 7g Saturated Fat)
- Carbohydrates: 45g
- Protein: 38g
- Sugar: 25g
- Sodium: 850mg
Share Your Homemade Korean Chikin Experience
And that’s it! You have officially unlocked the secrets to making Authentic Korean Fried Chicken right in your own kitchen. I feel like we just spent quality time together, and honestly, that’s exactly what I want Cooking by Felix to be about—empowering you to make amazing food without all the fuss.
When you finally get that batch of chicken fried and that double crunch hits you, please, please come back and tell me about it! Did you go for the sweet and spicy heat, or did the savory Soy Garlic win you over? Drop a rating below so other busy cooks know just how incredible this Best KFC Recipe at Home is.
I love seeing your successes! Tag me on social media with your photos of your crunchy, saucy masterpieces. When you share your results, you’re helping build this community where we prove that extraordinary flavor doesn’t require hours of effort. I’m already dreaming up what we can cook together next—maybe something comforting like my easy Southern peach cobbler?
Thanks for cooking with me. Happy eating, and don’t forget to enjoy every single crispy bite! You can see what others are loving over at Sweet and Savory Meals, too!
PrintAuthentic Korean Fried Chicken Recipe with Double-Fry Crunch
Make restaurant-style Korean Fried Chicken at home. This recipe uses the double-fry technique for an ultra-crispy crust and includes instructions for both a classic sweet and spicy Gochujang glaze and a savory Soy Garlic sauce.
- Prep Time: 25 min
- Cook Time: 20 min
- Total Time: 60 min
- Yield: 4 servings 1x
- Category: Dinner
- Method: Deep Frying
- Cuisine: Korean
- Diet: Low Lactose
Ingredients
- 2 lbs boneless, skinless chicken thighs or wings, cut into bite-sized pieces
- 1 cup all-purpose flour
- 1/2 cup potato starch or cornstarch
- 1 teaspoon salt
- 1/2 teaspoon black pepper
- 1/2 teaspoon garlic powder
- 1/4 teaspoon baking powder
- 1 large egg, beaten
- 1/2 cup cold water
- Vegetable oil, for frying
- For Sweet & Spicy Glaze (Yangnyeom): 1/4 cup Gochujang, 3 tablespoons honey, 2 tablespoons soy sauce, 1 tablespoon rice vinegar, 1 tablespoon brown sugar, 1 teaspoon minced garlic, 1 teaspoon sesame oil
- For Soy Garlic Glaze: 1/4 cup soy sauce, 3 tablespoons honey or corn syrup, 2 tablespoons water, 1 tablespoon minced garlic, 1 teaspoon grated ginger, 1 teaspoon sesame oil
Instructions
- Prepare the Chicken: Pat the chicken pieces completely dry with paper towels. In a large bowl, whisk together the flour, potato starch, salt, pepper, garlic powder, and baking powder.
- Make the Wet Batter: In a separate bowl, whisk the beaten egg and cold water. Pour the wet mixture into the dry ingredients and mix until just combined. A few lumps are fine; do not overmix.
- Coat the Chicken: Toss the dried chicken pieces into the batter until lightly coated. Let the coated chicken rest for 10 minutes.
- First Fry (Cooking Through): Heat about 2 inches of vegetable oil in a heavy-bottomed pot or deep fryer to 325°F (160°C). Fry the chicken in batches, ensuring the pot is not overcrowded, for 6 to 7 minutes until pale golden and cooked through. Remove the chicken and drain on a wire rack set over a baking sheet. Let the chicken rest for at least 15 minutes. This resting period is key for the ultimate crunch.
- Prepare the Sauces: While the chicken rests, prepare your chosen sauce. For the Sweet & Spicy Glaze, combine all glaze ingredients in a small saucepan. Bring to a simmer over medium heat, stirring until smooth and slightly thickened (about 3 minutes). Remove from heat. For the Soy Garlic Glaze, combine all ingredients in a saucepan and simmer until slightly reduced and syrupy (about 4 minutes).
- Second Fry (Crisping): Increase the oil temperature to 375°F (190°C). Return the rested chicken to the hot oil in small batches. Fry for 2 to 3 minutes until the crust is deep golden brown and shatteringly crisp. Remove immediately and drain on a clean wire rack.
- Glaze and Serve: Place the hot, double-fried chicken into a large bowl. Pour your desired sauce over the chicken and toss quickly to coat evenly. Serve immediately for the best texture. Garnish with sesame seeds or chopped green onions if desired.
Notes
- For the best results in achieving that paper-thin, ultra-crispy coating, use a mix of all-purpose flour and potato starch in your dry dredge.
- Do not skip the resting period between the first and second fry; this allows moisture to escape, resulting in a crispier final product.
- If you prefer a less spicy Yangnyeom sauce, reduce the amount of Gochujang and add a little more honey or corn syrup.
Nutrition
- Serving Size: 1 serving (approx. 6 pieces)
- Calories: 650
- Sugar: 25g
- Sodium: 850mg
- Fat: 35g
- Saturated Fat: 7g
- Unsaturated Fat: 28g
- Trans Fat: 0g
- Carbohydrates: 45g
- Fiber: 1g
- Protein: 38g
- Cholesterol: 110mg