

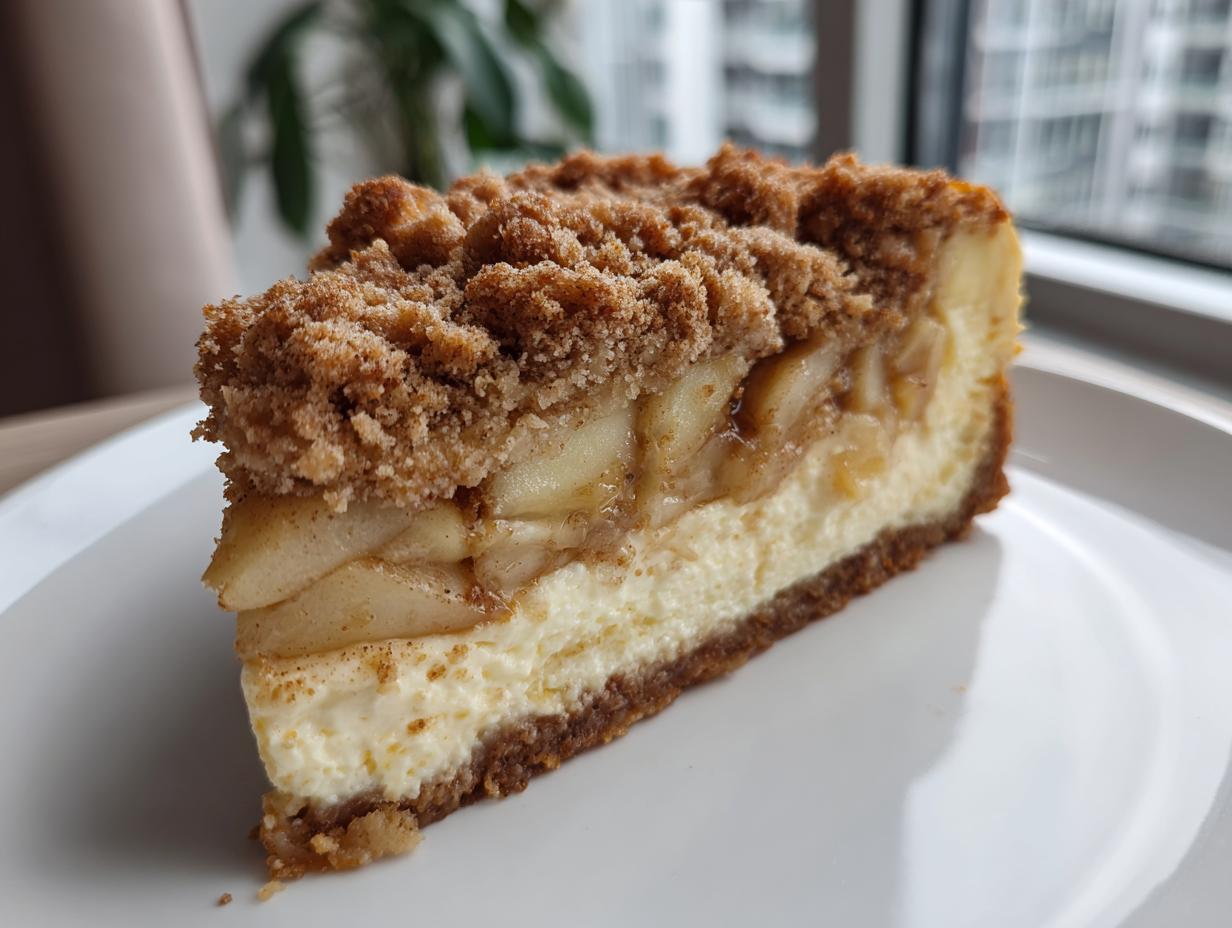
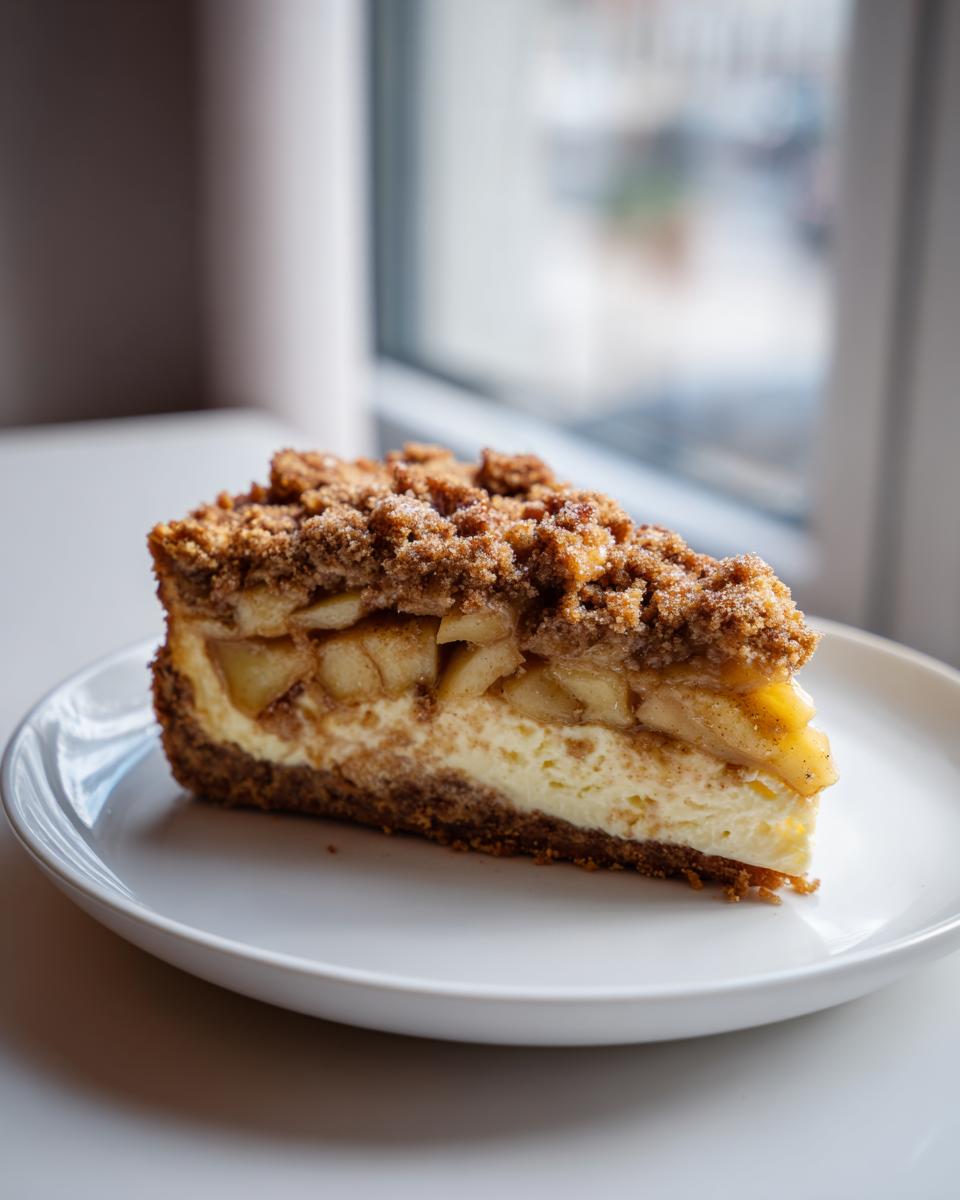
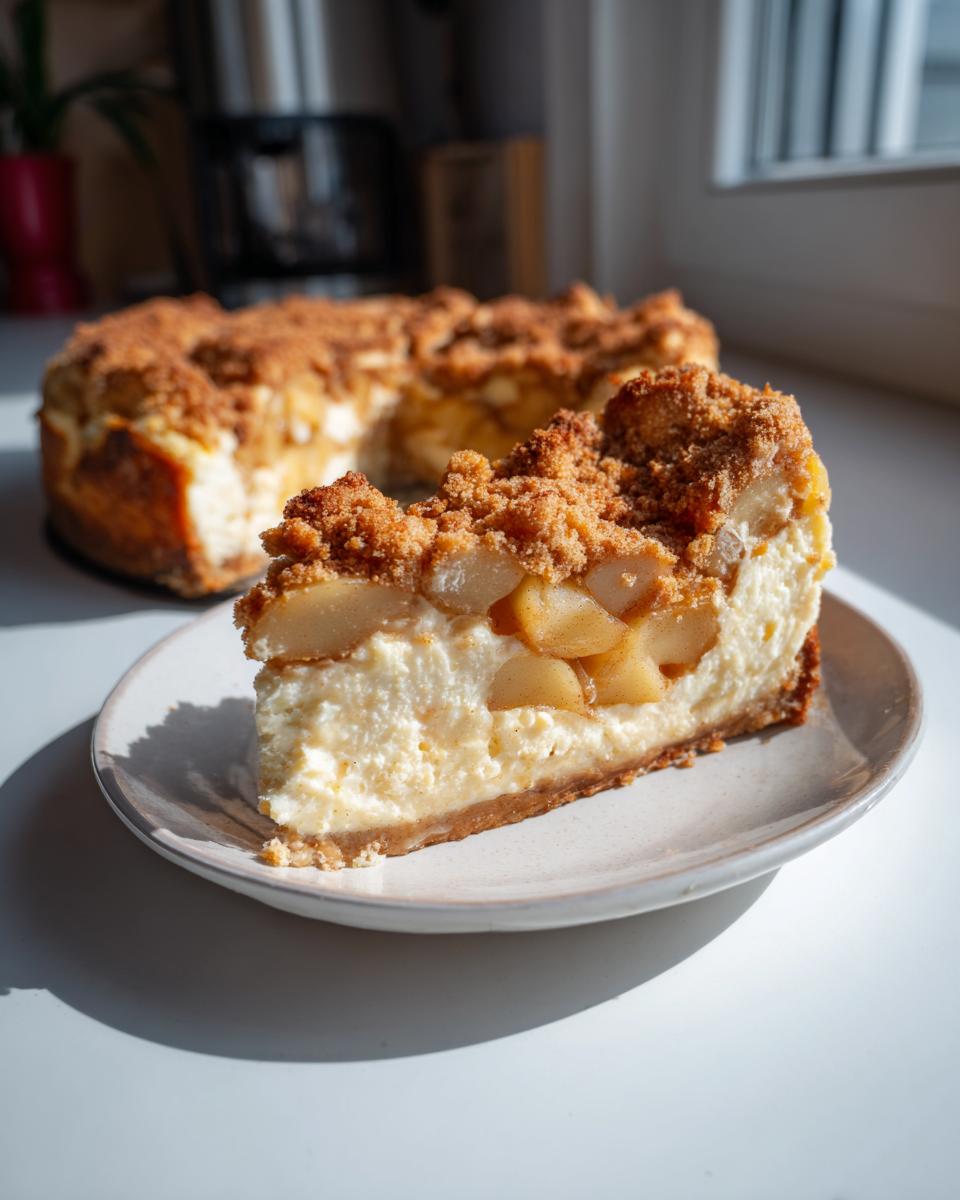
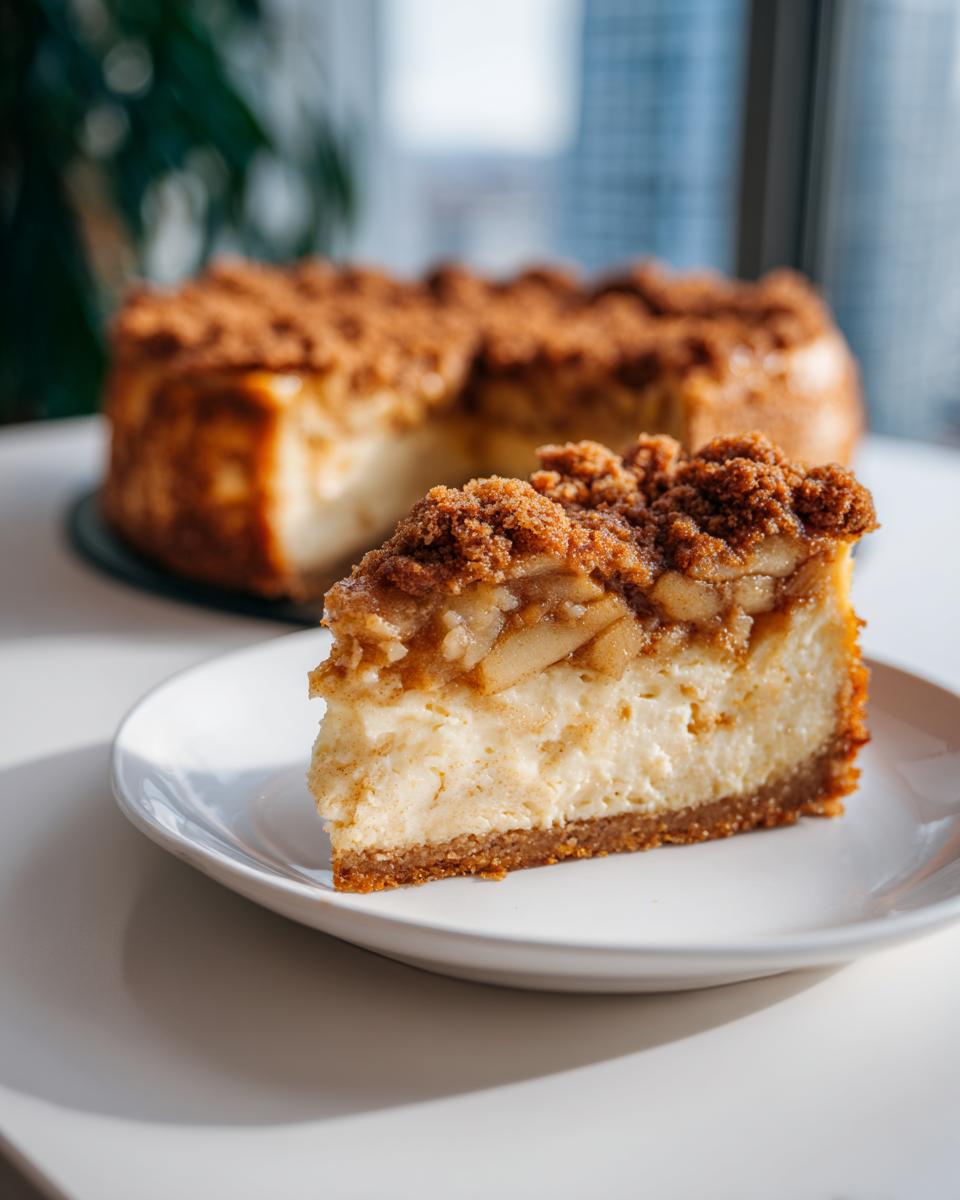
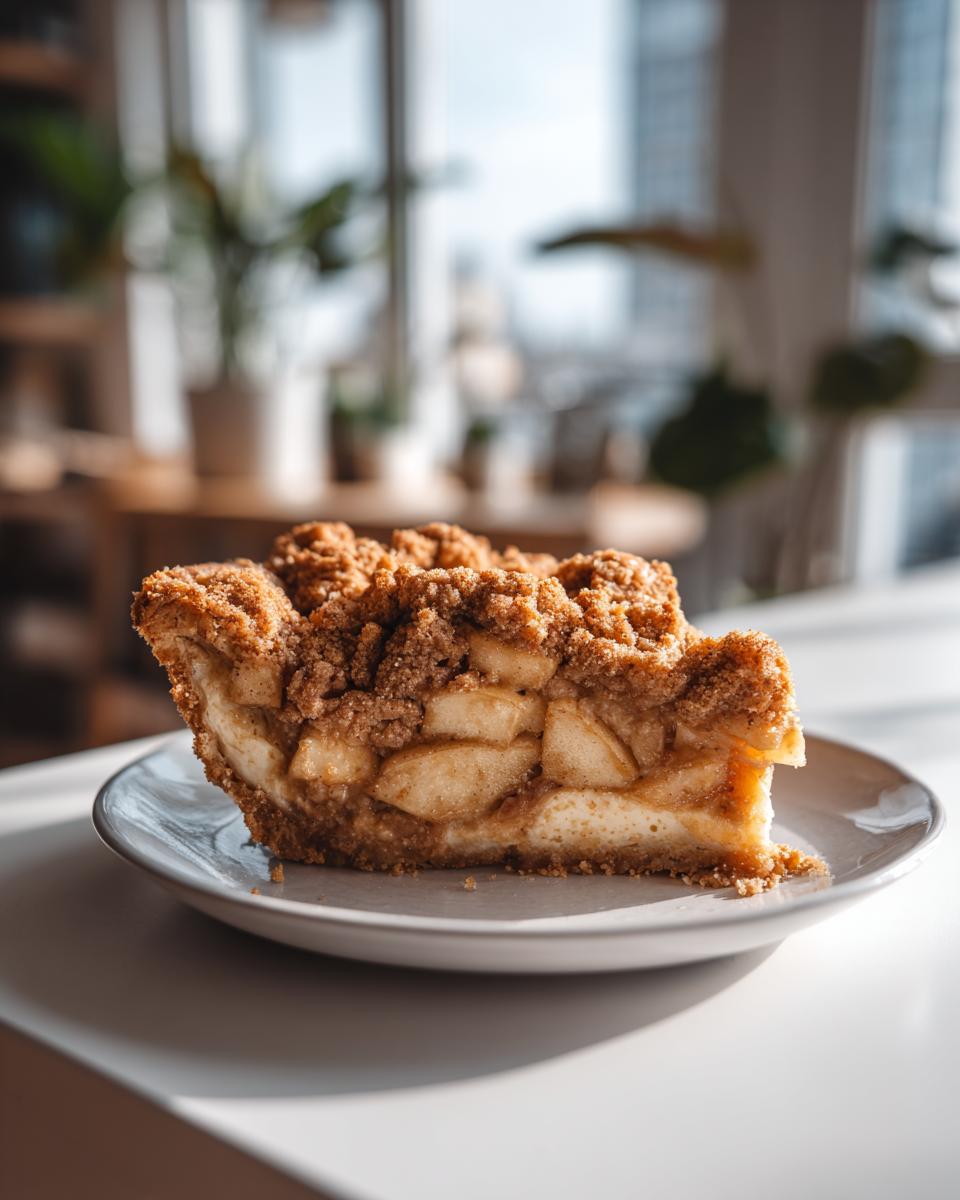
What happens when you can’t decide between sinking your fork into a slice of velvety, classic cheesecake or diving into a warm, spiced wedge of homemade apple pie? You stop choosing, my friends! You make the perfect dessert mashup: the Apple Pie Cheesecake. This isn’t just any combination; we’re talking creamy vanilla filling, tart spiced apples, and a crunchy cinnamon streusel topping baked right in. Hello, showstopper! I’m Felicia Hayes from Cooking by Felix, and I created this masterpiece because I believe you deserve impressive recipes that don’t eat up your entire week. Trust me, this baked version is totally achievable for any home cook.
- Why This Baked Apple Pie Cheesecake is Your New Favorite Showstopper Dessert
- Gathering Ingredients for the Ultimate Apple Pie Cheesecake
- Step-by-Step Instructions for Baked Apple Pie Cheesecake
- Expert Tips for a Perfect Apple Pie Cheesecake
- Variations: From Classic Apple Pie Cheesecake to No Bake Desserts
- Serving Suggestions for Your Apple Pie Cheesecake
- Storage and Reheating Instructions for Cheesecake Recipes
- Frequently Asked Questions About Apple Pie Cheesecake
- Share Your Apple Pie Cheesecake Success
Why This Baked Apple Pie Cheesecake is Your New Favorite Showstopper Dessert
When the holidays roll around, or you just need a dessert that makes everyone stop talking the second it hits the table, this is the one you need on your roster. Seriously, it’s the definition of a showstopper dessert without needing a pastry degree. It hits all those comforting spots—it’s pure comfort food baking magic wedged right into a creamy base.
Here’s the rundown on why you absolutely need to try this perfect dessert mashup:
- You get that irresistible creamy cheesecake texture, smooth as silk.
- We fold in those warm, spiced apples that taste just like your favorite pie.
- The buttery cinnamon streusel topping adds the necessary crunch and beautiful rustic look.
- It looks complicated, but I promise you, the steps are wonderfully simple to manage after a quick read.
It’s rich, it’s festive, and it’s way easier to pull off than you think. If you need more easy seasonal baking in your life, maybe check out my easy pumpkin fluff dip too!
Gathering Ingredients for the Ultimate Apple Pie Cheesecake
Okay, the secret to this dessert isn’t just the assembly; it’s starting with good, fresh ingredients. I’ve pulled together everything you’ll need, broken down by layer so you aren’t scrambling mid-bake. Before you start mixing anything for the filling, remember this rule: your cream cheese absolutely has to be soft and at room temperature. That’s the real trick for getting that smooth, luscious creamy cheesecake texture we all crave. No lumps allowed!
If you want to compare shelf staples or need a visual reminder, feel free to peek at another breakdown right here, but use my exact list below!
Ingredient Clarity: Achieving the Perfect Graham Cracker Crust
The base needs to hold up to all that creamy goodness, so we want it tight! For the crust, you will need:
- 1 1/2 cups graham cracker crumbs
- 1/4 cup granulated sugar
- 6 tablespoons unsalted butter, melted
When you press this into the springform pan, use the bottom of a measuring cup to really pack it down firmly. A strong Graham Cracker Crust means no breaking when you slice it later, which is huge for presentation!
Tips for the Apple Cinnamon Treats Layer
This is where the ‘pie’ element really sings. For this layer of Apple Cinnamon Treats, grab these things:
- 3 medium Granny Smith apples, peeled and diced
- 1/4 cup packed brown sugar
- 1 teaspoon ground cinnamon
- 1 tablespoon lemon juice
Seriously, don’t try to sneak in a sweeter apple here. Granny Smiths give you that essential tartness that cuts through the richness of the cream cheese perfectly. We cook them just a little bit so they soften up beautifully in the oven.
And finally, for the filling and that gorgeous topping, here’s what else you need:
- For the Cheesecake Filling: 3 (8 ounce) packages cream cheese softened, 1 1/2 cups granulated sugar, 1 teaspoon vanilla extract, 4 large eggs, 1/4 cup sour cream
- For the Cinnamon Streusel Topping: 1/2 cup all-purpose flour, 1/4 cup packed brown sugar, 1/4 cup granulated sugar, 1/2 teaspoon ground cinnamon, 4 tablespoons cold unsalted butter cut into pieces
Step-by-Step Instructions for Baked Apple Pie Cheesecake
Alright, let’s get baking! This recipe is about layering love, so follow these steps exactly, and you’ll get that incredible result every time. First things first, get your oven preheated to 350°F (175°C) and make sure that 9-inch springform pan is lightly greased. We’ve already pressed that crust in and given it a 10-minute head start, so we can move straight into the goodness.
Next, we gently layer our components. Remember, we cooked those apples slightly to soften them up, so they should be cool when you use them. I find that putting half the batter down first creates a nice barrier so the apples don’t sink entirely to the bottom. If you’re worried about cracking, check out my tips for a no-crack New York style cheesecake—it uses similar principles!
Assembling and Topping the Apple Pie Cheesecake
Here’s the assembly sequence: Pour half your gorgeous cheesecake batter right over that cooled crust. Then, spoon those cooked, spiced apples evenly across that first layer of batter. They shouldn’t touch the edges! Now, gently pour the remaining batter right over the apples. Try to pour it slowly onto the apples so you don’t disturb the layers underneath. Don’t overmix the filling, or you’ll introduce too much air, which leads to cracks later.
Time for the crunchy bits! In a separate bowl, mix your streusel ingredients until you have coarse crumbs—remember that cold butter creates that flaky texture. Sprinkle this streusel topped desserts element evenly over the very top layer of the batter. This topping finishes the dessert beautifully and adds that perfect bite contrast.
Baking and Cooling for a Crack-Free Finish
Pop the whole thing into the oven now and bake it for about 55 to 65 minutes. You are looking for the edges to be set firm, but the center should still have a very slight wiggle, like Jell-O. This slight jiggle is key!
Once that time is up, do NOT pull it out immediately. This is my most important tip for success: turn the oven OFF, prop the door open just a crack, and let the cheesecake cool slowly inside for a full hour. That gradual temperature drop is what prevents the dramatic shrinking and cracking. After an hour in the oven cave, take it out, loosen the sides of the pan, and then let it cool completely on the counter before you chill it. Remember, chilling takes at least 6 hours, but overnight is always best for firm baked cheesecake!
Expert Tips for a Perfect Apple Pie Cheesecake
We’ve made it through the baking, but a few insider tricks will take this from good to truly unforgettable. Since I’ve spent way too many hours perfecting this recipe for my own family gatherings, I’ve learned exactly where things can go sideways—and how to avoid it! We want that clean slice and that incredible flavor balance every time.
First, let’s talk about the presentation. Remember that note about running a knife around the edge? Seriously, do that before the cheesecake cools completely, right after you take it out of the oven but before the chilling phase. Use a thin, sharp knife and gently loosen the cheesecake from the sides of the springform pan. This prevents it from sticking as it contracts during cooling, which is another major cause of those awful surface cracks.
If you want to elevate this dessert for a real showstopper moment—especially if you love that salty-sweet combo—you have to drizzle it with caramel. I highly recommend a homemade batch!
Speaking of caramel, you can easily make my signature caramel topping recipe and add a pinch of sea salt to it. Drizzle that over the chilled cheesecake slices right before serving. The contrast of the cool, tart apple, the creamy cheese, and that warm, salty caramel is just breathtaking. You won’t regret it!
Also, don’t try to rush the chilling time. Six hours is the bare minimum, but trust me, chilling overnight is truly necessary. The flavors meld, the apples settle into the surrounding cheesecake perfectly, and the texture firms up exactly where it needs to be for easy slicing.
Variations: From Classic Apple Pie Cheesecake to No Bake Desserts
Now that you’ve mastered the baked version, you might be thinking, “What if I don’t want to turn on the oven, or maybe I only need mini versions?” I totally get it! Planning for fall baking ideas means having options for those hot days or when you need quick individual treats.
The beauty of a great base recipe, like this one, is how easily you can switch things up. If you’re looking to avoid baking altogether, transforming this into a no-bake version is super simple. You’d skip the oven-baking steps entirely, obviously, but you’d also need to swap out the filling slightly; usually, this means mixing stabilizers like gelatin or relying on stabilized whipped cream alongside your softened cream cheese. We have a fantastic guide for making no-bake desserts that uses simpler methods if you want to explore that route!
Another fantastic idea, inspired by some of the amazing mini versions out there, is to use your springform pan setup but line the bottom with individual cupcake liners. The baking and cooling times will drop significantly, making them perfect for parties. You get all the flavor impact of the full apple pie cheesecake in a single, perfect, mess-free portion!
Serving Suggestions for Your Apple Pie Cheesecake
This holiday dessert is decadent on its own, but don’t stop there! A showstopper like this deserves a stellar supporting cast, whether you’re serving it after a big holiday meal or just because it’s Tuesday.
Since the flavors here are so rich—the bright spice of the apples paired with the creamy tang of the cheese—you want simple accompaniments that complement rather than compete. The first thing you should always have on hand, as I mentioned before, is that salted caramel drizzle. It adds a layer of complexity that takes this dessert straight into gourmet territory. If you haven’t made a batch of my caramel sauce yet, now is the time to do it!
For beverages, keep it cozy. A steaming mug of coffee cuts through the richness beautifully. If you’re serving this in the colder months, skip the iced tea and make something warm and special. Trust me, pairing a slice with a mug of my boozy hot chocolate is pure heaven.
If you want something lighter on the side—maybe to balance out the richness after a huge Thanksgiving dinner—a small dollop of fresh, lightly sweetened whipped cream is perfect. Don’t go for the canned stuff; just whip heavy cream with a touch of powdered sugar and a splash of vanilla. It melts slightly against the cold cheesecake and adds a lovely, airy texture that makes every bite feel lighter.
Honestly, though, the best pairing is a fork and a quiet moment so you can really appreciate all those layers working together!
Storage and Reheating Instructions for Cheesecake Recipes
So, you managed to have leftovers? That is a genuine win, because this apple pie cheesecake tastes even better the next day once it’s had time to truly firm up. As with most great Cheesecake Recipes, proper storage is the key to ensuring that creamy texture stays perfect.
The hard truth is that cheesecake really shines when served cold. Once you’ve sliced it and served what you need, you must cover the remaining portion tightly. I use plastic wrap pressed gently against the cut surface first, and then I cover the whole pan—if you’ve left it in the springform pan—with foil. If it’s already on a plate, just wrap the whole thing well. Keep it tucked away in the refrigerator, and it should stay incredibly fresh for about three to four days maximum.
Now, the reheating question. Can you reheat cheesecake? Generally, no, not if you want that classic texture. Heating it will melt the cream cheese structure, and nobody wants warm, soupy cheesecake, right? It just turns into a slightly tangy, sweet puddle.
However, if you are absolutely determined to warm up just the apple-streusel part—maybe you’re having a super cold evening—you can try something careful. Slice a piece, and then put just the slice, sitting on a small plate, into the microwave for about 10 seconds on LOW power. You’re just trying to slightly take the chill off the apple filling and soften the streusel. Seriously, watch it closely! If you see even a hint of melting in the cheese layer, pull it out immediately. For the best experience, though, let it sit on the counter for 20 minutes before serving cold. That slight temper brings out the cinnamon and apple flavor beautifully without turning everything into soup!
Frequently Asked Questions About Apple Pie Cheesecake
I know you might have a few lingering questions now that you see how impressive this dessert is! Don’t worry, that’s completely normal. I pulled together the ones I get most often from friends trying this recipe for the first time. It’s my goal to make sure your first time baking this is a total success!
Can I make this apple pie cheesecake ahead of time?
Oh, absolutely you can! In fact, I highly encourage it. This apple pie cheesecake truly benefits from a long, cold rest. Life gets busy, especially around the holidays, so knowing you can conquer a major dessert a day or two ahead is a lifesaver. You can bake it completely, chill it overnight, and then let it sit covered in the fridge for up to two full days before you plan to serve it. The flavors just get richer and cling together better overnight. When you’re ready for it, just pull it out about 30 minutes before slicing so it loses that deep fridge chill.
What is the best apple to use for the filling?
This goes back to that crucial flavor balance we talked about when reviewing the ingredients! You really want tart fruit to stand up against the richness of the cream cheese filling. Please, please use Granny Smith apples. They hold their shape well during the pre-cooking step, and their sharp, acidic flavor stops the whole dessert from tasting overly sweet. If you use a softer, sweeter apple like a Fuji, you risk the apple layer turning to mush and disappearing into the batter, which defeats the purpose of the ‘pie’ element!
Another question I sometimes get is about texture. If you’re worried about the cheesecake cracking, remember my number one rule: don’t overmix the filling, and always let it cool slowly in the turned-off oven. It works every single time!
For more troubleshooting tips, you can always check out other experienced bakers who love this combo, like the insights here!
Share Your Apple Pie Cheesecake Success
Okay, you’ve made it! I’m so excited for you to try this incredible apple pie cheesecake. Now that you’ve successfully combined the best of both worlds—the comforting spice of apple pie and that creamy, luxurious cheesecake—I really, really want to hear about it!
This community here at Cooking by Felix thrives on seeing what you create in your own kitchens. Did the streusel turn out crispy? Were your layers defined? Did your family devour it in under five minutes?
Please, take a moment to drop a rating right below this section. Let me know in the comments how the baking process went for you. If you snapped a picture of your beautiful creation, tag me! Sharing your experience, especially if you tried one of the variations we talked about, helps everyone else who is gearing up to bake this for their next gathering.
If you have any questions that I missed, or just want to say hello, you can always reach out directly through my contact page. Happy baking, and enjoy every single bite of that homemade goodness!
PrintBaked Apple Pie Cheesecake with Cinnamon Streusel

Combine the creamy texture of classic cheesecake with the warm spice of apple pie, finished with a buttery cinnamon streusel topping. This showstopper dessert is perfect for holiday gatherings.
- Prep Time: 30 min
- Cook Time: 65 min
- Total Time: 7 hours 35 min
- Yield: 12 servings
- Category: Dessert
- Method: Baking
- Cuisine: American
- Diet: Vegetarian
Ingredients
- For the Crust: 1 1/2 cups graham cracker crumbs, 1/4 cup granulated sugar, 6 tablespoons unsalted butter melted
- For the Apple Layer: 3 medium Granny Smith apples peeled and diced, 1/4 cup packed brown sugar, 1 teaspoon ground cinnamon, 1 tablespoon lemon juice
- For the Cheesecake Filling: 3 (8 ounce) packages cream cheese softened, 1 1/2 cups granulated sugar, 1 teaspoon vanilla extract, 4 large eggs, 1/4 cup sour cream
- For the Cinnamon Streusel Topping: 1/2 cup all-purpose flour, 1/4 cup packed brown sugar, 1/4 cup granulated sugar, 1/2 teaspoon ground cinnamon, 4 tablespoons cold unsalted butter cut into pieces
Instructions
- Preheat your oven to 350°F (175°C). Lightly grease a 9-inch springform pan.
- Prepare the crust: Mix graham cracker crumbs, 1/4 cup sugar, and melted butter. Press the mixture firmly into the bottom of the prepared springform pan. Bake for 10 minutes. Set aside to cool slightly.
- Prepare the apple layer: In a medium saucepan, combine diced apples, brown sugar, cinnamon, and lemon juice. Cook over medium heat, stirring occasionally, until the apples soften slightly, about 8 to 10 minutes. Remove from heat and let cool.
- Prepare the cheesecake filling: In a large bowl, beat the softened cream cheese with an electric mixer until smooth. Gradually beat in the 1 1/2 cups sugar and vanilla extract. Beat in the eggs one at a time, mixing just until combined after each addition. Mix in the sour cream. Do not overmix.
- Assemble the cheesecake: Pour half of the cheesecake batter over the cooled crust. Spoon the cooled apple mixture evenly over the batter. Pour the remaining cheesecake batter over the apples.
- Prepare the streusel: In a small bowl, combine flour, brown sugar, granulated sugar, and cinnamon. Cut in the cold butter using a pastry blender or your fingers until the mixture resembles coarse crumbs. Sprinkle the streusel evenly over the top layer of batter.
- Bake the cheesecake: Bake for 55 to 65 minutes, or until the edges are set but the center still has a slight jiggle.
- Cool and chill: Turn off the oven and crack the door open slightly. Let the cheesecake cool in the oven for 1 hour. Remove from the oven, run a thin knife around the edge, and cool completely on a wire rack. Chill in the refrigerator for at least 6 hours, or preferably overnight, before serving.
Notes
- For a clean slice, run a thin, hot knife around the edge of the cheesecake before releasing the springform side.
- If you want an extra layer of flavor, drizzle with salted caramel sauce just before serving.
- If you prefer a less dense apple layer, you can skip cooking the apples and layer them raw over the first layer of batter.
Nutrition
- Serving Size: 1 slice
- Calories: 450
- Sugar: 38g
- Sodium: 310mg
- Fat: 28g
- Saturated Fat: 17g
- Unsaturated Fat: 11g
- Trans Fat: 0.5g
- Carbohydrates: 45g
- Fiber: 1g
- Protein: 7g
- Cholesterol: 115mg